Quick Start Guide
Page 2
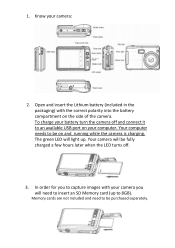
Know your computer. The green LED will need to an available USB port on your camera: 2. Your camera will be on the side of the camera. Your computer needs to be fully charged a few hours later when the LED turns off and connect it to be purchased separately. Open and... insert the Lithium battery (included in the packaging) with your camera you to capture images with the correct polarity into the battery compartment on and running while the camera is charging. 1. In order for you will light up to insert an SD Memory card (up...
Know your computer. The green LED will need to an available USB port on your camera: 2. Your camera will be on the side of the camera. Your computer needs to be fully charged a few hours later when the LED turns off and connect it to be purchased separately. Open and... insert the Lithium battery (included in the packaging) with your camera you to capture images with the correct polarity into the battery compartment on and running while the camera is charging. 1. In order for you will light up to insert an SD Memory card (up...
Quick Start Guide
Page 3
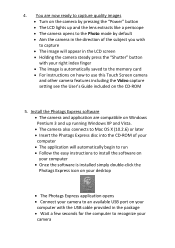
... to the Photo mode by pressing the "Power" button • The LCD lights up running Windows XP and Vista. • The camera also connects to Mac OS X (10.2.6) or later • Insert the Photags Express disc into the CD‐ROM of your computer • The application ...will appear in the LCD screen • Holding the camera steady press the "Shutter" button with the USB cable provided in the direction of the subject you wish to capture • The image will automatically...
... to the Photo mode by pressing the "Power" button • The LCD lights up running Windows XP and Vista. • The camera also connects to Mac OS X (10.2.6) or later • Insert the Photags Express disc into the CD‐ROM of your computer • The application ...will appear in the LCD screen • Holding the camera steady press the "Shutter" button with the USB cable provided in the direction of the subject you wish to capture • The image will automatically...
Quick Start Guide
Page 4
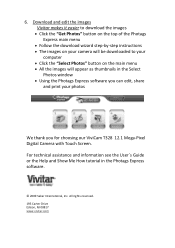
Download and edit the images Vivitar makes it easier to download the images • Click the "Get Photos" button on the top of the Photags Express main menu • Follow the download wizard step‐by‐step instructions • The images on your camera will be downloaded to your ...photos We thank you for choosing our ViviCam T328 12.1 Mega‐Pixel Digital Camera with Touch Screen. All rights reserved. 195 Carter Drive Edison, NJ 08817 www.vivitar.com 6. For technical assistance and information see the User`s Guide or the Help and Show Me How ...
Download and edit the images Vivitar makes it easier to download the images • Click the "Get Photos" button on the top of the Photags Express main menu • Follow the download wizard step‐by‐step instructions • The images on your camera will be downloaded to your ...photos We thank you for choosing our ViviCam T328 12.1 Mega‐Pixel Digital Camera with Touch Screen. All rights reserved. 195 Carter Drive Edison, NJ 08817 www.vivitar.com 6. For technical assistance and information see the User`s Guide or the Help and Show Me How ...
User Manual
Page 1
All rights reserved. All other trademarks are registered trademarks of their respective companies. Windows and the Windows logo are the property of Microsoft Corporation. ViviCam T328 Digital Camera With Touch Screen Owner Manual © 2009 Sakar International, Inc.
All rights reserved. All other trademarks are registered trademarks of their respective companies. Windows and the Windows logo are the property of Microsoft Corporation. ViviCam T328 Digital Camera With Touch Screen Owner Manual © 2009 Sakar International, Inc.
User Manual
Page 2
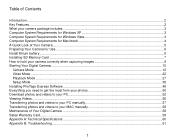
... Requirements for Windows Vista 3 Computer System Requirements for Macintosh 4 A Quick Look at Your Camera...5 Preparing Your Camera for Use...6 Install lithium battery...6 Installing SD Memory Card...7 How to hold your camera correctly when capturing images 9 Starting Your Digital Camera...10 Camera Mode...12 Video Mode ...22 Playback Mode ...27 Setup Mode ...38 Installing PhoTags Express...
... Requirements for Windows Vista 3 Computer System Requirements for Macintosh 4 A Quick Look at Your Camera...5 Preparing Your Camera for Use...6 Install lithium battery...6 Installing SD Memory Card...7 How to hold your camera correctly when capturing images 9 Starting Your Digital Camera...10 Camera Mode...12 Video Mode ...22 Playback Mode ...27 Setup Mode ...38 Installing PhoTags Express...
User Manual
Page 3
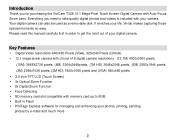
...card up to 8GB. Built in order to take quality digital photos and videos is included with your camera. Vivitar makes capturing those special moments so easy. Your digital camera can also be used as a removable disk. It enriches your photos, printing, sending photos by e-mails and ...much more. 2 Introduction Thank you need to get the most out of your digital camera. Please read this manual carefully first in Flash PhoTags Express software for purchasing the ViviCam T328 12.1 Mega-Pixel Touch Screen Digital Camera with Auto-Focus Zoom Lens.
...card up to 8GB. Built in order to take quality digital photos and videos is included with your camera. Vivitar makes capturing those special moments so easy. Your digital camera can also be used as a removable disk. It enriches your photos, printing, sending photos by e-mails and ...much more. 2 Introduction Thank you need to get the most out of your digital camera. Please read this manual carefully first in Flash PhoTags Express software for purchasing the ViviCam T328 12.1 Mega-Pixel Touch Screen Digital Camera with Auto-Focus Zoom Lens.
User Manual
Page 4
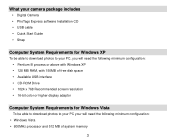
What your camera package includes Digital Camera PhoTags Express software Installation CD USB cable Quick Start Guide Strap Computer System Requirements for Windows XP To be able to ...
What your camera package includes Digital Camera PhoTags Express software Installation CD USB cable Quick Start Guide Strap Computer System Requirements for Windows XP To be able to ...

User Manual
Page 5
You may however use the camera as a regular MSDC USB removable device. 4 20GB hard driver with at least 15GB of available space Support for Super VGA graphics Available ...
You may however use the camera as a regular MSDC USB removable device. 4 20GB hard driver with at least 15GB of available space Support for Super VGA graphics Available ...
User Manual
Page 7
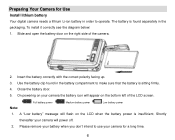
... polarity facing up. 3. Full battery power Medium battery power Low battery power Note: 1. To install it correctly see the diagram below: 1. Preparing Your Camera for a long time. 6 The battery is sitting firmly. 4. Slide and open the battery door on the LCD when the battery power is insufficient. ... the right side of the LCD screen. Please remove your battery when you don‟t intend to use your camera for Use Install lithium battery Your digital camera needs a lithium Li-ion battery in order to make sure that the battery is found separately in the battery...
... polarity facing up. 3. Full battery power Medium battery power Low battery power Note: 1. To install it correctly see the diagram below: 1. Preparing Your Camera for a long time. 6 The battery is sitting firmly. 4. Slide and open the battery door on the LCD when the battery power is insufficient. ... the right side of the LCD screen. Please remove your battery when you don‟t intend to use your camera for Use Install lithium battery Your digital camera needs a lithium Li-ion battery in order to make sure that the battery is found separately in the battery...
User Manual
Page 8
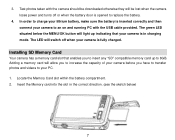
... provided. The green LED situated below ) 7 The LED will allow you to increase the capacity of your camera before you to insert any "SD" compatible memory card up indicating that your camera to 8GB. 3. Insert the Memory card into the slot in charging mode. Adding a memory card will switch... or when the battery door is inserted correctly and then connect your camera is fully charged. Installing SD Memory Card Your camera has a memory card slot that enables you have to transfer photos and videos to your camera is in the correct direction. (see the sketch below the MENU/...
... provided. The green LED situated below ) 7 The LED will allow you to increase the capacity of your camera before you to insert any "SD" compatible memory card up indicating that your camera to 8GB. 3. Insert the Memory card into the slot in charging mode. Adding a memory card will switch... or when the battery door is inserted correctly and then connect your camera is fully charged. Installing SD Memory Card Your camera has a memory card slot that enables you have to transfer photos and videos to your camera is in the correct direction. (see the sketch below the MENU/...
User Manual
Page 9
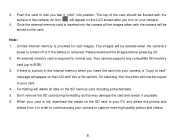
... the photo will now be flushed with the surface of the card should be copied to card" message will appear on the LCD with the camera will appear on the LCD screen after you insert the card into position. When your card is required for test images. An external memory card... is full, download the media on your camera. 4. The top of the camera. Limited internal memory is turned off . 2. Push the card in order to continue using your card. 4. Once the external memory card is a photo...
... the photo will now be flushed with the surface of the card should be copied to card" message will appear on the LCD with the camera will appear on the LCD screen after you insert the card into position. When your card is required for test images. An external memory card... is full, download the media on your camera. 4. The top of the camera. Limited internal memory is turned off . 2. Push the card in order to continue using your card. 4. Once the external memory card is a photo...
User Manual
Page 10
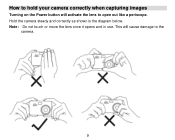
Note: Do not touch or move the lens once it opens and in use. This will activate the lens to the camera. 9 Hold the camera steady and correctly as shown is the diagram below. How to hold your camera correctly when capturing images Turning on the Power button will cause damage to open out like a periscope.
Note: Do not touch or move the lens once it opens and in use. This will activate the lens to the camera. 9 Hold the camera steady and correctly as shown is the diagram below. How to hold your camera correctly when capturing images Turning on the Power button will cause damage to open out like a periscope.
User Manual
Page 11
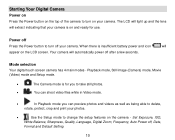
... on Press the Power button on the top of the camera to change the setup features on the camera - The LCD will light up and the lens will extract indicating that your camera is on and ready for you to take still photos. You can shoot video files while ... mode to turn off , Date, Format and Default Setting. 10 When there is for use. Playback mode, Still Image (Camera) mode, Movie (Video) mode and Setup mode. The Camera mode is insufficient battery power and icon will automatically power off after a few seconds. Set Exposure, ISO, White Balance, Sharpness...
... on Press the Power button on the top of the camera to change the setup features on the camera - The LCD will light up and the lens will extract indicating that your camera is on and ready for you to take still photos. You can shoot video files while ... mode to turn off , Date, Format and Default Setting. 10 When there is for use. Playback mode, Still Image (Camera) mode, Movie (Video) mode and Setup mode. The Camera mode is insufficient battery power and icon will automatically power off after a few seconds. Set Exposure, ISO, White Balance, Sharpness...
User Manual
Page 12
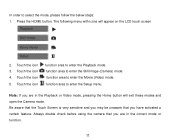
..., please follow the below steps: 1. In order to enter the Setup menu. The following menu with icons will exit these modes and open the Camera mode. Touch the icon 3. function area to enter the Playback mode. Touch the icon 4. Touch the icon function area to enter the Movie (... Note: If you have activated a certain feature. Press the HOME button. function area to enter the Still Image (Camera) mode. Touch the icon 5. Always double check before using the camera that you are in the Playback or Video mode, pressing the Home button will appear on the LCD touch screen 2....
..., please follow the below steps: 1. In order to enter the Setup menu. The following menu with icons will exit these modes and open the Camera mode. Touch the icon 3. function area to enter the Playback mode. Touch the icon 4. Touch the icon function area to enter the Movie (... Note: If you have activated a certain feature. Press the HOME button. function area to enter the Still Image (Camera) mode. Touch the icon 5. Always double check before using the camera that you are in the Playback or Video mode, pressing the Home button will appear on the LCD touch screen 2....

User Manual
Page 13
... (photo capacity) is the default mode when turning on your object with the white frame that appears on the Shutter button and wait for the camera to memory. There will be captured. 6. Either download the photos to your shot using the Photags Express software as described below in on the top... right of photos left to take the photo. 3. Camera Mode This is full, the LCD screen will display a message - "Memory Full, Insert a SD memory card to continue taking more photos. 12 Hold the...
... (photo capacity) is the default mode when turning on your object with the white frame that appears on the Shutter button and wait for the camera to memory. There will be captured. 6. Either download the photos to your shot using the Photags Express software as described below in on the top... right of photos left to take the photo. 3. Camera Mode This is full, the LCD screen will display a message - "Memory Full, Insert a SD memory card to continue taking more photos. 12 Hold the...
User Manual
Page 14
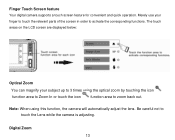
... your finger to touch the relevant parts of the screen in order to 3 times using this function, the camera will automatically adjust the lens. Finger Touch Screen feature Your digital camera supports a touch screen feature for convenient and quick operation. Be careful not to zoom back out. Note: ...When using the optical zoom by touching the icon function area to Zoom In or touch the icon function area to touch the Lens while the camera is adjusting....
... your finger to touch the relevant parts of the screen in order to 3 times using this function, the camera will automatically adjust the lens. Finger Touch Screen feature Your digital camera supports a touch screen feature for convenient and quick operation. Be careful not to zoom back out. Note: ...When using the optical zoom by touching the icon function area to Zoom In or touch the icon function area to touch the Lens while the camera is adjusting....

User Manual
Page 15
... function area to zoom in /out of your subject up to capture objects either at very near or very far distances. Macro/Far shooting The camera has the function that allows you can magnify your subject with Optical/Digital Zoom together. For close up shooting up to Zoom back out. Touch...
... function area to zoom in /out of your subject up to capture objects either at very near or very far distances. Macro/Far shooting The camera has the function that allows you can magnify your subject with Optical/Digital Zoom together. For close up shooting up to Zoom back out. Touch...
User Manual
Page 16
... the Next icon menu appears function area on left side of the touch screen until the Macro 3. Touch the Left icon function area to the camera standby mode. 7. The area beneath the Macro/Far shooting area describes the selected icon. : Macro shooting - Press the MENU/OK button to confirm, save your...
... the Next icon menu appears function area on left side of the touch screen until the Macro 3. Touch the Left icon function area to the camera standby mode. 7. The area beneath the Macro/Far shooting area describes the selected icon. : Macro shooting - Press the MENU/OK button to confirm, save your...
User Manual
Page 18
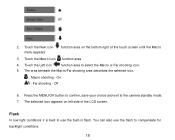
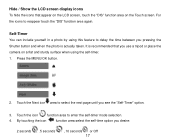
... Off 17 Press the MENU/OK button. 2. Hide / Show the LCD screen display icons To hide the icons that you use a tripod or place the camera on the Touch screen. Touch the icon function area to reappear touch the "DIS" function area again. By touching the icon function area select the...
... Off 17 Press the MENU/OK button. 2. Hide / Show the LCD screen display icons To hide the icons that you use a tripod or place the camera on the Touch screen. Touch the icon function area to reappear touch the "DIS" function area again. By touching the icon function area select the...
User Manual
Page 19
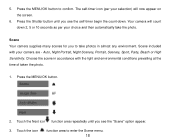
Scene Your camera supplies many scenes for you to take the photo. Press the Shutter button until you see the "Scene" option appear. 3. Touch the icon function area ... to enter the Scene menu. 18 Choose the scene in almost any environment. Press the MENU/OK button. 2. The self-timer icon (per your camera are - Your camera will now appear on the screen. 6. Touch the Next icon function area repeatedly until you see the self-timer begin the count-down 2, 5 or...
Scene Your camera supplies many scenes for you to take the photo. Press the Shutter button until you see the "Scene" option appear. 3. Touch the icon function area ... to enter the Scene menu. 18 Choose the scene in almost any environment. Press the MENU/OK button. 2. The self-timer icon (per your camera are - Your camera will now appear on the screen. 6. Touch the Next icon function area repeatedly until you see the self-timer begin the count-down 2, 5 or...


