Quick Start Guide
Page 4
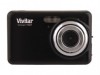
... thumbnails in the Photags Express software. © 2009 Sakar International, Inc. 6. All rights reserved. 195 Carter Drive Edison, NJ 08817 www.vivitar.com Download and edit the images Vivitar makes it easier to download the images • Click the "Get Photos" button on the top of the Photags Express main menu... • Follow the download wizard step‐by‐step instructions • The images on your camera will be downloaded to your photos We thank you for choosing our ViviCam T328 12.1 Mega‐Pixel Digital Camera with Touch Screen.
... thumbnails in the Photags Express software. © 2009 Sakar International, Inc. 6. All rights reserved. 195 Carter Drive Edison, NJ 08817 www.vivitar.com Download and edit the images Vivitar makes it easier to download the images • Click the "Get Photos" button on the top of the Photags Express main menu... • Follow the download wizard step‐by‐step instructions • The images on your camera will be downloaded to your photos We thank you for choosing our ViviCam T328 12.1 Mega‐Pixel Digital Camera with Touch Screen.
User Manual
Page 1
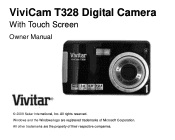
All other trademarks are registered trademarks of their respective companies. All rights reserved. ViviCam T328 Digital Camera With Touch Screen Owner Manual © 2009 Sakar International, Inc. Windows and the Windows logo are the property of Microsoft Corporation.
All other trademarks are registered trademarks of their respective companies. All rights reserved. ViviCam T328 Digital Camera With Touch Screen Owner Manual © 2009 Sakar International, Inc. Windows and the Windows logo are the property of Microsoft Corporation.
User Manual
Page 2
... Vista 3 Computer System Requirements for Macintosh 4 A Quick Look at Your Camera...5 Preparing Your Camera for Use...6 Install lithium battery...6 Installing SD Memory Card...7 How to hold your camera correctly when capturing images 9 Starting Your Digital Camera...10 Camera Mode...12 Video Mode ...22 Playback Mode ...27 Setup Mode ...38 Installing...photos and videos to your PC manually 57 Transferring photos and videos to your MAC manually 58 Maintenance of Your Digital Camera ...58 Sakar Warranty Card...59 Appendix A: Technical Specifications ...60 Appendix B: Troubleshooting...61 1
... Vista 3 Computer System Requirements for Macintosh 4 A Quick Look at Your Camera...5 Preparing Your Camera for Use...6 Install lithium battery...6 Installing SD Memory Card...7 How to hold your camera correctly when capturing images 9 Starting Your Digital Camera...10 Camera Mode...12 Video Mode ...22 Playback Mode ...27 Setup Mode ...38 Installing...photos and videos to your PC manually 57 Transferring photos and videos to your MAC manually 58 Maintenance of Your Digital Camera ...58 Sakar Warranty Card...59 Appendix A: Technical Specifications ...60 Appendix B: Troubleshooting...61 1
User Manual
Page 3
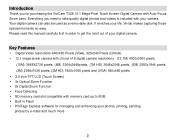
... SD memory card slot compatible with memory card up to take quality digital photos and videos is included with your camera. Vivitar makes capturing those special moments so easy. Everything you for managing and enhancing your... photos, printing, sending photos by e-mails and much more. 2 Introduction Thank you need to 8GB. Built in Flash PhoTags Express software for purchasing the ViviCam T328 12.1 Mega-Pixel Touch Screen Digital Camera...
... SD memory card slot compatible with memory card up to take quality digital photos and videos is included with your camera. Vivitar makes capturing those special moments so easy. Everything you for managing and enhancing your... photos, printing, sending photos by e-mails and much more. 2 Introduction Thank you need to 8GB. Built in Flash PhoTags Express software for purchasing the ViviCam T328 12.1 Mega-Pixel Touch Screen Digital Camera...
User Manual
Page 4
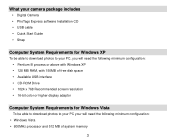
What your camera package includes Digital Camera PhoTags Express software Installation CD USB cable Quick Start Guide Strap Computer System Requirements for Windows XP To be able to ...
What your camera package includes Digital Camera PhoTags Express software Installation CD USB cable Quick Start Guide Strap Computer System Requirements for Windows XP To be able to ...
User Manual
Page 7
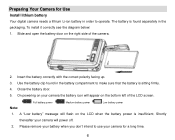
...Close the battery door. 5. Preparing Your Camera for a long time. 6 A "Low battery" message will power off. 2. Please remove your battery when you don‟t intend to operate. Shortly thereafter your camera for Use Install lithium battery Your digital camera needs a lithium Li-ion battery in ...the packaging. Use the battery clip found separately in order to use your camera will flash on the LCD when the battery ...
...Close the battery door. 5. Preparing Your Camera for a long time. 6 A "Low battery" message will power off. 2. Please remove your battery when you don‟t intend to operate. Shortly thereafter your camera for Use Install lithium battery Your digital camera needs a lithium Li-ion battery in ...the packaging. Use the battery clip found separately in order to use your camera will flash on the LCD when the battery ...
User Manual
Page 11
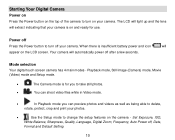
Starting Your Digital Camera Power on Press the Power button on the top of the camera to turn off your camera. When there is insufficient battery power and icon will appear on the camera - Your camera will extract indicating that your camera is for use. Power off Press the Power button to... you can preview photos and videos as well as being able to delete, rotate, protect, crop and print your camera. Set Exposure, ISO, White Balance, Sharpness, Quality, Language, Digital Zoom, Frequency, Auto Power off after a few seconds. The LCD will light up and the lens will automatically...
Starting Your Digital Camera Power on Press the Power button on the top of the camera to turn off your camera. When there is insufficient battery power and icon will appear on the camera - Your camera will extract indicating that your camera is for use. Power off Press the Power button to... you can preview photos and videos as well as being able to delete, rotate, protect, crop and print your camera. Set Exposure, ISO, White Balance, Sharpness, Quality, Language, Digital Zoom, Frequency, Auto Power off after a few seconds. The LCD will light up and the lens will automatically...
User Manual
Page 14
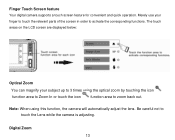
...the optical zoom by touching the icon function area to Zoom In or touch the icon function area to touch the Lens while the camera is adjusting. The touch areas on the LCD screen are displayed below: Optical Zoom You can magnify your finger to touch the ...relevant parts of the screen in order to activate the corresponding functions. Digital Zoom 13 Merely use your subject up to 3 times using this function, the camera will automatically adjust the lens. Finger Touch Screen feature Your digital camera supports a touch screen feature for convenient and quick operation.
...the optical zoom by touching the icon function area to Zoom In or touch the icon function area to touch the Lens while the camera is adjusting. The touch areas on the LCD screen are displayed below: Optical Zoom You can magnify your finger to touch the ...relevant parts of the screen in order to activate the corresponding functions. Digital Zoom 13 Merely use your subject up to 3 times using this function, the camera will automatically adjust the lens. Finger Touch Screen feature Your digital camera supports a touch screen feature for convenient and quick operation.

User Manual
Page 15
Note: you to Zoom back out. For close up shooting up to 8 times using the digital zoom by touching the icon and function area. 1. Touch the icon function area to capture objects either at very near or very far distances. Press ... area to zoom in /out of your object. 2. Touch the icon function area to 80cm: 1. The following icon will appear on your subject with Optical/Digital Zoom together. Macro/Far shooting The camera has the function that allows you can magnify your subject with 3x optical and 4x...
Note: you to Zoom back out. For close up shooting up to 8 times using the digital zoom by touching the icon and function area. 1. Touch the icon function area to capture objects either at very near or very far distances. Press ... area to zoom in /out of your object. 2. Touch the icon function area to 80cm: 1. The following icon will appear on your subject with Optical/Digital Zoom together. Macro/Far shooting The camera has the function that allows you can magnify your subject with 3x optical and 4x...
User Manual
Page 21
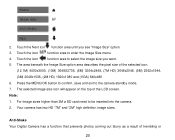
...the MENU/OK button to confirm, save and exit to enter the Image Size menu. 4. Note: 1. Touch the icon function area to the camera standby mode. 7. For Image sizes higher than 3M a SD card need to select the image size you see "Image Size" option. 3. The...(2M HD) 1920x1080 and (VGA) 640x480 6. Your camera has two HD "7M" and "2M" high definition image sizes. Touch the icon function area to be inserted into the camera. 2. Touch the Next icon function area until you want. 5. 2. Anti-Shake Your Digital Camera has a function that prevents photos coming out blurry as...
...the MENU/OK button to confirm, save and exit to enter the Image Size menu. 4. Note: 1. Touch the icon function area to the camera standby mode. 7. For Image sizes higher than 3M a SD card need to select the image size you see "Image Size" option. 3. The...(2M HD) 1920x1080 and (VGA) 640x480 6. Your camera has two HD "7M" and "2M" high definition image sizes. Touch the icon function area to be inserted into the camera. 2. Touch the Next icon function area until you want. 5. 2. Anti-Shake Your Digital Camera has a function that prevents photos coming out blurry as...
User Manual
Page 43
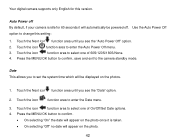
Auto Power off . Your digital camera supports only English for 60 seconds it is idle for this setting: 1. Press the ...60S/120S/180S/None. 4. Touch the icon function area to change this version. Touch the icon function area to the camera standby mode. Touch the icon function area to confirm. On selecting "On" the date will appear on ...the photo once it will be powered off By default, if your camera is taken. On selecting "Off" no date will appear on the photos. 1. Press the MENU/OK button ...
Auto Power off . Your digital camera supports only English for 60 seconds it is idle for this setting: 1. Press the ...60S/120S/180S/None. 4. Touch the icon function area to change this version. Touch the icon function area to the camera standby mode. Touch the icon function area to confirm. On selecting "On" the date will appear on ...the photo once it will be powered off By default, if your camera is taken. On selecting "Off" no date will appear on the photos. 1. Press the MENU/OK button ...
User Manual
Page 59
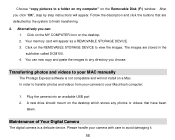
... to finish transferring. 2. In order to transfer photos and videos from your camera to your MAC manually The Photags Express software is a delicate device. Maintenance of Your Digital Camera The digital camera is not compatible and will not install on the Removable Disk (F:) window. Choose... "copy pictures to view the images. Alternatively you choose. Plug the camera into an available USB port 2. Your memory card...
... to finish transferring. 2. In order to transfer photos and videos from your camera to your MAC manually The Photags Express software is a delicate device. Maintenance of Your Digital Camera The digital camera is not compatible and will not install on the Removable Disk (F:) window. Choose... "copy pictures to view the images. Alternatively you choose. Plug the camera into an available USB port 2. Your memory card...

