Quick Start Guide
Page 3
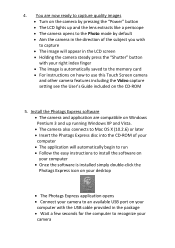
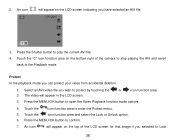
...; Connect your camera to use this Touch Screen camera and other camera features including the Video capture setting see the User's Guide included on your computer with the USB cable provided in the LCD screen • Holding the camera steady press the "Shutter" button with your camera 4. Install the Photags Express software • The camera and application are now ready to capture quality images • Turn on the camera by pressing the "Power" button • The LCD lights...
...; Connect your camera to use this Touch Screen camera and other camera features including the Video capture setting see the User's Guide included on your computer with the USB cable provided in the LCD screen • Holding the camera steady press the "Shutter" button with your camera 4. Install the Photags Express software • The camera and application are now ready to capture quality images • Turn on the camera by pressing the "Power" button • The LCD lights...
Quick Start Guide
Page 4
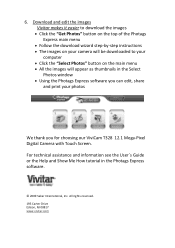
....vivitar.com For technical assistance and information see the User`s Guide or the Help and Show Me How tutorial in the Select Photos window • Using the Photags Express software you can edit, share and print your photos We thank you for choosing our ViviCam T328 12.1 Mega‐Pixel Digital Camera with Touch Screen. Download and edit the images Vivitar makes it easier to download the images • Click the "Get Photos" button...
....vivitar.com For technical assistance and information see the User`s Guide or the Help and Show Me How tutorial in the Select Photos window • Using the Photags Express software you can edit, share and print your photos We thank you for choosing our ViviCam T328 12.1 Mega‐Pixel Digital Camera with Touch Screen. Download and edit the images Vivitar makes it easier to download the images • Click the "Get Photos" button...
User Manual
Page 2
... Your Camera...5 Preparing Your Camera for Use...6 Install lithium battery...6 Installing SD Memory Card...7 How to hold your camera correctly when capturing images 9 Starting Your Digital Camera...10 Camera Mode...12 Video Mode ...22 Playback Mode ...27 Setup Mode ...38 Installing PhoTags Express Software...45 Everything you need to get the most from your photos 50 Download photos and videos to your PC ...52 Viewing Videos...56 Transferring photos and videos to your PC manually 57 Transferring photos and videos to your MAC manually 58 Maintenance of Your Digital Camera ...58...
... Your Camera...5 Preparing Your Camera for Use...6 Install lithium battery...6 Installing SD Memory Card...7 How to hold your camera correctly when capturing images 9 Starting Your Digital Camera...10 Camera Mode...12 Video Mode ...22 Playback Mode ...27 Setup Mode ...38 Installing PhoTags Express Software...45 Everything you need to get the most from your photos 50 Download photos and videos to your PC ...52 Viewing Videos...56 Transferring photos and videos to your PC manually 57 Transferring photos and videos to your MAC manually 58 Maintenance of Your Digital Camera ...58...
User Manual
Page 3
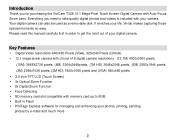
...) 640x480 pixels. 3.0 inch TFT LCD (Touch Screen) 3x Optical Zoom Function 8x Digital Zoom Function Face Detecting SD memory card slot compatible with memory card up to take quality digital photos and videos is included with Auto-Focus Zoom Lens. Everything you for managing and enhancing your photos, printing, sending photos by e-mails and much more. 2 It enriches your digital camera. Key Features Digital Video resolutions-640x480 Pixels (VGA), 320x240 Pixels...
...) 640x480 pixels. 3.0 inch TFT LCD (Touch Screen) 3x Optical Zoom Function 8x Digital Zoom Function Face Detecting SD memory card slot compatible with memory card up to take quality digital photos and videos is included with Auto-Focus Zoom Lens. Everything you for managing and enhancing your photos, printing, sending photos by e-mails and much more. 2 It enriches your digital camera. Key Features Digital Video resolutions-640x480 Pixels (VGA), 320x240 Pixels...
User Manual
Page 8
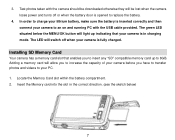
... button will allow you to increase the capacity of your camera before you to insert any "SD" compatible memory card up indicating that enables you have to transfer photos and videos to 8GB. 3. In order to replace the battery. 4. Insert the Memory card into the slot in charging mode. Test photos taken with the USB cable provided. The green LED situated below ) 7 Adding a memory card will light up to your camera is fully charged. Installing...
... button will allow you to increase the capacity of your camera before you to insert any "SD" compatible memory card up indicating that enables you have to transfer photos and videos to 8GB. 3. In order to replace the battery. 4. Insert the Memory card into the slot in charging mode. Test photos taken with the USB cable provided. The green LED situated below ) 7 Adding a memory card will light up to your camera is fully charged. Installing...
User Manual
Page 9
... the internal memory when you insert the card into your camera, a "Copy to card" message will appear on the LCD screen after you feel it "click" into the camera all the images taken with the camera will delete all data on the SD card to your PC and delete the photos and videos from it unusable. 6. An icon will appear on the card. Please download the images before powering off or if the battery...
... the internal memory when you insert the card into your camera, a "Copy to card" message will appear on the LCD screen after you feel it "click" into the camera all the images taken with the camera will delete all data on the SD card to your PC and delete the photos and videos from it unusable. 6. An icon will appear on the card. Please download the images before powering off or if the battery...
User Manual
Page 11
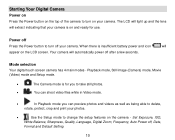
... to delete, rotate, protect, crop and print your camera. Playback mode, Still Image (Camera) mode, Movie (Video) mode and Setup mode. The Camera mode is for use. Mode selection Your digital touch screen camera has 4 main modes - Starting Your Digital Camera Power on Press the Power button on the top of the camera to turn off your camera is insufficient battery power and icon will automatically power off after a few seconds. Set Exposure, ISO, White Balance, Sharpness, Quality, Language, Digital Zoom, Frequency, Auto Power off Press the Power button to turn on...
... to delete, rotate, protect, crop and print your camera. Playback mode, Still Image (Camera) mode, Movie (Video) mode and Setup mode. The Camera mode is for use. Mode selection Your digital touch screen camera has 4 main modes - Starting Your Digital Camera Power on Press the Power button on the top of the camera to turn off your camera is insufficient battery power and icon will automatically power off after a few seconds. Set Exposure, ISO, White Balance, Sharpness, Quality, Language, Digital Zoom, Frequency, Auto Power off Press the Power button to turn on...

User Manual
Page 13
... another SD card to shoot at the selected resolution is taken (when the camera returns to icon mode) the numbers of the LCD screen. Hold the camera steady and press the Shutter button to focus in the section "Download photos and videos to your shot using the Photags Express software as described below in on the top right of photos left to continue taking more photos. 12 After each photo is displayed on the...
... another SD card to shoot at the selected resolution is taken (when the camera returns to icon mode) the numbers of the LCD screen. Hold the camera steady and press the Shutter button to focus in the section "Download photos and videos to your shot using the Photags Express software as described below in on the top right of photos left to continue taking more photos. 12 After each photo is displayed on the...
User Manual
Page 17
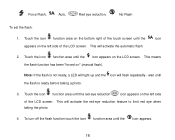
This will activate the red-eye reduction feature to limit red eye when taking a photo. 3. wait until the flash is not ready, a LED will light up and the icon will flash repeatedly - To turn off the flash function touch the icon function area until the icon appears on " (manual flash). Touch the icon function area until the red-eye reduction icon appears on the LCD screen. Force Flash, Auto, Red eye reduction, No Flash To set the flash: 1. Touch the icon function area until the...
This will activate the red-eye reduction feature to limit red eye when taking a photo. 3. wait until the flash is not ready, a LED will light up and the icon will flash repeatedly - To turn off the flash function touch the icon function area until the icon appears on " (manual flash). Touch the icon function area until the red-eye reduction icon appears on the LCD screen. Force Flash, Auto, Red eye reduction, No Flash To set the flash: 1. Touch the icon function area until the...

User Manual
Page 25
... select 5 different White Balance light conditions for shooting. White Balance, Image Size and Macro White Balance You can preview the AVI files in AVI format. Touch the "WB" function area to stop the recording and save this file in Playback mode or once downloaded to select the best White Balance option for shooting videos. 1. Touch the icon function area to your computer by using Quick Time and Windows Media Player. Press the MENU/OK button. 2. In Video mode there are 3 setup options - Auto Incandescent Fluorescent Cloudy...
... select 5 different White Balance light conditions for shooting. White Balance, Image Size and Macro White Balance You can preview the AVI files in AVI format. Touch the "WB" function area to stop the recording and save this file in Playback mode or once downloaded to select the best White Balance option for shooting videos. 1. Touch the icon function area to your computer by using Quick Time and Windows Media Player. Press the MENU/OK button. 2. In Video mode there are 3 setup options - Auto Incandescent Fluorescent Cloudy...
User Manual
Page 28
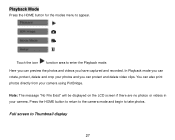
... the photos and videos you can protect and delete video clips. Press the HOME button to return to the camera mode and begin to appear. Full screen to enter the Playback mode. In Playback mode you can rotate, protect, delete and crop your camera. Note: The message "No File Exist" will be displayed on the LCD screen if there are no photos or videos in your photos and you have captured and recorded. Touch the icon function...
... the photos and videos you can protect and delete video clips. Press the HOME button to return to the camera mode and begin to appear. Full screen to enter the Playback mode. In Playback mode you can rotate, protect, delete and crop your camera. Note: The message "No File Exist" will be displayed on the LCD screen if there are no photos or videos in your photos and you have captured and recorded. Touch the icon function...
User Manual
Page 30
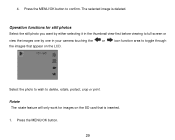
Press the MENU/OK button to delete, rotate, protect, crop or print. Rotate The rotate feature will only work for still photos Select the still photo you want by either selecting it in the thumbnail view first before viewing to full screen or view the images one by one in your camera touching the or icon function area to toggle through the images that appear on the SD card that is deleted. The selected image is inserted. 1. Press the MENU/OK button. 29 Select the photo to wish to confirm. 4. Operation functions for images on the LCD.
Press the MENU/OK button to delete, rotate, protect, crop or print. Rotate The rotate feature will only work for still photos Select the still photo you want by either selecting it in the thumbnail view first before viewing to full screen or view the images one by one in your camera touching the or icon function area to toggle through the images that appear on the SD card that is deleted. The selected image is inserted. 1. Press the MENU/OK button. 29 Select the photo to wish to confirm. 4. Operation functions for images on the LCD.
User Manual
Page 36
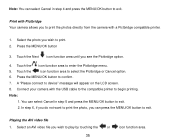
... LCD screen. 8. Select the photo you wish to exit. Press the MENU/OK button to print. 2. A "Please connect to exit. 2. You can select Cancel in step 4 and press the MENU/OK button to play by touching the or icon function area. 35 Playing the AVI video file 1. Print with Pictbridge Your camera allows you see the Pictbridge option. 4. Touch the icon function area to print the photos directly from the camera with the USB cable...
... LCD screen. 8. Select the photo you wish to exit. Press the MENU/OK button to print. 2. A "Please connect to exit. 2. You can select Cancel in step 4 and press the MENU/OK button to play by touching the or icon function area. 35 Playing the AVI video file 1. Print with Pictbridge Your camera allows you see the Pictbridge option. 4. Touch the icon function area to print the photos directly from the camera with the USB cable...
User Manual
Page 37
... icon function area to protect by touching the or icon function area. 2. Touch the icon function area and select the Lock or Unlock option. 6. 2. Press the Shutter button to open the Video Playback function mode options. 4. Press the MENU/OK button to play the current AVI file. 4. Press the MENU/OK button to the Playback mode. Protect In the playback mode you have selected an AVI file. 3. An icon will appear on the LCD screen indicating you can protect your video from accidental deletion...
... icon function area to protect by touching the or icon function area. 2. Touch the icon function area and select the Lock or Unlock option. 6. 2. Press the Shutter button to open the Video Playback function mode options. 4. Press the MENU/OK button to play the current AVI file. 4. Press the MENU/OK button to the Playback mode. Protect In the playback mode you have selected an AVI file. 3. An icon will appear on the LCD screen indicating you can protect your video from accidental deletion...
User Manual
Page 43
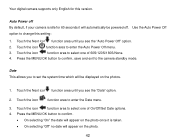
... be displayed on the photo. 42 Touch the icon function area to enter the Auto Power Off menu. 3. Touch the icon function area to the camera standby mode. Press the MENU/OK button to confirm, save and exit to enter the Date menu. 3. Your digital camera supports only English for 60 seconds it is idle for this setting: 1. Use the Auto Power Off option to select one of On/Off/Set Date options. 4. Touch the Next icon function...
... be displayed on the photo. 42 Touch the icon function area to enter the Auto Power Off menu. 3. Touch the icon function area to the camera standby mode. Press the MENU/OK button to confirm, save and exit to enter the Date menu. 3. Your digital camera supports only English for 60 seconds it is idle for this setting: 1. Use the Auto Power Off option to select one of On/Off/Set Date options. 4. Touch the Next icon function...
User Manual
Page 44
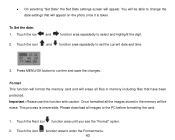
... save the changes. Important: Please use this function with caution. Press MENU/OK button to set the current date and time. 3. Once formatted all images to change the date settings that have been protected. Touch the icon function area to select and highlight the digit. 2. Touch the Next icon function area until you see the "Format" option. 2. Please download all the images stored in memory including files that will be able to the PC before formatting the card...
... save the changes. Important: Please use this function with caution. Press MENU/OK button to set the current date and time. 3. Once formatted all images to change the date settings that have been protected. Touch the icon function area to select and highlight the digit. 2. Touch the Next icon function area until you see the "Format" option. 2. Please download all the images stored in memory including files that will be able to the PC before formatting the card...
User Manual
Page 46
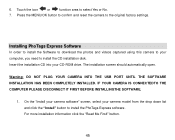
Installing PhoTags Express Software In order to install the Software to download the photos and videos captured using this camera to your CD-ROM drive. Insert the installation CD into your computer, you need to install the PhoTags Express software. The installation screen should automatically open. Touch the icon or function area to the original factory settings. Press the MENU/OK button to confirm and reset the camera to select Yes or No. 7. IF YOUR...
Installing PhoTags Express Software In order to install the Software to download the photos and videos captured using this camera to your CD-ROM drive. Insert the installation CD into your computer, you need to install the PhoTags Express software. The installation screen should automatically open. Touch the icon or function area to the original factory settings. Press the MENU/OK button to confirm and reset the camera to select Yes or No. 7. IF YOUR...

User Manual
Page 57
... now use PhoTags Express to the selected folder. Help Guide button found on a video with the avi extension. 56 In this mode you will enable you to view the video files (for all the images transferred to the PC without the option to select which photos you want to have downloaded from the camera to your camera are saved in AVI format. All the media - Videos are now downloaded to...
... now use PhoTags Express to the selected folder. Help Guide button found on a video with the avi extension. 56 In this mode you will enable you to view the video files (for all the images transferred to the PC without the option to select which photos you want to have downloaded from the camera to your camera are saved in AVI format. All the media - Videos are now downloaded to...
User Manual
Page 60
... You may also visit www.vivitar.com for further assistance if necessary or call our tech support department toll free at no charge for parts or labor for a period of one year. Copy of original bill of the problem. 3. Sakar Warranty Card This warranty covers for service, your package should include: 1. Your product will be repaired at (877) 397-8200. 59...
... You may also visit www.vivitar.com for further assistance if necessary or call our tech support department toll free at no charge for parts or labor for a period of one year. Copy of original bill of the problem. 3. Sakar Warranty Card This warranty covers for service, your package should include: 1. Your product will be repaired at (877) 397-8200. 59...
User Manual
Page 62
... Athlon 300Mhz or a Celeron 400MHz or higher as well as a removable drive on Mac OS X (10.2.6 or higher). Should your images will need to insert a SD card of power) the test pictures will work ? The device will be stored on the card. Appendix B: Troubleshooting Q: I have taken photos but my computer says, "No photos in fact taken photos. What do I do I make sure I don't lose important pictures?
... Athlon 300Mhz or a Celeron 400MHz or higher as well as a removable drive on Mac OS X (10.2.6 or higher). Should your images will need to insert a SD card of power) the test pictures will work ? The device will be stored on the card. Appendix B: Troubleshooting Q: I have taken photos but my computer says, "No photos in fact taken photos. What do I do I make sure I don't lose important pictures?


