
Camera Manual
Page 11
... Off settings menu (in Video Capture mode to start. You will see a "Goodbye" splash screen and then the camera will automatically power off completely. The camcorder will power off a few moments later. Powering ON/OFF Your Digital Video Camera Make sure the batteries have been inserted properly into your camera...
... Off settings menu (in Video Capture mode to start. You will see a "Goodbye" splash screen and then the camera will automatically power off completely. The camcorder will power off a few moments later. Powering ON/OFF Your Digital Video Camera Make sure the batteries have been inserted properly into your camera...

Camera Manual
Page 52
... the the camera‟s AV slot and to the TV, the LCD screen turns blank. The images will appear on the TV instead of the camcorder. 2) Connect the end with double-connectors to the video (yellow) and to the audio (red or white) input jack on the TV. 3) Turn on the... the camera‟s LCD screen. Connecting the Camera to a TV Your camera has an AV port to use your larger TV screen in the video camcorder on the LCD screen.
... the the camera‟s AV slot and to the TV, the LCD screen turns blank. The images will appear on the TV instead of the camcorder. 2) Connect the end with double-connectors to the video (yellow) and to the audio (red or white) input jack on the TV. 3) Turn on the... the camera‟s LCD screen. Connecting the Camera to a TV Your camera has an AV port to use your larger TV screen in the video camcorder on the LCD screen.

Camera Manual
Page 54
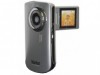
... available USB port on your camera model from the camera. Connecting the Camera to the Computer 1) Push the USB lever on the side of the camcorder to my computer" button for instructions. 5) If you can still download media from the list and click "Next" to open the application. 14)... and Macintosh: Click the "I accept the terms of this license agreement" and then click "Next" to continue. 10) On PC only: Let the "Vivitar Experience Image Manager" installer create the folder to where the program will be installed, and then click "Install". 11) Please wait while the application continues...
... available USB port on your camera model from the camera. Connecting the Camera to the Computer 1) Push the USB lever on the side of the camcorder to my computer" button for instructions. 5) If you can still download media from the list and click "Next" to open the application. 14)... and Macintosh: Click the "I accept the terms of this license agreement" and then click "Next" to continue. 10) On PC only: Let the "Vivitar Experience Image Manager" installer create the folder to where the program will be installed, and then click "Install". 11) Please wait while the application continues...
Camera Manual
Page 57
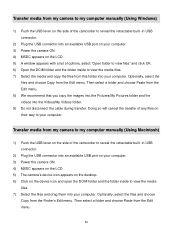
... drag them into your computer. Transfer media from my camera to my computer manually (Using Macintosh) 1) Push the USB lever on the side of the camcorder to reveal the retractable built -in USB connector. 2) Plug the USB connector into an available USB port on your computer. 3) Power the camera ON. ... from the Edit menu. 56 Transfer media from my camera to my computer manually (Using Windows) 1) Push the USB lever on the side of the camcorder to reveal the retractable built -in USB connector. 2) Plug the USB connector into an available USB port on your computer. 3) Power the camera ON. ...
... drag them into your computer. Transfer media from my camera to my computer manually (Using Macintosh) 1) Push the USB lever on the side of the camcorder to reveal the retractable built -in USB connector. 2) Plug the USB connector into an available USB port on your computer. 3) Power the camera ON. ... from the Edit menu. 56 Transfer media from my camera to my computer manually (Using Windows) 1) Push the USB lever on the side of the camcorder to reveal the retractable built -in USB connector. 2) Plug the USB connector into an available USB port on your computer. 3) Power the camera ON. ...


