
User Guide
Page 2
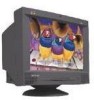
... change product specifications without notice. ViewSonic, the three birds logo, OnView, ViewMatch, and ViewMeter are registered trademarks of VESA. Environmental Protection Agency (EPA). For Your Records Write the Serial Number (see back of ViewPanel) and the Purchase Date in the event of the U.S. Product Name: Model Number: Document Number: Serial Number: Purchase Date: ViewSonic G70m/G70mb VCDTS21581-2/3 G70m/G70mb_UG_162 (Rev.1B ViewSonic G70m/G70mb Getting Started 1 VESA...
... change product specifications without notice. ViewSonic, the three birds logo, OnView, ViewMatch, and ViewMeter are registered trademarks of VESA. Environmental Protection Agency (EPA). For Your Records Write the Serial Number (see back of ViewPanel) and the Purchase Date in the event of the U.S. Product Name: Model Number: Document Number: Serial Number: Purchase Date: ViewSonic G70m/G70mb VCDTS21581-2/3 G70m/G70mb_UG_162 (Rev.1B ViewSonic G70m/G70mb Getting Started 1 VESA...
User Guide
Page 3
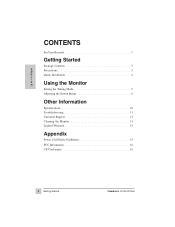
CONTENTS For Your Records 1 Getting Started Package Contents 3 E N Precautions 3 G Quick Installation 4 L I S H Using the Monitor Setting the Timing Mode 5 Adjusting the Screen Image 6 Other Information Specifications 10 Troubleshooting 11 Customer Support 12 Cleaning the Monitor 13 Limited Warranty 14 Appendix Power Cord Safety Guidelines 15 FCC Information 16 CE Conformity 16 2 Getting Started ViewSonic G70m/G70mb
CONTENTS For Your Records 1 Getting Started Package Contents 3 E N Precautions 3 G Quick Installation 4 L I S H Using the Monitor Setting the Timing Mode 5 Adjusting the Screen Image 6 Other Information Specifications 10 Troubleshooting 11 Customer Support 12 Cleaning the Monitor 13 Limited Warranty 14 Appendix Power Cord Safety Guidelines 15 FCC Information 16 CE Conformity 16 2 Getting Started ViewSonic G70m/G70mb
User Guide
Page 4
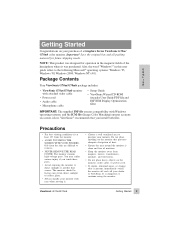
... anything on the monitor that you touch these parts. • Avoid exposing the monitor to continue using the monitor. NOTE: This product was purchased. N G Package Contents L I S Your ViewSonic G70m/G70mb package includes: H • ViewSonic G70m/G70mb monitor with attached video cable • Power cord • Audio cable • Microphone cable • Setup Guide • ViewSonic Wizard CD-ROM (incudes User Guide PDF file and INF/ICM Display Optimization files) IMPORTANT: The supplied INF file assures compatibility with care...
... anything on the monitor that you touch these parts. • Avoid exposing the monitor to continue using the monitor. NOTE: This product was purchased. N G Package Contents L I S Your ViewSonic G70m/G70mb package includes: H • ViewSonic G70m/G70mb monitor with attached video cable • Power cord • Audio cable • Microphone cable • Setup Guide • ViewSonic Wizard CD-ROM (incudes User Guide PDF file and INF/ICM Display Optimization files) IMPORTANT: The supplied INF file assures compatibility with care...
User Guide
Page 5
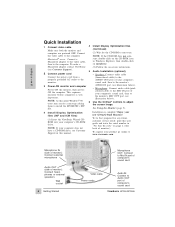
... your computer's S monitor. Quick Installation 1 Connect video cable Make sure both the monitor and computer are powered OFF. Connect 4 Install Display Optimization files (continued) (2) Wait for any future customer service needs: print this manual. NOTE: If the CD-ROM does not auto- E (see Customer Support in this user guide and write the serial number in Windows Explorer, then double-click on -screen instructions. See Using the Monitor (page 5). 4 Install Display Optimization files (INF and ICM files) (1) Insert the ViewSonic Wizard CDROM...
... your computer's S monitor. Quick Installation 1 Connect video cable Make sure both the monitor and computer are powered OFF. Connect 4 Install Display Optimization files (continued) (2) Wait for any future customer service needs: print this manual. NOTE: If the CD-ROM does not auto- E (see Customer Support in this user guide and write the serial number in Windows Explorer, then double-click on -screen instructions. See Using the Monitor (page 5). 4 Install Display Optimization files (INF and ICM files) (1) Insert the ViewSonic Wizard CDROM...
User Guide
Page 6
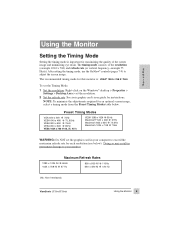
... : VESA® 1024 x 768 @ 75Hz I S To set the Timing Mode: H 1 Set the resolution: Right-click on the Windows® desktop > Properties > Settings > Desktop Area > set the graphics card in permanent damage to your computer to E N adjust the screen image. Maximum Refresh Rates 1280 x 1024 NI @ 66Hz 1024 x 768 NI @ 87 Hz 800 x 600 NI @ 110Hz 640 x 480 NI @ 120 Hz (NI= Non Interlaced) ViewSonic G70m/G70mb Using...
... : VESA® 1024 x 768 @ 75Hz I S To set the Timing Mode: H 1 Set the resolution: Right-click on the Windows® desktop > Properties > Settings > Desktop Area > set the graphics card in permanent damage to your computer to E N adjust the screen image. Maximum Refresh Rates 1280 x 1024 NI @ 66Hz 1024 x 768 NI @ 87 Hz 800 x 600 NI @ 110Hz 640 x 480 NI @ 120 Hz (NI= Non Interlaced) ViewSonic G70m/G70mb Using...
User Guide
Page 7
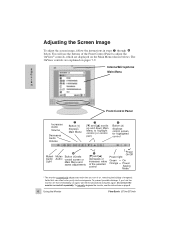
... the selected control – Power On/Off Power light: Green = On Orange = Power Saving Mode * The monitor automatically degausses each time you turn it on, removing the buildup of the Front Control Panel to highlight control (or control pair) ™ Button [2] displays control screen for highlighted control › Muted- To prevent possible damage, if you turn the monitor off repeatedly. The OnView controls are displayed on pages 7-9. To manually degauss the monitor, see the instructions on again...
... the selected control – Power On/Off Power light: Green = On Orange = Power Saving Mode * The monitor automatically degausses each time you turn it on, removing the buildup of the Front Control Panel to highlight control (or control pair) ™ Button [2] displays control screen for highlighted control › Muted- To prevent possible damage, if you turn the monitor off repeatedly. The OnView controls are displayed on pages 7-9. To manually degauss the monitor, see the instructions on again...

User Guide
Page 8
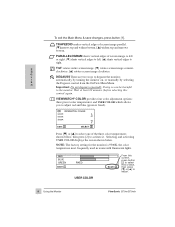
...Position) moves screen image left or right. [t] moves screen image left , [L] curves vertical edges to expand the image. ZOOM expands and contracts the entire screen image. ViewSonic G70m/G70mb Using the Monitor 7 Press [M] or [L] to adjust. V. SIZE (Vertical Size) adjusts height of screen image. [M] decreases width, [L] increases width. SIZE (Horizontal Size) adjusts width of screen image. [M] decreases height, [L] increases height. H. POSITION (Vertical Position) moves screen image up and down. [M] moves screen down, [L] moves screen up. BRIGHTNESS adjusts background black...
...Position) moves screen image left or right. [t] moves screen image left , [L] curves vertical edges to expand the image. ZOOM expands and contracts the entire screen image. ViewSonic G70m/G70mb Using the Monitor 7 Press [M] or [L] to adjust. V. SIZE (Vertical Size) adjusts height of screen image. [M] decreases width, [L] increases width. SIZE (Horizontal Size) adjusts width of screen image. [M] decreases height, [L] increases height. H. POSITION (Vertical Position) moves screen image up and down. [M] moves screen down, [L] moves screen up. BRIGHTNESS adjusts background black...
User Guide
Page 9
... Main Menu & save changes, press button [1]. I automatically by turning the monitor on, or manually by selecting S the Degauss control from the OnView Main Menu. Wait at least 20 minutes (before selecting this screen, press button [2] to select Red or Blue, then press [M] or [L] to the monitor. USER COLOR From this control again. Doing so can be harmful to adjust. 8 Using the Monitor ViewSonic G70m/G70mb E TILT rotates entire screen image. [M] rotates screen image counter- TRAPEZOID makes vertical edges of screen image...
... Main Menu & save changes, press button [1]. I automatically by turning the monitor on, or manually by selecting S the Degauss control from the OnView Main Menu. Wait at least 20 minutes (before selecting this screen, press button [2] to select Red or Blue, then press [M] or [L] to the monitor. USER COLOR From this control again. Doing so can be harmful to adjust. 8 Using the Monitor ViewSonic G70m/G70mb E TILT rotates entire screen image. [M] rotates screen image counter- TRAPEZOID makes vertical edges of screen image...
User Guide
Page 10
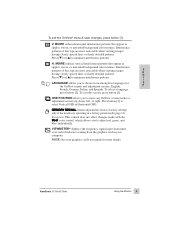
... viewing images having closely spaced lines or finely detailed patterns. English, H French, German, Italian, and Spanish. MEMORY RECALL returns adjustments back to adjust red, green, and blue individually. To select a language, press button [2]. Press button [2] to move any OnView screen (menu or adjustment screen) up, down, left, or right. V. OSD POSITION allows you to factory settings only if the monitor is operating in your graphics card's user guide for S the OnView menus and adjustment screens...
... viewing images having closely spaced lines or finely detailed patterns. English, H French, German, Italian, and Spanish. MEMORY RECALL returns adjustments back to adjust red, green, and blue individually. To select a language, press button [2]. Press button [2] to move any OnView screen (menu or adjustment screen) up, down, left, or right. V. OSD POSITION allows you to factory settings only if the monitor is operating in your graphics card's user guide for S the OnView menus and adjustment screens...
User Guide
Page 11
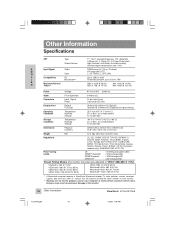
Other Information Specifications CRT Type 17" (16.0" viewable diagonal), 100° deflection 0.23mm (H), 0.13mm (V), 0.27mm (D) dot pitch Glass Surface High Contrast, Anti-Glare, Ant-static coating; Standard light transmission rate = 46% E Input Signal Video RGB Analog (0.7 Vp-p, 75 ohms) N HV Separated (TTL) , G Sync f : 30-70kHz, f : 50-120Hz H V L Compatibility PC Up to 1280 x 1024 I Macintosh®*1 Power Macintosh®, up to 1024 x 768 S Maximum Refresh H Rates*2 1280 x 1024...
Other Information Specifications CRT Type 17" (16.0" viewable diagonal), 100° deflection 0.23mm (H), 0.13mm (V), 0.27mm (D) dot pitch Glass Surface High Contrast, Anti-Glare, Ant-static coating; Standard light transmission rate = 46% E Input Signal Video RGB Analog (0.7 Vp-p, 75 ohms) N HV Separated (TTL) , G Sync f : 30-70kHz, f : 50-120Hz H V L Compatibility PC Up to 1280 x 1024 I Macintosh®*1 Power Macintosh®, up to 1024 x 768 S Maximum Refresh H Rates*2 1280 x 1024...
User Guide
Page 12
... the video N output port on but no screen image E • Make sure the video cable supplied with another power source, graphics card, or computer system. • Connect the video cable securely. If the other end of the video cable is not G attached permanently to the monitor, tightly secure it is tightly secured to support higher refresh rates, try selecting fewer colors or running lower resolutions. • Remove any colors (red, green, or blue) are within the monitor's specified frequency range...
... the video N output port on but no screen image E • Make sure the video cable supplied with another power source, graphics card, or computer system. • Connect the video cable securely. If the other end of the video cable is not G attached permanently to the monitor, tightly secure it is tightly secured to support higher refresh rates, try selecting fewer colors or running lower resolutions. • Remove any colors (red, green, or blue) are within the monitor's specified frequency range...

User Guide
Page 13
...Support (English) For the most expedient answer to a service center. E N NOTE: You will need to provide the serial number (on the previous page). 2 For assistance contact your reseller to refer you to your question, do the following: 1 Check Troubleshooting...Email S H United States T: (800) 688-6688 vscs@viewsonic.com F: (909) 468-1202 Canada T: (800) 688-6688 F: (909) 468-1202 vscs@viewsonic.com United Kingdom T: 0800 833 648 F: 0044 (0)1293 ...Indian Peninsula T: 886-2-2248-4072 F: 886-2-2240-8238 vsi@viewsonic.com.tw South Africa T: 27-11-314-0002 F: 27-11-314-...
...Support (English) For the most expedient answer to a service center. E N NOTE: You will need to provide the serial number (on the previous page). 2 For assistance contact your reseller to refer you to your question, do the following: 1 Check Troubleshooting...Email S H United States T: (800) 688-6688 vscs@viewsonic.com F: (909) 468-1202 Canada T: (800) 688-6688 F: (909) 468-1202 vscs@viewsonic.com United Kingdom T: 0800 833 648 F: 0044 (0)1293 ...Indian Peninsula T: 886-2-2248-4072 F: 886-2-2240-8238 vsi@viewsonic.com.tw South Africa T: 27-11-314-0002 F: 27-11-314-...
User Guide
Page 14
... from use of the monitor. This removes dust and other particles. 2 If still not clean, apply a small amount of a non-ammonia, non-alcohol based, mild non-abrasive detergent onto a clean, soft, lint-free cloth, then wipe the surface. Cleaning the Monitor • MAKE SURE THE MONITOR IS TURNED OFF. • NEVER SPRAY OR POUR ANY LIQUID DIRECTLY ONTO THE SCREEN OR CASE. ViewSonic G70m/G70mb...
... from use of the monitor. This removes dust and other particles. 2 If still not clean, apply a small amount of a non-ammonia, non-alcohol based, mild non-abrasive detergent onto a clean, soft, lint-free cloth, then wipe the surface. Cleaning the Monitor • MAKE SURE THE MONITOR IS TURNED OFF. • NEVER SPRAY OR POUR ANY LIQUID DIRECTLY ONTO THE SCREEN OR CASE. ViewSonic G70m/G70mb...
User Guide
Page 15
... AND FITNESS FOR A PARTICULAR PURPOSE. Use of damages: VIEWSONIC'S LIABILITY IS LIMITED TO THE COST OF REPAIR OR REPLACEMENT OF THE PRODUCT. Removal, installation, and set-up service charges. How to an authorized ViewSonic service center or ViewSonic. 4. Exclusion of supplies or parts not meeting ViewSonic's specifications. ANY OTHER DAMAGES, WHETHER INCIDENTAL, CONSEQUENTIAL OR OTHERWISE. 3. To obtain service under warranty, contact ViewSonic Customer Support. Accident, misuse, neglect, fire...
... AND FITNESS FOR A PARTICULAR PURPOSE. Use of damages: VIEWSONIC'S LIABILITY IS LIMITED TO THE COST OF REPAIR OR REPLACEMENT OF THE PRODUCT. Removal, installation, and set-up service charges. How to an authorized ViewSonic service center or ViewSonic. 4. Exclusion of supplies or parts not meeting ViewSonic's specifications. ANY OTHER DAMAGES, WHETHER INCIDENTAL, CONSEQUENTIAL OR OTHERWISE. 3. To obtain service under warranty, contact ViewSonic Customer Support. Accident, misuse, neglect, fire...
User Guide
Page 16
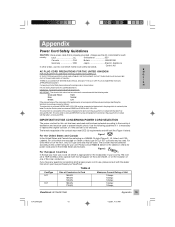
... rating for your plug, proceed as shown below for the selection criteria for power cords used to the country of the cord set which is not enclosed. Appendix Power Cord Safety Guidelines CAUTION: Use a power cable that will look like (Figure 1 below): For the United States and Canada Figure 1 In the United States and Canada the male plug is coloured BROWN must be connected...
... rating for your plug, proceed as shown below for the selection criteria for power cords used to the country of the cord set which is not enclosed. Appendix Power Cord Safety Guidelines CAUTION: Use a power cable that will look like (Figure 1 below): For the United States and Canada Figure 1 In the United States and Canada the male plug is coloured BROWN must be connected...
User Guide
Page 17
... based on appliance coupler. High voltage: Max. 30 kV. Install and use grounded power supply cord and the L provided shielded video interface cable with the instructions, may cause harmful interference to radio communications. These limits are shielded sufficiently. E N FCC Warning: G To assure continued FCC compliance, the user must use the equipment according to "Electromagnetic compatibility", and 73/23/EEC as amended by turning...
... based on appliance coupler. High voltage: Max. 30 kV. Install and use grounded power supply cord and the L provided shielded video interface cable with the instructions, may cause harmful interference to radio communications. These limits are shielded sufficiently. E N FCC Warning: G To assure continued FCC compliance, the user must use the equipment according to "Electromagnetic compatibility", and 73/23/EEC as amended by turning...


