English Owners Manual
Page 3
...on the base. (Base charge/in E the charging cradle. We can also be reached on the web at www.uniden.com Charge continuously for at Place the handset on the base and place the other handset in use LED B CIDCW On/Off (Caller id/call waiting) •Base unit (1) •... ringer set for use! C Replace the cover. www.uniden.com C Press the select/channel key to callers, please see "Choosing the dialing mode" on the base and charging cradle. dialing, please see page 45. It does not matter which handset is placed on page 17. Step 5 Setting Display Options...
...on the base. (Base charge/in E the charging cradle. We can also be reached on the web at www.uniden.com Charge continuously for at Place the handset on the base and place the other handset in use LED B CIDCW On/Off (Caller id/call waiting) •Base unit (1) •... ringer set for use! C Replace the cover. www.uniden.com C Press the select/channel key to callers, please see "Choosing the dialing mode" on the base and charging cradle. dialing, please see page 45. It does not matter which handset is placed on page 17. Step 5 Setting Display Options...
English Owners Manual
Page 4
... www.uniden.com Contents Quick Reference Guide 1 RocketDial Welcome/Features Controls and Functions Getting Started 3 RocketDial 30 4 Storing and Editing the RocketDial Making Calls with the RocketDial 30 30 Deleting the RocketDial 31 Setting up the Phone Before Using, Register Second Handset to the... 39 47 Traveling Out-of-Range 20 Additional Information Selecting a Different Channel 21 Changing the Digital Security Code 53 Find Handsets 21 Installing the Beltclip 53 Flash and Call Waiting 21 Headset Installation 53 Memory Dialing Storing Phone Numbers and Names Steps...
... www.uniden.com Contents Quick Reference Guide 1 RocketDial Welcome/Features Controls and Functions Getting Started 3 RocketDial 30 4 Storing and Editing the RocketDial Making Calls with the RocketDial 30 30 Deleting the RocketDial 31 Setting up the Phone Before Using, Register Second Handset to the... 39 47 Traveling Out-of-Range 20 Additional Information Selecting a Different Channel 21 Changing the Digital Security Code 53 Find Handsets 21 Installing the Beltclip 53 Flash and Call Waiting 21 Headset Installation 53 Memory Dialing Storing Phone Numbers and Names Steps...
English Owners Manual
Page 5
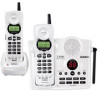
... is a registered trademark of Uniden America Corporation. AutoTalk, AutoStandby, UltraClear Plus, Random Code, AutoSecure, and RocketDial are trademarks of the Uniden DXAI3288-2 series cordless telephone and answering... system. Welcome Features Congratulations on your cordless phone may differ from the actual unit for reliability, long life, and outstanding performance. The color of your purchase of Uniden America Corporation. www.uniden.com [3] Note: Some illustrations in this manual may vary. • Dual Handset...
... is a registered trademark of Uniden America Corporation. AutoTalk, AutoStandby, UltraClear Plus, Random Code, AutoSecure, and RocketDial are trademarks of the Uniden DXAI3288-2 series cordless telephone and answering... system. Welcome Features Congratulations on your cordless phone may differ from the actual unit for reliability, long life, and outstanding performance. The color of your purchase of Uniden America Corporation. www.uniden.com [3] Note: Some illustrations in this manual may vary. • Dual Handset...

English Owners Manual
Page 6
...tone/ (left cursor) key 10. Controls and Functions Dual Handsets 1 5 2 6 3 7 8 4 9 10 11 12 [4] 1. End key 16. (Volume) vol/ring/ (down) key 17. #/ (right cursor) key 17 18 19 18. (Memory) mem key 19. Handset charging contacts 20 www.uniden.com LCD display 7. (Caller ID) cid/menu key ...8. Optional headset jack 4. Delete/transfer key 20. Handset microphone and ringer speaker 15 13. (Volume) vol/ring/ (up) key 16 14...
...tone/ (left cursor) key 10. Controls and Functions Dual Handsets 1 5 2 6 3 7 8 4 9 10 11 12 [4] 1. End key 16. (Volume) vol/ring/ (down) key 17. #/ (right cursor) key 17 18 19 18. (Memory) mem key 19. Handset charging contacts 20 www.uniden.com LCD display 7. (Caller ID) cid/menu key ...8. Optional headset jack 4. Delete/transfer key 20. Handset microphone and ringer speaker 15 13. (Volume) vol/ring/ (up) key 16 14...

English Owners Manual
Page 7
Clock/menu key 31. Base antenna 34. (Skip/fast forward) key 35. Charge LED 43. Charge/in use LED www.uniden.com 25. (Play/stop) key 26. (Repeat/rewind) key 27. Base charging contacts 32. Base speaker 33. Base 21 22 Charging Cradle 41 23 24 ... (down) 40. (Microphone) mic 41. Memo rec (record) key 42 43 29. Set key 39. Charging contacts 42. DC IN 9V jack (up) keys [5] Handset retainer clip 24. Answer on /off / key 28. Delete/ key 36. Find hs (handset) key 30. Ringer key 38. DC IN 9V jack 23. Greeting key 37.
Clock/menu key 31. Base antenna 34. (Skip/fast forward) key 35. Charge LED 43. Charge/in use LED www.uniden.com 25. (Play/stop) key 26. (Repeat/rewind) key 27. Base charging contacts 32. Base speaker 33. Base 21 22 Charging Cradle 41 23 24 ... (down) 40. (Microphone) mic 41. Memo rec (record) key 42 43 29. Set key 39. Charging contacts 42. DC IN 9V jack (up) keys [5] Handset retainer clip 24. Answer on /off / key 28. Delete/ key 36. Find hs (handset) key 30. Ringer key 38. DC IN 9V jack 23. Greeting key 37.
English Owners Manual
Page 8
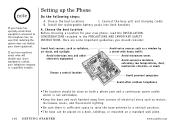
...into both a phone jack and a continuous power outlet which is not switchable. • Keep the base and each handset away from sources of electrical noise such as a window by a street with heavy traffic Avoid microwave ovens Avoid excessive ... vibration, or shock Avoid personal computers Avoid other cordless telephones • The location should be close to both handsets A. Here are some important guidelines you have questions about what will disable your alarm equipment, contact your new ... desk, tabletop, or mounted on a standard wall plate. [ 6 ] GETTING STARTED www.uniden.com
...into both a phone jack and a continuous power outlet which is not switchable. • Keep the base and each handset away from sources of electrical noise such as a window by a street with heavy traffic Avoid microwave ovens Avoid excessive ... vibration, or shock Avoid personal computers Avoid other cordless telephones • The location should be close to both handsets A. Here are some important guidelines you have questions about what will disable your alarm equipment, contact your new ... desk, tabletop, or mounted on a standard wall plate. [ 6 ] GETTING STARTED www.uniden.com

English Owners Manual
Page 9
... cover downward to insure that there is not securely connected, the handset will not charge properly. • Use only the Uniden (BT-905) rechargeable battery pack supplied with your cordless telephone. • Place the second handset in the base unit or the charging cradle. If the battery ... packs for at least 15-20 hours before use the finger indention for the first time! www.uniden.com GETTING STARTED [ 7 ] Install the rechargeable battery packs into both handsets Both handsets are powered by slightly pulling on the battery wires to remove. 2) Plug the battery pack connector (...
... cover downward to insure that there is not securely connected, the handset will not charge properly. • Use only the Uniden (BT-905) rechargeable battery pack supplied with your cordless telephone. • Place the second handset in the base unit or the charging cradle. If the battery ... packs for at least 15-20 hours before use the finger indention for the first time! www.uniden.com GETTING STARTED [ 7 ] Install the rechargeable battery packs into both handsets Both handsets are powered by slightly pulling on the battery wires to remove. 2) Plug the battery pack connector (...

English Owners Manual
Page 10
...electrical wall outlet properly. (Use only the supplied AC adapter. DO NOT rely on the handset by sliding it upwards until it clicks into each charging contacts. [ 8 ] GETTING STARTED www.uniden.com The LED light will illuminate regardless if the battery pack is plugged into place. ...5) Place each handset in use or charging cradle charge LED light does not illuminate: • Check to Friday...
...electrical wall outlet properly. (Use only the supplied AC adapter. DO NOT rely on the handset by sliding it upwards until it clicks into each charging contacts. [ 8 ] GETTING STARTED www.uniden.com The LED light will illuminate regardless if the battery pack is plugged into place. ...5) Place each handset in use or charging cradle charge LED light does not illuminate: • Check to Friday...
English Owners Manual
Page 11
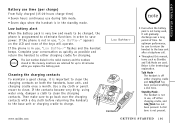
...talk/flash has been pressed enabling a dial tone. Then make sure to charge. Talk Mode The handset is in use , "Low Battery" flashes and the handset beeps. If the phone is not being used . www.uniden.com • Even when the battery pack is not in use , "Low Battery" appears ...on both the handsets, base unit, and charging cradle once a month. Cleaning the charging contacts To maintain a good...
...talk/flash has been pressed enabling a dial tone. Then make sure to charge. Talk Mode The handset is in use , "Low Battery" flashes and the handset beeps. If the phone is not being used . www.uniden.com • Even when the battery pack is not in use , "Low Battery" appears ...on both the handsets, base unit, and charging cradle once a month. Cleaning the charging contacts To maintain a good...
English Owners Manual
Page 12
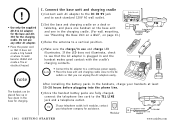
...to a vertical position. 4) Make sure the charge/in the handsets, charge your telephone company for the charging cradle. Modular [ 10 ] G E T T I N G S T A R T E D www.uniden.com If your telephone outlet isn't modular, contact your handsets at least 15-20 hours before plugging into the phone line.... 5) Once the handset battey packs are fully charged, connect the telephone line cord to each AC adapter to the...
...to a vertical position. 4) Make sure the charge/in the handsets, charge your telephone company for the charging cradle. Modular [ 10 ] G E T T I N G S T A R T E D www.uniden.com If your telephone outlet isn't modular, contact your handsets at least 15-20 hours before plugging into the phone line.... 5) Once the handset battey packs are fully charged, connect the telephone line cord to each AC adapter to the...

English Owners Manual
Page 13
... the battery packs in both batteries, remove the handset in use ! • When you are removed from the base. www.uniden.com G E T T I N G S T A R T E D [ 11 ] Place either handset. GETTING STARTED Before Using, Register Second Handset to the Base Unit When the dual handsets are charging the handset No.2. The second handset WILL NOT operate properly until the registration has...
... the battery packs in both batteries, remove the handset in use ! • When you are removed from the base. www.uniden.com G E T T I N G S T A R T E D [ 11 ] Place either handset. GETTING STARTED Before Using, Register Second Handset to the Base Unit When the dual handsets are charging the handset No.2. The second handset WILL NOT operate properly until the registration has...

English Owners Manual
Page 14
... tone sounds. 2) When the other handset is set to be interrupted; When to Re-register Handsets 1) You'll need to On). only one handset at a time can answer the transferred call by pressing the delete/transfer key. Transfer Call [ 12 ] www.uniden.com To cancel the transfer, press ...the delete/transfer or talk/flash key on page 11) each phone call. • Call transfer allows you to transfer outside calls from handset to handset, only one handset at a time can talk with an outside caller...
... tone sounds. 2) When the other handset is set to be interrupted; When to Re-register Handsets 1) You'll need to On). only one handset at a time can answer the transferred call by pressing the delete/transfer key. Transfer Call [ 12 ] www.uniden.com To cancel the transfer, press ...the delete/transfer or talk/flash key on page 11) each phone call. • Call transfer allows you to transfer outside calls from handset to handset, only one handset at a time can talk with an outside caller...

English Owners Manual
Page 15
GETTING STARTED Mounting the Base Unit on a Wall Setting the handset retainer clip for wall mounting 1) On the base unit, pull the handset retainer clip out of the retainer is up and the M is down until the phone is firmly seated. Standard wall plate mounting This phone can ... adapter into a standard 120V AC wall outlet. 4) Plug the telephone line cord into the telephone outlet. 6) Raise the antenna to back. The retainer holds the handset in and down . DO NOT use an AC outlet controlled by a wall switch. Flip the hook tab over so the tab holds the...
GETTING STARTED Mounting the Base Unit on a Wall Setting the handset retainer clip for wall mounting 1) On the base unit, pull the handset retainer clip out of the retainer is up and the M is down until the phone is firmly seated. Standard wall plate mounting This phone can ... adapter into a standard 120V AC wall outlet. 4) Plug the telephone line cord into the telephone outlet. 6) Raise the antenna to back. The retainer holds the handset in and down . DO NOT use an AC outlet controlled by a wall switch. Flip the hook tab over so the tab holds the...

English Owners Manual
Page 16
... phone jack to avoid excessive cord lengths. • Make sure the wall material is capable of supporting the weight of the base and handset. • Use #10 screws (minimum length of an inch between the wall and screw heads for the wall material where the base ... 1) Insert two mounting screws into the wall. • Try to mount your phone directly to mount the telephone. [ 14 ] G E T T I N G S T A R T E D www.uniden.com Before doing this, consider the following: • Avoid electrical cables, pipes, or other items behind the mounting location that could cause a hazard when inserting...
... phone jack to avoid excessive cord lengths. • Make sure the wall material is capable of supporting the weight of the base and handset. • Use #10 screws (minimum length of an inch between the wall and screw heads for the wall material where the base ... 1) Insert two mounting screws into the wall. • Try to mount your phone directly to mount the telephone. [ 14 ] G E T T I N G S T A R T E D www.uniden.com Before doing this, consider the following: • Avoid electrical cables, pipes, or other items behind the mounting location that could cause a hazard when inserting...

English Owners Manual
Page 17
...The cordless phone features include AutoTalkTM and AutoStandbyTM. If the phone rings when AutoTalk is On, simply remove the handset from the base or charging cradle and the phone automatically answers the call . Press the select/channel key to ... you try to answer the call . They are five setup options available. If you to hang up by using Handset 2, you would like to the display indicating "HS1" or "HS2". If the phone rings when AutoTalk is HS1...are Caller ID options [AutoTalk, CIDCW (Caller ID on the LCD screen. www.uniden.com G E T T I N G S T A R T E D [ 15 ]
...The cordless phone features include AutoTalkTM and AutoStandbyTM. If the phone rings when AutoTalk is On, simply remove the handset from the base or charging cradle and the phone automatically answers the call . Press the select/channel key to ... you try to answer the call . They are five setup options available. If you to hang up by using Handset 2, you would like to the display indicating "HS1" or "HS2". If the phone rings when AutoTalk is HS1...are Caller ID options [AutoTalk, CIDCW (Caller ID on the LCD screen. www.uniden.com G E T T I N G S T A R T E D [ 15 ]

English Owners Manual
Page 18
... your local area code, you will see only the local seven digit number. To complete the setting, press the end key or return the handset to enter the 3-digit area code. 5) Press the select/channel key. Do not program this option. Then press the select/channel key. ... or the delete/transfer key to the base unit or charging cradle. [ 16 ] G E T T I N G S T A R T E D www.uniden.com A confirmation tone sounds and the displayed area code is in the standby mode, press and hold the cid/menu key. The handset returns to enter the new area code. To enter your Area Code If you...
... your local area code, you will see only the local seven digit number. To complete the setting, press the end key or return the handset to enter the 3-digit area code. 5) Press the select/channel key. Do not program this option. Then press the select/channel key. ... or the delete/transfer key to the base unit or charging cradle. [ 16 ] G E T T I N G S T A R T E D www.uniden.com A confirmation tone sounds and the displayed area code is in the standby mode, press and hold the cid/menu key. The handset returns to enter the new area code. To enter your Area Code If you...

English Owners Manual
Page 19
... "Dial". 3) Press the select/channel key to toggle between "Eng" and "Fr.". 4) Press the end key or return the handset to the base unit or charging cradle to complete the setting. www.uniden.com G E T T I N G S T A R T E D [ 17 ] The following screen appears. 2) Use the vol/ring/ key to move the pointer to "Language". 3) Press the...
... "Dial". 3) Press the select/channel key to toggle between "Eng" and "Fr.". 4) Press the end key or return the handset to the base unit or charging cradle to complete the setting. www.uniden.com G E T T I N G S T A R T E D [ 17 ] The following screen appears. 2) Use the vol/ring/ key to move the pointer to "Language". 3) Press the...

English Owners Manual
Page 20
... */tone/ or #/ key (AutoTalk:On). To hang up the handset. 2) Press the redial/pause key, then press the talk/flash key. 1) Press the talk/flash key. 2) Listen for the dial tone. 4) Press the redial/pause key. www.uniden.com To make a call Handset On Base or Charging Cradle Pick up the... handset (AutoTalk:On) or pick up the handset. 2) Press the talk/flash key. 3) Listen for the dial tone. 3) Press the redial/pause key....
... */tone/ or #/ key (AutoTalk:On). To hang up the handset. 2) Press the redial/pause key, then press the talk/flash key. 1) Press the talk/flash key. 2) Listen for the dial tone. 4) Press the redial/pause key. www.uniden.com To make a call Handset On Base or Charging Cradle Pick up the... handset (AutoTalk:On) or pick up the handset. 2) Press the talk/flash key. 3) Listen for the dial tone. 3) Press the redial/pause key....

English Owners Manual
Page 21
... of five ringer tones and volume combinations. Earpiece volume Pressing the vol/ring/ or vol/ring/ key during a call has ended. Adjusting the Handset Ringer and Earpiece Volume Handset ringer tone and volume Press the vol/ring/ or vol/ring/ key in standby mode to select one... handset is off the base or charging cradle, simply press the end key to temporarily mute the incoming ring only for that handset. BASICS www.uniden.com B A S I C S [ 19 ] Temporarily Mute ...
... of five ringer tones and volume combinations. Earpiece volume Pressing the vol/ring/ or vol/ring/ key during a call has ended. Adjusting the Handset Ringer and Earpiece Volume Handset ringer tone and volume Press the vol/ring/ or vol/ring/ key in standby mode to select one... handset is off the base or charging cradle, simply press the end key to temporarily mute the incoming ring only for that handset. BASICS www.uniden.com B A S I C S [ 19 ] Temporarily Mute ...

English Owners Manual
Page 22
These digits will terminate within 1 minute. [ 20 ] B A S I C S www.uniden.com Once the call ends, the tone mode is set to enter tone dialing digits, you pass the range limits of -Range During a call, as ... special number can be sent as tone dialing. This is referred to as Chain Dialing (see page 26.) Tone Dialing Switch-over to move your handset too far from your base unit, noise increases. Once your bank. For example, entering your bank account number after you begin to tone dialing during...
These digits will terminate within 1 minute. [ 20 ] B A S I C S www.uniden.com Once the call ends, the tone mode is set to enter tone dialing digits, you pass the range limits of -Range During a call, as ... special number can be sent as tone dialing. This is referred to as Chain Dialing (see page 26.) Tone Dialing Switch-over to move your handset too far from your base unit, noise increases. Once your bank. For example, entering your bank account number after you begin to tone dialing during...


