
Owners Manual
Page 1
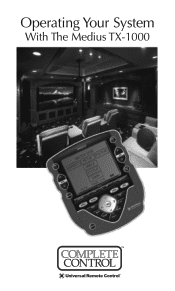
Operating Your System With The Medius TX-1000
Operating Your System With The Medius TX-1000
Owners Manual
Page 2
... within an audio/video installation. Only a Complete Control dealer has the requisite experience and training to change without prior written consent from Universal Remote Control, Inc. Universal Remote Control, Inc. 500 Mamaroneck Avenue, Harrison, NY 10528 Phone: (914) 835-4484 Fax: (914) 835-4532 TX-1000 Owners Manual © 2006-2013 Universal Remote Control, Inc. UNIVERSAL REMOTE CONTROL, INC. SHALL NOT BE LIABLE FOR OPERATIONAL, TECHNICAL OR EDITORIAL ERRORS/OMISSIONS MADE IN THIS MANUAL. It...
... within an audio/video installation. Only a Complete Control dealer has the requisite experience and training to change without prior written consent from Universal Remote Control, Inc. Universal Remote Control, Inc. 500 Mamaroneck Avenue, Harrison, NY 10528 Phone: (914) 835-4484 Fax: (914) 835-4532 TX-1000 Owners Manual © 2006-2013 Universal Remote Control, Inc. UNIVERSAL REMOTE CONTROL, INC. SHALL NOT BE LIABLE FOR OPERATIONAL, TECHNICAL OR EDITORIAL ERRORS/OMISSIONS MADE IN THIS MANUAL. It...

Owners Manual
Page 3
TABLE OF CONTENTS Introduction 1 LCD Touch Screen 1 Optional RF "No Rules" Operation 2 Installing Batteries 3 Programming the Medius 4 Selecting a New "Activity" 5 Using the Medius to Control an "Activity" 6 Displaying the Setup Screen 7 Selecting from the Setup Screen 7 Setting the TIME 8 Setting the LCD 8 Light Settings 10 Sound Volume 10 System Settings 11 Calibrating the Touch Screen 11 Version Information Displays 12 Warranty 12 End User Agreement 15 Specifications 15
TABLE OF CONTENTS Introduction 1 LCD Touch Screen 1 Optional RF "No Rules" Operation 2 Installing Batteries 3 Programming the Medius 4 Selecting a New "Activity" 5 Using the Medius to Control an "Activity" 6 Displaying the Setup Screen 7 Selecting from the Setup Screen 7 Setting the TIME 8 Setting the LCD 8 Light Settings 10 Sound Volume 10 System Settings 11 Calibrating the Touch Screen 11 Version Information Displays 12 Warranty 12 End User Agreement 15 Specifications 15

Owners Manual
Page 4
... flexibility, simplifying and automating operation of hardware and software engineering, the Complete Control Medius. It is equipped with a bright easy to use a button, simply tap the screen with a beep sound. Integrated Sound Signaling The Medius incorporates a small speaker for your installer will disappear, and you press a button, the Medius signals that it is transmitting, the Medius will blink as long as the Medius is...
... flexibility, simplifying and automating operation of hardware and software engineering, the Complete Control Medius. It is equipped with a bright easy to use a button, simply tap the screen with a beep sound. Integrated Sound Signaling The Medius incorporates a small speaker for your installer will disappear, and you press a button, the Medius signals that it is transmitting, the Medius will blink as long as the Medius is...
Owners Manual
Page 5
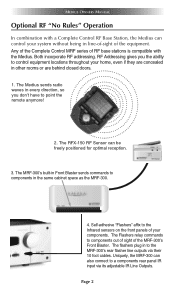
... are concealed in every direction, so you the ability to control equipment locations throughout your system without being in line-of-sight of the MRF-300's Front Blaster. RF Addressing gives you don't have to a components rear panel IR input via their 10 foot cables. MEDIUS OWNERS MANUAL Optional RF "No Rules" Operation In combination with the...
... are concealed in every direction, so you the ability to control equipment locations throughout your system without being in line-of-sight of the MRF-300's Front Blaster. RF Addressing gives you don't have to a components rear panel IR input via their 10 foot cables. MEDIUS OWNERS MANUAL Optional RF "No Rules" Operation In combination with the...
Owners Manual
Page 6
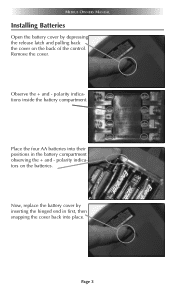
polarity indications inside the battery compartment. Page 3 polarity indicators on the back of the control. Now, replace the battery cover by depressing the release latch and pulling back the cover on the batteries. Observe the + and - Place the four AA batteries into their positions in first, then snapping the cover back into place. Remove the cover. MEDIUS OWNERS MANUAL Installing Batteries Open the battery cover by inserting the hinged end in the battery compartment observing the + and -
polarity indications inside the battery compartment. Page 3 polarity indicators on the back of the control. Now, replace the battery cover by depressing the release latch and pulling back the cover on the batteries. Observe the + and - Place the four AA batteries into their positions in first, then snapping the cover back into place. Remove the cover. MEDIUS OWNERS MANUAL Installing Batteries Open the battery cover by inserting the hinged end in the battery compartment observing the + and -

Owners Manual
Page 7
... as well as one touch operation via a Windows PC equipped with this software. You can download this software from our website: www.universalremote.com Basic setup takes only a short time with a USB port (programming cable included), using our proprietary software, TX-1000 Editor. However, to enjoy all the benefits of each component, you the user (and your Medius so you use a professional audio/video installer to program your preferences) and how...
... as well as one touch operation via a Windows PC equipped with this software. You can download this software from our website: www.universalremote.com Basic setup takes only a short time with a USB port (programming cable included), using our proprietary software, TX-1000 Editor. However, to enjoy all the benefits of each component, you the user (and your Medius so you use a professional audio/video installer to program your preferences) and how...
Owners Manual
Page 8
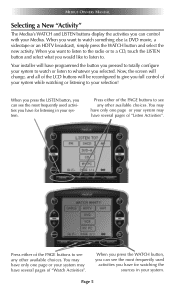
... the WATCH button and select the new activity. When you press the WATCH button, you can see the most frequently used activities you want to listen to the radio or to see the most frequently used activities you full control of "Listen Activities". MEDIUS OWNERS MANUAL Selecting a New "Activity" The Medius's WATCH and LISTEN buttons display the activities you can control with your...
... the WATCH button and select the new activity. When you press the WATCH button, you can see the most frequently used activities you want to listen to the radio or to see the most frequently used activities you full control of "Listen Activities". MEDIUS OWNERS MANUAL Selecting a New "Activity" The Medius's WATCH and LISTEN buttons display the activities you can control with your...
Owners Manual
Page 9
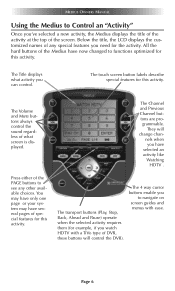
... navigate on screen guides and menus with a TiVo type of DVR, these buttons will change chan- The touch screen button labels describe special features for this activity. Press either of any other available choices. They will control the DVR). The Channel and Previous Channel buttons are programmable. The Volume and Mute buttons always control the sound regardless of the Medius have now changed to functions...
... navigate on screen guides and menus with a TiVo type of DVR, these buttons will change chan- The touch screen button labels describe special features for this activity. Press either of any other available choices. They will control the DVR). The Channel and Previous Channel buttons are programmable. The Volume and Mute buttons always control the sound regardless of the Medius have now changed to functions...

Owners Manual
Page 10
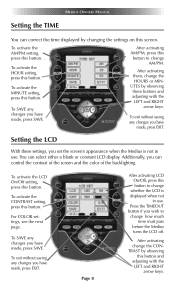
... the SETUP screen within 30 seconds, the Medius will change to normal operation before that by pressing and holding both the WATCH button and the SEL button. LCD - Page 7 MEDIUS OWNERS MANUAL Displaying the Setup Screen You can adjust the settings of the Medius whenever you like to adjust: TIME - LIGHT - SYSTEM - The battery low warning. If you 'd like by pressing either the WATCH or the LISTEN button. SOUND...
... the SETUP screen within 30 seconds, the Medius will change to normal operation before that by pressing and holding both the WATCH button and the SEL button. LCD - Page 7 MEDIUS OWNERS MANUAL Displaying the Setup Screen You can adjust the settings of the Medius whenever you like to adjust: TIME - LIGHT - SYSTEM - The battery low warning. If you 'd like by pressing either the WATCH or the LISTEN button. SOUND...
Owners Manual
Page 11
... is displayed when not in use . Setting the LCD With these buttons and adjusting with the LEFT and RIGHT arrow keys. Page 8 After activating LCD On/Off, press this screen. To activate the LCD On/Off setting, press this button. To activate the MINUTE setting, press this button. . After activating them, change the CONTRAST by changing the settings on this button to change how much time must...
... is displayed when not in use . Setting the LCD With these buttons and adjusting with the LEFT and RIGHT arrow keys. Page 8 After activating LCD On/Off, press this screen. To activate the LCD On/Off setting, press this button. To activate the MINUTE setting, press this button. . After activating them, change the CONTRAST by changing the settings on this button to change how much time must...

Owners Manual
Page 12
... SET screen appears. To activate BLUE, first press this button. MEDIUS OWNERS MANUAL Overriding COLOR Settings Your professional installer may have set the color of buttons. Page 9 You can override the settings he/she made in the TX-1000 software with the LEFT and RIGHT arrow keys. Here's how the settings are adjusted: To activate RED, first press this button displays S/W to indicate that the colors are controlled by observing these settings...
... SET screen appears. To activate BLUE, first press this button. MEDIUS OWNERS MANUAL Overriding COLOR Settings Your professional installer may have set the color of buttons. Page 9 You can override the settings he/she made in the TX-1000 software with the LEFT and RIGHT arrow keys. Here's how the settings are adjusted: To activate RED, first press this button displays S/W to indicate that the colors are controlled by observing these settings...
Owners Manual
Page 13
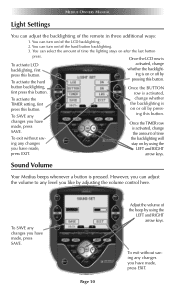
... and RIGHT press EXIT. button backlighting, first press this button. Once the TIMER row is activated, change whether the backlighting is activated, To activate the TIMER setting, first press this button. To activate the hard activated, change whether the backlight- Once the BUTTON row is on or off by adjusting the volume control here. MEDIUS OWNERS MANUAL Light Settings You can turn on/off the LCD backlighting...
... and RIGHT press EXIT. button backlighting, first press this button. Once the TIMER row is activated, change whether the backlighting is activated, To activate the TIMER setting, first press this button. To activate the hard activated, change whether the backlight- Once the BUTTON row is on or off by adjusting the volume control here. MEDIUS OWNERS MANUAL Light Settings You can turn on/off the LCD backlighting...

Owners Manual
Page 14
... SETUP screen. It works like this setting. Press the + symbol with this : 1. The current battery power remaining is displayed here. Press the TOUCH button on the SETUP screen. 2. Page 11 When the process is complete, the screen will return to cycle through the available battery level settings (0%, 5%, 10%, 15% or 20%). System Settings MEDIUS OWNERS MANUAL You can set your Medius to finger presses accurately, you can calibrate...
... SETUP screen. It works like this setting. Press the + symbol with this : 1. The current battery power remaining is displayed here. Press the TOUCH button on the SETUP screen. 2. Page 11 When the process is complete, the screen will return to cycle through the available battery level settings (0%, 5%, 10%, 15% or 20%). System Settings MEDIUS OWNERS MANUAL You can set your Medius to finger presses accurately, you can calibrate...

Owners Manual
Page 15
... reasonable measures to promptly cause such to program your Medius. Limited Warranty and Disclaimers Universal Remote Control, Inc. ("URC") warrants that the URC equipment shall be curious, the Version indicates what firmware and software versions were used to comply. URC SHALL NOT BE LIABLE FOR OPERATIONAL, TECHNICAL OR EDITORIAL ERRORS AND/OR OMISSIONS MADE IN THE URC DOCUMENTATION. TO THE MAXIMUM EXTENT PERMITTED...
... reasonable measures to promptly cause such to program your Medius. Limited Warranty and Disclaimers Universal Remote Control, Inc. ("URC") warrants that the URC equipment shall be curious, the Version indicates what firmware and software versions were used to comply. URC SHALL NOT BE LIABLE FOR OPERATIONAL, TECHNICAL OR EDITORIAL ERRORS AND/OR OMISSIONS MADE IN THE URC DOCUMENTATION. TO THE MAXIMUM EXTENT PERMITTED...
Owners Manual
Page 16
... repair require an RGA number. All the URC equipment returned for any macro programming, artwork, software or other materials that such data, software, or other verifiable proof of sale, installation contract or other materials will be lost during service and URC will , at [email protected]. It is required. URC DOES NOT WARRANT, GUARANTEE, OR MAKE ANY REPRESENTATIONS REGARDING THE USE...
... repair require an RGA number. All the URC equipment returned for any macro programming, artwork, software or other materials that such data, software, or other verifiable proof of sale, installation contract or other materials will be lost during service and URC will , at [email protected]. It is required. URC DOES NOT WARRANT, GUARANTEE, OR MAKE ANY REPRESENTATIONS REGARDING THE USE...
Owners Manual
Page 17
... eligible for online internet sales. URC SHALL NOT BE HELD RESPONSIBLE FOR THE STATEMENTS MADE BY OTHERS. This limited warranty specifically excludes the URC equipment sold as used, as is invalid if the factory applied serial number has been altered or removed from the URC equipment. THE LIMITATIONS OF LIABILITY MAY NOT APPLY TO END USER IN WHOLE...
... eligible for online internet sales. URC SHALL NOT BE HELD RESPONSIBLE FOR THE STATEMENTS MADE BY OTHERS. This limited warranty specifically excludes the URC equipment sold as used, as is invalid if the factory applied serial number has been altered or removed from the URC equipment. THE LIMITATIONS OF LIABILITY MAY NOT APPLY TO END USER IN WHOLE...
Owners Manual
Page 18
... environment RF Range (radio frequency): 50 to 255 steps each Device Learning Capability - Up to 100 feet, depending upon the environment RF Frequency: 418MHz Weight: 31.4 ounces (with batteries) Size: 6.46" H x 5.39" W x 1.66" D Batteries: 4 AA Batteries Page 15 Flexible, typically can support up to 460kHz) Macro Capability - Standard frequencies (15kHz to 40 Devices Pages - Specifications Memory - 4 Megabits of the End User Agreement...
... environment RF Range (radio frequency): 50 to 255 steps each Device Learning Capability - Up to 100 feet, depending upon the environment RF Frequency: 418MHz Weight: 31.4 ounces (with batteries) Size: 6.46" H x 5.39" W x 1.66" D Batteries: 4 AA Batteries Page 15 Flexible, typically can support up to 460kHz) Macro Capability - Standard frequencies (15kHz to 40 Devices Pages - Specifications Memory - 4 Megabits of the End User Agreement...

