

Owners Manual
Page 4
...instructions. 2. RETAIN THIS BOOKLET FOR FUTURE REFERENCE. Read owner's manual After unpacking this unit will fit into the outlet, try reversing the plug. Heat The product should be blocked or covered. Power Sources This product should be situated away from overheating, and these openings must not be operated only from battery power..., or other ). This plug will protect you if you are provided for installation, use can be blocked by the user. If the plug should never be repaired by placing the...
...instructions. 2. RETAIN THIS BOOKLET FOR FUTURE REFERENCE. Read owner's manual After unpacking this unit will fit into the outlet, try reversing the plug. Heat The product should be blocked or covered. Power Sources This product should be situated away from overheating, and these openings must not be operated only from battery power..., or other ). This plug will protect you if you are provided for installation, use can be blocked by the user. If the plug should never be repaired by placing the...
Owners Manual
Page 5
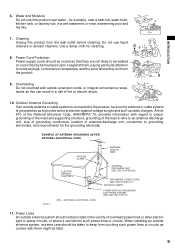
... ANTENNA GROUNDING AS PER NATIONAL ELECTRICAL CODE GROUND CLAMP ELECTRIC SERVICE EQUIPMENT S2898A NEC - for example, near a swimming pool and the like. 7. Power Lines An outside antenna or cable system is connected to provide some protection against voltage surges and built-up static charges. Use a damp cloth for the grounding electrode. extension cords, or integral convenience receptacles as contact...
... ANTENNA GROUNDING AS PER NATIONAL ELECTRICAL CODE GROUND CLAMP ELECTRIC SERVICE EQUIPMENT S2898A NEC - for example, near a swimming pool and the like. 7. Power Lines An outside antenna or cable system is connected to provide some protection against voltage surges and built-up static charges. Use a damp cloth for the grounding electrode. extension cords, or integral convenience receptacles as contact...

Owners Manual
Page 6
... or electric shock. f) When the product exhibits a distinct change in proper operating condition. 6 Refer all servicing to lightning and power-line surges. 13. Accessories Do not place this product yourself as an improper adjustment of the product should follow the manufacturer's instructions, and should be sure the service technician has used replacement parts specified by the manufacturer or have fallen into this...
... or electric shock. f) When the product exhibits a distinct change in proper operating condition. 6 Refer all servicing to lightning and power-line surges. 13. Accessories Do not place this product yourself as an improper adjustment of the product should follow the manufacturer's instructions, and should be sure the service technician has used replacement parts specified by the manufacturer or have fallen into this...
Owners Manual
Page 7
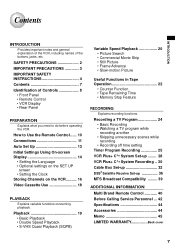
... do before operating the VCR. Recording a TV Program 24 • Basic Recording • Watching a TV program while recording another • Skipping unnecessary scenes while recording • Recording off time setting Timer Program Recording 25 VCR Plus+ C3 ® System Set-up ........ 28 VCR Plus+ C3 ® System Recording .. 30 Cable Box Set-up 32 DSS®Satellite Receive Set-up 36 MTS Broadcast Compatibility ......... 39 ADDITIONAL INFORMATION Multi Brand Remote Control 40 Before Calling Service Personnel ... 42 Specifications 44 Accessories 44...
... do before operating the VCR. Recording a TV Program 24 • Basic Recording • Watching a TV program while recording another • Skipping unnecessary scenes while recording • Recording off time setting Timer Program Recording 25 VCR Plus+ C3 ® System Set-up ........ 28 VCR Plus+ C3 ® System Recording .. 30 Cable Box Set-up 32 DSS®Satellite Receive Set-up 36 MTS Broadcast Compatibility ......... 39 ADDITIONAL INFORMATION Multi Brand Remote Control 40 Before Calling Service Personnel ... 42 Specifications 44 Accessories 44...
Owners Manual
Page 8
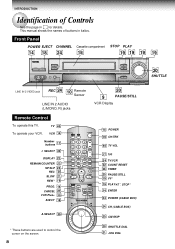
... To operate your VCR. This manual shows the names of Controls See the page in italics. Front Panel POWER EJECT CHANNEL Cassette compartment STOP PLAY 14 18 24 18 19 19 19 19 LINE IN 2 VIDEO jack REC 24 10 Remote Sensor LINE IN 2 AUDIO (L/MONO, R) jacks 20 9 PAUSE/STILL VCR Display Remote Control To operate this TV. VCR 14 Number buttons 17 I .SELECT 0 100 REMAIN/ DISPLAY COUNTER COUNT RESET TV/ VCR SP/ SLP REC TIMER SLOW PLAY/x2...
... To operate your VCR. This manual shows the names of Controls See the page in italics. Front Panel POWER EJECT CHANNEL Cassette compartment STOP PLAY 14 18 24 18 19 19 19 19 LINE IN 2 VIDEO jack REC 24 10 Remote Sensor LINE IN 2 AUDIO (L/MONO, R) jacks 20 9 PAUSE/STILL VCR Display Remote Control To operate this TV. VCR 14 Number buttons 17 I .SELECT 0 100 REMAIN/ DISPLAY COUNTER COUNT RESET TV/ VCR SP/ SLP REC TIMER SLOW PLAY/x2...
Owners Manual
Page 14
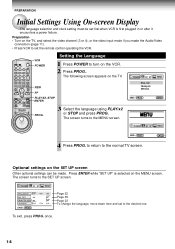
... the TV, and select the video channel (3 or 4), or the video input mode if you made . CANCEL VCR Plus+ A.SELECT ENTER CABLE BOX CH EJECT CM SKIP POWER VCR POWER Setting the Language 1 Press POWER to set the remote control operating the VCR. The screen turns to the SET UP screen. VCR TV POWER CH/TRK 123 456 TV VOL 789 I.SELECT 0 100 REMAIN/ DISPLAY COUNTER COUNT RESET TV/ VCR SP/ SLP REC TIMER SLOW PLAY/x2 PAUSE /STILL CURSOR REW...
... the TV, and select the video channel (3 or 4), or the video input mode if you made . CANCEL VCR Plus+ A.SELECT ENTER CABLE BOX CH EJECT CM SKIP POWER VCR POWER Setting the Language 1 Press POWER to set the remote control operating the VCR. The screen turns to the SET UP screen. VCR TV POWER CH/TRK 123 456 TV VOL 789 I.SELECT 0 100 REMAIN/ DISPLAY COUNTER COUNT RESET TV/ VCR SP/ SLP REC TIMER SLOW PLAY/x2 PAUSE /STILL CURSOR REW...
Owners Manual
Page 19
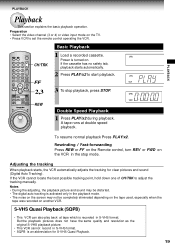
... video channel (3 or 4) or video input mode on another VCR. To resume normal playback Press PLAY/x2. CANCEL ENTER VCR Plus+ A.SELECT CABLE BOX CH EJECT CM SKIP POWER REW VCR Double Speed Playback 1 Press PLAY/x2 during playback. Rewinding / Fast-forwarding Press REW or FF on the Remote control, turn REV or FWD on . Notes • During the adjusting, the playback picture and sound may be completely eliminated depending on the tape used, especially when the tape was recorded...
... video channel (3 or 4) or video input mode on another VCR. To resume normal playback Press PLAY/x2. CANCEL ENTER VCR Plus+ A.SELECT CABLE BOX CH EJECT CM SKIP POWER REW VCR Double Speed Playback 1 Press PLAY/x2 during playback. Rewinding / Fast-forwarding Press REW or FF on the Remote control, turn REV or FWD on . Notes • During the adjusting, the playback picture and sound may be completely eliminated depending on the tape used, especially when the tape was recorded...

Owners Manual
Page 22
...; Linear time counter → Tape remaining time (R) → Clock DISPLAY PLAY/x2, STOP FF The indication above will help your playback. Tape Remaining Time To view the tape remaining time in Tape Operation These functions will also appear on the tape. • When the tape is ejected or the VCR is turned off, the display changes to the tape speed (SP or SLP) and the cassette type. 22 once to display the MENU screen. 3 Select "SET UP" using FF or...
...; Linear time counter → Tape remaining time (R) → Clock DISPLAY PLAY/x2, STOP FF The indication above will help your playback. Tape Remaining Time To view the tape remaining time in Tape Operation These functions will also appear on the tape. • When the tape is ejected or the VCR is turned off, the display changes to the tape speed (SP or SLP) and the cassette type. 22 once to display the MENU screen. 3 Select "SET UP" using FF or...

Owners Manual
Page 24
.../VCR to turn off "VCR" indicator. 2) Choose another channel using the SP tape speed. While recording, press simultaneously both REC on the VCR. To resume recording, press PAUSE/STILL again. L2: To record via the cable box, finish the cable box set the desired off automatically. VCR Notes • To cancel the recording in the VCR display, press I .SELECT 1 Load a cassette with H CHANNEL on the VCR, or CH/TRK ST VCR LS or number buttons on your connection...
.../VCR to turn off "VCR" indicator. 2) Choose another channel using the SP tape speed. While recording, press simultaneously both REC on the VCR. To resume recording, press PAUSE/STILL again. L2: To record via the cable box, finish the cable box set the desired off automatically. VCR Notes • To cancel the recording in the VCR display, press I .SELECT 1 Load a cassette with H CHANNEL on the VCR, or CH/TRK ST VCR LS or number buttons on your connection...

Owners Manual
Page 25
... cable box is not remote-controllable, choose the desired channel (1 to 125) on August 30. CANCEL VCR Plus+ A.SELECT ENTER CABLE BOX CH EJECT CM SKIP POWER Timer Programming Procedure Number buttons Example: To record cable channel 25 in the SP tape speed from the connected DSS® satellite receiver: Enter the satellite channel number (100 to 999) by number buttons, PLAY/x2 or STOP. to display the MENU screen. 10 3 Select "PROGRAM" using FF, and select the channel number 25 by pressing number buttons...
... cable box is not remote-controllable, choose the desired channel (1 to 125) on August 30. CANCEL VCR Plus+ A.SELECT ENTER CABLE BOX CH EJECT CM SKIP POWER Timer Programming Procedure Number buttons Example: To record cable channel 25 in the SP tape speed from the connected DSS® satellite receiver: Enter the satellite channel number (100 to 999) by number buttons, PLAY/x2 or STOP. to display the MENU screen. 10 3 Select "PROGRAM" using FF, and select the channel number 25 by pressing number buttons...

Owners Manual
Page 27
..., reset the clock Overlaps of the programs If two timer programs overlap, the recording start time of program 1 has priority over the recording off , and then turn the VCR on the front panel of program 2. again to cancel in step 4, and press CANCEL. Error indication The "--E--" ( Error ) indicator appears in progress. the loaded cassette has no safety tab. -- The line is not loaded. -- If a power failure occurs during timer recording mode. Program 1 (Start time) Program...
..., reset the clock Overlaps of the programs If two timer programs overlap, the recording start time of program 1 has priority over the recording off , and then turn the VCR on the front panel of program 2. again to cancel in step 4, and press CANCEL. Error indication The "--E--" ( Error ) indicator appears in progress. the loaded cassette has no safety tab. -- The line is not loaded. -- If a power failure occurs during timer recording mode. Program 1 (Start time) Program...
Owners Manual
Page 28
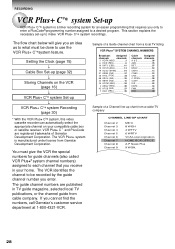
... easier programming that you an idea as to make VCR Plus+ C3® system recordings. VCR Plus+ C 3 and PlusCode are published in your compatible cable box or satellite receiver. You must be recorded by the guide channel number you cannot find the numbers, call Gemstar's customer service department at 1-800-4321-VCR. RECORDING VCR Plus+ C3® system Set-up VCR Plus+ C 3® system is manufactured under license from a cable-TV company CHANNEL LINE-UP CHART Channel 2 Channel 3 Channel 4 Channel 5 Channel 6 Channel 7 Channel 8 Channel...
... easier programming that you an idea as to make VCR Plus+ C3® system recordings. VCR Plus+ C 3 and PlusCode are published in your compatible cable box or satellite receiver. You must be recorded by the guide channel number you cannot find the numbers, call Gemstar's customer service department at 1-800-4321-VCR. RECORDING VCR Plus+ C3® system Set-up VCR Plus+ C 3® system is manufactured under license from a cable-TV company CHANNEL LINE-UP CHART Channel 2 Channel 3 Channel 4 Channel 5 Channel 6 Channel 7 Channel 8 Channel...

Owners Manual
Page 29
Preparation • Select the video channel (3 or 4) or video input mode on the TV. • If you marked on the list using PLAY/x2 or STOP, and enter the corresponding home channel number if necessary by cable companies) 7 RECORDING Guide Channel Setting VCR TV POWER CH/TRK 123 456 TV VOL 789 I.SELECT 0 100 REMAIN/ DISPLAY COUNTER COUNT RESET TV/ VCR SP/ SLP REC TIMER SLOW PLAY/x2 PAUSE /STILL CURSOR REW FF...
Preparation • Select the video channel (3 or 4) or video input mode on the TV. • If you marked on the list using PLAY/x2 or STOP, and enter the corresponding home channel number if necessary by cable companies) 7 RECORDING Guide Channel Setting VCR TV POWER CH/TRK 123 456 TV VOL 789 I.SELECT 0 100 REMAIN/ DISPLAY COUNTER COUNT RESET TV/ VCR SP/ SLP REC TIMER SLOW PLAY/x2 PAUSE /STILL CURSOR REW FF...

Owners Manual
Page 30
.... CANCEL VCR Plus+ A.SELECT ENTER CABLE BOX CH EJECT CM SKIP POWER 2 8 3,4 CANCEL 5 PROG. 1 1 Press VCR Plus+. For AUTO speed, see "Timer Program Recording" (pages 25 - 27). To make an unattended recording of TV program listing in the TV listings of Ted's teachers stays at the ranch. Example: To record a program with the VCR Plus+ C 3® system feature. To correct a mistake, press CANCEL and enter the correct number. 3 Select "MODE" using PLAY/x2 or STOP, and set the recording tape speed...
.... CANCEL VCR Plus+ A.SELECT ENTER CABLE BOX CH EJECT CM SKIP POWER 2 8 3,4 CANCEL 5 PROG. 1 1 Press VCR Plus+. For AUTO speed, see "Timer Program Recording" (pages 25 - 27). To make an unattended recording of TV program listing in the TV listings of Ted's teachers stays at the ranch. Example: To record a program with the VCR Plus+ C 3® system feature. To correct a mistake, press CANCEL and enter the correct number. 3 Select "MODE" using PLAY/x2 or STOP, and set the recording tape speed...

Owners Manual
Page 31
... VCR Plus+ C3® system timer programs Before the VCR enters the timer standby mode (TIMER indicator not lit) 1)Press PROG. Recording or playback in the timer standby mode First press both TIMER to turn it tells you want to add another program, repeat steps 1 to enter a PlusCode®programming number. 31 During the timer recording 1) Press PROG.. 2)The screen for use. • Be sure to correct by using a PLAY/x2 or STOP. to display...
... VCR Plus+ C3® system timer programs Before the VCR enters the timer standby mode (TIMER indicator not lit) 1)Press PROG. Recording or playback in the timer standby mode First press both TIMER to turn it tells you want to add another program, repeat steps 1 to enter a PlusCode®programming number. 31 During the timer recording 1) Press PROG.. 2)The screen for use. • Be sure to correct by using a PLAY/x2 or STOP. to display...

Owners Manual
Page 32
...; Keep the cable box turned on the top of the connected cable box. It is also possible to your cable box even during timer program recording or VCR Plus+ C3®system recording. You can directly control channel selecting of the VCR as shown below. The VCR sends out infrared signals to a cable box equipped with an infrared wireless remote control. Do not block the sensor window. RECORDING Cable Box Set-up The VCR can select cable channels from the cable box by the cable box...
...; Keep the cable box turned on the top of the connected cable box. It is also possible to your cable box even during timer program recording or VCR Plus+ C3®system recording. You can directly control channel selecting of the VCR as shown below. The VCR sends out infrared signals to a cable box equipped with an infrared wireless remote control. Do not block the sensor window. RECORDING Cable Box Set-up The VCR can select cable channels from the cable box by the cable box...

Owners Manual
Page 33
... 16). Box DSS FF • Cable channels will be selected by CH (CABLE BOX) on the remote control. USE no . RECORDING Preparation • Select the video channel (3 or 4) or video input mode on the TV. • Set "TV/CATV" on the CH MEMORY screen to step 5. USE OUTPUT CH COnTROL BRAnD TYPE no Off no C. Box DSS OUTPUT CH COnTROL Off 2 CH on 5 Select "OUTPUT CH" using number buttons. (Usually 3 or 4. Type B, C: the output channel number of (Example) your cable box using PLAY/x2...
... 16). Box DSS FF • Cable channels will be selected by CH (CABLE BOX) on the remote control. USE no . RECORDING Preparation • Select the video channel (3 or 4) or video input mode on the TV. • Set "TV/CATV" on the CH MEMORY screen to step 5. USE OUTPUT CH COnTROL BRAnD TYPE no Off no C. Box DSS OUTPUT CH COnTROL Off 2 CH on 5 Select "OUTPUT CH" using number buttons. (Usually 3 or 4. Type B, C: the output channel number of (Example) your cable box using PLAY/x2...

Owners Manual
Page 36
... your program setting in the timer program recording. DSS® Satellite Receiver Control This VCR needs to be controlled properly because the infrared signal fails to reach the DSS® satellite receiver, change the satellite channels according to a DSS® satellite receiver equipped with an infrared wireless remote control. Notes • If the channels cannot be connected to your DSS® satellite receiver even during timer program recording...
... your program setting in the timer program recording. DSS® Satellite Receiver Control This VCR needs to be controlled properly because the infrared signal fails to reach the DSS® satellite receiver, change the satellite channels according to a DSS® satellite receiver equipped with an infrared wireless remote control. Notes • If the channels cannot be connected to your DSS® satellite receiver even during timer program recording...
Owners Manual
Page 42
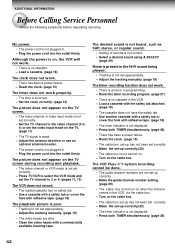
... the power cord into the outlet firmly. Use a cassette with a safety tab or cover the hole with adhesive tape. (page 18) • The timer indicator is not correct. - Plug the power cord into the outlet firmly. Adjust the tracking manually. (page 19) • The video heads are not set correctly. - Turn on the TV screen during recording and playback. • The video channel or VCR mode is not displayed. - ADDITIONAL INFORMATION Before Calling Service...
... the power cord into the outlet firmly. Use a cassette with a safety tab or cover the hole with adhesive tape. (page 18) • The timer indicator is not correct. - Plug the power cord into the outlet firmly. Adjust the tracking manually. (page 19) • The video heads are not set correctly. - Turn on the TV screen during recording and playback. • The video channel or VCR mode is not displayed. - ADDITIONAL INFORMATION Before Calling Service...
Owners Manual
Page 45
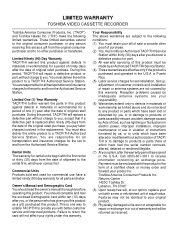
... notify an Authorized TACP/THI Service Station within ten (10) days after the date of equal value. Features may not be made by us; You should read the owner's manual thoroughly before operating this warranty. Set up, adjustment of customer controls and installation of sale or provide other purchaser or transferee. or to units which have had the serial number removed, altered, defaced or rendered...
... notify an Authorized TACP/THI Service Station within ten (10) days after the date of equal value. Features may not be made by us; You should read the owner's manual thoroughly before operating this warranty. Set up, adjustment of customer controls and installation of sale or provide other purchaser or transferee. or to units which have had the serial number removed, altered, defaced or rendered...
