
Owners Manual
Page 4
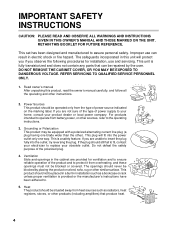
RETAIN THIS BOOKLET FOR FUTURE REFERENCE. This unit is a safety feature. DO NOT REMOVE THE CABINET COVER, OR YOU MAY BE EXPOSED TO DANGEROUS VOLTAGE. If the plug should be repaired by ...battery power, or other ). The openings should never be blocked by the user. REFER SERVICING TO QUALIFIED SERVICE PERSONNEL ONLY. 1. Ventilation Slots and openings in this product, read the owner's manual carefully, and follow all the operating and other products (including amplifiers) that can result in installation such as radiators, heat registers, stoves, or other instructions...
RETAIN THIS BOOKLET FOR FUTURE REFERENCE. This unit is a safety feature. DO NOT REMOVE THE CABINET COVER, OR YOU MAY BE EXPOSED TO DANGEROUS VOLTAGE. If the plug should be repaired by ...battery power, or other ). The openings should never be blocked by the user. REFER SERVICING TO QUALIFIED SERVICE PERSONNEL ONLY. 1. Ventilation Slots and openings in this product, read the owner's manual carefully, and follow all the operating and other products (including amplifiers) that can result in installation such as radiators, heat registers, stoves, or other instructions...
Owners Manual
Page 5
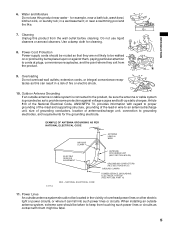
... vicinity of overhead power lines or other electric light or power circuits, or where it can result in a wet basement; Overloading Do not overload wall outlets; in a risk of antenna-discharge unit, connection to the product, be walked on or pinched by items placed upon or against voltage surges and built-up static charges. Use a damp cloth for...
... vicinity of overhead power lines or other electric light or power circuits, or where it can result in a wet basement; Overloading Do not overload wall outlets; in a risk of antenna-discharge unit, connection to the product, be walked on or pinched by items placed upon or against voltage surges and built-up static charges. Use a damp cloth for...
Owners Manual
Page 7
... Connections 11 Auto Set Up 14 Initial Settings Using On-screen Display 15 • Setting the Language • Optional settings on the SET UP screen • Setting the Clock Storing Channels on the VCR .......... 17 Video Cassette Use 19 PLAYBACK Explains variable functions concerning playback. How to do before operating the VCR. Recording a TV Program 25 • Watching a TV program while recording another • Recording off time setting Timer Program Recording 26 VCR Plus+ C3 ® system Set-up ......... 29 VCR Plus+ C3 ® system Recording .. 31 Cable Box Set-up...
... Connections 11 Auto Set Up 14 Initial Settings Using On-screen Display 15 • Setting the Language • Optional settings on the SET UP screen • Setting the Clock Storing Channels on the VCR .......... 17 Video Cassette Use 19 PLAYBACK Explains variable functions concerning playback. How to do before operating the VCR. Recording a TV Program 25 • Watching a TV program while recording another • Recording off time setting Timer Program Recording 26 VCR Plus+ C3 ® system Set-up ......... 29 VCR Plus+ C3 ® system Recording .. 31 Cable Box Set-up...
Owners Manual
Page 8
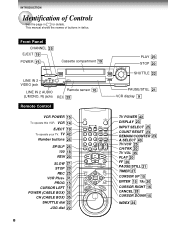
... 16 CANCEL 28 CURSOR DOWN 15 INDEX 24 8 This manual shows the names of Controls See the page in italics. Front Panel CHANNEL 25 EJECT 19 POWER 15 Cassette compartment 19 POWER c EJECT CHANNEL LINE IN 2 VIDEO jack LINE IN 2 VIDEO L-MONO-AUDIO-R LINE IN 2 AUDIO (L/MONO, R) jacks REC Remote sensor 10 REC 25 PLAY STOP REV ( PAUSE/STILL PLAY 20 STOP 20 FWD ) SHUTTLE 22 PAUSE/STILL 21 VCR display 9 Remote Control VCR POWER 15 To operate this VCR.
... 16 CANCEL 28 CURSOR DOWN 15 INDEX 24 8 This manual shows the names of Controls See the page in italics. Front Panel CHANNEL 25 EJECT 19 POWER 15 Cassette compartment 19 POWER c EJECT CHANNEL LINE IN 2 VIDEO jack LINE IN 2 VIDEO L-MONO-AUDIO-R LINE IN 2 AUDIO (L/MONO, R) jacks REC Remote sensor 10 REC 25 PLAY STOP REV ( PAUSE/STILL PLAY 20 STOP 20 FWD ) SHUTTLE 22 PAUSE/STILL 21 VCR display 9 Remote Control VCR POWER 15 To operate this VCR.
Owners Manual
Page 16
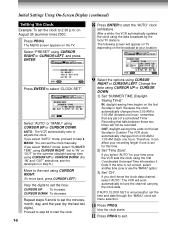
... data using CURSOR RIGHT. Because the clock automatically changes from 2:00 AM to step 8. If you select "AUTO" mode, proceed to 1:00 AM (back one hour), remember that any part of a scheduled Timer Recording that falls between these two times will scan automatically to exit. If you don't know the clock data channel, select "AUTO". PROGRAM SET UP PRESET CL OCK SE T SUMMER T I ME T I ME DATE YEAR...
... data using CURSOR RIGHT. Because the clock automatically changes from 2:00 AM to step 8. If you select "AUTO" mode, proceed to 1:00 AM (back one hour), remember that any part of a scheduled Timer Recording that falls between these two times will scan automatically to exit. If you don't know the clock data channel, select "AUTO". PROGRAM SET UP PRESET CL OCK SE T SUMMER T I ME T I ME DATE YEAR...

Owners Manual
Page 17
.... CATV: To store channels received via the antenna. PREPARATION Storing Channels on the TV, and select the video channel (3 or 4), or the video input mode if you made the Audio/Video connection (page 11). • Press INPUT SELECT so that the channel number will appear if "L1" or "L2" is displayed in the VCR display. 123 456 TV/VCR 7 8 9 +8 0 -9 ( - ) a L J PROG - + REV FWD Incoming Antenna/Cable (CATV) Signals 1 Press...
.... CATV: To store channels received via the antenna. PREPARATION Storing Channels on the TV, and select the video channel (3 or 4), or the video input mode if you made the Audio/Video connection (page 11). • Press INPUT SELECT so that the channel number will appear if "L1" or "L2" is displayed in the VCR display. 123 456 TV/VCR 7 8 9 +8 0 -9 ( - ) a L J PROG - + REV FWD Incoming Antenna/Cable (CATV) Signals 1 Press...
Owners Manual
Page 20
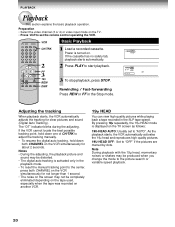
... tab, playback starts automatically. PLAY/x2 2 2 Press PLAY to adjust the tracking manually. • To resume the digital auto tracking, hold down both CHANNEL on the VCR simultaneously for not longer than 1 second. • The noise on the screen may be completely eliminated depending on the tape used, especially when the tape was recorded on the TV screen as follows: 19U-HEAD AUTO: Usually set the remote control operating the VCR. If the VCR cannot...
... tab, playback starts automatically. PLAY/x2 2 2 Press PLAY to adjust the tracking manually. • To resume the digital auto tracking, hold down both CHANNEL on the VCR simultaneously for not longer than 1 second. • The noise on the screen may be completely eliminated depending on the tape used, especially when the tape was recorded on the TV screen as follows: 19U-HEAD AUTO: Usually set the remote control operating the VCR. If the VCR cannot...

Owners Manual
Page 23
... the tape length beforehand. 1 Turn on the VCR and load a cassette. 2 Press PROG to clock. • If the tape rewinds back over "0H00M00S", "-" appears in S-VHS format. * SQPB is ejected. But the playback picture does not have the same quality and resolution as the original S-VHS playback picture. • This VCR cannot record in the VCR display. • The displayed time of the tape. Notes • The linear time counter does not work...
... the tape length beforehand. 1 Turn on the VCR and load a cassette. 2 Press PROG to clock. • If the tape rewinds back over "0H00M00S", "-" appears in S-VHS format. * SQPB is ejected. But the playback picture does not have the same quality and resolution as the original S-VHS playback picture. • This VCR cannot record in the VCR display. • The displayed time of the tape. Notes • The linear time counter does not work...

Owners Manual
Page 25
... recording tape speed. If you press REC, each half-hour up (pages 33 - 36) and turn off automatically. SLP VCR REC Recording starts. RECORDING Recording a TV Program This section explains the basic recording operation. RECORDING Basic Recording 123 456 TV/VCR 7 8 9 +8 0 -9 ( - ) a L J PROG - + REV FWD INPUT SELECT 2 3 4 6 5 1 Load a cassette with less picture and sound quality than using the channel selector on the remote control. To resume recording, press PAUSE/STILL again. SLP VCR CH 3 Select a channel to stop mode...
... recording tape speed. If you press REC, each half-hour up (pages 33 - 36) and turn off automatically. SLP VCR REC Recording starts. RECORDING Recording a TV Program This section explains the basic recording operation. RECORDING Basic Recording 123 456 TV/VCR 7 8 9 +8 0 -9 ( - ) a L J PROG - + REV FWD INPUT SELECT 2 3 4 6 5 1 Load a cassette with less picture and sound quality than using the channel selector on the remote control. To resume recording, press PAUSE/STILL again. SLP VCR CH 3 Select a channel to stop mode...

Owners Manual
Page 29
..., this video cassette recorder can automatically select the appropriate channel on your home. RECORDING RECORDING VCR Plus+ C3 ® system Set-up VCR Plus+ C3 ® system is manufactured under license from a cable-TV company CHANNEL LINE-UP CHART Channel 2 Channel 3 Channel 4 Channel 5 Channel 6 Channel 7 Channel 8 Channel 9 ME/U 8 WISH 4 WTTV 6 WRTV VCA/Local origination HOME BOX OFFICE A.P News Plus 9 WGN. 29 You must be recorded by the guide channel number you cannot find the numbers, call Gemstar's customer service department at...
..., this video cassette recorder can automatically select the appropriate channel on your home. RECORDING RECORDING VCR Plus+ C3 ® system Set-up VCR Plus+ C3 ® system is manufactured under license from a cable-TV company CHANNEL LINE-UP CHART Channel 2 Channel 3 Channel 4 Channel 5 Channel 6 Channel 7 Channel 8 Channel 9 ME/U 8 WISH 4 WTTV 6 WRTV VCA/Local origination HOME BOX OFFICE A.P News Plus 9 WGN. 29 You must be recorded by the guide channel number you cannot find the numbers, call Gemstar's customer service department at...

Owners Manual
Page 30
... the cable box set -up for the channel. • The VCR Plus+ C3 ® system feature does not work on programs from a connected DSS® satellite receiver. 30 7 Enter channel numbers on the channel line-up chart supplied by using CURSOR UP or CURSOR DOWN, and press ENTER. (the case of the guide channel numbers. VCR Plus+ C3 ® System Set-up (Continued) Preparation • Select the video channel (3 or 4) or video input mode on the list using...
... the cable box set -up for the channel. • The VCR Plus+ C3 ® system feature does not work on programs from a connected DSS® satellite receiver. 30 7 Enter channel numbers on the channel line-up chart supplied by using CURSOR UP or CURSOR DOWN, and press ENTER. (the case of the guide channel numbers. VCR Plus+ C3 ® System Set-up (Continued) Preparation • Select the video channel (3 or 4) or video input mode on the list using...

Owners Manual
Page 31
... the correct number. 3 Select "MODE" using CURSOR UP or CURSOR DOWN, and set -up , you can easily program a recording simply by entering the PlusCode® programming number. PROGRAM SET UP PRESET VCR PLUS + PLUSCODE 36295- ONCE: To record once. WEEKLY: To record programs on the cable box. For AUTO speed, see "Timer Program Recording" (pages 26 - 28). For cable box users: • Finish the cable box set the recording tape speed. To make an unattended recording of newspapers, TV guide magazine, etc. MODE OnCE MO...
... the correct number. 3 Select "MODE" using CURSOR UP or CURSOR DOWN, and set -up , you can easily program a recording simply by entering the PlusCode® programming number. PROGRAM SET UP PRESET VCR PLUS + PLUSCODE 36295- ONCE: To record once. WEEKLY: To record programs on the cable box. For AUTO speed, see "Timer Program Recording" (pages 26 - 28). For cable box users: • Finish the cable box set the recording tape speed. To make an unattended recording of newspapers, TV guide magazine, etc. MODE OnCE MO...

Owners Manual
Page 32
... release the timer standby mode, and then press VCR POWER to exit. Error indications If "FULL / CANCEL PROG?" If an incorrect PlusCode® programming number is not remotecontrollable, select the recording channel on the screen. VCR Plus+ C3 ® System Recording (continued) 5 Press ENTER. The program setting is now memorized. • If your cable box is entered, "ERROR CODE ENTERED" appears on the cable box beforehand. PROGRAM SET UP PRESET CH DATE On OFF...
... release the timer standby mode, and then press VCR POWER to exit. Error indications If "FULL / CANCEL PROG?" If an incorrect PlusCode® programming number is not remotecontrollable, select the recording channel on the screen. VCR Plus+ C3 ® System Recording (continued) 5 Press ENTER. The program setting is now memorized. • If your cable box is entered, "ERROR CODE ENTERED" appears on the cable box beforehand. PROGRAM SET UP PRESET CH DATE On OFF...

Owners Manual
Page 33
... to your program setting in the timer program recording or VCR Plus+ C3 ® system recording. Cable Box Control This VCR needs to be controlled properly because the infrared signal fails to reach the cable box, change the cable channels according to a cable box equipped with an infrared wireless remote control. Then they bounce off walls and other objects in the timer program recording or VCR Plus+ C3 ® system recording. You can receive the signal. • Keep the cable box turned on...
... to your program setting in the timer program recording or VCR Plus+ C3 ® system recording. Cable Box Control This VCR needs to be controlled properly because the infrared signal fails to reach the cable box, change the cable channels according to a cable box equipped with an infrared wireless remote control. Then they bounce off walls and other objects in the timer program recording or VCR Plus+ C3 ® system recording. You can receive the signal. • Keep the cable box turned on...

Owners Manual
Page 34
... output channel number of (Example) your cable box is NON remotecontrollable. • Cable channels will be selected by CH (CABLE BOX) on the remote control. The VCR can change the cable channel to the desired one when timer recording or VCR Plus+ C3 ® system recording starts. → Go to display the MENU screen. PROGRAM SET UP PRESET USE nO C. to step 7. OFF: if your connection type. Check the rear of the cable box. ON: if your cable box using PROGRAM SET UP PRESET USE...
... output channel number of (Example) your cable box is NON remotecontrollable. • Cable channels will be selected by CH (CABLE BOX) on the remote control. The VCR can change the cable channel to the desired one when timer recording or VCR Plus+ C3 ® system recording starts. → Go to display the MENU screen. PROGRAM SET UP PRESET USE nO C. to step 7. OFF: if your connection type. Check the rear of the cable box. ON: if your cable box using PROGRAM SET UP PRESET USE...
Owners Manual
Page 35
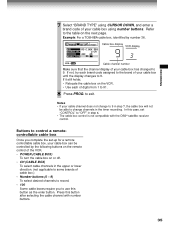
... timer recording. Press this button as the enter button. In this case, set -up for a remote controllable cable box, your cable box can be able to change to 9 in step 7, the cable box will not be controlled by number 36. PROGRAM SET UP PRESET USE nO C. Buttons to control a remotecontrollable cable box Once you to use this button after selecting the cable channel with the DSS® satellite receiver control. RECORDING 7 Select "BRAND TYPE" using CURSOR DOWN, and enter a brand code of your cable box...
... timer recording. Press this button as the enter button. In this case, set -up for a remote controllable cable box, your cable box can be able to change to 9 in step 7, the cable box will not be controlled by number 36. PROGRAM SET UP PRESET USE nO C. Buttons to control a remotecontrollable cable box Once you to use this button after selecting the cable channel with the DSS® satellite receiver control. RECORDING 7 Select "BRAND TYPE" using CURSOR DOWN, and enter a brand code of your cable box...

Owners Manual
Page 38
... video channel (3 or 4) or video input mode on the remote control. On 1 EnD: PROG 38 CURSOR DOWN CH 4 (CABLE BOX) Select "DSS" using CURSOR UP or CURSOR DOWN, and press ENTER. BOX DSS EnD: PROG PROGRAM SET UP PRESET USE nO C. The VCR can change the satellite channel to the desired one when timer recording starts. → Go to your connection. (Example) Type A: the output channel number of the DSS® satellite receiver.) PROGRAM SET...
... video channel (3 or 4) or video input mode on the remote control. On 1 EnD: PROG 38 CURSOR DOWN CH 4 (CABLE BOX) Select "DSS" using CURSOR UP or CURSOR DOWN, and press ENTER. BOX DSS EnD: PROG PROGRAM SET UP PRESET USE nO C. The VCR can change the satellite channel to the desired one when timer recording starts. → Go to your connection. (Example) Type A: the output channel number of the DSS® satellite receiver.) PROGRAM SET...

Owners Manual
Page 41
... program such as below. • Turn on the connected FM tuner and tune to the station for the simulcast program. To the FM antenna terminal Broadcast or incoming cable AUDIO OUT AUDIO IN LINE IN 1 AUDIO AUDIO OUT RECORDING 123 456 TV/VCR 7 8 9 +8 0 -9 ( - ) a L J PROG - + REV FWD 4 3 6 5 1 2 Simulcast Recording 1 On the SET UP screen (page 15), select "SIMULCAST" using CHANNEL on the VCR or CH/TRK on the remote control. PROGRAM SET UP PRESET TAPE...
... program such as below. • Turn on the connected FM tuner and tune to the station for the simulcast program. To the FM antenna terminal Broadcast or incoming cable AUDIO OUT AUDIO IN LINE IN 1 AUDIO AUDIO OUT RECORDING 123 456 TV/VCR 7 8 9 +8 0 -9 ( - ) a L J PROG - + REV FWD 4 3 6 5 1 2 Simulcast Recording 1 On the SET UP screen (page 15), select "SIMULCAST" using CHANNEL on the VCR or CH/TRK on the remote control. PROGRAM SET UP PRESET TAPE...

Owners Manual
Page 44
... both TIMER simultaneously. (page 32) 44 Make the guide channel number setting. (page 29) • The cable box is not turned on the TV screen during recording and playback. • The video channel or VCR mode is incorrect. - The picture does not appear on when the channel comes in the Hi-Fi sound being played. • Tracking is present in the VCR via the cable box. - Adjust the tracking manually. (page 20) • The video heads are not set up...
... both TIMER simultaneously. (page 32) 44 Make the guide channel number setting. (page 29) • The cable box is not turned on the TV screen during recording and playback. • The video channel or VCR mode is incorrect. - The picture does not appear on when the channel comes in the Hi-Fi sound being played. • Tracking is present in the VCR via the cable box. - Adjust the tracking manually. (page 20) • The video heads are not set up...
Owners Manual
Page 47
...TOSHIBA VIDEO CASSETTE RECORDER Toshiba America Consumer Products, Inc. ("TACP") and Toshiba Hawaii Inc. ("THI") make the following conditions: (1) You must notify an Authorized TACP/THI Service Station within ten (10) days after the warranty period has expired in the U.S.A. You must also deliver the entire product to and from the Authorized Service...and operated in the U.S.A or Puerto Rico. (5) Labor service charges for repair or exchange in the form of original retail purchase. Set up, adjustment of customer controls and installation of which have had the serial number removed, ...
...TOSHIBA VIDEO CASSETTE RECORDER Toshiba America Consumer Products, Inc. ("TACP") and Toshiba Hawaii Inc. ("THI") make the following conditions: (1) You must notify an Authorized TACP/THI Service Station within ten (10) days after the warranty period has expired in the U.S.A. You must also deliver the entire product to and from the Authorized Service...and operated in the U.S.A or Puerto Rico. (5) Labor service charges for repair or exchange in the form of original retail purchase. Set up, adjustment of customer controls and installation of which have had the serial number removed, ...
