
Owners Manual
Page 4
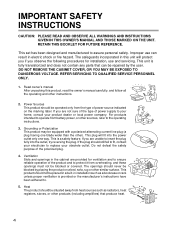
... to the operating instructions. 3. Read owner's manual After unpacking this unit will fit into the outlet, try reversing the plug. Grounding or Polarization This product may be situated away from battery power, or other instructions. 2. Heat The product should never be repaired by placing the product on the marking label. REFER SERVICING TO QUALIFIED SERVICE PERSONNEL ONLY. 1. This unit is a safety feature. This...
... to the operating instructions. 3. Read owner's manual After unpacking this unit will fit into the outlet, try reversing the plug. Grounding or Polarization This product may be situated away from battery power, or other instructions. 2. Heat The product should never be repaired by placing the product on the marking label. REFER SERVICING TO QUALIFIED SERVICE PERSONNEL ONLY. 1. This unit is a safety feature. This...
Owners Manual
Page 5
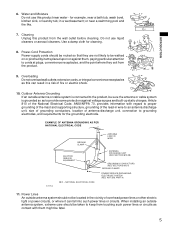
... vicinity of overhead power lines or other electric light or power circuits, or where it can result in a wet basement; Power Lines An outside antenna or cable system is grounded so as to grounding electrodes, and requirements for cleaning. 8. Article 810 of antenna-discharge unit, connection to provide some protection against voltage surges and built-up static charges. EXAMPLE OF ANTENNA...
... vicinity of overhead power lines or other electric light or power circuits, or where it can result in a wet basement; Power Lines An outside antenna or cable system is grounded so as to grounding electrodes, and requirements for cleaning. 8. Article 810 of antenna-discharge unit, connection to provide some protection against voltage surges and built-up static charges. EXAMPLE OF ANTENNA...

Owners Manual
Page 6
... and power-line surges. 13. Safety Check Upon completion of other hazards. A product and cart combination should use attachments not recommended by the product manufacturer as they may result in proper operating condition. 6 d) If the product does not operate normally by the operating instructions as the original part. Replacement Parts When replacement parts are covered by following conditions: a) When the power-supply cord or...
... and power-line surges. 13. Safety Check Upon completion of other hazards. A product and cart combination should use attachments not recommended by the product manufacturer as they may result in proper operating condition. 6 d) If the product does not operate normally by the operating instructions as the original part. Replacement Parts When replacement parts are covered by following conditions: a) When the power-supply cord or...
Owners Manual
Page 7
...off time setting Timer Program Recording 27 VCR Plus+® system Set-up 30 VCR Plus+® system Recording ........ 32 MTS Broadcast Compatibility .......... 34 Simulcast Recording 35 ADDITIONAL INFORMATION Multi Brand Remote Control 36 Before Calling Service Personnel ... 38 Specifications 40 Accessories 40 LIMITED WARRANTY 41 7 Playback 21 • 19µ HEAD Variable Speed Playback 22 • Picture Search • Still Picture • Slow-motion Picture • Frame Advance • Double Speed Playback • Jog Dial Operation • Shuttle Dial Operation Useful...
...off time setting Timer Program Recording 27 VCR Plus+® system Set-up 30 VCR Plus+® system Recording ........ 32 MTS Broadcast Compatibility .......... 34 Simulcast Recording 35 ADDITIONAL INFORMATION Multi Brand Remote Control 36 Before Calling Service Personnel ... 38 Specifications 40 Accessories 40 LIMITED WARRANTY 41 7 Playback 21 • 19µ HEAD Variable Speed Playback 22 • Picture Search • Still Picture • Slow-motion Picture • Frame Advance • Double Speed Playback • Jog Dial Operation • Shuttle Dial Operation Useful...

Owners Manual
Page 8
Front Panel CHANNEL 26 EJECT 20 POWER 15 Cassette compartment 20 POWER c EJECT CHANNEL LINE IN 2 VIDEO jack LINE IN 2 VIDEO L-MONO-AUDIO-R LINE IN 2 AUDIO (L/MONO, R) jacks REC Remote sensor 10 REC 26 PLAY STOP REV ( PAUSE/STILL PLAY 21 STOP 21 FWD ) SHUTTLE 23 PAUSE/STILL 22 VCR display 9 Remote Control VCR POWER 15 To operate this VCR. TV 36 Number buttons 26 SP/SLP 26 100 18 REW 21 SLOW 22 STOP 21 REC 26 VCR Plus+ 32 PROG 15...
Front Panel CHANNEL 26 EJECT 20 POWER 15 Cassette compartment 20 POWER c EJECT CHANNEL LINE IN 2 VIDEO jack LINE IN 2 VIDEO L-MONO-AUDIO-R LINE IN 2 AUDIO (L/MONO, R) jacks REC Remote sensor 10 REC 26 PLAY STOP REV ( PAUSE/STILL PLAY 21 STOP 21 FWD ) SHUTTLE 23 PAUSE/STILL 22 VCR display 9 Remote Control VCR POWER 15 To operate this VCR. TV 36 Number buttons 26 SP/SLP 26 100 18 REW 21 SLOW 22 STOP 21 REC 26 VCR Plus+ 32 PROG 15...
Owners Manual
Page 14
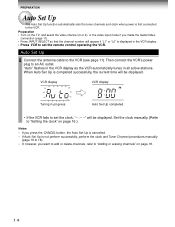
... clock and Tuner Channel procedures manually (page 16 to 18). • If, however, you made the Audio/Video connection (page 11). • Press INPUT SELECT so that the channel number will appear if "L1" or "L2" is displayed in the VCR display. • Press VCR to set the remote control operating the VCR. Auto Set Up 1 Connect the antenna cable to an AC outlet. "Auto" flashes in the VCR display as the VCR automatically tunes in progress. Auto Set...
... clock and Tuner Channel procedures manually (page 16 to 18). • If, however, you made the Audio/Video connection (page 11). • Press INPUT SELECT so that the channel number will appear if "L1" or "L2" is displayed in the VCR display. • Press VCR to set the remote control operating the VCR. Auto Set Up 1 Connect the antenna cable to an AC outlet. "Auto" flashes in the VCR display as the VCR automatically tunes in progress. Auto Set...
Owners Manual
Page 15
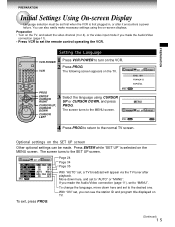
... 3 Select the language using the on the SET UP screen Other optional settings can also easily make necessary settings using CURSOR UP or CURSOR DOWN, and press CURSOR UP, CURSOR DOWN PROG. With "ON" set, you made the Audio/Video connection (page 11). • Press VCR to set the remote control operating the VCR. 123 456 TV/VCR 7 8 9 +8 0 -9 ( - ) a L J PROG - + REV FWD Setting the Language 1 VCR POWER Press VCR POWER to turn on TV. To...
... 3 Select the language using the on the SET UP screen Other optional settings can also easily make necessary settings using CURSOR UP or CURSOR DOWN, and press CURSOR UP, CURSOR DOWN PROG. With "ON" set, you made the Audio/Video connection (page 11). • Press VCR to set the remote control operating the VCR. 123 456 TV/VCR 7 8 9 +8 0 -9 ( - ) a L J PROG - + REV FWD Setting the Language 1 VCR POWER Press VCR POWER to turn on TV. To...
Owners Manual
Page 16
... clock automatically changes from 2:00 AM to step 8. Initial Settings Using On-Screen Display (continued) Setting the Clock Example: To set menu selection. 10 Press PROG. If you select "AUTO" mode, proceed to 1:00 AM (back one hour), remember that any part of a scheduled Timer Recording that falls between these two times will not be recorded. If the time is unsuccessful, set the time and date through the "MANU" clock set the clock to exit. PROGRAM SET...
... clock automatically changes from 2:00 AM to step 8. Initial Settings Using On-Screen Display (continued) Setting the Clock Example: To set menu selection. 10 Press PROG. If you select "AUTO" mode, proceed to 1:00 AM (back one hour), remember that any part of a scheduled Timer Recording that falls between these two times will not be recorded. If the time is unsuccessful, set the time and date through the "MANU" clock set the clock to exit. PROGRAM SET...

Owners Manual
Page 17
Preparation • Turn on the VCR This section is required if you can select a desired channel using CH. PREPARATION Storing Channels on the TV, and select the video channel (3 or 4), or the video input mode if you made the Audio/Video connection (page 11). • Press INPUT SELECT so that the channel number will appear if "L1" or "L2" is displayed in the VCR display. 123 456 TV/VCR 7 8 9 +8 0 -9 ( - ) a L J PROG - + REV...
Preparation • Turn on the VCR This section is required if you can select a desired channel using CH. PREPARATION Storing Channels on the TV, and select the video channel (3 or 4), or the video input mode if you made the Audio/Video connection (page 11). • Press INPUT SELECT so that the channel number will appear if "L1" or "L2" is displayed in the VCR display. 123 456 TV/VCR 7 8 9 +8 0 -9 ( - ) a L J PROG - + REV...

Owners Manual
Page 18
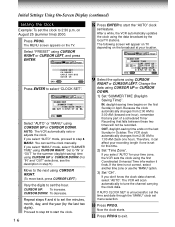
... to display the MENU screen. 2) Select "PRESET" using CURSOR RIGHT or CURSOR LEFT, and press ENTER. 3) Select "CABLE BOX/DSS" using CURSOR UP or CURSOR DOWN, and press ENTER. For CATV channels, refer to the chart below . Number buttons To enter digits of 1 to 125 using CURSOR UP or CURSOR DOWN. Cable Box/DSS Output Channel Setting To set to be scanned automatically because of the cable box.) or line input mode "L1" using...
... to display the MENU screen. 2) Select "PRESET" using CURSOR RIGHT or CURSOR LEFT, and press ENTER. 3) Select "CABLE BOX/DSS" using CURSOR UP or CURSOR DOWN, and press ENTER. For CATV channels, refer to the chart below . Number buttons To enter digits of 1 to 125 using CURSOR UP or CURSOR DOWN. Cable Box/DSS Output Channel Setting To set to be scanned automatically because of the cable box.) or line input mode "L1" using...
Owners Manual
Page 21
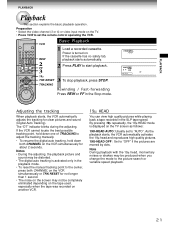
...; repeatedly, the 19µ HEAD mode is displayed on the TV. • Press VCR to set to the picture search or variable speed playback. 21 Preparation • Select the video channel (3 or 4) or video input mode on the TV screen as follows: 19U-HEAD AUTO: Usually set the remote control operating the VCR. 123 456 TV/VCR 7 8 9 +8 0 -9 ( - ) a L J PROG - + REV FWD VCR REW 2 FF 3 19µ TRK RESET TRACKING Basic Playback 1 Load a recorded cassette. POWER POWER S P VCR DT Adjusting the tracking When playback starts, the VCR automatically adjusts the tracking...
...; repeatedly, the 19µ HEAD mode is displayed on the TV. • Press VCR to set to the picture search or variable speed playback. 21 Preparation • Select the video channel (3 or 4) or video input mode on the TV screen as follows: 19U-HEAD AUTO: Usually set the remote control operating the VCR. 123 456 TV/VCR 7 8 9 +8 0 -9 ( - ) a L J PROG - + REV FWD VCR REW 2 FF 3 19µ TRK RESET TRACKING Basic Playback 1 Load a recorded cassette. POWER POWER S P VCR DT Adjusting the tracking When playback starts, the VCR automatically adjusts the tracking...

Owners Manual
Page 24
... Tape Remaining Time To view the tape remaining time in the VCR display, select the tape length beforehand. 1 Turn on the VCR and load a cassette. 2 Press PROG to "0H00M00S" when a cassette is recorded in S-VHS format. T120: for a T-120 tape or shorter T160: for a T-140 or T-160 tape T180: for S-VHS Quasi Playback. 123 456 TV/VCR 7 8 9 +8 0 -9 ( - ) a L J PROG - + REV FWD Counter Function You can also play back a tape which is ejected. COUNT RESET REMAIN...
... Tape Remaining Time To view the tape remaining time in the VCR display, select the tape length beforehand. 1 Turn on the VCR and load a cassette. 2 Press PROG to "0H00M00S" when a cassette is recorded in S-VHS format. T120: for a T-120 tape or shorter T160: for a T-140 or T-160 tape T180: for S-VHS Quasi Playback. 123 456 TV/VCR 7 8 9 +8 0 -9 ( - ) a L J PROG - + REV FWD Counter Function You can also play back a tape which is ejected. COUNT RESET REMAIN...

Owners Manual
Page 26
... time you record cable channels via the cable box, make the output channel number of the cable box or "L1" appear, depending on your connection. (See pages 11 - 13.) To record from other connected equipment In step 3, press INPUT SELECT to set , this function will not activate. If you see "L1" or "L2" in progress, press STOP. • If the VCR clock is turned off "VCR" indicator. 2) Choose another channel using the SP tape speed...
... time you record cable channels via the cable box, make the output channel number of the cable box or "L1" appear, depending on your connection. (See pages 11 - 13.) To record from other connected equipment In step 3, press INPUT SELECT to set , this function will not activate. If you see "L1" or "L2" in progress, press STOP. • If the VCR clock is turned off "VCR" indicator. 2) Choose another channel using the SP tape speed...

Owners Manual
Page 27
... you record cable channels via the cable box, keep the cable box turned on and select a channel to record on the cable box. The date changes as follows: → 8/25 → 8/26 9/24 → WKLYSU → ... Today is set the recording date using CURSOR UP or CURSOR DOWN. EnD: PROG If you to record up to 6 different programs over one month. RECORDING Timer Program Recording The programmable timer allows you use the cable box, enter the output channel number of the cable box with...
... you record cable channels via the cable box, keep the cable box turned on and select a channel to record on the cable box. The date changes as follows: → 8/25 → 8/26 9/24 → WKLYSU → ... Today is set the recording date using CURSOR UP or CURSOR DOWN. EnD: PROG If you to record up to 6 different programs over one month. RECORDING Timer Program Recording The programmable timer allows you use the cable box, enter the output channel number of the cable box with...

Owners Manual
Page 29
.... If a power failure occurs during the timer program recording (including VCR Plus+® system recording (page 32)) • When a power failure has occurred, "- -:- -" appears in the timer standby mode) Press PROG. Reset the clock. the loaded cassette has no timer program is then cleared. 3) Press both TIMER to release the timer standby mode, and then press VCR POWER to turn it off time of the current time display blinks. no safety tab. -- The screen for use. •...
.... If a power failure occurs during the timer program recording (including VCR Plus+® system recording (page 32)) • When a power failure has occurred, "- -:- -" appears in the timer standby mode) Press PROG. Reset the clock. the loaded cassette has no timer program is then cleared. 3) Press both TIMER to release the timer standby mode, and then press VCR POWER to turn it off time of the current time display blinks. no safety tab. -- The screen for use. •...
Owners Manual
Page 30
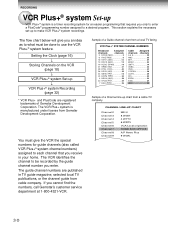
... VCR Plus+ system is a timer recording system for guide channels (also called VCR Plus+® system channel numbers) assigned to each channel that requires you cannot find the numbers, call Gemstar's customer service department at 1-800-4321-VCR. The VCR identifies the channel to be done to a desired program. The guide channel numbers are registered trademarks of a Channel line-up chart from cable company. Sample of a Guide channel chart from a local TV listing VCR Plus+® SYSTEM CHANNEL NUMBERS Broadcast Assigned channels channels...
... VCR Plus+ system is a timer recording system for guide channels (also called VCR Plus+® system channel numbers) assigned to each channel that requires you cannot find the numbers, call Gemstar's customer service department at 1-800-4321-VCR. The VCR identifies the channel to be done to a desired program. The guide channel numbers are registered trademarks of a Channel line-up chart from cable company. Sample of a Guide channel chart from a local TV listing VCR Plus+® SYSTEM CHANNEL NUMBERS Broadcast Assigned channels channels...

Owners Manual
Page 33
... timer standby mode. Check the programmed data. 3) Press PROG to clear the number and enter correct one existing program on the screen. The program setting is entered, "ERROR CODE ENTERED" appears on the screen by using CURSOR UP or CURSOR DOWN. 2) Correct the data, or clear out the line by pressing CANCEL and then press VCR Plus+ to correct by pressing VCR POWER. 2) Press PROG to display the MENU screen...
... timer standby mode. Check the programmed data. 3) Press PROG to clear the number and enter correct one existing program on the screen. The program setting is entered, "ERROR CODE ENTERED" appears on the screen by using CURSOR UP or CURSOR DOWN. 2) Correct the data, or clear out the line by pressing CANCEL and then press VCR Plus+ to correct by pressing VCR POWER. 2) Press PROG to display the MENU screen...

Owners Manual
Page 35
... recording tape speed using CURSOR LEFT or CURSOR RIGHT. If you use a cable box, select a desired channel on the remote control. RECORDING Simulcast Recording When TV program such as below. • Turn on the connected FM tuner and tune to the station for the simulcast program. To the FM antenna terminal Broadcast or incoming cable AUDIO OUT AUDIO IN LINE IN 1 AUDIO AUDIO OUT RECORDING 123 456 TV/VCR 7 8 9 +8 0 -9 ( - ) a L J PROG - + REV FWD 4 3 6 5 1 2 Simulcast Recording 1 On the SET...
... recording tape speed using CURSOR LEFT or CURSOR RIGHT. If you use a cable box, select a desired channel on the remote control. RECORDING Simulcast Recording When TV program such as below. • Turn on the connected FM tuner and tune to the station for the simulcast program. To the FM antenna terminal Broadcast or incoming cable AUDIO OUT AUDIO IN LINE IN 1 AUDIO AUDIO OUT RECORDING 123 456 TV/VCR 7 8 9 +8 0 -9 ( - ) a L J PROG - + REV FWD 4 3 6 5 1 2 Simulcast Recording 1 On the SET...
Owners Manual
Page 38
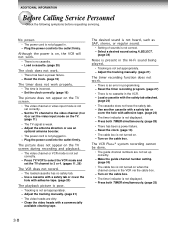
... sound. • Setting of sounds is not displayed. - Adjust the tracking manually. (page 21) The timer recording function does not work . • There is no cassette. - Turn on the TV. (page 11) • The TV signal is incorrect. - Turn on the cable box. • The timer indicator is not correct. - Load a cassette with a commercially available cleaning tape. Although the power is on the TV screen. • The video channel or video input mode is an error in . - Adjust the tracking manually...
... sound. • Setting of sounds is not displayed. - Adjust the tracking manually. (page 21) The timer recording function does not work . • There is no cassette. - Turn on the TV. (page 11) • The TV signal is incorrect. - Turn on the cable box. • The timer indicator is not correct. - Load a cassette with a commercially available cleaning tape. Although the power is on the TV screen. • The video channel or video input mode is an error in . - Adjust the tracking manually...
Owners Manual
Page 41
... an exchange price. Set up, adjustment of customer controls and installation of equal value. Returns Center 1420C Toshiba Dr. Lebanon, TN 37087 (8) Upon receipt we will not affect your unit with better customer service and improved products. Owner's Manual and Demographic Card You should complete and mail the enclosed Demographic card within thirty (30) days after you option, after the date of God...
... an exchange price. Set up, adjustment of customer controls and installation of equal value. Returns Center 1420C Toshiba Dr. Lebanon, TN 37087 (8) Upon receipt we will not affect your unit with better customer service and improved products. Owner's Manual and Demographic Card You should complete and mail the enclosed Demographic card within thirty (30) days after you option, after the date of God...
