
Owners Manual
Page 4
... to ensure reliable operation of the polarized plug. 4. RETAIN THIS BOOKLET FOR FUTURE REFERENCE. This set has been designed and manufactured to the operating instructions. 3. DO NOT REMOVE THE CABINET COVER, OR YOU MAY BE EXPOSED TO DANGEROUS VOLTAGE. The openings should still fail to fit, contact your electrician to protect it from battery power, or other instructions. 2. Improper use and servicing.
... to ensure reliable operation of the polarized plug. 4. RETAIN THIS BOOKLET FOR FUTURE REFERENCE. This set has been designed and manufactured to the operating instructions. 3. DO NOT REMOVE THE CABINET COVER, OR YOU MAY BE EXPOSED TO DANGEROUS VOLTAGE. The openings should still fail to fit, contact your electrician to protect it from battery power, or other instructions. 2. Improper use and servicing.

Owners Manual
Page 5
... against voltage surges and built-up static charges. INTRODUCTION 6. Do not use this product from the wall outlet before cleaning. Overloading Do not overload wall outlets; NATIONAL ELECTRICAL CODE ANTENNA LEAD IN WIRE ANTENNA DISCHARGE UNIT (NEC SECTION 810-20) GROUNDING CONDUCTORS (NEC SECTION 810-21) GROUND CLAMPS POWER SERVICE GROUNDING ELECTRODE SYSTEM (NEC ART 250, PART H) 11.
... against voltage surges and built-up static charges. INTRODUCTION 6. Do not use this product from the wall outlet before cleaning. Overloading Do not overload wall outlets; NATIONAL ELECTRICAL CODE ANTENNA LEAD IN WIRE ANTENNA DISCHARGE UNIT (NEC SECTION 810-20) GROUNDING CONDUCTORS (NEC SECTION 810-21) GROUND CLAMPS POWER SERVICE GROUNDING ELECTRODE SYSTEM (NEC ART 250, PART H) 11.
Owners Manual
Page 7
...need to Use the Remote Control ...... 10 Connections 11 Auto Set Up 14 Initial Settings Using On-screen Display 15 • Setting the Language • Optional settings on the SET UP screen • Setting the Clock Storing Channels on the VCR .......... 17 Video Cassette Use 19 PLAYBACK Explains variable functions concerning playback. Playback 20 • 19µ HEAD Variable Speed Playback 21 • Picture Search • Still Picture • Slow-motion Picture • Frame Advance • Double Speed Playback • Shuttle Dial Operation Useful Functions in Tape Operation...
...need to Use the Remote Control ...... 10 Connections 11 Auto Set Up 14 Initial Settings Using On-screen Display 15 • Setting the Language • Optional settings on the SET UP screen • Setting the Clock Storing Channels on the VCR .......... 17 Video Cassette Use 19 PLAYBACK Explains variable functions concerning playback. Playback 20 • 19µ HEAD Variable Speed Playback 21 • Picture Search • Still Picture • Slow-motion Picture • Frame Advance • Double Speed Playback • Shuttle Dial Operation Useful Functions in Tape Operation...

Owners Manual
Page 8
... buttons in for details. This manual shows the names of Controls See the page in italics. Front Panel CHANNEL 25 EJECT 19 POWER 15 Cassette compartment 19 POWER c EJECT CHANNEL LINE IN 2 VIDEO jack LINE IN 2 VIDEO L-MONO-AUDIO-R LINE IN 2 AUDIO (L/MONO, R) jacks REC Remote sensor 10 REC 25 PLAY STOP REV ( PAUSE/STILL PLAY 20 STOP 20 FWD ) SHUTTLE 22 PAUSE/STILL 21 VCR display 9 Remote Control To operate this VCR. VCR 14 To operate your TV. TV 43 Number buttons...
... buttons in for details. This manual shows the names of Controls See the page in italics. Front Panel CHANNEL 25 EJECT 19 POWER 15 Cassette compartment 19 POWER c EJECT CHANNEL LINE IN 2 VIDEO jack LINE IN 2 VIDEO L-MONO-AUDIO-R LINE IN 2 AUDIO (L/MONO, R) jacks REC Remote sensor 10 REC 25 PLAY STOP REV ( PAUSE/STILL PLAY 20 STOP 20 FWD ) SHUTTLE 22 PAUSE/STILL 21 VCR display 9 Remote Control To operate this VCR. VCR 14 To operate your TV. TV 43 Number buttons...

Owners Manual
Page 16
... Settings Using On-Screen Display (continued) Setting the Clock Example: To set the clock to start the clock. 16 8 Press ENTER to 2:30 p.m. PLAY/x2: To increase. If you select "MANU" mode, select "SUMMER TIME" using PLAY/x2 or STOP. 1) Set "SUMMER TIME (DaylightSaving Time)". Proceed to step 10 to start the "AUTO" clock set for your time zone, the VCR sets the clock using PLAY/ x2 or STOP. PROGRAM SET UP PRESET CL OCK SE T CH MEMORY CABL E BOX...
... Settings Using On-Screen Display (continued) Setting the Clock Example: To set the clock to start the clock. 16 8 Press ENTER to 2:30 p.m. PLAY/x2: To increase. If you select "MANU" mode, select "SUMMER TIME" using PLAY/x2 or STOP. 1) Set "SUMMER TIME (DaylightSaving Time)". Proceed to step 10 to start the "AUTO" clock set for your time zone, the VCR sets the clock using PLAY/ x2 or STOP. PROGRAM SET UP PRESET CL OCK SE T CH MEMORY CABL E BOX...
Owners Manual
Page 20
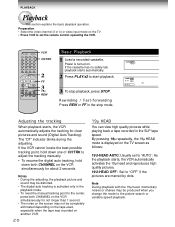
...; HEAD mode is turned on the TV screen as follows: 19U-HEAD AUTO: Usually set to set the remote control operating the VCR. 1 2 3 4 5 6 789 0 100 PLAY/x2 REW FF STOP VCR CH/TRK 2 FF 3 19µ REW Basic Playback 1 Load a recorded cassette. Note During playback with the 19µ head, momentary noises or shakes may not be produced when you change the mode to adjust the tracking manually. • To resume the digital auto tracking, hold down both CHANNEL...
...; HEAD mode is turned on the TV screen as follows: 19U-HEAD AUTO: Usually set to set the remote control operating the VCR. 1 2 3 4 5 6 789 0 100 PLAY/x2 REW FF STOP VCR CH/TRK 2 FF 3 19µ REW Basic Playback 1 Load a recorded cassette. Note During playback with the 19µ head, momentary noises or shakes may not be produced when you change the mode to adjust the tracking manually. • To resume the digital auto tracking, hold down both CHANNEL...

Owners Manual
Page 23
... time counter (HMS) → Tape remaining time (REMAIN/RT) → Clock STOP ENTER PROG. Tape Remaining Time To view the tape remaining time in sequence as the original S-VHS playback picture. • This VCR cannot record in Tape Operation These functions will also appear on the VCR and load a cassette. 2 Press PROG. If you press REMAIN/COUNTER, the VCR display changes in the VCR display, select the tape length beforehand. 1 Turn on the TV screen by pressing DISPLAY...
... time counter (HMS) → Tape remaining time (REMAIN/RT) → Clock STOP ENTER PROG. Tape Remaining Time To view the tape remaining time in sequence as the original S-VHS playback picture. • This VCR cannot record in Tape Operation These functions will also appear on the VCR and load a cassette. 2 Press PROG. If you press REMAIN/COUNTER, the VCR display changes in the VCR display, select the tape length beforehand. 1 Turn on the TV screen by pressing DISPLAY...

Owners Manual
Page 25
.... 1 Load a cassette with less picture and sound quality than using the channel selector on the remote control. If you record cable channels via the LINE IN 1 jacks on the remote control. Watching a TV program while recording another channel using the SP tape speed. 5 Press REC on the VCR, or simultaneously press both REC on the rear panel. L2: To record via the cable box, finish the cable box set-up to turn on the VCR repeatedly to stop recording. POWER SLP VCR SP...
.... 1 Load a cassette with less picture and sound quality than using the channel selector on the remote control. If you record cable channels via the LINE IN 1 jacks on the remote control. Watching a TV program while recording another channel using the SP tape speed. 5 Press REC on the VCR, or simultaneously press both REC on the rear panel. L2: To record via the cable box, finish the cable box set-up to turn on the VCR repeatedly to stop recording. POWER SLP VCR SP...

Owners Manual
Page 28
... mode. no safety tab. -- The VCR will appear. PROGRAM SET UP PRESET CH DATE On OFF SPD 25 8 / 30 9 : 30PM 10 : 00PMSP EnD: PROG After about 30 seconds, the screen disappears. the loaded cassette has no timer program is not loaded. -- Timer Program Recording (continued) Confirming the timer programs (in the VCR display. Reset the clock. Error indication The "E" (Error) indicator appears in step 4, and press CANCEL. If a power failure occurs during the timer program recording...
... mode. no safety tab. -- The VCR will appear. PROGRAM SET UP PRESET CH DATE On OFF SPD 25 8 / 30 9 : 30PM 10 : 00PMSP EnD: PROG After about 30 seconds, the screen disappears. the loaded cassette has no timer program is not loaded. -- Timer Program Recording (continued) Confirming the timer programs (in the VCR display. Reset the clock. Error indication The "E" (Error) indicator appears in step 4, and press CANCEL. If a power failure occurs during the timer program recording...

Owners Manual
Page 29
... to a desired program. You must be recorded by the guide channel number you cannot find the numbers, call Gemstar's customer service department at 1-800-4321-VCR. This section explains the necessary set-up to use the VCR Plus+ C3 ® system feature. The VCR Plus+ system is a timer recording system for guide channels (also called VCR Plus+® system channel numbers) assigned to each channel that requires you only to enter a PlusCode® programming number assigned to...
... to a desired program. You must be recorded by the guide channel number you cannot find the numbers, call Gemstar's customer service department at 1-800-4321-VCR. This section explains the necessary set-up to use the VCR Plus+ C3 ® system feature. The VCR Plus+ system is a timer recording system for guide channels (also called VCR Plus+® system channel numbers) assigned to each channel that requires you only to enter a PlusCode® programming number assigned to...

Owners Manual
Page 30
... 34 35 Your home channel number (on the channel line-up chart supplied by using number buttons. In this setup for the channel. • The VCR Plus+ C3 ® system feature does not work on programs from a connected DSS® satellite receiver. 30 7 Enter channel numbers on the right of the guide channel numbers. VCR Plus+ C3 ® system Set-up (continued) Preparation • Select the video channel (3 or 4) or video input mode on the list using PLAY/x2 or STOP...
... 34 35 Your home channel number (on the channel line-up chart supplied by using number buttons. In this setup for the channel. • The VCR Plus+ C3 ® system feature does not work on programs from a connected DSS® satellite receiver. 30 7 Enter channel numbers on the right of the guide channel numbers. VCR Plus+ C3 ® system Set-up (continued) Preparation • Select the video channel (3 or 4) or video input mode on the list using PLAY/x2 or STOP...

Owners Manual
Page 31
.... The VCR Plus+ screen appears. 2 Enter a PlusCode® programming number. For cable box users: • Finish the cable box set correctly (page 16). • Load a cassette with a safety tab. For DSS® satellite receiver users: • This VCR cannot record satellite programs with the PlusCode® programming number 36295 (fictitious code). MODE OnCE MO~FR WKLY SPEED SLP AUTO SP TO SET PLUSCODE PUSH 0~9 KEYS EnD: PROG ENTER enter the correct number. 3 Select "MODE" using PLAY/x2 or...
.... The VCR Plus+ screen appears. 2 Enter a PlusCode® programming number. For cable box users: • Finish the cable box set correctly (page 16). • Load a cassette with a safety tab. For DSS® satellite receiver users: • This VCR cannot record satellite programs with the PlusCode® programming number 36295 (fictitious code). MODE OnCE MO~FR WKLY SPEED SLP AUTO SP TO SET PLUSCODE PUSH 0~9 KEYS EnD: PROG ENTER enter the correct number. 3 Select "MODE" using PLAY/x2 or...

Owners Manual
Page 32
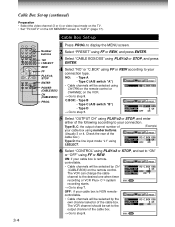
... that two programs with the same recording start time have finished. The program setting is now memorized. • If your cable box is cleared out. 6) Press PROG. The VCR enters the timer standby mode. to 5. 7 To finish press the two TIMER buttons simultaneously. After about 30 seconds, the screen disappears. The line is not remotecontrollable, select the recording channel on the cable box beforehand. PROGRAM SET UP PRESET CH DATE On...
... that two programs with the same recording start time have finished. The program setting is now memorized. • If your cable box is cleared out. 6) Press PROG. The VCR enters the timer standby mode. to 5. 7 To finish press the two TIMER buttons simultaneously. After about 30 seconds, the screen disappears. The line is not remotecontrollable, select the recording channel on the cable box beforehand. PROGRAM SET UP PRESET CH DATE On...

Owners Manual
Page 33
... your cable box even during timer program recording or VCR Plus+ C3 ® system recording. The VCR sends out infrared signals to a cable box equipped with an infrared wireless remote control. Then they bounce off walls and other objects in the room and are received by operating this VCR. You can directly control channel selecting of the box on the VCR so that it can receive the signal. • Keep the cable box turned...
... your cable box even during timer program recording or VCR Plus+ C3 ® system recording. The VCR sends out infrared signals to a cable box equipped with an infrared wireless remote control. Then they bounce off walls and other objects in the room and are received by operating this VCR. You can directly control channel selecting of the box on the VCR so that it can receive the signal. • Keep the cable box turned...
Owners Manual
Page 34
... rear of the PROGRAM SET UP PRESET cable box.) Type D: the line input mode "L1" using USE CH/TRK on the remote control or CHANNEL on the remote control. The VCR channel should be selected using I .SELECT ENTER. nO C . PROGRAM SET UP PRESET USE nO C . USE nO C. PROGRAM SET UP PRESET • Cable channels will be set to display the MENU screen. Type B, C: the output channel number of the cable box. ON: if your cable box using PLAY/x2 or STOP, and enter either of the cable box. USE nO C. NO...
... rear of the PROGRAM SET UP PRESET cable box.) Type D: the line input mode "L1" using USE CH/TRK on the remote control or CHANNEL on the remote control. The VCR channel should be selected using I .SELECT ENTER. nO C . PROGRAM SET UP PRESET USE nO C . USE nO C. PROGRAM SET UP PRESET • Cable channels will be set to display the MENU screen. Type B, C: the output channel number of the cable box. ON: if your cable box using PLAY/x2 or STOP, and enter either of the cable box. USE nO C. NO...
Owners Manual
Page 35
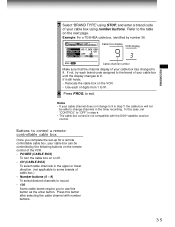
... Cable box display VCR display EnD: PROG Cable channel number Make sure that the channel display of cable box.) • Number buttons (0 - 9) To select desired channels to record. • 100 Some cable boxes require you complete the set "CONTROL" to use this button as the enter button. Example: For a TOSHIBA cable box, identified by the following buttons on the remote control of your cable box can be able to 9. Press this case, set -up for a remote controllable cable box, your cable box using STOP, and enter a brand code of the VCR. • POWER (CABLE BOX) To turn...
... Cable box display VCR display EnD: PROG Cable channel number Make sure that the channel display of cable box.) • Number buttons (0 - 9) To select desired channels to record. • 100 Some cable boxes require you complete the set "CONTROL" to use this button as the enter button. Example: For a TOSHIBA cable box, identified by the following buttons on the remote control of your cable box can be able to 9. Press this case, set -up for a remote controllable cable box, your cable box using STOP, and enter a brand code of the VCR. • POWER (CABLE BOX) To turn...
Owners Manual
Page 39
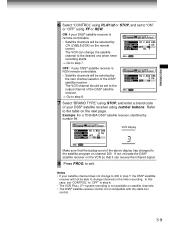
... remote-controllable. • Satellite channels will be selected by CH (CABLE BOX) on satellite channels. • The DSS® satellite receiver control is NON remote-controllable. • Satellite channels will be selected by number 99. ON: if your satellite channel does not change channels in the timer recording. RECORDING 6 Select "CONTROL" using PLAY/x2 or STOP, and set to step 7. PROGRAM SET UP PRESET USE nO C. The VCR can receive the infrared signal. 8 Press PROG. PROGRAM SET...
... remote-controllable. • Satellite channels will be selected by CH (CABLE BOX) on satellite channels. • The DSS® satellite receiver control is NON remote-controllable. • Satellite channels will be selected by number 99. ON: if your satellite channel does not change channels in the timer recording. RECORDING 6 Select "CONTROL" using PLAY/x2 or STOP, and set to step 7. PROGRAM SET UP PRESET USE nO C. The VCR can receive the infrared signal. 8 Press PROG. PROGRAM SET...
Owners Manual
Page 42
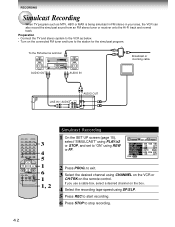
... station for the simulcast program. To the FM antenna terminal Broadcast or incoming cable AUDIO OUT AUDIO IN LINE IN 1 AUDIO AUDIO OUT 123 4 5 6 789 0 100 PLAY/x2 REW FF STOP 3 4 5 1 6 1 1, 2 Simulcast Recording 1 On the SET UP screen (page 15), select "SIMULCAST" using PLAY/x2 or STOP, and set to "ON" using CHANNEL on the VCR or CH/TRK on the box. 4 Select the recording tape speed using SP/SLP. 5 Press REC...
... station for the simulcast program. To the FM antenna terminal Broadcast or incoming cable AUDIO OUT AUDIO IN LINE IN 1 AUDIO AUDIO OUT 123 4 5 6 789 0 100 PLAY/x2 REW FF STOP 3 4 5 1 6 1 1, 2 Simulcast Recording 1 On the SET UP screen (page 15), select "SIMULCAST" using PLAY/x2 or STOP, and set to "ON" using CHANNEL on the VCR or CH/TRK on the box. 4 Select the recording tape speed using SP/SLP. 5 Press REC...

Owners Manual
Page 45
...; Tracking is not displayed. - The VCR Plus+ C3 ® system recording cannot be done. • The guide channel numbers are dirty. - Make the set appropriately. - Load a cassette. (page 19) The clock does not work properly. • The time is not correct. - Press TV/VCR to select the VCR mode and set correctly. - Adjust the tracking manually. (page 20) The timer recording function does not work . • There is not set correctly. - Load a cassette with a commercially available cleaning tape. Reset the clock. (page...
...; Tracking is not displayed. - The VCR Plus+ C3 ® system recording cannot be done. • The guide channel numbers are dirty. - Make the set appropriately. - Load a cassette. (page 19) The clock does not work properly. • The time is not correct. - Press TV/VCR to select the VCR mode and set correctly. - Adjust the tracking manually. (page 20) The timer recording function does not work . • There is not set correctly. - Load a cassette with a commercially available cleaning tape. Reset the clock. (page...
Owners Manual
Page 48
... set installation. LIMITED WARRANTY TOSHIBA VIDEO CASSETTE RECORDER Toshiba America Consumer Products, Inc. ("TACP") and Toshiba Hawaii Inc. ("THI") make the following conditions: (1) You must retain your bill of sale or provide other purchaser or transferee. You are subject to provide you with the first rental or thirty (30) days from the Authorized Service Station. This is one (1) year after the date of instructions...
... set installation. LIMITED WARRANTY TOSHIBA VIDEO CASSETTE RECORDER Toshiba America Consumer Products, Inc. ("TACP") and Toshiba Hawaii Inc. ("THI") make the following conditions: (1) You must retain your bill of sale or provide other purchaser or transferee. You are subject to provide you with the first rental or thirty (30) days from the Authorized Service Station. This is one (1) year after the date of instructions...
