
Owners Manual
Page 3
... most crucial internal parts. As an ENERGY STAR® Partner, TOSHIBA has determined that this unit immediately after moving it was originally packed at least 2 hours when there is compatible with existing, non-HQ VHS equipment. Compatibility This video cassette recorder (VCR) is an extreme or sudden change in handy if you...
... most crucial internal parts. As an ENERGY STAR® Partner, TOSHIBA has determined that this unit immediately after moving it was originally packed at least 2 hours when there is compatible with existing, non-HQ VHS equipment. Compatibility This video cassette recorder (VCR) is an extreme or sudden change in handy if you...
Owners Manual
Page 7
...RECORDING Explains recording functions. Contents INTRODUCTION INTRODUCTION Provides important notes and general explanation of the VCR, including names of Controls 8 • Front Panel • Remote Control • VCR Display • Rear Panel PREPARATION Explains what you need to Use the Remote Control...• Setting the Language • Optional settings on the SET UP screen • Setting the Clock Storing Channels on the VCR .......... 16 Video Cassette Use 18 PLAYBACK Explains variable functions concerning playback. Recording a TV Program 24 • Basic Recording •...
...RECORDING Explains recording functions. Contents INTRODUCTION INTRODUCTION Provides important notes and general explanation of the VCR, including names of Controls 8 • Front Panel • Remote Control • VCR Display • Rear Panel PREPARATION Explains what you need to Use the Remote Control...• Setting the Language • Optional settings on the SET UP screen • Setting the Clock Storing Channels on the VCR .......... 16 Video Cassette Use 18 PLAYBACK Explains variable functions concerning playback. Recording a TV Program 24 • Basic Recording •...

Owners Manual
Page 8
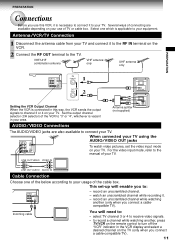
...buttons 16 A.SELECT 28 EJECT 18 REW * 19 SLOW 21 DISPLAY 22 REMAIN/COUNTER 22 I.SELECT 24 REC 24 TV VOL 29 VCR TV POWER 1 23 456 789 A.SELECT 0 100 EJECT VC-613 PLAY REW FF ENTER STOP SLOW PAUSE/STILL REMAIN/ COUNT DISPLAY... SP/ SLP I.SELECT REC TIMER TV VOL PROG. CANCEL 14 POWER 19 CH/TRK 17 100 14 ENTER 19 PLAY * 24 TV/VCR 19 FF * 20 PAUSE/STILL 22 COUNT RESET 24 SP/SLP 24 TIMER 27 CANCEL 14 PROG. 19 STOP * * These buttons...19 FF 18 EJECT LINE IN 2 AUDIO 24 (L/MONO, R) jacks REC LINE IN 2 VIDEO jack 10 Remote Sensor 9 VCR Display Remote Control To operate your TV.
...buttons 16 A.SELECT 28 EJECT 18 REW * 19 SLOW 21 DISPLAY 22 REMAIN/COUNTER 22 I.SELECT 24 REC 24 TV VOL 29 VCR TV POWER 1 23 456 789 A.SELECT 0 100 EJECT VC-613 PLAY REW FF ENTER STOP SLOW PAUSE/STILL REMAIN/ COUNT DISPLAY... SP/ SLP I.SELECT REC TIMER TV VOL PROG. CANCEL 14 POWER 19 CH/TRK 17 100 14 ENTER 19 PLAY * 24 TV/VCR 19 FF * 20 PAUSE/STILL 22 COUNT RESET 24 SP/SLP 24 TIMER 27 CANCEL 14 PROG. 19 STOP * * These buttons...19 FF 18 EJECT LINE IN 2 AUDIO 24 (L/MONO, R) jacks REC LINE IN 2 VIDEO jack 10 Remote Sensor 9 VCR Display Remote Control To operate your TV.

Owners Manual
Page 9
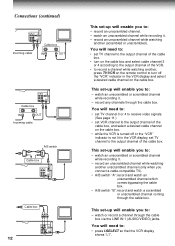
... recording indicator Hi-Fi indicator TIMER Hi-Fi SAP VCR indicator Multifunctional indicator SAP indicator Rear Panel LINE OUT AUDIO jacks (L, R) RF IN (FROM ANT.) terminal LINE IN 1 AUDIO jacks (L, R) To wall outlet LINE OUT ...
... recording indicator Hi-Fi indicator TIMER Hi-Fi SAP VCR indicator Multifunctional indicator SAP indicator Rear Panel LINE OUT AUDIO jacks (L, R) RF IN (FROM ANT.) terminal LINE IN 1 AUDIO jacks (L, R) To wall outlet LINE OUT ...

Owners Manual
Page 10
...the Remote Control 1 Open the battery compartment lid on anything wet, and avoid sharp impacts. 10 Caring for a long period of the VCR to a strong light source such as direct sunlight or illumination (especially high-frequency lighting) when using the remote control. • Be ...panel. 2 Install 2 batteries ("AA" size) following the polarity diagrams. 3 Close the battery compartment lid. + + 4 Point the remote control at the VCR and press the buttons within the operating range. Distance: within about 7 m from the front of the remote sensor Angles: within about 30˚ in every...
...the Remote Control 1 Open the battery compartment lid on anything wet, and avoid sharp impacts. 10 Caring for a long period of the VCR to a strong light source such as direct sunlight or illumination (especially high-frequency lighting) when using the remote control. • Be ...panel. 2 Install 2 batteries ("AA" size) following the polarity diagrams. 3 Close the battery compartment lid. + + 4 Point the remote control at the VCR and press the buttons within the operating range. Distance: within about 7 m from the front of the remote sensor Angles: within about 30˚ in every...
Owners Manual
Page 11
... to your equipment. Antenna splitter (not supplied) VHF UHF AUDIO/VIDEO Connections The AUDIO/VIDEO jacks are available depending on your use this way, the VCR sends the output signals to : LINE LINE OUT IN 1 IN (FROM ANT.) R AUDIO L VIDEO CH OUT RF (TO TV) 34 - watch video pictures, set...RF (TO TV) 34 IN (FROM ANT.) 1 OUT RF (TO TV) 2 VHF/UHF PREPARATION Setting the VCR Output Channel When the VCR is vacant in the VCR display and select a desired channel on the VCR. 2 Connect the RF OUT terminal to the RF IN terminal on the TV (only when you connect a ...
... to your equipment. Antenna splitter (not supplied) VHF UHF AUDIO/VIDEO Connections The AUDIO/VIDEO jacks are available depending on your use this way, the VCR sends the output signals to : LINE LINE OUT IN 1 IN (FROM ANT.) R AUDIO L VIDEO CH OUT RF (TO TV) 34 - watch video pictures, set...RF (TO TV) 34 IN (FROM ANT.) 1 OUT RF (TO TV) 2 VHF/UHF PREPARATION Setting the VCR Output Channel When the VCR is vacant in the VCR display and select a desired channel on the VCR. 2 Connect the RF OUT terminal to the RF IN terminal on the TV (only when you connect a ...
Owners Manual
Page 12
... to the output channel of the cable box, and select a desired cable channel on the cable box. • while the VCR is turned off the "VCR" indicator in the VCR display, set -up will enable you to : - You will need to : - record any channels through the cable box via the LINE...unscrambled channel coming through the cable box. You will need to: • set -up will enable you to : • press I.SELECT so that the VCR display shows "L1". You will enable you connect a cable-compatible TV). • A/B switch "A": record and watch an unscrambled channel which comes bypassing the...
... to the output channel of the cable box, and select a desired cable channel on the cable box. • while the VCR is turned off the "VCR" indicator in the VCR display, set -up will enable you to : - You will need to : - record any channels through the cable box via the LINE...unscrambled channel coming through the cable box. You will need to: • set -up will enable you to : • press I.SELECT so that the VCR display shows "L1". You will enable you connect a cable-compatible TV). • A/B switch "A": record and watch an unscrambled channel which comes bypassing the...
Owners Manual
Page 13
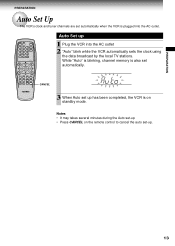
... set-up • Press CANCEL on standby mode. CANCEL CANCEL Auto Set up 1 Plug the VCR into the AC outlet. PREPARATION PREPARATION Auto Set Up The VCR's clock and tuner channels are set automatically when the VCR is on the remote control to cancel the auto set-up has been completed, the... using the data broadcast by the local TV stations. While "Auto" is blinking, channel memory is also set automatically. 3 When Auto set up . 13 VCR TV POWER 1 23 456 789 A.SELECT 0 100 EJECT VC-513 PLAY REW ENTER FF STOP SLOW PAUSE/STILL REMAIN/ COUNT DISPLAY COUNTER RESET SP/ SLP...
... set-up • Press CANCEL on standby mode. CANCEL CANCEL Auto Set up 1 Plug the VCR into the AC outlet. PREPARATION PREPARATION Auto Set Up The VCR's clock and tuner channels are set automatically when the VCR is on the remote control to cancel the auto set-up has been completed, the... using the data broadcast by the local TV stations. While "Auto" is blinking, channel memory is also set automatically. 3 When Auto set up . 13 VCR TV POWER 1 23 456 789 A.SELECT 0 100 EJECT VC-513 PLAY REW ENTER FF STOP SLOW PAUSE/STILL REMAIN/ COUNT DISPLAY COUNTER RESET SP/ SLP...

Owners Manual
Page 14
...turns to the normal TV screen. The screen turns to the SET UP screen. To exit, press PROG. CANCEL VCR POWER REW FF PLAY, STOP ENTER PROG. 1 Press POWER to turn on the TV. 3 Select the language... using PLAY or STOP , and press PROG.. The following screen appears on the VCR. 2 Press PROG.. Optional settings on LAnGUAGE EnG E n D : PROG 160 FRA 180 off off ESP Page 22... Page 28 Page 23 To change the language, move down here and set first when VCR is selected on the TV, and select the video channel (3 or 4), or the video input mode if ...
...turns to the normal TV screen. The screen turns to the SET UP screen. To exit, press PROG. CANCEL VCR POWER REW FF PLAY, STOP ENTER PROG. 1 Press POWER to turn on the TV. 3 Select the language... using PLAY or STOP , and press PROG.. The following screen appears on the VCR. 2 Press PROG.. Optional settings on LAnGUAGE EnG E n D : PROG 160 FRA 180 off off ESP Page 22... Page 28 Page 23 To change the language, move down here and set first when VCR is selected on the TV, and select the video channel (3 or 4), or the video input mode if ...
Owners Manual
Page 15
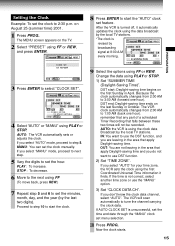
... 2001. 1 Press PROG.. If you are not leaving in April. Proceed to step 10 to tune the channel carrying the clock data. AUTO: the VCR is revised by the local TV stations. on the first Sunday in the area that apply Daylight-saving time. PREPARATION 3 Press ENTER to set feature... to set menu selection. 10 Press PROG.. Now the clock starts. 15 DST start the clock. 9 Select the options using PLAY or STOP. The VCR will not be recorded. Setting the Clock Example: To set the clock manually. If you don't know the clock data channel, select "AUTO". Change the...
... 2001. 1 Press PROG.. If you are not leaving in April. Proceed to step 10 to tune the channel carrying the clock data. AUTO: the VCR is revised by the local TV stations. on the first Sunday in the area that apply Daylight-saving time. PREPARATION 3 Press ENTER to set feature... to set menu selection. 10 Press PROG.. Now the clock starts. 15 DST start the clock. 9 Select the options using PLAY or STOP. The VCR will not be recorded. Setting the Clock Example: To set the clock manually. If you don't know the clock data channel, select "AUTO". Change the...

Owners Manual
Page 16
...REW FF PLAY,STOP ENTER I .SELECT REC TIMER TV VOL PROG. The VCR starts scanning and the channels are stored in the VCR in AUTO SCAn 2 CH on ascending order. Incoming Antenna/Cable(CATV) Signals VCR TV POWER 1 23 456 789 A.SELECT 0 100 EJECT VC-613 PLAY ... Set "TV/CATV" to "ON". twice to display the MENU screen. 2 Select "PRESET" using CH/TRK. CANCEL 1 Press PROG. PREPARATION Storing Channels on the VCR This section is finished, the screen automatically returns. to exit. 16 CATV: To store channels received via the antenna. Once the storing is displayed in...
...REW FF PLAY,STOP ENTER I .SELECT REC TIMER TV VOL PROG. The VCR starts scanning and the channels are stored in the VCR in AUTO SCAn 2 CH on ascending order. Incoming Antenna/Cable(CATV) Signals VCR TV POWER 1 23 456 789 A.SELECT 0 100 EJECT VC-613 PLAY ... Set "TV/CATV" to "ON". twice to display the MENU screen. 2 Select "PRESET" using CH/TRK. CANCEL 1 Press PROG. PREPARATION Storing Channels on the VCR This section is finished, the screen automatically returns. to exit. 16 CATV: To store channels received via the antenna. Once the storing is displayed in...

Owners Manual
Page 17
... channels have been stored, you can erase a stored channel from the memory if it can be pressed within 2 seconds. Channel reference chart Number on the VCR Corresponding channel number CH NUMBER TV CATV STD (HRC/IRC) 123456789 -23456789 1(A-8) 2 3 4 5(A-7) 6(A-6) 7 8 9 10 11 12 13 14 15 16 17 18 19 20 21 22...
... channels have been stored, you can erase a stored channel from the memory if it can be pressed within 2 seconds. Channel reference chart Number on the VCR Corresponding channel number CH NUMBER TV CATV STD (HRC/IRC) 123456789 -23456789 1(A-8) 2 3 4 5(A-7) 6(A-6) 7 8 9 10 11 12 13 14 15 16 17 18 19 20 21 22...

Owners Manual
Page 18
Ejecting a cassette Press EJECT. This may result in the VCR display. The cassette is automatically turned on. Take special care with a screwdriver. If the tab has already been removed, recording cannot be performed. Warning Do ... with adhesive tape. • Avoid exposing cassettes to direct sunlight. To prevent accidental erasure Remove this safety tab with children to prevent accidental erasure. The VCR is ejected from heaters. To record again Cover the tab hole with the window side facing up and the label side towards the front. Avoid...
Ejecting a cassette Press EJECT. This may result in the VCR display. The cassette is automatically turned on. Take special care with a screwdriver. If the tab has already been removed, recording cannot be performed. Warning Do ... with adhesive tape. • Avoid exposing cassettes to direct sunlight. To prevent accidental erasure Remove this safety tab with children to prevent accidental erasure. The VCR is ejected from heaters. To record again Cover the tab hole with the window side facing up and the label side towards the front. Avoid...
Owners Manual
Page 19
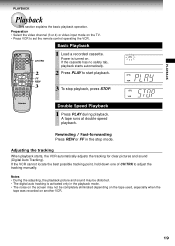
... Load a recorded cassette. 1 23 456 CH/TRK Power is activated only in the stop playback, press STOP. PLAY REW FF ENTER FF REW ST VCR L STOP SLOW PAUSE/STILL REMAIN/ COUNT DISPLAY COUNTER RESET SP/ SLP I.SELECT REC TIMER 3 3 To stop mode. Notes • During the adjusting... mode. • The noise on the screen may be distorted. • The digital auto tracking is turned on the TV. • Press VCR to start playback. Preparation • Select the video channel (3 or 4) or video input mode on . PLAYBACK PLAYBACK Playback This section explains the ...
... Load a recorded cassette. 1 23 456 CH/TRK Power is activated only in the stop playback, press STOP. PLAY REW FF ENTER FF REW ST VCR L STOP SLOW PAUSE/STILL REMAIN/ COUNT DISPLAY COUNTER RESET SP/ SLP I.SELECT REC TIMER 3 3 To stop mode. Notes • During the adjusting... mode. • The noise on the screen may be distorted. • The digital auto tracking is turned on the TV. • Press VCR to start playback. Preparation • Select the video channel (3 or 4) or video input mode on . PLAYBACK PLAYBACK Playback This section explains the ...

Owners Manual
Page 20
... 5 times. The picture freezes. If you can watch closer. 1 Press PAUSE/STILL during playback. Note The distortion of CH/TRK until the picture becomes stable. VCR TV POWER 1 23 456 789 A.SELECT 0 100 EJECT VC-613 PLAY REW FF ENTER STOP SLOW PAUSE/STILL REMAIN/ COUNT DISPLAY COUNTER RESET SP/ SLP...
... 5 times. The picture freezes. If you can watch closer. 1 Press PAUSE/STILL during playback. Note The distortion of CH/TRK until the picture becomes stable. VCR TV POWER 1 23 456 789 A.SELECT 0 100 EJECT VC-613 PLAY REW FF ENTER STOP SLOW PAUSE/STILL REMAIN/ COUNT DISPLAY COUNTER RESET SP/ SLP...

Owners Manual
Page 22
... UP" using FF or REW. They are switchable with REMAIN/COUNTER. Tape Remaining Time To view the tape remaining time in the VCR display, select the tape length beforehand. 1 Turn on the VCR and load a cassette. 2 Press PROG. to clock. • If the tape rewinds back over "0:00:00", "-" appears in the... PROG. Notes • The linear time counter does not work on non-recorded portions on the tape. • When the tape is ejected or the VCR is only an approximation. PLAYBACK Useful Functions in Tape Operation These functions will also appear on the TV screen by pressing DISPLAY.
... UP" using FF or REW. They are switchable with REMAIN/COUNTER. Tape Remaining Time To view the tape remaining time in the VCR display, select the tape length beforehand. 1 Turn on the VCR and load a cassette. 2 Press PROG. to clock. • If the tape rewinds back over "0:00:00", "-" appears in the... PROG. Notes • The linear time counter does not work on non-recorded portions on the tape. • When the tape is ejected or the VCR is only an approximation. PLAYBACK Useful Functions in Tape Operation These functions will also appear on the TV screen by pressing DISPLAY.

Owners Manual
Page 23
... to a counter reading of "0H00M00S" from any point on whenever the time counter with memory is convenient when you are rewinding the tape and the VCR stops at "0H00M00S M", press REW again to watch a segment of the tape. 23 DISPLAY 1 On the SET UP screen, select "COUNTER MEM."...this feature. This is displayed on LAnGUAGE EnG E n D : PROG 160 FRA 180 off off ESP 2 Press PROG. PLAYBACK Memory Stop Feature (Zero Return) VCR TV POWER 1 23 456 789 A.SELECT 0 100 EJECT VC-613 PLAY REW FF ENTER STOP SLOW PAUSE/STILL REMAIN/ COUNT DISPLAY COUNTER RESET SP/ SLP...
... to a counter reading of "0H00M00S" from any point on whenever the time counter with memory is convenient when you are rewinding the tape and the VCR stops at "0H00M00S M", press REW again to watch a segment of the tape. 23 DISPLAY 1 On the SET UP screen, select "COUNTER MEM."...this feature. This is displayed on LAnGUAGE EnG E n D : PROG 160 FRA 180 off off ESP 2 Press PROG. PLAYBACK Memory Stop Feature (Zero Return) VCR TV POWER 1 23 456 789 A.SELECT 0 100 EJECT VC-613 PLAY REW FF ENTER STOP SLOW PAUSE/STILL REMAIN/ COUNT DISPLAY COUNTER RESET SP/ SLP...

Owners Manual
Page 24
... while recording another channel using the SP tape speed. 5 L1: To record via the LINE IN 1 jacks on the TV. Basic Recording VCR TV POWER 1 23 456 789 A.SELECT 0 100 EJECT VC-613 PLAY REW ENTER FF STOP SLOW PAUSE/STILL REMAIN/ COUNT DISPLAY COUNTER RESET..., press POWER on your connection. (See pages 11 - 12.) 4 Press SP/SLP to set the desired off "VCR" indicator. 2) Choose another 1) While recording, press TV/VCR to record with VCR REC L better picture and sound quality. While recording, press simultaneously both REC on 2 jacks on the TV. RECORDING...
... while recording another channel using the SP tape speed. 5 L1: To record via the LINE IN 1 jacks on the TV. Basic Recording VCR TV POWER 1 23 456 789 A.SELECT 0 100 EJECT VC-613 PLAY REW ENTER FF STOP SLOW PAUSE/STILL REMAIN/ COUNT DISPLAY COUNTER RESET..., press POWER on your connection. (See pages 11 - 12.) 4 Press SP/SLP to set the desired off "VCR" indicator. 2) Choose another 1) While recording, press TV/VCR to record with VCR REC L better picture and sound quality. While recording, press simultaneously both REC on 2 jacks on the TV. RECORDING...

Owners Manual
Page 25
... the channels on the cable box. • You can make corrections: Press REW to move back to the item, or FF to 125) on the VCR (pages 16 and 17). RECORDING • To record a cable program from 9:20 p.m. CANCEL Number buttons PLAY ENTER FF REW STOP 10 2,9 Timer Programming Procedure ... the connected cable box: Enter the cable channel number by number buttons, PLAY or STOP. until 10:00 p.m. If your connection. (See pages 8 and 12). VCR TV POWER 1 23 456 789 A.SELECT 0 100 EJECT VC-613 PLAY REW ENTER FF STOP SLOW PAUSE/STILL REMAIN/ COUNT DISPLAY COUNTER RESET SP/ SLP...
... the channels on the cable box. • You can make corrections: Press REW to move back to the item, or FF to 125) on the VCR (pages 16 and 17). RECORDING • To record a cable program from 9:20 p.m. CANCEL Number buttons PLAY ENTER FF REW STOP 10 2,9 Timer Programming Procedure ... the connected cable box: Enter the cable channel number by number buttons, PLAY or STOP. until 10:00 p.m. If your connection. (See pages 8 and 12). VCR TV POWER 1 23 456 789 A.SELECT 0 100 EJECT VC-613 PLAY REW ENTER FF STOP SLOW PAUSE/STILL REMAIN/ COUNT DISPLAY COUNTER RESET SP/ SLP...

Owners Manual
Page 26
... SET UP screen (page 22). • When the SLP tape speed is long enough for timer program recording in the SP tape speed and the VCR automatically selects the tape speed to record the program to 8. 9 Press PROG.. To set the recording date using PLAY or STOP. REC TIMER The power... to the next using FF, and set the recording tape speed to "AUTO". PM 7 Move to the next, and set the recording off and the VCR enters the timer standby mode.
... SET UP screen (page 22). • When the SLP tape speed is long enough for timer program recording in the SP tape speed and the VCR automatically selects the tape speed to record the program to 8. 9 Press PROG.. To set the recording date using PLAY or STOP. REC TIMER The power... to the next using FF, and set the recording tape speed to "AUTO". PM 7 Move to the next, and set the recording off and the VCR enters the timer standby mode.