
Owners Manual
Page 3
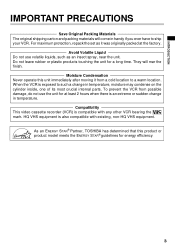
... a long time. Do not leave rubber or plastic products touching the unit for energy efficiency. 3 As an ENERGY STAR® Partner, TOSHIBA has determined that this unit immediately after moving it was originally packed at least 2 hours when there is compatible with existing, non-HQ VHS... equipment. Compatibility This video cassette recorder (VCR) is an extreme or sudden change in temperature, moisture may condense on the cylinder inside, one of its most crucial internal parts. They...
... a long time. Do not leave rubber or plastic products touching the unit for energy efficiency. 3 As an ENERGY STAR® Partner, TOSHIBA has determined that this unit immediately after moving it was originally packed at least 2 hours when there is compatible with existing, non-HQ VHS... equipment. Compatibility This video cassette recorder (VCR) is an extreme or sudden change in temperature, moisture may condense on the cylinder inside, one of its most crucial internal parts. They...
Owners Manual
Page 7
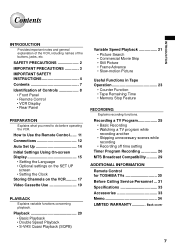
... • Recording off time setting Timer Program Recording 26 MTS Broadcast Compatibility .......... 29 ADDITIONAL INFORMATION Remote Control for TOSHIBA TVs 30 Before Calling Service Personnel ... 31 Specifications 33 Accessories 33 Memo 34 LIMITED WARRANTY Back cover 7 How to do... before operating the VCR. Contents INTRODUCTION INTRODUCTION Provides important notes and general explanation of the VCR, including names of Controls 8 • Front Panel • Remote Control • VCR Display • Rear Panel PREPARATION Explains what you ...
... • Recording off time setting Timer Program Recording 26 MTS Broadcast Compatibility .......... 29 ADDITIONAL INFORMATION Remote Control for TOSHIBA TVs 30 Before Calling Service Personnel ... 31 Specifications 33 Accessories 33 Memo 34 LIMITED WARRANTY Back cover 7 How to do... before operating the VCR. Contents INTRODUCTION INTRODUCTION Provides important notes and general explanation of the VCR, including names of Controls 8 • Front Panel • Remote Control • VCR Display • Rear Panel PREPARATION Explains what you ...
Owners Manual
Page 8
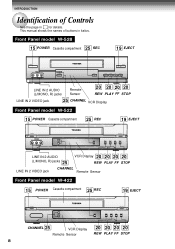
... 25 REC 19 EJECT LINE IN 2 AUDIO (L/MONO, R) jacks Remote Sensor 20 20 20 20 REW PLAY FF STOP LINE IN 2 VIDEO jack 25 CHANNEL VCR Display Front Panel model W-522 15 POWER Cassette compartment 25 REC 19 EJECT LINE IN 2 AUDIO (L/MONO, R) jacks 25... REW PLAY FF STOP LINE IN 2 VIDEO jack CHANNEL Remote Sensor Front Panel model W-422 15 POWER Cassette compartment 25 REC 19 EJECT CHANNEL 25 VCR Display Remote Sensor 20 20 20 20 REW PLAY FF STOP 8 This manual shows the names of Controls See the page in italics.
... 25 REC 19 EJECT LINE IN 2 AUDIO (L/MONO, R) jacks Remote Sensor 20 20 20 20 REW PLAY FF STOP LINE IN 2 VIDEO jack 25 CHANNEL VCR Display Front Panel model W-522 15 POWER Cassette compartment 25 REC 19 EJECT LINE IN 2 AUDIO (L/MONO, R) jacks 25... REW PLAY FF STOP LINE IN 2 VIDEO jack CHANNEL Remote Sensor Front Panel model W-422 15 POWER Cassette compartment 25 REC 19 EJECT CHANNEL 25 VCR Display Remote Sensor 20 20 20 20 REW PLAY FF STOP 8 This manual shows the names of Controls See the page in italics.
Owners Manual
Page 9
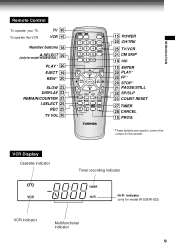
... for model W-528/W-522 ) 29 PLAY * 20 EJECT 19 REW * 20 SLOW 22 DISPLAY 23 REMAIN/COUNTER 23 I.SELECT 25 REC 25 TV VOL 30 VCR TV POWER 1 23 45 78 A.SELECT 0 6 CM SKIP 9 100 EJECT PLAY REW FF ENTER STOP SLOW PAUSE/STILL REMAIN/ COUNT DISPLAY COUNTER RESET SP/ SLP... I.SELECT REC TIMER TV VOL PROG. TV 30 VCR 15 Number buttons 18 A.SELECT (only for model W-528/W-522) VCR indicator Multifunctional indicator 9 CANCEL 15 POWER 20 CH/TRK 25 TV/VCR 21 CM SKIP 18 100 15 ENTER 20 PLAY * 20 FF * 20 STOP * 21...
... for model W-528/W-522 ) 29 PLAY * 20 EJECT 19 REW * 20 SLOW 22 DISPLAY 23 REMAIN/COUNTER 23 I.SELECT 25 REC 25 TV VOL 30 VCR TV POWER 1 23 45 78 A.SELECT 0 6 CM SKIP 9 100 EJECT PLAY REW FF ENTER STOP SLOW PAUSE/STILL REMAIN/ COUNT DISPLAY COUNTER RESET SP/ SLP... I.SELECT REC TIMER TV VOL PROG. TV 30 VCR 15 Number buttons 18 A.SELECT (only for model W-528/W-522) VCR indicator Multifunctional indicator 9 CANCEL 15 POWER 20 CH/TRK 25 TV/VCR 21 CM SKIP 18 100 15 ENTER 20 PLAY * 20 FF * 20 STOP * 21...
Owners Manual
Page 11
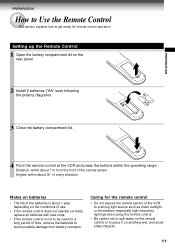
Caring for the remote control • Do not expose the remote sensor of the VCR to a strong light source such as direct sunlight or illumination (especially high-frequency lighting) when using the remote control. • Be careful not to spill ... compartment lid on the rear panel. 2 Install 2 batteries ("AA" size) following the polarity diagrams. 3 Close the battery compartment lid. + + 4 Point the remote control at the VCR and press the buttons within about 1 year depending on anything wet, and avoid sharp impacts. 11
Caring for the remote control • Do not expose the remote sensor of the VCR to a strong light source such as direct sunlight or illumination (especially high-frequency lighting) when using the remote control. • Be careful not to spill ... compartment lid on the rear panel. 2 Install 2 batteries ("AA" size) following the polarity diagrams. 3 Close the battery compartment lid. + + 4 Point the remote control at the VCR and press the buttons within about 1 year depending on anything wet, and avoid sharp impacts. 11
Owners Manual
Page 12
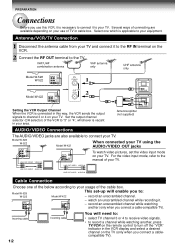
... (TO TV) 34 AUDIO OUT IN VIDEO IN (FROM ANT.) OUT RF (TO TV) CH 34 - record an unscrambled channel while watching another , press TV/VCR on your TV. Set the output channel selector (CH selector) of the below according to your TV and connect it to the RF IN terminal... on your TV. Antenna/VCR/TV Connection 1 Disconnect the antenna cable from your usage of TV or cable box. Antenna splitter (not supplied) AUDIO/VIDEO Connections The AUDIO/VIDEO jacks...
... (TO TV) 34 AUDIO OUT IN VIDEO IN (FROM ANT.) OUT RF (TO TV) CH 34 - record an unscrambled channel while watching another , press TV/VCR on your TV. Set the output channel selector (CH selector) of the below according to your TV and connect it to the RF IN terminal... on your TV. Antenna/VCR/TV Connection 1 Disconnect the antenna cable from your usage of TV or cable box. Antenna splitter (not supplied) AUDIO/VIDEO Connections The AUDIO/VIDEO jacks...
Owners Manual
Page 13
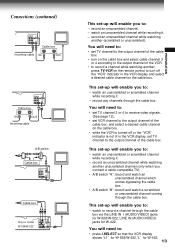
...channel while watching another unscrambled channel (only when you to the output channel of the cable box. • turn off or the "VCR" indicator is not lit in the VCR display and select a desired cable channel on the cable box and select cable channel 3 or 4 according to : - You will need... to the output channel of the cable box, and select a desired cable channel on the cable box. • while the VCR is turned off the "VCR" indicator in the VCR display, set -up will enable you connect a cable-compatible TV). • A/B switch "A": record and watch an unscrambled channel which ...
...channel while watching another unscrambled channel (only when you to the output channel of the cable box. • turn off or the "VCR" indicator is not lit in the VCR display and select a desired cable channel on the cable box and select cable channel 3 or 4 according to : - You will need... to the output channel of the cable box, and select a desired cable channel on the cable box. • while the VCR is turned off the "VCR" indicator in the VCR display, set -up will enable you connect a cable-compatible TV). • A/B switch "A": record and watch an unscrambled channel which ...

Owners Manual
Page 14
... standby mode. While "Auto" is blinking, channel memory is also set automatically. 3 When Auto set up has been completed, the VCR is plugged into the AC outlet 2 "Auto" blink while the VCR automatically sets the clock using the data broadcast by the local TV stations. PREPARATION Auto Set Up The... VCR's clock and tuner channels are set automatically when the VCR is on the remote control to cancel the auto set-up. ...
... standby mode. While "Auto" is blinking, channel memory is also set automatically. 3 When Auto set up has been completed, the VCR is plugged into the AC outlet 2 "Auto" blink while the VCR automatically sets the clock using the data broadcast by the local TV stations. PREPARATION Auto Set Up The... VCR's clock and tuner channels are set automatically when the VCR is on the remote control to cancel the auto set-up. ...
Owners Manual
Page 15
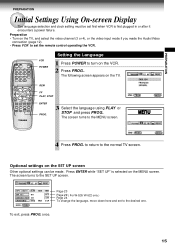
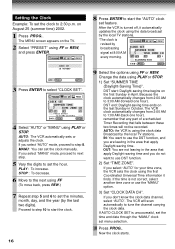
... 24 To change the language, move down here and set to the MENU screen. TAPE LEnGTH 120 SAP SET COUnTER MEM LAnGUAGE on on the VCR. 2 Press PROG.. once. 15 The following screen appears on the MENU screen. The screen turns to the desired one. To exit, press PROG. ...PREPARATION PREPARATION Initial Settings Using On-screen Display The language selection and clock setting must be made the Audio/Video connection (page 12). • Press VCR to the SET UP screen. ENTER MEnU EnD : PROG ENTER 4 Press PROG. Press ENTER while "SET UP" is first plugged in or after it...
... 24 To change the language, move down here and set to the MENU screen. TAPE LEnGTH 120 SAP SET COUnTER MEM LAnGUAGE on on the VCR. 2 Press PROG.. once. 15 The following screen appears on the MENU screen. The screen turns to the desired one. To exit, press PROG. ...PREPARATION PREPARATION Initial Settings Using On-screen Display The language selection and clock setting must be made the Audio/Video connection (page 12). • Press VCR to the SET UP screen. ENTER MEnU EnD : PROG ENTER 4 Press PROG. Press ENTER while "SET UP" is first plugged in or after it...
Owners Manual
Page 16
... the clock data. If AUTO CLOCK SET is not correct, select another time zone or use the "MANU" option. 3) Set "CLOCK DATA CH". After the VCR is turned off, it finds. If you select "MANU" mode, proceed to next step. 5 Vary the digits to 2:30 p.m. remember that any part of a ...scheduled Timer Recording that apply Daylight-saving time and you don't know the clock data channel, select "AUTO". AUTO: the VCR is revised by the last two digits). STOP : To decrease. 6 Move to set the minutes, month, day, and the year (by broadcasting signal at 8:00...
... the clock data. If AUTO CLOCK SET is not correct, select another time zone or use the "MANU" option. 3) Set "CLOCK DATA CH". After the VCR is turned off, it finds. If you select "MANU" mode, proceed to next step. 5 Vary the digits to 2:30 p.m. remember that any part of a ...scheduled Timer Recording that apply Daylight-saving time and you don't know the clock data channel, select "AUTO". AUTO: the VCR is revised by the last two digits). STOP : To decrease. 6 Move to set the minutes, month, day, and the year (by broadcasting signal at 8:00...

Owners Manual
Page 17
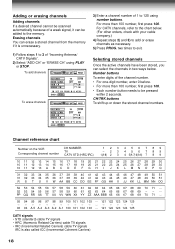
... only normal TV or unscrambled cable channels. CATV: To store channels received via the antenna. The VCR starts scanning and the channels are stored in the VCR in your area into the memory. to exit. 17 VCR TV POWER 1 23 45 78 A.SELECT 0 6 CM SKIP 9 100 EJECT PLAY REW FF ENTER ... CH/TRK. When the scanning is finished, you can select a desired channel using FF or REW, and press ENTER. Preparation • Turn on the VCR This section is required if you made the Audio/Video connection (page 12). • Press I.SELECT so that the channel number will appear if "L1...
... only normal TV or unscrambled cable channels. CATV: To store channels received via the antenna. The VCR starts scanning and the channels are stored in the VCR in your area into the memory. to exit. 17 VCR TV POWER 1 23 45 78 A.SELECT 0 6 CM SKIP 9 100 EJECT PLAY REW FF ENTER ... CH/TRK. When the scanning is finished, you can select a desired channel using FF or REW, and press ENTER. Preparation • Turn on the VCR This section is required if you made the Audio/Video connection (page 12). • Press I.SELECT so that the channel number will appear if "L1...
Owners Manual
Page 18
... channels, refer to add or erase channels as necessary. 5) Press PROG. Number buttons To enter digits of 1 to exit. Channel reference chart Number on the VCR Corresponding channel number CH NUMBER TV CATV STD (HRC/IRC) 123456789 -23456789 1(A-8) 2 3 4 5(A-7) 6(A-6) 7 8 9 10 11 12 13 14 15 16 17 18 19 20 21 22...
... channels, refer to add or erase channels as necessary. 5) Press PROG. Number buttons To enter digits of 1 to exit. Channel reference chart Number on the VCR Corresponding channel number CH NUMBER TV CATV STD (HRC/IRC) 123456789 -23456789 1(A-8) 2 3 4 5(A-7) 6(A-6) 7 8 9 10 11 12 13 14 15 16 17 18 19 20 21 22...
Owners Manual
Page 19
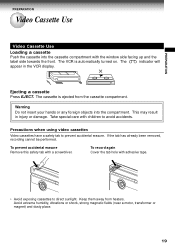
..., recording cannot be performed. To record again Cover the tab hole with the window side facing up and the label side towards the front. The VCR is ejected from heaters. Warning Do not insert your hands or any foreign objects into the cassette compartment with adhesive tape. • Avoid exposing cassettes... indicator will appear in injury or damage. To prevent accidental erasure Remove this safety tab with children to avoid accidents. This may result in the VCR display.
..., recording cannot be performed. To record again Cover the tab hole with the window side facing up and the label side towards the front. The VCR is ejected from heaters. Warning Do not insert your hands or any foreign objects into the cassette compartment with adhesive tape. • Avoid exposing cassettes... indicator will appear in injury or damage. To prevent accidental erasure Remove this safety tab with children to avoid accidents. This may result in the VCR display.
Owners Manual
Page 20
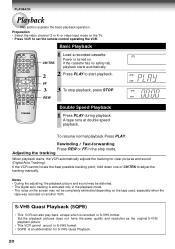
... the screen may be completely eliminated depending on the tape used, especially when the tape was recorded on another VCR. Adjusting the tracking When playback starts, the VCR automatically adjusts the tracking for S-VHS Quasi Playback. 20 Preparation • Select the video channel (3 or ...4) or video input mode on . S-VHS Quasi Playback (SQPB) • This VCR can also play back at double speed playback. CANCEL Double Speed Playback 1 Press PLAY during playback. PLAYBACK Playback This section explains the basic ...
... the screen may be completely eliminated depending on the tape used, especially when the tape was recorded on another VCR. Adjusting the tracking When playback starts, the VCR automatically adjusts the tracking for S-VHS Quasi Playback. 20 Preparation • Select the video channel (3 or ...4) or video input mode on . S-VHS Quasi Playback (SQPB) • This VCR can also play back at double speed playback. CANCEL Double Speed Playback 1 Press PLAY during playback. PLAYBACK Playback This section explains the basic ...
Owners Manual
Page 21
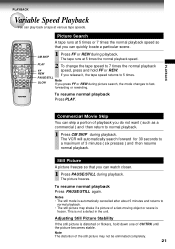
VCR TV POWER 1 23 45 78 A.SELECT 0 6 CM SKIP 9 100 EJECT PLAY REW FF ENTER STOP SLOW PAUSE/STILL REMAIN/ COUNT DISPLAY COUNTER RESET SP/ SLP I.... or scene is not a defect in the unit. PLAYBACK Variable Speed Playback You can quickly locate a particular scene. 1 Press FF or REW during playback. The VCR will automatically search forward for 30 seconds to normal playback. 1 Press CM SKIP during playback.
VCR TV POWER 1 23 45 78 A.SELECT 0 6 CM SKIP 9 100 EJECT PLAY REW FF ENTER STOP SLOW PAUSE/STILL REMAIN/ COUNT DISPLAY COUNTER RESET SP/ SLP I.... or scene is not a defect in the unit. PLAYBACK Variable Speed Playback You can quickly locate a particular scene. 1 Press FF or REW during playback. The VCR will automatically search forward for 30 seconds to normal playback. 1 Press CM SKIP during playback.
Owners Manual
Page 23
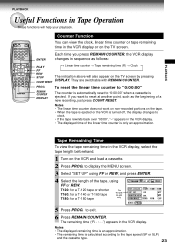
...) and the cassette type. 23 They are switchable with REMAIN/COUNTER. Tape Remaining Time To view the tape remaining time in the VCR display, select the tape length beforehand. 1 Turn on the TV screen by pressing DISPLAY. PLAYBACK PLAYBACK Useful Functions in Tape Operation ...These functions will also appear on the VCR and load a cassette. 2 Press PROG. to exit. 6 Press REMAIN/COUNTER. VCR TV POWER 1 23 456 CM SKIP 7 89 A.SELECT 0 100 EJECT PLAY REW FF ENTER STOP ...
...) and the cassette type. 23 They are switchable with REMAIN/COUNTER. Tape Remaining Time To view the tape remaining time in the VCR display, select the tape length beforehand. 1 Turn on the TV screen by pressing DISPLAY. PLAYBACK PLAYBACK Useful Functions in Tape Operation ...These functions will also appear on the VCR and load a cassette. 2 Press PROG. to exit. 6 Press REMAIN/COUNTER. VCR TV POWER 1 23 456 CM SKIP 7 89 A.SELECT 0 100 EJECT PLAY REW FF ENTER STOP ...
Owners Manual
Page 24
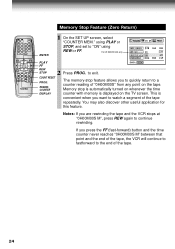
... and the time counter never reaches "0H00M00S M" between that point and the end of the tape, the VCR will continue to fastforward to a counter reading of "0H00M00S" from any point on the TV screen. VCR TV POWER 1 23 456 CM SKIP 7 89 A.SELECT 0 100 EJECT PLAY REW FF ENTER STOP SLOW PAUSE... you to quickly return to the end of the tape repeatedly. to continue rewinding. Memory stop feature allows you are rewinding the tape and the VCR stops at "0H00M00S M", press REW again to exit.
... and the time counter never reaches "0H00M00S M" between that point and the end of the tape, the VCR will continue to fastforward to a counter reading of "0H00M00S" from any point on the TV screen. VCR TV POWER 1 23 456 CM SKIP 7 89 A.SELECT 0 100 EJECT PLAY REW FF ENTER STOP SLOW PAUSE... you to quickly return to the end of the tape repeatedly. to continue rewinding. Memory stop feature allows you are rewinding the tape and the VCR stops at "0H00M00S M", press REW again to exit.
Owners Manual
Page 25
...I .SELECT to 4 Press SP/SLP to stop recording. Each time you record cable channels via the LINE IN Press REC on the VCR, or 2 jacks on the VCR. 25 Skipping unnecessary scenes while recording Press PAUSE/STILL to record with less picture and L1: To record via the LINE IN sound.... CANCEL 2 6 4 5 I.SELECT 3 Select a channel to stop mode if the recording pause mode continues for general recording with the safety tab attached. 2 Press TV/VCR so that the channel number appears. • If you press REC, each half-hour up to set the desired off time. To record from other...
...I .SELECT to 4 Press SP/SLP to stop recording. Each time you record cable channels via the LINE IN Press REC on the VCR, or 2 jacks on the VCR. 25 Skipping unnecessary scenes while recording Press PAUSE/STILL to record with less picture and L1: To record via the LINE IN sound.... CANCEL 2 6 4 5 I.SELECT 3 Select a channel to stop mode if the recording pause mode continues for general recording with the safety tab attached. 2 Press TV/VCR so that the channel number appears. • If you press REC, each half-hour up to set the desired off time. To record from other...
Owners Manual
Page 26
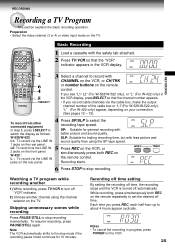
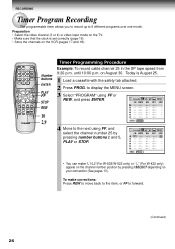
... timer allows you to record up to the next using FF or REW, and press ENTER. 10 2,9 4 Move to 6 different programs over one month. VCR TV POWER 1 23 45 78 A.SELECT 0 6 CM SKIP 9 100 EJECT PLAY REW FF ENTER STOP SLOW PAUSE/STILL REMAIN/ COUNT DISPLAY COUNTER RESET SP.../ SLP I .SELECT depending on the VCR (pages 17 and 18). Today is set correctly (page 16). • Store the channels on your connection (See pages 13). to display the MENU screen...
... timer allows you to record up to the next using FF or REW, and press ENTER. 10 2,9 4 Move to 6 different programs over one month. VCR TV POWER 1 23 45 78 A.SELECT 0 6 CM SKIP 9 100 EJECT PLAY REW FF ENTER STOP SLOW PAUSE/STILL REMAIN/ COUNT DISPLAY COUNTER RESET SP.../ SLP I .SELECT depending on the VCR (pages 17 and 18). Today is set correctly (page 16). • Store the channels on your connection (See pages 13). to display the MENU screen...
Owners Manual
Page 27
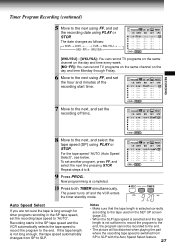
... to the tape used on the day and time Monday through Friday. 6 Move to the next using FF, and set the recording off and the VCR enters the timer standby mode. RECORDING 8 Move to 8. 9 Press PROG.. TIMERHi-Fi STEREO L SAP Auto Speed Select If you are not sure the tape is... be distorted when playing the part where the recording tape speed is long enough for timer program recording in the SP tape speed and the VCR automatically selects the tape speed to record the program to the end. Repeat steps 4 to the next, and select the tape speed (SP) using PLAY...
... to the tape used on the day and time Monday through Friday. 6 Move to the next using FF, and set the recording off and the VCR enters the timer standby mode. RECORDING 8 Move to 8. 9 Press PROG.. TIMERHi-Fi STEREO L SAP Auto Speed Select If you are not sure the tape is... be distorted when playing the part where the recording tape speed is long enough for timer program recording in the SP tape speed and the VCR automatically selects the tape speed to record the program to the end. Repeat steps 4 to the next, and select the tape speed (SP) using PLAY...