
Owners Manual
Page 2
... VOLTAGES ARE PRESENT INSIDE THE ENCLOSURE. Model No. Product Name: Video Cassette Recorder Model Number: W-528/ W-522/ W-422 FCC Notice: "Declaration of your video cassette recorder. Copyright It is provided to call the CATV system installer's attention to operate the equipment. REFER SERVICING TO QUALIFIED PERSONNEL ONLY. DO NOT OPEN THE CABINET. SAFETY PRECAUTIONS The lightning flash with part 15 of the FCC Rules.
... VOLTAGES ARE PRESENT INSIDE THE ENCLOSURE. Model No. Product Name: Video Cassette Recorder Model Number: W-528/ W-522/ W-422 FCC Notice: "Declaration of your video cassette recorder. Copyright It is provided to call the CATV system installer's attention to operate the equipment. REFER SERVICING TO QUALIFIED PERSONNEL ONLY. DO NOT OPEN THE CABINET. SAFETY PRECAUTIONS The lightning flash with part 15 of the FCC Rules.
Owners Manual
Page 4
...line plug (a plug having one way. This set has been designed and manufactured to the operating instructions. 3. DO NOT REMOVE THE CABINET COVER, OR YOU MAY BE EXPOSED TO DANGEROUS VOLTAGE. This is fully transistorized and does not contain any parts that produce heat. 4 If the plug should never be repaired... If you are provided for installation, use can be blocked by the user. RETAIN THIS BOOKLET FOR FUTURE REFERENCE. This unit is a safety feature. Ventilation Slots and openings in this product, read the owner's manual carefully, and follow all the operating and other ).
...line plug (a plug having one way. This set has been designed and manufactured to the operating instructions. 3. DO NOT REMOVE THE CABINET COVER, OR YOU MAY BE EXPOSED TO DANGEROUS VOLTAGE. This is fully transistorized and does not contain any parts that produce heat. 4 If the plug should never be repaired... If you are provided for installation, use can be blocked by the user. RETAIN THIS BOOKLET FOR FUTURE REFERENCE. This unit is a safety feature. Ventilation Slots and openings in this product, read the owner's manual carefully, and follow all the operating and other ).
Owners Manual
Page 5
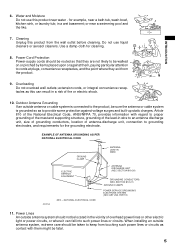
..., PART H) 11. Do not use this product near a bath tub, wash bowl, kitchen sink, or laundry tub; Cleaning Unplug this can result in the vicinity of antenna-discharge unit, connection to an antenna discharge unit, size of grounding conductors, location of overhead power lines or other electric light or power circuits, or where it can fall into such power lines or circuits. Power-Cord Protection Power...
..., PART H) 11. Do not use this product near a bath tub, wash bowl, kitchen sink, or laundry tub; Cleaning Unplug this can result in the vicinity of antenna-discharge unit, connection to an antenna discharge unit, size of grounding conductors, location of overhead power lines or other electric light or power circuits, or where it can fall into such power lines or circuits. Power-Cord Protection Power...
Owners Manual
Page 6
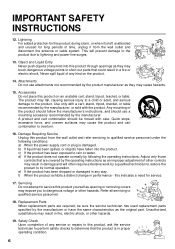
... the product to its normal operation. Any mounting of other hazards. 19. b) If liquid has been spilled, or objects have the same characteristics as an improper adjustment of the product should follow the manufacturer's instructions, and should be sure the service technician has used replacement parts specified by following conditions: a) When the power-supply cord or plug is damaged...
... the product to its normal operation. Any mounting of other hazards. 19. b) If liquid has been spilled, or objects have the same characteristics as an improper adjustment of the product should follow the manufacturer's instructions, and should be sure the service technician has used replacement parts specified by following conditions: a) When the power-supply cord or plug is damaged...
Owners Manual
Page 7
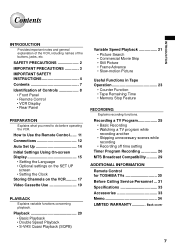
... time setting Timer Program Recording 26 MTS Broadcast Compatibility .......... 29 ADDITIONAL INFORMATION Remote Control for TOSHIBA TVs 30 Before Calling Service Personnel ... 31 Specifications 33 Accessories 33 Memo 34 LIMITED WARRANTY Back cover 7 How to do before operating the VCR. SAFETY PRECAUTIONS 2 IMPORTANT PRECAUTIONS 3 IMPORTANT SAFETY INSTRUCTIONS 4 Contents 7 Identification of the buttons, jacks, etc. Playback 20 • Basic Playback • Double Speed Playback • S-VHS Quasi Playback (SQPB) Variable Speed Playback 21 • Picture...
... time setting Timer Program Recording 26 MTS Broadcast Compatibility .......... 29 ADDITIONAL INFORMATION Remote Control for TOSHIBA TVs 30 Before Calling Service Personnel ... 31 Specifications 33 Accessories 33 Memo 34 LIMITED WARRANTY Back cover 7 How to do before operating the VCR. SAFETY PRECAUTIONS 2 IMPORTANT PRECAUTIONS 3 IMPORTANT SAFETY INSTRUCTIONS 4 Contents 7 Identification of the buttons, jacks, etc. Playback 20 • Basic Playback • Double Speed Playback • S-VHS Quasi Playback (SQPB) Variable Speed Playback 21 • Picture...
Owners Manual
Page 8
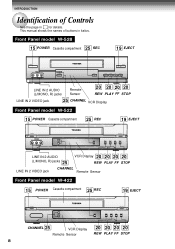
... Panel model W-528 15 POWER Cassette compartment 25 REC 19 EJECT LINE IN 2 AUDIO (L/MONO, R) jacks Remote Sensor 20 20 20 20 REW PLAY FF STOP LINE IN 2 VIDEO jack 25 CHANNEL VCR Display Front Panel model W-522 15 POWER Cassette compartment 25 REC 19 EJECT LINE IN 2 AUDIO (L/MONO, R) jacks 25 VCR Display 20 20 20 20 REW PLAY FF STOP LINE IN 2 VIDEO jack CHANNEL Remote Sensor Front Panel model W-422 15 POWER Cassette compartment 25 REC 19 EJECT CHANNEL 25 VCR Display Remote Sensor 20 20...
... Panel model W-528 15 POWER Cassette compartment 25 REC 19 EJECT LINE IN 2 AUDIO (L/MONO, R) jacks Remote Sensor 20 20 20 20 REW PLAY FF STOP LINE IN 2 VIDEO jack 25 CHANNEL VCR Display Front Panel model W-522 15 POWER Cassette compartment 25 REC 19 EJECT LINE IN 2 AUDIO (L/MONO, R) jacks 25 VCR Display 20 20 20 20 REW PLAY FF STOP LINE IN 2 VIDEO jack CHANNEL Remote Sensor Front Panel model W-422 15 POWER Cassette compartment 25 REC 19 EJECT CHANNEL 25 VCR Display Remote Sensor 20 20...
Owners Manual
Page 12
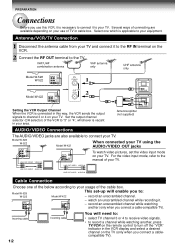
... - Antenna splitter (not supplied) AUDIO/VIDEO Connections The AUDIO/VIDEO jacks are available depending on your TV. watch video pictures, set -up will need to: • select TV channel 3 or 4 to receive video signals. • to record a channel while watching another (only when you connect a cablecompatible TV). 12 Select one of TV or cable box. Model:W-528 W-522 Model:W-422 This set the video input mode on the VCR. 2 Connect the RF OUT terminal...
... - Antenna splitter (not supplied) AUDIO/VIDEO Connections The AUDIO/VIDEO jacks are available depending on your TV. watch video pictures, set -up will need to: • select TV channel 3 or 4 to receive video signals. • to record a channel while watching another (only when you connect a cablecompatible TV). 12 Select one of TV or cable box. Model:W-528 W-522 Model:W-422 This set the video input mode on the VCR. 2 Connect the RF OUT terminal...
Owners Manual
Page 13
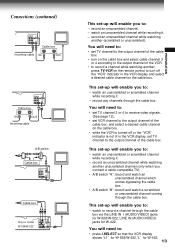
... channel while recording it. - record any channels through the cable box via the LINE IN 1 (AUDIO/VIDEO) jacks for W-528/W-522, LINE IN (AUDIO/VIDEO) jacks for W-422. You will need to: • set TV channel 3 or 4 to receive video signals. (See page 12). • set VCR channel to the output channel of the cable box, and select a desired cable channel on the cable box. • while the VCR is turned off the "VCR" indicator in the VCR display and select a desired cable channel...
... channel while recording it. - record any channels through the cable box via the LINE IN 1 (AUDIO/VIDEO) jacks for W-528/W-522, LINE IN (AUDIO/VIDEO) jacks for W-422. You will need to: • set TV channel 3 or 4 to receive video signals. (See page 12). • set VCR channel to the output channel of the cable box, and select a desired cable channel on the cable box. • while the VCR is turned off the "VCR" indicator in the VCR display and select a desired cable channel...
Owners Manual
Page 15
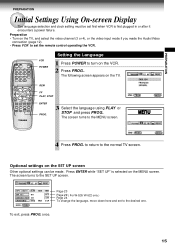
... off ESP Page 23 Page 29 ( For W-528/ W-522 only ) Page 24 To change the language, move down here and set to the desired one. The screen turns to the normal TV screen. The screen turns to the MENU screen. PREPARATION PREPARATION Initial Settings Using On-screen Display The language selection and clock setting must be made the Audio/Video connection (page 12). • Press VCR to set the remote control operating the VCR.
... off ESP Page 23 Page 29 ( For W-528/ W-522 only ) Page 24 To change the language, move down here and set to the desired one. The screen turns to the normal TV screen. The screen turns to the MENU screen. PREPARATION PREPARATION Initial Settings Using On-screen Display The language selection and clock setting must be made the Audio/Video connection (page 12). • Press VCR to set the remote control operating the VCR.
Owners Manual
Page 16
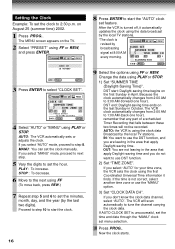
... any part of a scheduled Timer Recording that apply Daylight-saving time and you select "AUTO" for your time zone, the VCR sets the clock using the clock data Broadcast by the local TV stations. *The clock is unsuccessful, set the time and date through the "MANU" clock set the minutes, month, day, and the year (by the last two digits). If you do not want to set feature. After the VCR is turned...
... any part of a scheduled Timer Recording that apply Daylight-saving time and you select "AUTO" for your time zone, the VCR sets the clock using the clock data Broadcast by the local TV stations. *The clock is unsuccessful, set the time and date through the "MANU" clock set the minutes, month, day, and the year (by the last two digits). If you do not want to set feature. After the VCR is turned...

Owners Manual
Page 17
... cable. 5 Select "AUTO SCAN" using CH/TRK. VCR TV POWER 1 23 45 78 A.SELECT 0 6 CM SKIP 9 100 EJECT PLAY REW FF ENTER STOP SLOW PAUSE/STILL REMAIN/ COUNT DISPLAY COUNTER RESET SP/ SLP I .SELECT 3 Select "CH MEMORY" using PLAY or STOP, and press ENTER. 4 Set "TV/CATV" to exit. 17 to display the MENU screen. 2 Select "PRESET" using FF or REW. FF PLAY, STOP ENTER 1,6 I .SELECT REC TIMER...
... cable. 5 Select "AUTO SCAN" using CH/TRK. VCR TV POWER 1 23 45 78 A.SELECT 0 6 CM SKIP 9 100 EJECT PLAY REW FF ENTER STOP SLOW PAUSE/STILL REMAIN/ COUNT DISPLAY COUNTER RESET SP/ SLP I .SELECT 3 Select "CH MEMORY" using PLAY or STOP, and press ENTER. 4 Set "TV/CATV" to exit. 17 to display the MENU screen. 2 Select "PRESET" using FF or REW. FF PLAY, STOP ENTER 1,6 I .SELECT REC TIMER...
Owners Manual
Page 20
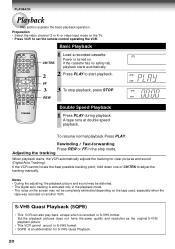
... playback. Preparation • Select the video channel (3 or 4) or video input mode on the screen may be completely eliminated depending on the tape used, especially when the tape was recorded on . A.SELECT 0 100 2 2 Press PLAY to set the remote control operating the VCR. A tape runs at tape which is turned on another VCR. If the VCR cannot locate the best possible tracking point, hold down one of CH/TRK to adjust the tracking manually. Basic Playback VCR TV POWER 1 Load a recorded cassette...
... playback. Preparation • Select the video channel (3 or 4) or video input mode on the screen may be completely eliminated depending on the tape used, especially when the tape was recorded on . A.SELECT 0 100 2 2 Press PLAY to set the remote control operating the VCR. A tape runs at tape which is turned on another VCR. If the VCR cannot locate the best possible tracking point, hold down one of CH/TRK to adjust the tracking manually. Basic Playback VCR TV POWER 1 Load a recorded cassette...
Owners Manual
Page 23
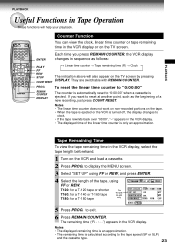
...:00" when a cassette is calculated according to reset at another point, such as follows: PLAY → Linear time counter → Tape remaining time (R) → Clock FF REW STOP The indication above will help your playback. Notes • The linear time counter does not work on non-recorded portions on the tape. • When the tape is ejected or the VCR is turned off, the display changes to exit. 6 Press...
...:00" when a cassette is calculated according to reset at another point, such as follows: PLAY → Linear time counter → Tape remaining time (R) → Clock FF REW STOP The indication above will help your playback. Notes • The linear time counter does not work on non-recorded portions on the tape. • When the tape is ejected or the VCR is turned off, the display changes to exit. 6 Press...
Owners Manual
Page 24
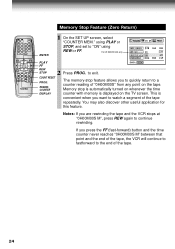
... of the tape. 24 VCR TV POWER 1 23 456 CM SKIP 7 89 A.SELECT 0 100 EJECT PLAY REW FF ENTER STOP SLOW PAUSE/STILL REMAIN/ COUNT DISPLAY COUNTER RESET SP/ SLP I.SELECT REC TIMER TV VOL PROG. using PLAY or STOP, and set to exit. to "ON" using REW or FF. REMAIN/ COUNTER The memory-stop is automatically turned on the TV screen. If you...
... of the tape. 24 VCR TV POWER 1 23 456 CM SKIP 7 89 A.SELECT 0 100 EJECT PLAY REW FF ENTER STOP SLOW PAUSE/STILL REMAIN/ COUNT DISPLAY COUNTER RESET SP/ SLP I.SELECT REC TIMER TV VOL PROG. using PLAY or STOP, and set to exit. to "ON" using REW or FF. REMAIN/ COUNTER The memory-stop is automatically turned on the TV screen. If you...
Owners Manual
Page 25
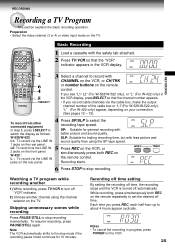
... to stop mode if the recording pause mode continues for 10 minutes. Recording off time setting By setting the recording off time, the recording stops and the VCR is turned off time. W-422 : L : To record via the LINE IN simultaneously press both REC on the remote control. Watching a TV program while recording another channel using the SP tape speed. 1 jacks on the rear panel. 5 L2: To record via the cable box, make the output channel number of the cable box or "L1...
... to stop mode if the recording pause mode continues for 10 minutes. Recording off time setting By setting the recording off time, the recording stops and the VCR is turned off time. W-422 : L : To record via the LINE IN simultaneously press both REC on the remote control. Watching a TV program while recording another channel using the SP tape speed. 1 jacks on the rear panel. 5 L2: To record via the cable box, make the output channel number of the cable box or "L1...
Owners Manual
Page 26
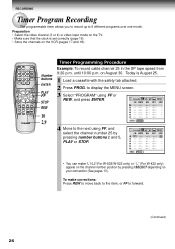
... video channel (3 or 4) or video input mode on the TV. • Make sure that the clock is August 25. 1 Load a cassette with the safety tab attached. 2 Press PROG. CANCEL Number buttons ENTER PLAY FF STOP REW Timer Programming Procedure Example: To record cable channel 25 in the SP tape speed from 9:20 p.m. until 10:00 p.m. on the VCR (pages 17 and 18). VCR TV POWER 1 23 45 78 A.SELECT 0 6 CM SKIP 9 100 EJECT PLAY...
... video channel (3 or 4) or video input mode on the TV. • Make sure that the clock is August 25. 1 Load a cassette with the safety tab attached. 2 Press PROG. CANCEL Number buttons ENTER PLAY FF STOP REW Timer Programming Procedure Example: To record cable channel 25 in the SP tape speed from 9:20 p.m. until 10:00 p.m. on the VCR (pages 17 and 18). VCR TV POWER 1 23 45 78 A.SELECT 0 6 CM SKIP 9 100 EJECT PLAY...
Owners Manual
Page 27
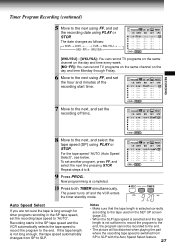
... record the program to the end, the program cannot be recorded to the end. • The picture will be distorted when playing the part where the recording tape speed is long enough for timer program recording in the SP tape speed and the VCR automatically selects the tape speed to record the program to the end. PM 7 Move to the next, and set the recording date using PLAY or STOP. Notes • Make sure that the tape...
... record the program to the end, the program cannot be recorded to the end. • The picture will be distorted when playing the part where the recording tape speed is long enough for timer program recording in the SP tape speed and the VCR automatically selects the tape speed to record the program to the end. PM 7 Move to the next, and set the recording date using PLAY or STOP. Notes • Make sure that the tape...
Owners Manual
Page 28
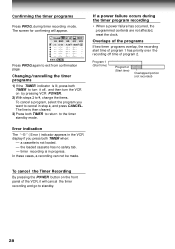
... screen for confirming will cancel the timer recording and go to cancel in step 4, and press CANCEL. Changing/cancelling the timer programs 1) If the TIMER indicator is then cleared. 3) Press both TIMER when: -- a cassette is in the VCR display if you want to standby. 28 If a power failure occurs during timer recording mode. Program 1 (Start time) Program 2 (Start time) Overlapped portion (not recorded) To cancel the Timer Recording By pressing the POWER button on...
... screen for confirming will cancel the timer recording and go to cancel in step 4, and press CANCEL. Changing/cancelling the timer programs 1) If the TIMER indicator is then cleared. 3) Press both TIMER when: -- a cassette is in the VCR display if you want to standby. 28 If a power failure occurs during timer recording mode. Program 1 (Start time) Program 2 (Start time) Overlapped portion (not recorded) To cancel the Timer Recording By pressing the POWER button on...
Owners Manual
Page 31
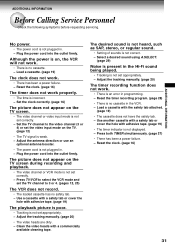
... sound being played. • Tracking is not displayed. - Select a desired sound using A.SELECT. (page 29) Noise is incorrect. - Reset the clock. (page 16) 31 Load a cassette. (page 19) The clock does not work properly. • The time is present in . - Press TV/VCR to 3 or 4. (pages 12, 25) The VCR does not record. • The loaded cassette has no cassette. - Reset the timer recording program. (page 28) • There is weak. - Set the TV channel...
... sound being played. • Tracking is not displayed. - Select a desired sound using A.SELECT. (page 29) Noise is incorrect. - Reset the clock. (page 16) 31 Load a cassette. (page 19) The clock does not work properly. • The time is present in . - Press TV/VCR to 3 or 4. (pages 12, 25) The VCR does not record. • The loaded cassette has no cassette. - Reset the timer recording program. (page 28) • There is weak. - Set the TV channel...
Owners Manual
Page 34
... power, improper installation, improper maintenance or use have had the serial number removed, altered, defaced or rendered illegible. (7) At you option, after the date of the original retail purchase, you . Reception problems caused by inadequate antenna systems are your original product. (9) Physically damaged units are responsible for all transportation and insurance charges for all parts and labor. ADDITIONAL INFORMATION LIMITED WARRANTY TOSHIBA VIDEO CASSETTE RECORDER Toshiba...
... power, improper installation, improper maintenance or use have had the serial number removed, altered, defaced or rendered illegible. (7) At you option, after the date of the original retail purchase, you . Reception problems caused by inadequate antenna systems are your original product. (9) Physically damaged units are responsible for all transportation and insurance charges for all parts and labor. ADDITIONAL INFORMATION LIMITED WARRANTY TOSHIBA VIDEO CASSETTE RECORDER Toshiba...
