

Owners Manual
Page 7
...notes and general explanation of the VCR, including names of Controls 8 • Front Panel • Remote Control • VCR Display • Rear Panel PREPARATION Explains what you need to Use the Remote Control ...... 10 Connections 11 Auto Set Up 14 Initial Settings Using On-screen Display 15 • ... Box Set-up 37 DSS® Satellite Receiver Set-up ........ 41 MTS Broadcast Compatibility .......... 44 Simulcast Recording 45 ADDITIONAL INFORMATION Multi Brand Remote Control 46 Before Calling Service Personnel ... 48 Specifications 50 Accessories 50 LIMITED WARRANTY 51 7
...notes and general explanation of the VCR, including names of Controls 8 • Front Panel • Remote Control • VCR Display • Rear Panel PREPARATION Explains what you need to Use the Remote Control ...... 10 Connections 11 Auto Set Up 14 Initial Settings Using On-screen Display 15 • ... Box Set-up 37 DSS® Satellite Receiver Set-up ........ 41 MTS Broadcast Compatibility .......... 44 Simulcast Recording 45 ADDITIONAL INFORMATION Multi Brand Remote Control 46 Before Calling Service Personnel ... 48 Specifications 50 Accessories 50 LIMITED WARRANTY 51 7
Owners Manual
Page 8
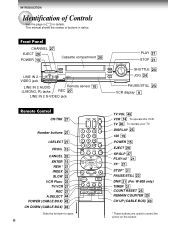
... 20 POWER 15 Cassette compartment 20 POWER c EJECT CHANNEL LINE IN 2 LINE IN 2 REC VIDEO jack VIDEO L-MONO-AUDIO-R S-VIDEO LINE IN 2 AUDIO (L/MONO, R) jacks Remote sensor 10 REC 27 LINE IN 2 S-VIDEO jack PLAY STOP REV ( PAUSE/STILL PLAY 21 STOP 21 FWD ) SHUTTLE 24 JOG 24 PAUSE/STILL 23... VCR display 9 Remote Control CH/TRK 27 Number buttons 27 I.SELECT 27 PROG. 15 CANCEL 32 ENTER 15 REW * 21 INDEX 26 SLOW 23 VCR Plus+ 35 TV...
... 20 POWER 15 Cassette compartment 20 POWER c EJECT CHANNEL LINE IN 2 LINE IN 2 REC VIDEO jack VIDEO L-MONO-AUDIO-R S-VIDEO LINE IN 2 AUDIO (L/MONO, R) jacks Remote sensor 10 REC 27 LINE IN 2 S-VIDEO jack PLAY STOP REV ( PAUSE/STILL PLAY 21 STOP 21 FWD ) SHUTTLE 24 JOG 24 PAUSE/STILL 23... VCR display 9 Remote Control CH/TRK 27 Number buttons 27 I.SELECT 27 PROG. 15 CANCEL 32 ENTER 15 REW * 21 INDEX 26 SLOW 23 VCR Plus+ 35 TV...

Owners Manual
Page 10
... 1 year depending on batteries • The life of the batteries is about 7 m from battery corrosion. Setting up the Remote Control 1 Open the battery compartment on the front of the Remote Control by pressing on the centre of the slide cover and pull off in one motion in the direction of... the arrow. 1 2 2 Install 2 batteries ("AAA" size) following the polarity diagrams. 3 Close the battery compartment lid. 4 Point the remote control at the VCR and press the buttons within about 30˚ in every direction Notes on the conditions of use. • If the...
... 1 year depending on batteries • The life of the batteries is about 7 m from battery corrosion. Setting up the Remote Control 1 Open the battery compartment on the front of the Remote Control by pressing on the centre of the slide cover and pull off in one motion in the direction of... the arrow. 1 2 2 Install 2 batteries ("AAA" size) following the polarity diagrams. 3 Close the battery compartment lid. 4 Point the remote control at the VCR and press the buttons within about 30˚ in every direction Notes on the conditions of use. • If the...
Owners Manual
Page 12
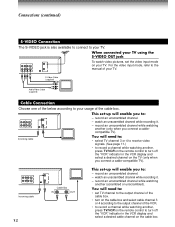
record an unscrambled channel while watching another , press TV/VCR on the remote control to turn off the "VCR" indicator in the VCR display and select a desired cable channel on the cable box. For the video input mode, ... channel to the output channel of the cable box. • turn off the "VCR" indicator in the VCR display and select a desired channel on the remote control to your TV. watch an unscrambled channel while recording it . - Connections (continued) S-VIDEO Connection The S-VIDEO jack is also available to connect to : - You...
record an unscrambled channel while watching another , press TV/VCR on the remote control to turn off the "VCR" indicator in the VCR display and select a desired cable channel on the cable box. For the video input mode, ... channel to the output channel of the cable box. • turn off the "VCR" indicator in the VCR display and select a desired channel on the remote control to your TV. watch an unscrambled channel while recording it . - Connections (continued) S-VIDEO Connection The S-VIDEO jack is also available to connect to : - You...
Owners Manual
Page 14
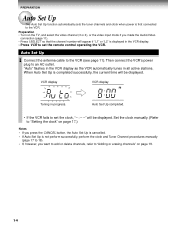
... all active stations. Auto Set Up completed. • If the VCR fails to an AC outlet. Then connect the VCR's power plug to set the remote control operating the VCR. Preparation • Turn on the TV, and select the video channel (3 or 4), or the video input mode if you want to...
... all active stations. Auto Set Up completed. • If the VCR fails to an AC outlet. Then connect the VCR's power plug to set the remote control operating the VCR. Preparation • Turn on the TV, and select the video channel (3 or 4), or the video input mode if you want to...

Owners Manual
Page 15
...: PROG Page 25 Page 44 Page 45 With "AUTO" set to "AUTO" or "MANU". To exit, press PROG. (Continued) 15 You can be set the remote control operating the VCR. 123 456 789 0 100 PLAY/x2 REW ENTER FF STOP VCR Plus+ DNR A.SELECT POWER REMAIN COUNTER CH DOWN COUNT RESET...
...: PROG Page 25 Page 44 Page 45 With "AUTO" set to "AUTO" or "MANU". To exit, press PROG. (Continued) 15 You can be set the remote control operating the VCR. 123 456 789 0 100 PLAY/x2 REW ENTER FF STOP VCR Plus+ DNR A.SELECT POWER REMAIN COUNTER CH DOWN COUNT RESET...
Owners Manual
Page 21
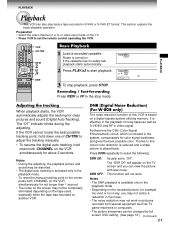
... can be distorted. • The digital auto tracking is included in video signal. Thanks to select the following: DnR On: DnR OFF: Usually set the remote control operating the VCR. 123 456 789 0 100 PLAY/x2 REW ENTER FF STOP VCR Plus+ DNR A.SELECT POWER REMAIN COUNTER CH DOWN COUNT RESET...
... can be distorted. • The digital auto tracking is included in video signal. Thanks to select the following: DnR On: DnR OFF: Usually set the remote control operating the VCR. 123 456 789 0 100 PLAY/x2 REW ENTER FF STOP VCR Plus+ DNR A.SELECT POWER REMAIN COUNTER CH DOWN COUNT RESET...

Owners Manual
Page 27
... unnecessary scenes while recording (including S-VHS/S-VHS ET recording) Press PAUSE/STILL to stop recording. L2: To record via the LINE IN 2 jacks on the remote control. REC TIMER POWER SLP VCR REC CH 6 Press STOP to stop recording momentarily. RECORDING Recording a TV Program This VCR can record in the VCR... VCR, or simultaneously press both REC on the VCR repeatedly to set -up to turn on the rear panel. While recording, press REC on the remote control.
... unnecessary scenes while recording (including S-VHS/S-VHS ET recording) Press PAUSE/STILL to stop recording. L2: To record via the LINE IN 2 jacks on the remote control. REC TIMER POWER SLP VCR REC CH 6 Press STOP to stop recording momentarily. RECORDING Recording a TV Program This VCR can record in the VCR... VCR, or simultaneously press both REC on the VCR repeatedly to set -up to turn on the rear panel. While recording, press REC on the remote control.

Owners Manual
Page 28
... quality video recordings with a horizontal resolution of 400 lines compared with 240 lines of resolution of the cable box or "L1" appear, depending on the remote control. S-VIDEO jack will appear on the front panel. SLP VCR CH 3 Select a channel to record with better picture and sound quality. L2: To... REC" setting. 28 SLP: Suitable for general recording with POWER CHANNEL on the VCR, or CH/TRK SLP VCR or number buttons on the remote control. SLP VCR CH SP: Suitable for tripling recording time, but with less picture and sound quality than using REW or FF. Note If VHS...
... quality video recordings with a horizontal resolution of 400 lines compared with 240 lines of resolution of the cable box or "L1" appear, depending on the remote control. S-VIDEO jack will appear on the front panel. SLP VCR CH 3 Select a channel to record with better picture and sound quality. L2: To... REC" setting. 28 SLP: Suitable for general recording with POWER CHANNEL on the VCR, or CH/TRK SLP VCR or number buttons on the remote control. SLP VCR CH SP: Suitable for tripling recording time, but with less picture and sound quality than using REW or FF. Note If VHS...

Owners Manual
Page 29
... POWER SLP VCR REC CH 9 Press STOP to record with POWER CHANNEL on the VCR, or CH/TRK SLP VCR or number buttons on the remote control. SLP: Suitable for general recording with the safety tab attached. 2 Press TV/VCR so that the channel number appears. • If you record cable... the "VCR" POWER indicator appears in S-VHS ET Mode This VCR is selected. 8 Press REC on the VCR, or simultaneously press both REC on the remote control.
... POWER SLP VCR REC CH 9 Press STOP to record with POWER CHANNEL on the VCR, or CH/TRK SLP VCR or number buttons on the remote control. SLP: Suitable for general recording with the safety tab attached. 2 Press TV/VCR so that the channel number appears. • If you record cable... the "VCR" POWER indicator appears in S-VHS ET Mode This VCR is selected. 8 Press REC on the VCR, or simultaneously press both REC on the remote control.

Owners Manual
Page 30
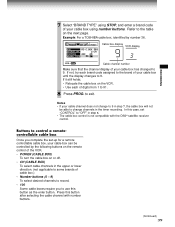
...REW 10 2, 9 Timer Programming Procedure Example: To record cable channel 25 in the SP tape speed from 9:30 p.m. If your cable box is not remote-controllable, choose the desired channel (1 to 125) on the cable box. • To record a satellite program from the connected DSS® satellite receiver:...a satellite's.) If your DSS® satellite receiver is August 25. 1 Load a cassette with the safety tab attached. 2 Press PROG. Today is not remote-controllable, choose the desired channel (100 to 999) on the DSS® satellite receiver. To make corrections: Press REW to move back to the item...
...REW 10 2, 9 Timer Programming Procedure Example: To record cable channel 25 in the SP tape speed from 9:30 p.m. If your cable box is not remote-controllable, choose the desired channel (1 to 125) on the cable box. • To record a satellite program from the connected DSS® satellite receiver:...a satellite's.) If your DSS® satellite receiver is August 25. 1 Load a cassette with the safety tab attached. 2 Press PROG. Today is not remote-controllable, choose the desired channel (100 to 999) on the DSS® satellite receiver. To make corrections: Press REW to move back to the item...

Owners Manual
Page 37
... during timer program recording or VCR Plus+ C3 ® system recording. The VCR sends out infrared signals to a cable box equipped with an infrared wireless remote control. RECORDING RECORDING Cable Box Set-up The VCR can select cable channels from the cable box by the cable box.
... during timer program recording or VCR Plus+ C3 ® system recording. The VCR sends out infrared signals to a cable box equipped with an infrared wireless remote control. RECORDING RECORDING Cable Box Set-up The VCR can select cable channels from the cable box by the cable box.

Owners Manual
Page 38
... output channel number of the PROGRAM SET UP PRESET cable box.) Type D: the line input mode "L1" using USE CH/TRK on the remote control or CHANNEL on the remote control. BOX DSS OUTPUT CH 3 CH COn TROL OFF On → Go to step 5. C.BOX: • Type B • Type C (A/B switch "B") • Type...
... output channel number of the PROGRAM SET UP PRESET cable box.) Type D: the line input mode "L1" using USE CH/TRK on the remote control or CHANNEL on the remote control. BOX DSS OUTPUT CH 3 CH COn TROL OFF On → Go to step 5. C.BOX: • Type B • Type C (A/B switch "B") • Type...
Owners Manual
Page 39
...that the channel display of your cable box has changed to the table on the next page. Refer to 9. Example: For a TOSHIBA cable box, identified by the following buttons on the remote control of the VCR. • POWER (CABLE BOX) To turn the cable box on the VCR. • Use each ... BRAnD TYPE OFFnO . Notes • If your cable box can be able to "OFF" in the timer recording. In this case, set -up for a remote controllable cable box, your cable channel does not change channels in step 6. • The cable box control is not compatible with number buttons. (Continued) 39...
...that the channel display of your cable box has changed to the table on the next page. Refer to 9. Example: For a TOSHIBA cable box, identified by the following buttons on the remote control of the VCR. • POWER (CABLE BOX) To turn the cable box on the VCR. • Use each ... BRAnD TYPE OFFnO . Notes • If your cable box can be able to "OFF" in the timer recording. In this case, set -up for a remote controllable cable box, your cable channel does not change channels in step 6. • The cable box control is not compatible with number buttons. (Continued) 39...

Owners Manual
Page 41
... on the top of the VCR as shown below. The VCR sends out infrared signals to a DSS® satellite receiver equipped with an infrared wireless remote control. Then they bounce off walls and other objects in the timer program recording. Notes • If the channels cannot be connected to your program...
... on the top of the VCR as shown below. The VCR sends out infrared signals to a DSS® satellite receiver equipped with an infrared wireless remote control. Then they bounce off walls and other objects in the timer program recording. Notes • If the channels cannot be connected to your program...

Owners Manual
Page 42
Check the rear of your DSS® satellite receiver is PROGRAM SET UP PRESET remote-controllable. • Satellite channels will be selected by CH UP/CH DOWN (CABLE BOX) on the TV. 123 456 789 0 100 PLAY/x2 REW ENTER ... set to display the MENU screen. DSS® Satellite Receiver Set-up (continued) Preparation Select the video channel (3 or 4) or video input mode on the remote control.
Check the rear of your DSS® satellite receiver is PROGRAM SET UP PRESET remote-controllable. • Satellite channels will be selected by CH UP/CH DOWN (CABLE BOX) on the TV. 123 456 789 0 100 PLAY/x2 REW ENTER ... set to display the MENU screen. DSS® Satellite Receiver Set-up (continued) Preparation Select the video channel (3 or 4) or video input mode on the remote control.
Owners Manual
Page 43
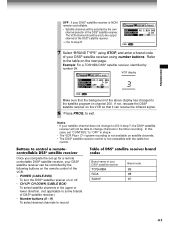
... (not applicable to some brands of DSS® satellite receiver.) • Number buttons (0 - 9) To select desired channels to record. Example: For a TOSHIBA DSS® satellite receiver, identified by number 99. On 99 EnD: PROG Make sure that it can be controlled by the following buttons on the... • If your satellite channel does not change channels in the timer recording. RECORDING OFF: if your DSS® satellite receiver is NON remote-controllable. • Satellite channels will not be able to change to 200 in step 7, the DSS® satetllite receiver will be selected by...
... (not applicable to some brands of DSS® satellite receiver.) • Number buttons (0 - 9) To select desired channels to record. Example: For a TOSHIBA DSS® satellite receiver, identified by number 99. On 99 EnD: PROG Make sure that it can be controlled by the following buttons on the... • If your satellite channel does not change channels in the timer recording. RECORDING OFF: if your DSS® satellite receiver is NON remote-controllable. • Satellite channels will not be able to change to 200 in step 7, the DSS® satetllite receiver will be selected by...

Owners Manual
Page 45
... from an FM stereo tuner or receiver onto the Hi-Fi track and normal track. If you use a cable box, select a desired channel on the remote control.
... from an FM stereo tuner or receiver onto the Hi-Fi track and normal track. If you use a cable box, select a desired channel on the remote control.

Owners Manual
Page 46
... 4 Point the remote control at all the operations above, or may not respond to set the brand code again. 46 CH/TRK To select TV channels in the upper or lower direction. Notes • For some brands, several control codes (brand codes) are allocated. The TOSHIBA code has initially ... this case, operate your TV with various brands of them until the buttons work on your TV. • If you replace the remote control's batteries, set the remote control operating your TV. 2 While holding down . Number buttons To select TV channels. Try each button listed below to 9, first ...
... 4 Point the remote control at all the operations above, or may not respond to set the brand code again. 46 CH/TRK To select TV channels in the upper or lower direction. Notes • For some brands, several control codes (brand codes) are allocated. The TOSHIBA code has initially ... this case, operate your TV with various brands of them until the buttons work on your TV. • If you replace the remote control's batteries, set the remote control operating your TV. 2 While holding down . Number buttons To select TV channels. Try each button listed below to 9, first ...

Owners Manual
Page 49
.... (page 10) • Too far from the front of the VCR. (page 10) • An obstacle may be in the VCR. - Make sure the remote control is loaded. • The cassette was inserted with the label side not paralleling the compartment. - Reload it is within 7 m from the VCR. - Eject ...the cassette and reload the new one. (page 20) 49 Use the remote control within 30° of the remote sensor on the equipment you want to operate. (pages 14, 46) The cassette is ejected immediately after it carefully. (page 20) The...
.... (page 10) • Too far from the front of the VCR. (page 10) • An obstacle may be in the VCR. - Make sure the remote control is loaded. • The cassette was inserted with the label side not paralleling the compartment. - Reload it is within 7 m from the VCR. - Eject ...the cassette and reload the new one. (page 20) 49 Use the remote control within 30° of the remote sensor on the equipment you want to operate. (pages 14, 46) The cassette is ejected immediately after it carefully. (page 20) The...
