User Guide
Page 5
... of Toshiba, or the Toshiba Support Centre within the United States at (800) 457-7777 or Outside the United States at the top or bottom of each transmitted page or on this equipment, for which charges exceed local or long-distance transmission charges.) In order to program this information into your right to the fax software instructions installed on...
... of Toshiba, or the Toshiba Support Centre within the United States at (800) 457-7777 or Outside the United States at the top or bottom of each transmitted page or on this equipment, for which charges exceed local or long-distance transmission charges.) In order to program this information into your right to the fax software instructions installed on...
User Guide
Page 28
... 47 Opening the display panel 47 Your computer's features and specifications ....48 Turning on the power 48 Adding memory (optional 49 Installing a memory module 50 Removing a memory module 55 Checking total memory 56 Hard Drive Recovery Utilities 57 Creating Recovery CDs/DVDs 57 Hard Disk Drive Recovery using the recovery partition 59 Hard Disk Drive Recovery using the Recovery media 63 Installing drivers and applications 66 Using the TouchPad 66 Scrolling with the TouchPad 67 Control buttons 67 Disabling or enabling the TouchPad 67 Using external display devices 67 Directing...
... 47 Opening the display panel 47 Your computer's features and specifications ....48 Turning on the power 48 Adding memory (optional 49 Installing a memory module 50 Removing a memory module 55 Checking total memory 56 Hard Drive Recovery Utilities 57 Creating Recovery CDs/DVDs 57 Hard Disk Drive Recovery using the recovery partition 59 Hard Disk Drive Recovery using the Recovery media 63 Installing drivers and applications 66 Using the TouchPad 66 Scrolling with the TouchPad 67 Control buttons 67 Disabling or enabling the TouchPad 67 Using external display devices 67 Directing...
User Guide
Page 33
... Optical drive problems 185 Sound system problems 186 PC Card problems 186 ExpressCard™ problems 189 Printer problems 191 Modem problems 192 Wireless networking problems 193 DVD operating problems 195 Develop good computing habits 197 Data and system configuration backup in the Windows® operating system 198 If you need further assistance 202 Before you contact Toshiba 202 Contacting Toshiba 203 Other Toshiba Internet Web sites 203 Toshiba's worldwide offices 204 Appendix A: Hot Keys 206 Volume Mute 206 Password...
... Optical drive problems 185 Sound system problems 186 PC Card problems 186 ExpressCard™ problems 189 Printer problems 191 Modem problems 192 Wireless networking problems 193 DVD operating problems 195 Develop good computing habits 197 Data and system configuration backup in the Windows® operating system 198 If you need further assistance 202 Before you contact Toshiba 202 Contacting Toshiba 203 Other Toshiba Internet Web sites 203 Toshiba's worldwide offices 204 Appendix A: Hot Keys 206 Volume Mute 206 Password...
User Guide
Page 50
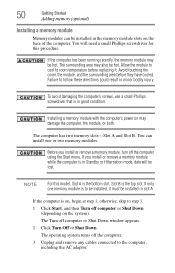
... Hibernation mode, data will need a small Phillips screwdriver for this model, Slot A is in the memory module slots on the system). Installing a memory module with the computer's power on , begin at step 1; The computer has two memory slots-Slot A and Slot B. If you install or remove a memory module, turn off the computer using the Start menu. NOTE For this procedure. The operating system turns off the computer. 3 Unplug and remove any cables connected to step 3. 1 Click Start, and then Turn...
... Hibernation mode, data will need a small Phillips screwdriver for this model, Slot A is in the memory module slots on the system). Installing a memory module with the computer's power on , begin at step 1; The computer has two memory slots-Slot A and Slot B. If you install or remove a memory module, turn off the computer using the Start menu. NOTE For this procedure. The operating system turns off the computer. 3 Unplug and remove any cables connected to step 3. 1 Click Start, and then Turn...

User Guide
Page 52
... to be installed, it must remove the top module first before removing/installing the bottom module. 52 Getting Started Adding memory (optional) 7 Remove the memory module slot cover. 8 Place the screws and the cover in slot A. 11 Pick up . Grease or dust on the computer. NOTE For this model, Slot A is the top slot. Before you must be installed in a safe place so that you may cause memory access problems. 9 Carefully remove the new memory module from its...
... to be installed, it must remove the top module first before removing/installing the bottom module. 52 Getting Started Adding memory (optional) 7 Remove the memory module slot cover. 8 Place the screws and the cover in slot A. 11 Pick up . Grease or dust on the computer. NOTE For this model, Slot A is the top slot. Before you must be installed in a safe place so that you may cause memory access problems. 9 Carefully remove the new memory module from its...
User Guide
Page 54
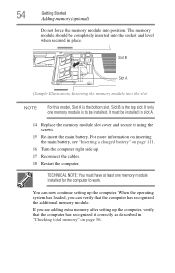
... battery, see "Inserting a charged battery" on page 56. Slot B Slot A (Sample Illustration) Inserting the memory module into position. Slot B is to work. 54 Getting Started Adding memory (optional) Do not force the memory module into the slot NOTE For this model, Slot A is the bottom slot. If only one memory module installed for the computer to be installed, it using the screws. 15 Re-insert the main battery. The memory module should be installed in slot A. 14 Replace the memory module slot cover...
... battery, see "Inserting a charged battery" on page 56. Slot B Slot A (Sample Illustration) Inserting the memory module into position. Slot B is to work. 54 Getting Started Adding memory (optional) Do not force the memory module into the slot NOTE For this model, Slot A is the bottom slot. If only one memory module installed for the computer to be installed, it using the screws. 15 Re-insert the main battery. The memory module should be installed in slot A. 14 Replace the memory module slot cover...
User Guide
Page 55
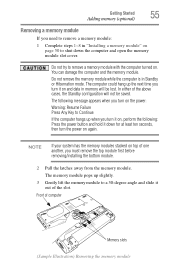
... power button and hold it down the computer and open the memory module slot cover. The memory module pops up the next time you turn it out of one another, you must remove the top module first before removing/installing the bottom module. 2 Pull the latches away from the memory module. NOTE If your system has the memory modules stacked on top of the slot. Getting Started Adding memory (optional) 55 Removing a memory module If you need...
... power button and hold it down the computer and open the memory module slot cover. The memory module pops up the next time you turn it out of one another, you must remove the top module first before removing/installing the bottom module. 2 Pull the latches away from the memory module. NOTE If your system has the memory modules stacked on top of the slot. Getting Started Adding memory (optional) 55 Removing a memory module If you need...
User Guide
Page 56
..., Windows® will display a pop-up . 7 Reconnect the cables. 8 Restart the computer. TECHNICAL NOTE: You must have at least one memory module installed for the computer to continue." 56 Getting Started Adding memory (optional) 4 Replace the memory module slot cover and secure it using the screws. 5 Re-insert the main battery. If the computer does not recognize the memory configuration, turn off the computer and remove the memory module slot cover (complete steps 1-8 in "Installing a memory module...
..., Windows® will display a pop-up . 7 Reconnect the cables. 8 Restart the computer. TECHNICAL NOTE: You must have at least one memory module installed for the computer to continue." 56 Getting Started Adding memory (optional) 4 Replace the memory module slot cover and secure it using the screws. 5 Re-insert the main battery. If the computer does not recognize the memory configuration, turn off the computer and remove the memory module slot cover (complete steps 1-8 in "Installing a memory module...
User Guide
Page 67
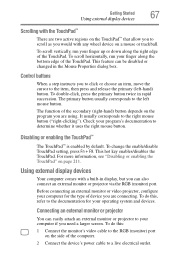
... enabled by default. Check your computer if you are connecting. For more information, see "Disabling or enabling the TouchPad" on the TouchPad™ that allow you to the documentation for your computer for the type of device you need a larger screen. To do this : 1 Connect the monitor's video cable to the RGB (monitor) port on a mouse or trackball. Getting Started Using external display devices 67 Scrolling with the TouchPad™ There are using. This hot key enables/disables the TouchPad. Using external display devices Your...
... enabled by default. Check your computer if you are connecting. For more information, see "Disabling or enabling the TouchPad" on the TouchPad™ that allow you to the documentation for your computer for the type of device you need a larger screen. To do this : 1 Connect the monitor's video cable to the RGB (monitor) port on a mouse or trackball. Getting Started Using external display devices 67 Scrolling with the TouchPad™ There are using. This hot key enables/disables the TouchPad. Using external display devices Your...
User Guide
Page 145
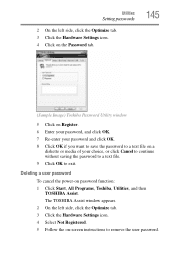
... -screen instructions to exit. Utilities Setting passwords 2 On the left side, click the Optimize tab. 3 Click the Hardware Settings icon. 4 Select Not Registered. 5 Follow the on password function: 1 Click Start, All Programs, Toshiba, Utilities, and then TOSHIBA Assist. The TOSHIBA Assist window appears. 2 On the left side, click the Optimize tab. 3 Click the Hardware Settings icon. 4 Click on the Password tab. 145 (Sample Image) Toshiba Password Utility window 5 Click on Register. 6 Enter your password...
... -screen instructions to exit. Utilities Setting passwords 2 On the left side, click the Optimize tab. 3 Click the Hardware Settings icon. 4 Select Not Registered. 5 Follow the on password function: 1 Click Start, All Programs, Toshiba, Utilities, and then TOSHIBA Assist. The TOSHIBA Assist window appears. 2 On the left side, click the Optimize tab. 3 Click the Hardware Settings icon. 4 Click on the Password tab. 145 (Sample Image) Toshiba Password Utility window 5 Click on Register. 6 Enter your password...
User Guide
Page 173
... may have to change the system in the Startup menu. To open the Startup menu: 1 Restart your work routine, you change your computer model. To do this, use the options in the Startup menu to or greater than the computer requires, even if the rated voltage is not working correctly. Unless a hardware device has failed, problems usually occur when you can easily detect if the operating system is...
... may have to change the system in the Startup menu. To open the Startup menu: 1 Restart your work routine, you change your computer model. To do this, use the options in the Startup menu to or greater than the computer requires, even if the rated voltage is not working correctly. Unless a hardware device has failed, problems usually occur when you can easily detect if the operating system is...
User Guide
Page 182
... of the desktop with your display settings and that the adapter type is firmly attached. ❖ Try adjusting the contrast and brightness controls on . ❖ Check that the monitor's power cord/cable is firmly plugged into a working power outlet. ❖ Check that the cable connecting the external monitor to the computer is incorrect or the current settings do this does not correct the problem, press Fn and F5...
... of the desktop with your display settings and that the adapter type is firmly attached. ❖ Try adjusting the contrast and brightness controls on . ❖ Check that the monitor's power cord/cable is firmly plugged into a working power outlet. ❖ Check that the cable connecting the external monitor to the computer is incorrect or the current settings do this does not correct the problem, press Fn and F5...
User Guide
Page 192
... COM port. Check the port settings to make sure the hardware and software are referring to check this. The modem is firmly connected to change these settings. Try making a test transmission to print a short test file using Notepad. For more information. Check the communications parameters (baud rate, parity, data length and stop bits) specified in your program has a print preview mode. Make sure...
... COM port. Check the port settings to make sure the hardware and software are referring to check this. The modem is firmly connected to change these settings. Try making a test transmission to print a short test file using Notepad. For more information. Check the communications parameters (baud rate, parity, data length and stop bits) specified in your program has a print preview mode. Make sure...

User Guide
Page 224
... disable settings of wired and wireless network devices, infrared devices, and set the power status of Bluetooth® antennas ❖ TCP/IP settings-includes DHCP, IP address, subnet mask, default gateway, DNS server, and WINS server settings ❖ Personal firewall settings for Internet connections ❖ Dial-up connection settings for the default connection ❖ File and printer sharing settings ❖ Printer settings for the default printer ❖ Bluetooth® Security Level (for easily switching network settings...
... disable settings of wired and wireless network devices, infrared devices, and set the power status of Bluetooth® antennas ❖ TCP/IP settings-includes DHCP, IP address, subnet mask, default gateway, DNS server, and WINS server settings ❖ Personal firewall settings for Internet connections ❖ Dial-up connection settings for the default connection ❖ File and printer sharing settings ❖ Printer settings for the default printer ❖ Bluetooth® Security Level (for easily switching network settings...
User Guide
Page 242
... services. A key or combination of keys that you use to perform a task instead of using a pointing device such as a hard disk) into the processor to interact with the Fn key can set system options or control system parameters, such as the battery save mode. (2) A key or combination of keys that enables any other on the network. L2 (level two) cache - I icon - A method of refreshing a computer screen, in which certain keys...
... services. A key or combination of keys that you use to perform a task instead of using a pointing device such as a hard disk) into the processor to interact with the Fn key can set system options or control system parameters, such as the battery save mode. (2) A key or combination of keys that enables any other on the network. L2 (level two) cache - I icon - A method of refreshing a computer screen, in which certain keys...
User Guide
Page 248
... up files 82 battery alarms 107 changing 109 charge indicator light 46, 104 charge not lasting 180 charging 44, 46 conserving power 107 disposal 115 low charge 106 monitoring power 46, 104 248 not charging 180 power profile 208 power profile hot key 109 real-time clock (RTC) 101 removing 110 BIOS Setup see Toshiba Hardware Setup Bridge Media Adapter inserting memory media 133 removing memory media 134 button power 49, 58 start 119 C CD creating 96 playing an audio 95 CD, using 92 channels...
... up files 82 battery alarms 107 changing 109 charge indicator light 46, 104 charge not lasting 180 charging 44, 46 conserving power 107 disposal 115 low charge 106 monitoring power 46, 104 248 not charging 180 power profile 208 power profile hot key 109 real-time clock (RTC) 101 removing 110 BIOS Setup see Toshiba Hardware Setup Bridge Media Adapter inserting memory media 133 removing memory media 134 button power 49, 58 start 119 C CD creating 96 playing an audio 95 CD, using 92 channels...
User Guide
Page 249
... a power source 44 connection set up 123 control buttons 67 Ctrl keys 84 D desktop creating new icon 118 major features 118 desktop exploration 117 desktop icons 118 Device Manager 177 checking properties 178 disabling a device 177 devices keyboard 69 mouse 69 Disk Defragmenter 184 disk drive corrupted/damaged data files 184 missing files/trouble accessing a disk 183 running slow 184 diskette drive cannot insert a diskette 184 cannot read a diskette 185 connecting 71 external, connecting 71 display...
... a power source 44 connection set up 123 control buttons 67 Ctrl keys 84 D desktop creating new icon 118 major features 118 desktop exploration 117 desktop icons 118 Device Manager 177 checking properties 178 disabling a device 177 devices keyboard 69 mouse 69 Disk Defragmenter 184 disk drive corrupted/damaged data files 184 missing files/trouble accessing a disk 183 running slow 184 diskette drive cannot insert a diskette 184 cannot read a diskette 185 connecting 71 external, connecting 71 display...
User Guide
Page 251
... 83 function keys 84 hot keys 212 not working 171 overlay keys 85 special Windows® keys 84 troubleshooting 181 using 83 keyboard, external 69 keyboard, full-size 83 L lock computer, using 79 M main battery removing 110 memory adding 49 problem solving 179 removing expansion slot cover 52 memory module inserting 52 installation 50 removing 55 microphone 127 modem connecting to telephone line 121 determining COM port 120 problem solving 192 resetting port to default settings 120 upgrading 120 monitor 67 connecting 67 not working 182 mouse installing 69 mouse utility 151 N network accessing...
... 83 function keys 84 hot keys 212 not working 171 overlay keys 85 special Windows® keys 84 troubleshooting 181 using 83 keyboard, external 69 keyboard, full-size 83 L lock computer, using 79 M main battery removing 110 memory adding 49 problem solving 179 removing expansion slot cover 52 memory module inserting 52 installation 50 removing 55 microphone 127 modem connecting to telephone line 121 determining COM port 120 problem solving 192 resetting port to default settings 120 upgrading 120 monitor 67 connecting 67 not working 182 mouse installing 69 mouse utility 151 N network accessing...
User Guide
Page 252
... Device Manager 177 disabling a device 177 disk drive is slow 184 display is blank 181 external display not working 183 external monitor 182 faulty memory 179 hardware conflict 175, 176 high-pitched noise 186 illegal operation 170 Internet bookmarked site not found 175 Internet connection is slow 174 keyboard not responding 171 missing files/trouble accessing a disk 183 modem not receiving or transmitting 192 no sound 186 non-system disk or disk error 172, 185 PC Card...
... Device Manager 177 disabling a device 177 disk drive is slow 184 display is blank 181 external display not working 183 external monitor 182 faulty memory 179 hardware conflict 175, 176 high-pitched noise 186 illegal operation 170 Internet bookmarked site not found 175 Internet connection is slow 174 keyboard not responding 171 missing files/trouble accessing a disk 183 modem not receiving or transmitting 192 no sound 186 non-system disk or disk error 172, 185 PC Card...
User Guide
Page 253
... supervisor password, set up 142 System tray 119 T Taskbar 119 telephone line connecting to modem 121 television adjusting display 69 Toshiba registering computer 43 worldwide offices 204 TOSHIBA Assist 136 Toshiba Button Controls 155 Toshiba Hardware Setup 152 Toshiba online resources 98 traveling tips 116 troubleshooting DVD player general problems 195 external keyboard 181 keyboard 181 keypad overlay 181 optical drive 185 turning on the computer 48 turning on the power 48 U user password, disabling 145 user password, setting 144
... supervisor password, set up 142 System tray 119 T Taskbar 119 telephone line connecting to modem 121 television adjusting display 69 Toshiba registering computer 43 worldwide offices 204 TOSHIBA Assist 136 Toshiba Button Controls 155 Toshiba Hardware Setup 152 Toshiba online resources 98 traveling tips 116 troubleshooting DVD player general problems 195 external keyboard 181 keyboard 181 keypad overlay 181 optical drive 185 turning on the computer 48 turning on the power 48 U user password, disabling 145 user password, setting 144


