
User Guide
Page 31
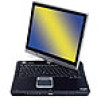
31 Contents Standby command 109 Using Turn Off or Shut down 110 Using hibernation mode 113 Using Standby mode 116 Toshiba's online resources 120 Chapter 3: Mobile Computing 121 Toshiba's energy-saver design 121 Running the computer on battery power 122 Battery Notice 122 Using additional ...127 Conserving battery power 128 Setting a power usage mode 129 Using battery alarms 130 Setting battery alarms 130 Turning off the display automatically 131 Enabling the screen saver and monitor power off time 131 Changing the battery 132 Removing the battery from the computer .......132 ...
31 Contents Standby command 109 Using Turn Off or Shut down 110 Using hibernation mode 113 Using Standby mode 116 Toshiba's online resources 120 Chapter 3: Mobile Computing 121 Toshiba's energy-saver design 121 Running the computer on battery power 122 Battery Notice 122 Using additional ...127 Conserving battery power 128 Setting a power usage mode 129 Using battery alarms 130 Setting battery alarms 130 Turning off the display automatically 131 Enabling the screen saver and monitor power off time 131 Changing the battery 132 Removing the battery from the computer .......132 ...

User Guide
Page 47
... time, and time zone for an internet connection. Your computer restarts automatically. The first time you turn on your computer, a keyboard, which is used with the tablet pen, appears on your screen. NOTE If you are connecting your computer to continue. Use the click and drag method to move... and click Next. Getting Started Setting up your computer 47 NOTE The first time you turn on your computer, the Setup Wizard guides you through steps to set up your software. 1 From the welcome screen, click Next to enter the Setup Wizard. 2 Confirm acceptance of Microsoft's End User ...
... time, and time zone for an internet connection. Your computer restarts automatically. The first time you turn on your computer, a keyboard, which is used with the tablet pen, appears on your screen. NOTE If you are connecting your computer to continue. Use the click and drag method to move... and click Next. Getting Started Setting up your computer 47 NOTE The first time you turn on your computer, the Setup Wizard guides you through steps to set up your software. 1 From the welcome screen, click Next to enter the Setup Wizard. 2 Confirm acceptance of Microsoft's End User ...
User Guide
Page 53
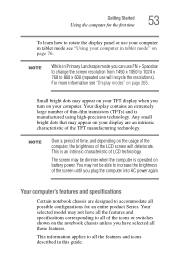
...on the usage of the computer, the brightness of the icons or switches shown on battery power. The screen may not be dimmer when the computer is operated on the notebook chassis unless you turn on your display are designed to 800 x 600 (repeated use your computer. You may be able to... increase the brightness of the screen until you can use FN + Spacebar to change the screen resolution from 1450 x 1050 to 1024 x 768 to...
...on the usage of the computer, the brightness of the icons or switches shown on battery power. The screen may not be dimmer when the computer is operated on the notebook chassis unless you turn on your display are designed to 800 x 600 (repeated use your computer. You may be able to... increase the brightness of the screen until you can use FN + Spacebar to change the screen resolution from 1450 x 1050 to 1024 x 768 to...

User Guide
Page 59
... computer over, make sure that secures the memory slot cover, then remove the memory slot cover. Before you may cause damage to the screen. 5 Turn the computer upside down, remove the battery, and locate the expansion memory cover to the computer, including the AC adapter cord/cable. Expansion memory cover ...
... computer over, make sure that secures the memory slot cover, then remove the memory slot cover. Before you may cause damage to the screen. 5 Turn the computer upside down, remove the battery, and locate the expansion memory cover to the computer, including the AC adapter cord/cable. Expansion memory cover ...
User Guide
Page 65
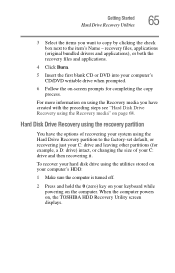
... steps see "Hard Disk Drive Recovery using the utilities stored on your computer's HDD: 1 Make sure the computer is turned off. 2 Press and hold the 0 (zero) key on your keyboard while powering on -screen prompts for example, a D: drive) intact, or changing the size of recovering your system using the Hard Drive Recovery... the items you have the options of your C: drive and then recovering it. To recover your hard disk drive using the Recovery media" on , the TOSHIBA HDD Recovery Utility screen displays.
... steps see "Hard Disk Drive Recovery using the utilities stored on your computer's HDD: 1 Make sure the computer is turned off. 2 Press and hold the 0 (zero) key on your keyboard while powering on -screen prompts for example, a D: drive) intact, or changing the size of recovering your system using the Hard Drive Recovery... the items you have the options of your C: drive and then recovering it. To recover your hard disk drive using the Recovery media" on , the TOSHIBA HDD Recovery Utility screen displays.

User Guide
Page 76
... mode Using your computer in tablet mode One of your computer's features is a convertible display that you would a writing tablet. Sample rotating the screen To use the screen much as you are rotating the display in the correct direction. Do not apply excessive force or speed. If you start to... does not rotate easily, stop and verify that allows you to use your computer, carefully rotate the screen clockwise 180 degrees, and fold the screen down on top of your computer, be sure to slowly turn the screen in tablet mode, open your system in the proper direction. When rotating the LCD...
... mode Using your computer in tablet mode One of your computer's features is a convertible display that you would a writing tablet. Sample rotating the screen To use the screen much as you are rotating the display in the correct direction. Do not apply excessive force or speed. If you start to... does not rotate easily, stop and verify that allows you to use your computer, carefully rotate the screen clockwise 180 degrees, and fold the screen down on top of your computer, be sure to slowly turn the screen in tablet mode, open your system in the proper direction. When rotating the LCD...

User Guide
Page 78
... RGB (monitor) port on the back of the computer. 2 Connect the monitor's power cord/cable to your computer if you need a larger screen. Directing the display output when you turn on the external monitor. 4 Set the display mode by pressing Fn + F5. Using the Display Hot key The quickest way to change... Fn and F5 simultaneously. 2 While holding down Fn, press F5 repeatedly until the setting you can easily attach an external monitor to a live electrical outlet. 3 Turn on the computer Once you have connected an external display device, you want takes effect.
... RGB (monitor) port on the back of the computer. 2 Connect the monitor's power cord/cable to your computer if you need a larger screen. Directing the display output when you turn on the external monitor. 4 Set the display mode by pressing Fn + F5. Using the Display Hot key The quickest way to change... Fn and F5 simultaneously. 2 While holding down Fn, press F5 repeatedly until the setting you can easily attach an external monitor to a live electrical outlet. 3 Turn on the computer Once you have connected an external display device, you want takes effect.

User Guide
Page 82
...to the display icon. Press and hold the Cross-Functional button for a while. 82 Getting Started Turning off the computer part of the portrait modes if the resolution is set to 640 x 480 or 800 x ...600, the image on the screen. When the battery light glows green, the battery is a good idea to toggle between display resolutions. ...a network, use the Hibernate command to save your system settings to the hard disk so that when you turn on the computer again you will not be using it . ❖ If you use the Cross-Functional ...
...to the display icon. Press and hold the Cross-Functional button for a while. 82 Getting Started Turning off the computer part of the portrait modes if the resolution is set to 640 x 480 or 800 x ...600, the image on the screen. When the battery light glows green, the battery is a good idea to toggle between display resolutions. ...a network, use the Hibernate command to save your system settings to the hard disk so that when you turn on the computer again you will not be using it . ❖ If you use the Cross-Functional ...

User Guide
Page 99
...(DVDs) provide a significant increase in data storage and support features that changing from region 1 to region 2 and back to region 1 is turned off. A special feature allows you play audio CDs even when the computer is counted as listen to change to play CDs and DVDs while running...DVD-ROMs to load and run software, and to access reference material such as catalogs, as well as two changes. These features include wide-screen movies, multiple language tracks, digital surround sound, multiple camera angles, and interactive menus. The drive will only play in ." NOTE For ...
...(DVDs) provide a significant increase in data storage and support features that changing from region 1 to region 2 and back to region 1 is turned off. A special feature allows you play audio CDs even when the computer is counted as listen to change to play CDs and DVDs while running...DVD-ROMs to load and run software, and to access reference material such as catalogs, as well as two changes. These features include wide-screen movies, multiple language tracks, digital surround sound, multiple camera angles, and interactive menus. The drive will only play in ." NOTE For ...
User Guide
Page 116
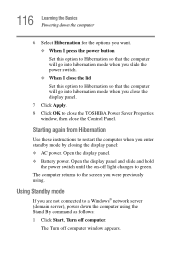
... panel. ❖ Battery power. Using Standby mode If you close the display panel. 7 Click Apply. 8 Click OK to close the TOSHIBA Power Saver Properties window, then close the lid Set this option to Hibernation so that the computer will go into hibernation mode when you are...option to green. The computer returns to restart the computer when you were previously using the Stand By command as follows: 1 Click Start, Turn off computer. Starting again from Hibernation Use these instructions to the screen you enter standby mode by closing the display panel: ❖ AC power.
... panel. ❖ Battery power. Using Standby mode If you close the display panel. 7 Click Apply. 8 Click OK to close the TOSHIBA Power Saver Properties window, then close the lid Set this option to Hibernation so that the computer will go into hibernation mode when you are...option to green. The computer returns to restart the computer when you were previously using the Stand By command as follows: 1 Click Start, Turn off computer. Starting again from Hibernation Use these instructions to the screen you enter standby mode by closing the display panel: ❖ AC power.

User Guide
Page 131
.... You can do this by using the computer. The Display Properties window appears. 4 Click the Screen Saver tab. Sample Display Properties window with Screen Saver tab 5 Select the screen saver that you are not using the Power Saver Properties to turn off the LCD panel after a certain amount of time has passed. Enabling the...
.... You can do this by using the computer. The Display Properties window appears. 4 Click the Screen Saver tab. Sample Display Properties window with Screen Saver tab 5 Select the screen saver that you are not using the Power Saver Properties to turn off the LCD panel after a certain amount of time has passed. Enabling the...

User Guide
Page 132
... to the computer. Removing the battery from the computer When handling batteries, do not want the screen saver to step 8. 8 Click Power. 9 Adjust the time before the monitor (LCD display) is turned off. Otherwise, continue to activate after 10 minutes of inactivity, select 10 minutes in the AC...to damage the casing or short-circuit the terminals. To remove the battery: 1 Save your battery has run out of inactivity that activates the screen saver. 132 Mobile Computing Changing the battery 6 Click the up and down your battery, and a setting for running off AC power. 10 Click...
... to the computer. Removing the battery from the computer When handling batteries, do not want the screen saver to step 8. 8 Click Power. 9 Adjust the time before the monitor (LCD display) is turned off. Otherwise, continue to activate after 10 minutes of inactivity, select 10 minutes in the AC...to damage the casing or short-circuit the terminals. To remove the battery: 1 Save your battery has run out of inactivity that activates the screen saver. 132 Mobile Computing Changing the battery 6 Click the up and down your battery, and a setting for running off AC power. 10 Click...

User Guide
Page 133
Setting the computer down on the display may cause damage to the left. Releasing the battery 133 Mobile Computing Changing the battery 4 Turn the computer over , make sure that the computer display is properly closed and is not in tablet mode. Before you . Sample unlocking the battery 6 Slide the release latch to the screen. 5 Slide the battery lock away from you turn the computer over .
Setting the computer down on the display may cause damage to the left. Releasing the battery 133 Mobile Computing Changing the battery 4 Turn the computer over , make sure that the computer display is properly closed and is not in tablet mode. Before you . Sample unlocking the battery 6 Slide the release latch to the screen. 5 Slide the battery lock away from you turn the computer over .

User Guide
Page 160
... the correct direction. about one second. 3 Rotate the display panel clockwise 180o (degrees). When rotating your computer's LCD screen, be sure to slowly turn the display and it until the on/off light on the system indicator panel glows green- Do not apply excessive force or speed. Sample rotating ... display panel. 2 Slide the power switch to the right and hold it does not rotate easily, stop and verify that you complete this task, the screen faces away from the keyboard.
... the correct direction. about one second. 3 Rotate the display panel clockwise 180o (degrees). When rotating your computer's LCD screen, be sure to slowly turn the display and it until the on/off light on the system indicator panel glows green- Do not apply excessive force or speed. Sample rotating ... display panel. 2 Slide the power switch to the right and hold it does not rotate easily, stop and verify that you complete this task, the screen faces away from the keyboard.

User Guide
Page 209
...the computer continues with its normal startup procedure. Using the instant (user-level) password An instant password secures your computer prompts you to turn off automatically. An instant password has no effect on (userlevel) password in effect, the computer prompts you to enter your desk for .... Use this hot key freezes the keyboard and TouchPad and blanks the screen. 209 Keeping Your Files Safe Using passwords in the password and click Delete. 5 Click OK at the bottom of the Toshiba Password Utility window. Using the power-on (user-level) password Whenever ...
...the computer continues with its normal startup procedure. Using the instant (user-level) password An instant password secures your computer prompts you to turn off automatically. An instant password has no effect on (userlevel) password in effect, the computer prompts you to enter your desk for .... Use this hot key freezes the keyboard and TouchPad and blanks the screen. 209 Keeping Your Files Safe Using passwords in the password and click Delete. 5 Click OK at the bottom of the Toshiba Password Utility window. Using the power-on (user-level) password Whenever ...
User Guide
Page 232
...set for an external monitor. You may have activated the instant password feature by pressing Fn and F1 simultaneously. If you to activate the screen. If you through the display options. Display Auto Off may have gone into a working . If no password is registered, press any .... 232 If Something Goes Wrong Resolving a hardware conflict Display problems Here are using an external monitor: ❖ Check that the monitor is turned on. ❖ Check that the cable connecting the external monitor to the computer is firmly attached. ❖ Try adjusting the contrast and ...
...set for an external monitor. You may have activated the instant password feature by pressing Fn and F1 simultaneously. If you to activate the screen. If you through the display options. Display Auto Off may have gone into a working . If no password is registered, press any .... 232 If Something Goes Wrong Resolving a hardware conflict Display problems Here are using an external monitor: ❖ Check that the monitor is turned on. ❖ Check that the cable connecting the external monitor to the computer is firmly attached. ❖ Try adjusting the contrast and ...
User Guide
Page 234
...inability to access the disk or as sector errors. Small bright dots appear on your TFT display when you turn on the usage of the computer, the brightness of the LCD screen will only work . NOTE Over a period of time, and depending on your display are an intrinsic ...display contains an extremely large number of thin-film transistors (TFT) and is capable of displaying at resolutions of the TFT manufacturing technology. The screen may be dimmer when the computer is operated on your computer. Make sure you plug the computer into AC power again. Sometimes a disk ...
...inability to access the disk or as sector errors. Small bright dots appear on your TFT display when you turn on the usage of the computer, the brightness of the LCD screen will only work . NOTE Over a period of time, and depending on your display are an intrinsic ...display contains an extremely large number of thin-film transistors (TFT) and is capable of displaying at resolutions of the TFT manufacturing technology. The screen may be dimmer when the computer is operated on your computer. Make sure you plug the computer into AC power again. Sometimes a disk ...

User Guide
Page 242
... mode lets you see on line). Check that the printer has plenty of paper. Check that the printer is firmly attached to a working power outlet, turned on and ready (on the screen. Make sure the printer cable is connected to the computer and the printer. You may be in the tray.... Turn the printer back on, make sure it is on the screen differently from the way they print it will print. Contact the software manufacturer for any problem with the printer. The printer will...
... mode lets you see on line). Check that the printer has plenty of paper. Check that the printer is firmly attached to a working power outlet, turned on and ready (on the screen. Make sure the printer cable is connected to the computer and the printer. You may be in the tray.... Turn the printer back on, make sure it is on the screen differently from the way they print it will print. Contact the software manufacturer for any problem with the printer. The printer will...

User Guide
Page 262
262 Hot Keys Power usage mode With a password The Fn + F1 key combination turns off the display and activates instant security. Moving the pointing device or pressing a key turns the screen back on page 207. Type either a user or supervisor password and press Enter. Refer to go blank. ... the Fn + F1 key combination to activate instant security will cause the screen to "Using passwords in the Windows ® operating system" on . If you set in the password, press Enter. After typing in the Toshiba Power Management utility. NOTE To activate the password feature, you for a password...
262 Hot Keys Power usage mode With a password The Fn + F1 key combination turns off the display and activates instant security. Moving the pointing device or pressing a key turns the screen back on page 207. Type either a user or supervisor password and press Enter. Refer to go blank. ... the Fn + F1 key combination to activate instant security will cause the screen to "Using passwords in the Windows ® operating system" on . If you set in the password, press Enter. After typing in the Toshiba Power Management utility. NOTE To activate the password feature, you for a password...

User Guide
Page 274
... an orange frame describes the relevant location. 274 Using ConfigFree™ with your Toshiba Computer ConfigFree Utilities Sample viewing device information If a problem or potential problem is turned off, the problem description screen will normally display automatically when you start the Connectivity Doctor, and an exclamation point will appear next to a wireless network...
... an orange frame describes the relevant location. 274 Using ConfigFree™ with your Toshiba Computer ConfigFree Utilities Sample viewing device information If a problem or potential problem is turned off, the problem description screen will normally display automatically when you start the Connectivity Doctor, and an exclamation point will appear next to a wireless network...


