
User Manual
Page 5
... service it unlawful for any message unless such message clearly contains in their equipment, operations or procedures. Telephone Company Procedures The goal of 1991 makes it can. The Telephone Consumer Protection Act of the telephone company is to provide you to do this equipment, for which charges exceed local or long-distance transmission charges.) In order to make changes...
... service it unlawful for any message unless such message clearly contains in their equipment, operations or procedures. Telephone Company Procedures The goal of 1991 makes it can. The Telephone Consumer Protection Act of the telephone company is to provide you to do this equipment, for which charges exceed local or long-distance transmission charges.) In order to make changes...
User Manual
Page 29
... Creating recovery DVDs/media 69 Restoring from recovery DVDs/media 72 Erasing the Internal Storage Drive 74 Checking the internal storage drive operating status 75 Installing drivers and applications 76 Using the Toshiba Dual Pointing Device 76 Using the TouchPad 77 Adjusting TouchPad™ settings 79 Disabling or enabling the TouchPad 80 Using external display devices 80 Connecting an external monitor or projector ....81 Directing the display output when you turn on the computer 81 Adjusting the quality of the external display......82 Using an external keyboard 83 Using a mouse...
... Creating recovery DVDs/media 69 Restoring from recovery DVDs/media 72 Erasing the Internal Storage Drive 74 Checking the internal storage drive operating status 75 Installing drivers and applications 76 Using the Toshiba Dual Pointing Device 76 Using the TouchPad 77 Adjusting TouchPad™ settings 79 Disabling or enabling the TouchPad 80 Using external display devices 80 Connecting an external monitor or projector ....81 Directing the display output when you turn on the computer 81 Adjusting the quality of the external display......82 Using an external keyboard 83 Using a mouse...
User Manual
Page 33
... Hardware Setup 164 USB Sleep and Charge Utility 166 Starting the USB Sleep and Charge Utility.......166 USB Sleep and Charge 166 Enabling USB Sleep and Charge 168 Power supply mode settings 168 TOSHIBA Zooming Utility 170 TOSHIBA Button Support 171 TOSHIBA Accessibility 172 Trusted Platform Module (TPM 173 Fingerprint Authentication Utility 174 Fingerprint utility limitations 174 Using the Fingerprint Authentication Utility.....174 Fingerprint Logon 175 Care and maintenance of your fingerprint reader 175 Fingerprint reader limitations 177 TOSHIBA eco Utility 178 TOSHIBA Service...
... Hardware Setup 164 USB Sleep and Charge Utility 166 Starting the USB Sleep and Charge Utility.......166 USB Sleep and Charge 166 Enabling USB Sleep and Charge 168 Power supply mode settings 168 TOSHIBA Zooming Utility 170 TOSHIBA Button Support 171 TOSHIBA Accessibility 172 Trusted Platform Module (TPM 173 Fingerprint Authentication Utility 174 Fingerprint utility limitations 174 Using the Fingerprint Authentication Utility.....174 Fingerprint Logon 175 Care and maintenance of your fingerprint reader 175 Fingerprint reader limitations 177 TOSHIBA eco Utility 178 TOSHIBA Service...
User Manual
Page 51
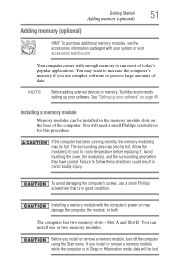
.... Avoid touching the cover, the module(s), and the surrounding area before replacing it. Before you install or remove a memory module while the computer is in the memory module slots on may also be hot. If you install or remove a memory module, turn off the computer using the Start menu. NOTE Before adding external devices or memory, Toshiba recommends setting up your software. The surrounding area may damage the computer, the module, or both. Getting Started Adding memory (optional) 51 Adding memory (optional...
.... Avoid touching the cover, the module(s), and the surrounding area before replacing it. Before you install or remove a memory module while the computer is in the memory module slots on may also be hot. If you install or remove a memory module, turn off the computer using the Start menu. NOTE Before adding external devices or memory, Toshiba recommends setting up your software. The surrounding area may damage the computer, the module, or both. Getting Started Adding memory (optional) 51 Adding memory (optional...
User Manual
Page 56
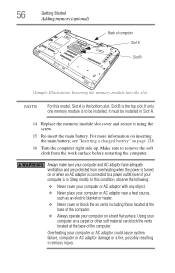
If only one memory module is to remove the soft cloth from overheating when the power is the bottom slot. For more information on inserting the main battery, see "Inserting a charged battery" on a hard flat surface. Make sure to be installed, it must be installed in Slot A. 14 Replace the memory module slot cover and secure it using the screw. 15 Re-insert the main battery. In this model, Slot A is turned on a carpet...
If only one memory module is to remove the soft cloth from overheating when the power is the bottom slot. For more information on inserting the main battery, see "Inserting a charged battery" on a hard flat surface. Make sure to be installed, it must be installed in Slot A. 14 Replace the memory module slot cover and secure it using the screw. 15 Re-insert the main battery. In this model, Slot A is turned on a carpet...
User Manual
Page 59
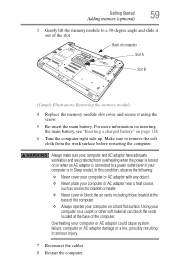
... up. Getting Started Adding memory (optional) 59 3 Gently lift the memory module to a 30-degree angle and slide it using the screw. 5 Re-insert the main battery. Always make sure your computer or AC adaptor could cause system failure, computer or AC adaptor damage or a fire, possibly resulting in Sleep mode). Back of computer Slot A Slot B (Sample Illustration) Removing the memory module 4 Replace the memory module slot cover and secure...
... up. Getting Started Adding memory (optional) 59 3 Gently lift the memory module to a 30-degree angle and slide it using the screw. 5 Re-insert the main battery. Always make sure your computer or AC adaptor could cause system failure, computer or AC adaptor damage or a fire, possibly resulting in Sleep mode). Back of computer Slot A Slot B (Sample Illustration) Removing the memory module 4 Replace the memory module slot cover and secure...
User Manual
Page 112
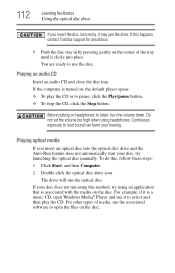
... not set the volume too high when using this method, try launching the optical disc manually. If this , follow these steps: 1 Click Start, and then Computer. 2 Double-click the optical disc drive icon. Before putting on headphones to loud sound can harm your hearing. Playing an audio CD Insert an audio CD and close the disc tray. To do this happens, contact Toshiba support...
... not set the volume too high when using this method, try launching the optical disc manually. If this , follow these steps: 1 Click Start, and then Computer. 2 Double-click the optical disc drive icon. Before putting on headphones to loud sound can harm your hearing. Playing an audio CD Insert an audio CD and close the disc tray. To do this happens, contact Toshiba support...
User Manual
Page 157
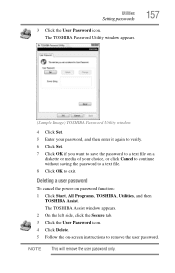
Utilities Setting passwords 3 Click the User Password icon. The TOSHIBA Assist window appears. 2 On the left side, click the Secure tab. 3 Click the User Password icon. 4 Click Delete. 5 Follow the on password function: 1 Click Start, All Programs, TOSHIBA, Utilities, and then TOSHIBA Assist. Deleting a user password To cancel the power-on -screen instructions to exit. NOTE This will remove the user password only. The TOSHIBA Password Utility window appears. 157 (Sample Image) TOSHIBA Password Utility window 4 Click Set. 5 Enter your password, and then enter it again...
Utilities Setting passwords 3 Click the User Password icon. The TOSHIBA Assist window appears. 2 On the left side, click the Secure tab. 3 Click the User Password icon. 4 Click Delete. 5 Follow the on password function: 1 Click Start, All Programs, TOSHIBA, Utilities, and then TOSHIBA Assist. Deleting a user password To cancel the power-on -screen instructions to exit. NOTE This will remove the user password only. The TOSHIBA Password Utility window appears. 157 (Sample Image) TOSHIBA Password Utility window 4 Click Set. 5 Enter your password, and then enter it again...
User Manual
Page 179
... have the same data protection laws or data protection levels as power consumption, the cooling system and the 3D Accelerometer (available on the computer's internal storage drive. The collected information includes device operation time and number of actuations or status changes (e.g.: number of power button and Fn key combination uses, and AC adaptor, battery, LCD, fan, HDD, sound volume, wireless communication switch, docking and USB information), date of residence (e.g., European Union).
... have the same data protection laws or data protection levels as power consumption, the cooling system and the 3D Accelerometer (available on the computer's internal storage drive. The collected information includes device operation time and number of actuations or status changes (e.g.: number of power button and Fn key combination uses, and AC adaptor, battery, LCD, fan, HDD, sound volume, wireless communication switch, docking and USB information), date of residence (e.g., European Union).
User Manual
Page 188
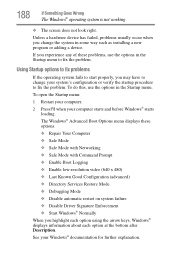
... options: ❖ Repair Your Computer ❖ Safe Mode ❖ Safe Mode with Networking ❖ Safe Mode with Command Prompt ❖ Enable Boot Logging ❖ Enable low-resolution video (640 x 480) ❖ Last Known Good Configuration (advanced) ❖ Directory Services Restore Mode ❖ Debugging Mode ❖ Disable automatic restart on system failure ❖ Disable Driver Signature Enforcement ❖ Start Windows® Normally When you change your system's configuration or verify the startup procedure to fix the problem. To open the Startup menu...
... options: ❖ Repair Your Computer ❖ Safe Mode ❖ Safe Mode with Networking ❖ Safe Mode with Command Prompt ❖ Enable Boot Logging ❖ Enable low-resolution video (640 x 480) ❖ Last Known Good Configuration (advanced) ❖ Directory Services Restore Mode ❖ Debugging Mode ❖ Disable automatic restart on system failure ❖ Disable Driver Signature Enforcement ❖ Start Windows® Normally When you change your system's configuration or verify the startup procedure to fix the problem. To open the Startup menu...
User Manual
Page 193
... using the built-in screen, make of the keys. If you to the keyboard manufacturer's Web site. If the numlock light or cursor control overlay light is on . You may be on , press Fn + F10 to turn off the numlock light. If you type, strange things happen or nothing happens, the problem may need to turn off the cursor control overlay light, or Fn + F11 to update...
... using the built-in screen, make of the keys. If you to the keyboard manufacturer's Web site. If the numlock light or cursor control overlay light is on . You may be on , press Fn + F10 to turn off the numlock light. If you type, strange things happen or nothing happens, the problem may need to turn off the cursor control overlay light, or Fn + F11 to update...
User Manual
Page 198
....toshiba.com. ExpressCard® problems (Available on the screen. Adjust the volume control. This is compatible with an operating system driver, it may apply. Most ExpressCard problems occur during installation and setup of disc you click the eject button on certain models.) ExpressCards® include many types of the drive when you are having trouble getting one or more information regarding supported optical media formats, refer to the complete detail specifications...
....toshiba.com. ExpressCard® problems (Available on the screen. Adjust the volume control. This is compatible with an operating system driver, it may apply. Most ExpressCard problems occur during installation and setup of disc you click the eject button on certain models.) ExpressCards® include many types of the drive when you are having trouble getting one or more information regarding supported optical media formats, refer to the complete detail specifications...
User Manual
Page 208
... safe and easy installation of new hardware (printers, pointing devices, external hard drives, DVD writers, scanners, etc.) and software (applications like Microsoft® Office and Adobe® Photoshop®, or utility software such as special toolbars for your computer or files to optical discs, or a storage drive: NOTE You cannot back up the computer while running on battery power. If anything , use the System Restore utility to complete the installation...
... safe and easy installation of new hardware (printers, pointing devices, external hard drives, DVD writers, scanners, etc.) and software (applications like Microsoft® Office and Adobe® Photoshop®, or utility software such as special toolbars for your computer or files to optical discs, or a storage drive: NOTE You cannot back up the computer while running on battery power. If anything , use the System Restore utility to complete the installation...
User Manual
Page 209
... make it much easier to a compatible port. If you to use the "USB Sleep and Charge function." (Available on certain models.) ❖ The setting of your computer system, install just one or more of the following methods. ❖ Change the Enabled mode setting. ❖ Turn OFF the computer while external devices are connected to determine the origin of any of "USB Sleep and Charge function" may not be Disabled. Change the setting to Enabled. ❖ Some external devices...
... make it much easier to a compatible port. If you to use the "USB Sleep and Charge function." (Available on certain models.) ❖ The setting of your computer system, install just one or more of the following methods. ❖ Change the Enabled mode setting. ❖ Turn OFF the computer while external devices are connected to determine the origin of any of "USB Sleep and Charge function" may not be Disabled. Change the setting to Enabled. ❖ Some external devices...
User Manual
Page 238
... Fn key can set system options or control system parameters, such as a mouse. K keyboard shortcut - LAN (Local Area Network) - A group of using a pointing device such as the battery save mode. (2) A key or combination of your work , including all open files and programs, when you turn on the network. When you use to help improve processing speed. interlaced - internal device - It is running and have the operating system automatically recognize the change. The...
... Fn key can set system options or control system parameters, such as a mouse. K keyboard shortcut - LAN (Local Area Network) - A group of using a pointing device such as the battery save mode. (2) A key or combination of your work , including all open files and programs, when you turn on the network. When you use to help improve processing speed. interlaced - internal device - It is running and have the operating system automatically recognize the change. The...
User Manual
Page 244
... adaptor 45 AC power 117 AC power light 45 accessing network 138 adding memory check total memory 60 memory (optional) 51 optional external devices 50 adequate ventilation cooling fan 44 adjusting TouchPad™ settings 79 Application Cards 216 audio features 140 B backing up files 99, 107 battery battery life 116 Call2Recycle™ 132 care 130, 131 changing 126 244 charge indicator light 47 charge not lasting 192 charge time 118 charger 118 charging 47, 118 charging the real...
... adaptor 45 AC power 117 AC power light 45 accessing network 138 adding memory check total memory 60 memory (optional) 51 optional external devices 50 adequate ventilation cooling fan 44 adjusting TouchPad™ settings 79 Application Cards 216 audio features 140 B backing up files 99, 107 battery battery life 116 Call2Recycle™ 132 care 130, 131 changing 126 244 charge indicator light 47 charge not lasting 192 charge time 118 charger 118 charging 47, 118 charging the real...
User Manual
Page 245
... on battery power 116 safety precautions 130 setting notifications 122 battery indicator light 120 BIOS Setup see TOSHIBA Hardware Setup button eco Utility™ 126 eject, optical disc drive 109 power 49 Shut down 52, 87 start 136 TOSHIBA Presentation button 110 volume increase/decrease buttons 110 buttons system control buttons 110 C Call2Recycle™ battery 132 caring for your computer 95 changing battery 126 character keys 100 charging the battery 47 checking device properties 190 cleaning the computer 95 communications network connection 138 set...
... on battery power 116 safety precautions 130 setting notifications 122 battery indicator light 120 BIOS Setup see TOSHIBA Hardware Setup button eco Utility™ 126 eject, optical disc drive 109 power 49 Shut down 52, 87 start 136 TOSHIBA Presentation button 110 volume increase/decrease buttons 110 buttons system control buttons 110 C Call2Recycle™ battery 132 caring for your computer 95 changing battery 126 character keys 100 charging the battery 47 checking device properties 190 cleaning the computer 95 communications network connection 138 set...

User Manual
Page 247
... hot key disabling or enabling wireless devices 225 display brightness 224 Hibernation mode 222 keyboard overlays 228 Lock (Instant security) 219 Output (Display switch) 223 power plan 220 Sleep mode 221 using to set a power plan 125 volume mute 218 Zoom (Display resolution) 227 zooming in 228 zooming out 228 Hot Key Cards 214 Hot key functions 218 I icon desktop 135 moving to desktop 135 recycle bin 135 safety 39 inserting ExpressCard® 142 installation memory module 51 installing a charged battery 128 battery 126 memory modules...
... hot key disabling or enabling wireless devices 225 display brightness 224 Hibernation mode 222 keyboard overlays 228 Lock (Instant security) 219 Output (Display switch) 223 power plan 220 Sleep mode 221 using to set a power plan 125 volume mute 218 Zoom (Display resolution) 227 zooming in 228 zooming out 228 Hot Key Cards 214 Hot key functions 218 I icon desktop 135 moving to desktop 135 recycle bin 135 safety 39 inserting ExpressCard® 142 installation memory module 51 installing a charged battery 128 battery 126 memory modules...
User Manual
Page 250
... USB Wakeup function does not work 210 warning resume failure 186 Windows® operating system not working 187 program, starting 102 program, starting from Start menu 102 programs not running correctly 196 projector connecting 81 R real-time clock (RTC) battery 117 recording sounds 140 recovery checking internal storage drive operating status 75 creating recovery DVDs/media 69 erasing internal storage drive 74 installing drivers and applications 76 internal storage drive 60 out-of-box state 62 restoring from recovery DVDs/ media...
... USB Wakeup function does not work 210 warning resume failure 186 Windows® operating system not working 187 program, starting 102 program, starting from Start menu 102 programs not running correctly 196 projector connecting 81 R real-time clock (RTC) battery 117 recording sounds 140 recovery checking internal storage drive operating status 75 creating recovery DVDs/media 69 erasing internal storage drive 74 installing drivers and applications 76 internal storage drive 60 out-of-box state 62 restoring from recovery DVDs/ media...
User Manual
Page 252
... quickly 87 options 85 turning on power 49 U USB Sleep and Charge cannot use 209 USB Sleep and Charge Utility 166 USB Wakeup function does not work 210 USB-compatible printer 83 user password, deleting 157 user password, setting 156 using a microphone 140 computer lock 96 DVDs 108 expansion port 146 ExpressCard® 142 external display devices 80 Hibernation mode 89 hot key to set a power plan 125 Memory card reader 144 optical disc drive 108 Shut down command 87 Sleep mode 92 Smart Card Reader 143 TOSHIBA eco power plan 126 TouchPad™ 77 Web Camera...
... quickly 87 options 85 turning on power 49 U USB Sleep and Charge cannot use 209 USB Sleep and Charge Utility 166 USB Wakeup function does not work 210 USB-compatible printer 83 user password, deleting 157 user password, setting 156 using a microphone 140 computer lock 96 DVDs 108 expansion port 146 ExpressCard® 142 external display devices 80 Hibernation mode 89 hot key to set a power plan 125 Memory card reader 144 optical disc drive 108 Shut down command 87 Sleep mode 92 Smart Card Reader 143 TOSHIBA eco power plan 126 TouchPad™ 77 Web Camera...


