
User Guide
Page 29
29 Contents Using the computer for the first time 53 Opening the display panel 53 Your computer's features and specifications ....54 Turning on the power 54 Adding memory 55 Installing a memory module 56 Removing a memory module ...
29 Contents Using the computer for the first time 53 Opening the display panel 53 Your computer's features and specifications ....54 Turning on the power 54 Adding memory 55 Installing a memory module 56 Removing a memory module ...

User Guide
Page 53
... panel 1 Facing the front of the display panel. 2 Push the display latch in and raise the display panel. Display release latch Sample opening the display panel 3 Adjust the display to turn on and begin using it. Your display contains an extremely Getting Started Using the computer for you ...
... panel 1 Facing the front of the display panel. 2 Push the display latch in and raise the display panel. Display release latch Sample opening the display panel 3 Adjust the display to turn on and begin using it. Your display contains an extremely Getting Started Using the computer for you ...
User Guide
Page 61
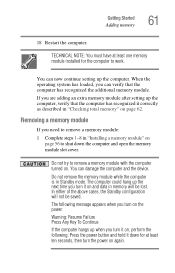
... . Removing a memory module If you can damage the computer and the device. You can verify that the computer has recognized it down the computer and open the memory module slot cover.
... . Removing a memory module If you can damage the computer and the device. You can verify that the computer has recognized it down the computer and open the memory module slot cover.

User Guide
Page 77
... still on, these actions will occur: ❖ If you have the LCD power-saver feature set, the LCD panel will automatically turn off until you open it is still on. ❖ If you are connecting. Getting Started Using external display devices 77 Closing the display panel When you have the audible...
... still on, these actions will occur: ❖ If you have the LCD power-saver feature set, the LCD panel will automatically turn off until you open it is still on. ❖ If you are connecting. Getting Started Using external display devices 77 Closing the display panel When you have the audible...

User Guide
Page 84
...To keep your desk. Cleaning the computer Keep liquids, including cleaning fluid, out of your battery" on purchasing a cable lock, visit accessories.toshiba.com. Doing so could damage the system. For information about taking care of your computer's battery, see "Taking care of the computer's ...keyboard, speaker grille, and other openings. 84 Getting Started Caring for your computer Caring for your computer This section gives tips on cleaning and moving your computer, even across...
...To keep your desk. Cleaning the computer Keep liquids, including cleaning fluid, out of your battery" on purchasing a cable lock, visit accessories.toshiba.com. Doing so could damage the system. For information about taking care of your computer's battery, see "Taking care of the computer's ...keyboard, speaker grille, and other openings. 84 Getting Started Caring for your computer Caring for your computer This section gives tips on cleaning and moving your computer, even across...

User Guide
Page 90
... the keyboard Function keys The function keys (not to be confused with icons execute specific functions on the computer. Used in Windows: ❖ Start key-Opens the Start menu ❖ Application key-Has the same function as you would using the 10-key keypad on page 225. This overlay lets you...
... the keyboard Function keys The function keys (not to be confused with icons execute specific functions on the computer. Used in Windows: ❖ Start key-Opens the Start menu ❖ Application key-Has the same function as you would using the 10-key keypad on page 225. This overlay lets you...

User Guide
Page 92
.... Using the overlay for the program on , press Fn and F10 simultaneously. To find the file, use the numeric overlay keys. ❖ To return to open the program first, you use My Computer or Windows® Explorer. 92 Learning the Basics Starting a program To disable the numeric overlay, hold down the...
.... Using the overlay for the program on , press Fn and F10 simultaneously. To find the file, use the numeric overlay keys. ❖ To return to open the program first, you use My Computer or Windows® Explorer. 92 Learning the Basics Starting a program To disable the numeric overlay, hold down the...

User Guide
Page 93
... file ends with step 2. 2 Point to All Programs. The Windows® XP operating system displays the All Programs menu, which use this example, WordPad. WordPad opens. Windows® Explorer gives you a view of each drive and folder on your computer's contents as an example: 1 Click Start, then point to the program...
... file ends with step 2. 2 Point to All Programs. The Windows® XP operating system displays the All Programs menu, which use this example, WordPad. WordPad opens. Windows® Explorer gives you a view of each drive and folder on your computer's contents as an example: 1 Click Start, then point to the program...

User Guide
Page 94
...contents of the Program Files folder on the right side of the window. 9 In the right part of the window. The operating system opens WordPad. Windows® Explorer shows the contents of the Accessories folder on the right side of the window, double-click WordPad. 94 ...Learning the Basics Starting a program This example opens WordPad using Windows® Explorer and its filename wordpad.exe. 1 Click Start, then point to All Programs. 2 Click Accessories. 3 Click Windows Explorer...
...contents of the Program Files folder on the right side of the window. 9 In the right part of the window. The operating system opens WordPad. Windows® Explorer shows the contents of the Accessories folder on the right side of the window, double-click WordPad. 94 ...Learning the Basics Starting a program This example opens WordPad using Windows® Explorer and its filename wordpad.exe. 1 Click Start, then point to All Programs. 2 Click Accessories. 3 Click Windows Explorer...

User Guide
Page 98
... Basics Printing your work Ensure the operating system is not on, turn it . To print a file: 1 If your printer is set up a printer" on now. 2 Open the File menu of your Windows® program and click Print. Printing your Windows® XP online help.
... Basics Printing your work Ensure the operating system is not on, turn it . To print a file: 1 If your printer is set up a printer" on now. 2 Open the File menu of your Windows® program and click Print. Printing your Windows® XP online help.

User Guide
Page 100
.... If you play a DVD disc from another region, the drive will automatically change to change , the region will be accessed when the display panel is open. On the fourth change regions four times. The System Control buttons are located along the right side of the other region.
.... If you play a DVD disc from another region, the drive will automatically change to change , the region will be accessed when the display panel is open. On the fourth change regions four times. The System Control buttons are located along the right side of the other region.

User Guide
Page 101
When the disc tray is off. Power button TOSHIBA Assist button* Presentation button* *Available on an external monitor (if connected). Sample System ... models) on the right side of the keyboard allow you need to release the disc tray when the power is open, be careful not to touch the lens or the area around it . Use a straightened paper clip or other ...manual eject button located inside the computer and damage it . Manual eject hole-Use if you to quickly launch TOSHIBA Assist or display output on certain models. 101 Learning the Basics Using the DVD-ROM or multi-function drive ...
When the disc tray is off. Power button TOSHIBA Assist button* Presentation button* *Available on an external monitor (if connected). Sample System ... models) on the right side of the keyboard allow you need to release the disc tray when the power is open, be careful not to touch the lens or the area around it . Use a straightened paper clip or other ...manual eject button located inside the computer and damage it . Manual eject hole-Use if you to quickly launch TOSHIBA Assist or display output on certain models. 101 Learning the Basics Using the DVD-ROM or multi-function drive ...

User Guide
Page 102
...partially out of dust. 102 Learning the Basics Using the DVD-ROM or multi-function drive The following applications: ❖ The TOSHIBA Assist button activates the TOSHIBA Assist. For more information, see "TOSHIBA Assist" on . 2 Make sure the in-use indicator light is free of the drive (about 1 inch). Inserting a compact... between the LCD and LCD/CRT (or projector). Sample drive tray fully extended HINT: The drive will not open if the computer's power is off. 4 Grasp the tray and pull it fully open. 5 Hold the disc by its edges and check that it is off. 3 Press the drive's eject ...
...partially out of dust. 102 Learning the Basics Using the DVD-ROM or multi-function drive The following applications: ❖ The TOSHIBA Assist button activates the TOSHIBA Assist. For more information, see "TOSHIBA Assist" on . 2 Make sure the in-use indicator light is free of the drive (about 1 inch). Inserting a compact... between the LCD and LCD/CRT (or projector). Sample drive tray fully extended HINT: The drive will not open if the computer's power is off. 4 Grasp the tray and pull it fully open. 5 Hold the disc by its edges and check that it is off. 3 Press the drive's eject ...

User Guide
Page 104
...with the computer off inside the computer and damage it. 2 Gently pull the tray out until it is fully open , remove the disc, and place it in its protective cover. 3 Gently push the tray in to close it.... The disc tray slides partially out of the tray until it is fully open , remove the disc, and place it in its protective cover. 3 Gently push the tray in to press... Push the disc tray in -use indicator light is glowing. Also, if the disc is still spinning when you open the disc tray, wait for it to stop spinning before you remove it. 2 Pull the tray until it ....
...with the computer off inside the computer and damage it. 2 Gently pull the tray out until it is fully open , remove the disc, and place it in its protective cover. 3 Gently push the tray in to close it.... The disc tray slides partially out of the tray until it is fully open , remove the disc, and place it in its protective cover. 3 Gently push the tray in to press... Push the disc tray in -use indicator light is glowing. Also, if the disc is still spinning when you open the disc tray, wait for it to stop spinning before you remove it. 2 Pull the tray until it ....

User Guide
Page 108
... after all, wait a few seconds before turning the computer on again. NOTE Holding the Shift key while the Turn Off computer Windows dialog box is open, changes the Stand By button to hibernate. To use either of these steps to shut down the computer: 1 Click the Start button, then Shut down..." on page 110. 108 Learning the Basics Powering down the computer When you power down the computer, you first need to turn it on in Toshiba's Power Saver utility. If you change your files and make sure the disk activity lights are off.
... after all, wait a few seconds before turning the computer on again. NOTE Holding the Shift key while the Turn Off computer Windows dialog box is open, changes the Stand By button to hibernate. To use either of these steps to shut down the computer: 1 Click the Start button, then Shut down..." on page 110. 108 Learning the Basics Powering down the computer When you power down the computer, you first need to turn it on in Toshiba's Power Saver utility. If you change your files and make sure the disk activity lights are off.

User Guide
Page 109
109 Learning the Basics Powering down the computer 1 Open the Start menu, click Control Panel, then Performance and Maintenance. 2 Click the Toshiba Power Saver icon. 3 Click the Setup Action tab. 4 Select the options you want from the drop-down lists. ❖ When I press the power button Set this option to Shutdown to have the computer shut down when you press the power button. 5 Click Apply. 6 Click OK. Sample system power mode settings NOTE For more information about the Power Saver utility, see "TOSHIBA Power Saver" on page 164.
109 Learning the Basics Powering down the computer 1 Open the Start menu, click Control Panel, then Performance and Maintenance. 2 Click the Toshiba Power Saver icon. 3 Click the Setup Action tab. 4 Select the options you want from the drop-down lists. ❖ When I press the power button Set this option to Shutdown to have the computer shut down when you press the power button. 5 Click Apply. 6 Click OK. Sample system power mode settings NOTE For more information about the Power Saver utility, see "TOSHIBA Power Saver" on page 164.
User Guide
Page 110
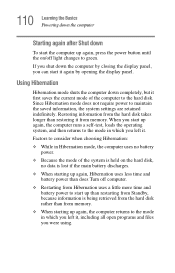
... information is being retrieved from the hard disk rather than from memory. Restoring information from the hard disk takes longer than restoring it , including all open programs and files you were using. 110 Learning the Basics Powering down the computer Starting again after Shut down To start the computer up again... power than does Turn off light changes to green. If you shut down the computer by closing the display panel, you left it again by opening the display panel.
... information is being retrieved from the hard disk rather than from memory. Restoring information from the hard disk takes longer than restoring it , including all open programs and files you were using. 110 Learning the Basics Powering down the computer Starting again after Shut down To start the computer up again... power than does Turn off light changes to green. If you shut down the computer by closing the display panel, you left it again by opening the display panel.

User Guide
Page 111
...on page 164. The computer is configured, put the computer into Hibernation when your computer for Hibernation 1 Open the Start menu, click Control Panel, then Performance and Maintenance. 2 Click the Toshiba Power Saver icon. 3 Click the Setup Action tab. 4 Select Hibernation for the options you press the ...10070; When I close the display panel. 5 Click Apply. 6 Click OK. NOTE For more information about the Power Saver utility, see "TOSHIBA Power Saver" on the hibernation options taken. 111 Learning the Basics Powering down the computer Configuring your option settings occur.
...on page 164. The computer is configured, put the computer into Hibernation when your computer for Hibernation 1 Open the Start menu, click Control Panel, then Performance and Maintenance. 2 Click the Toshiba Power Saver icon. 3 Click the Setup Action tab. 4 Select Hibernation for the options you press the ...10070; When I close the display panel. 5 Click Apply. 6 Click OK. NOTE For more information about the Power Saver utility, see "TOSHIBA Power Saver" on the hibernation options taken. 111 Learning the Basics Powering down the computer Configuring your option settings occur.
User Guide
Page 112
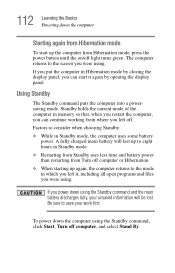
112 Learning the Basics Powering down the computer Starting again from Hibernation mode To start it , including all open programs and files you were using the Standby command and the main battery discharges fully, your work first. Using Standby The Standby command puts the ... time and battery power than restarting from Turn off computer or Hibernation. ❖ When starting up the computer from where you left it again by opening the display panel.
112 Learning the Basics Powering down the computer Starting again from Hibernation mode To start it , including all open programs and files you were using the Standby command and the main battery discharges fully, your work first. Using Standby The Standby command puts the ... time and battery power than restarting from Turn off computer or Hibernation. ❖ When starting up the computer from where you left it again by opening the display panel.

User Guide
Page 113
The on/off light blinks amber indicating the machine is in Toshiba's Power Saver utility. 1 Open the Start menu, click Control Panel, then Performance and Maintenance. 2 Click the Toshiba Power Saver icon. 3 Click the Setup Action tab. You can put the computer into Standby mode. Going into Standby mode more ...after which the computer automatically goes into Standby mode by either pressing the power button or closing the display panel. To use any of all open programs and files, turns off the display, and goes into a low-power mode. The computer saves the status of these methods, you...
The on/off light blinks amber indicating the machine is in Toshiba's Power Saver utility. 1 Open the Start menu, click Control Panel, then Performance and Maintenance. 2 Click the Toshiba Power Saver icon. 3 Click the Setup Action tab. You can put the computer into Standby mode. Going into Standby mode more ...after which the computer automatically goes into Standby mode by either pressing the power button or closing the display panel. To use any of all open programs and files, turns off the display, and goes into a low-power mode. The computer saves the status of these methods, you...


