

User Guide
Page 7
7 Instructions for this device is 0.3B. Any repairs or alterations made by the supplier. The termination on an interface may not prevent degradation of the power utility, telephone lines and internal metallic water pipe system, if present, are connected together. The equipment must contain the equipment's Ringer Equivalence Number (REN) and ...
7 Instructions for this device is 0.3B. Any repairs or alterations made by the supplier. The termination on an interface may not prevent degradation of the power utility, telephone lines and internal metallic water pipe system, if present, are connected together. The equipment must contain the equipment's Ringer Equivalence Number (REN) and ...

User Guide
Page 9
...accept any interference that may cause undesired operation. Industry Canada (IC) This device complies with the product. Nevertheless, the Toshiba Wireless LAN Mini PCI Card shall be used in strict accordance with the manufacturer's instructions as identified in the documentation that ... interference, including interference that may cause undesired operation of Industry Canada. Caution: Exposure to Radio Frequency Radiation The radiated output power of the devices in such a manner that comes with Part 15 of FCC Rules. Canada - USA-Federal Communications Commission ...
...accept any interference that may cause undesired operation. Industry Canada (IC) This device complies with the product. Nevertheless, the Toshiba Wireless LAN Mini PCI Card shall be used in strict accordance with the manufacturer's instructions as identified in the documentation that ... interference, including interference that may cause undesired operation of Industry Canada. Caution: Exposure to Radio Frequency Radiation The radiated output power of the devices in such a manner that comes with Part 15 of FCC Rules. Canada - USA-Federal Communications Commission ...
User Guide
Page 16
... external devices 50 Turning on the computer 51 Opening the display panel 51 Turning on the power 51 Using the computer for the first time 53 Registering your computer 53 Shutting down the computer 54 Power down tips 56 Chapter 3: Connecting Other External Devices 57 Using external display devices 57 Connecting the...
... external devices 50 Turning on the computer 51 Opening the display panel 51 Turning on the power 51 Using the computer for the first time 53 Registering your computer 53 Shutting down the computer 54 Power down tips 56 Chapter 3: Connecting Other External Devices 57 Using external display devices 57 Connecting the...

User Guide
Page 18
... (memory) mode 111 Shutdown mode hot key 113 Restarting a computer in a special shutdown mode... 114 Chapter 5: Power Management 115 Toshiba's energy-saver design 115 Running the computer on battery power 116 Charging the batteries 117 Monitoring battery power 118 What to do when the battery alarm sounds 122 Changing batteries 123 Taking care of...
... (memory) mode 111 Shutdown mode hot key 113 Restarting a computer in a special shutdown mode... 114 Chapter 5: Power Management 115 Toshiba's energy-saver design 115 Running the computer on battery power 116 Charging the batteries 117 Monitoring battery power 118 What to do when the battery alarm sounds 122 Changing batteries 123 Taking care of...

User Guide
Page 20
...Zooming out 172 Adjusting the color balance 173 Launching an Internet browser from WinDVD 174 Getting Help 174 Exiting WinDVD 174 Chapter 8: Toshiba Utilities 175 Fn-esse 176 Starting Fn-esse 176 Assigning a key to a program or document 177 Viewing existing key assignments 180...Windows 197 User-level passwords 198 Protecting against forgetfulness 198 Setting a user-level password 199 Disabling the user-level password 203 Using the power-on (user-level) password 205 Using the instant (user-level) password 206 Supervisor-level passwords 206 Setting a supervisor-level password ...
...Zooming out 172 Adjusting the color balance 173 Launching an Internet browser from WinDVD 174 Getting Help 174 Exiting WinDVD 174 Chapter 8: Toshiba Utilities 175 Fn-esse 176 Starting Fn-esse 176 Assigning a key to a program or document 177 Viewing existing key assignments 180...Windows 197 User-level passwords 198 Protecting against forgetfulness 198 Setting a user-level password 199 Disabling the user-level password 203 Using the power-on (user-level) password 205 Using the instant (user-level) password 206 Supervisor-level passwords 206 Setting a supervisor-level password ...
User Guide
Page 21
... 234 Using the Windows 98 Second Edition troubleshooting feature 234 A plan of action 234 Resolving hardware conflicts on your own 234 Memory card problems 237 Power and the batteries 238 Keyboard problems 239 AccuPoint II problems 241 Display problems 241 Disk drive problems 243 Modem problems 246 Problems with the CD...
... 234 Using the Windows 98 Second Edition troubleshooting feature 234 A plan of action 234 Resolving hardware conflicts on your own 234 Memory card problems 237 Power and the batteries 238 Keyboard problems 239 AccuPoint II problems 241 Display problems 241 Disk drive problems 243 Modem problems 246 Problems with the CD...

User Guide
Page 22
22 Minimum system requirements 259 Developing good computing habits 260 Use VirtualTech 261 If you need further assistance 263 Before you call 263 Contacting Toshiba 263 Other Toshiba Internet Web sites 264 Toshiba's worldwide offices 265 Appendix A: Hot Keys 269 Appendix B: Power Cable Connectors 273 Appendix C: Video Modes 275 Glossary 279 Index 293
22 Minimum system requirements 259 Developing good computing habits 260 Use VirtualTech 261 If you need further assistance 263 Before you call 263 Contacting Toshiba 263 Other Toshiba Internet Web sites 264 Toshiba's worldwide offices 265 Appendix A: Hot Keys 269 Appendix B: Power Cable Connectors 273 Appendix C: Video Modes 275 Glossary 279 Index 293

User Guide
Page 23
The Tecra 8200 Series notebook's modular design also lets you add, change, or update components at any time, making this computer one of powerful, portable, multimedia computing. Because you or your company's Information Technology (IT) personnel have been given the opportunity to the world of the most flexible tools you've ever owned. 23 Introduction Welcome to choose among so many options-you have a computer that truly meets your specific needs. Your new Toshiba Tecra 8200 Series notebook computer is designed just for you.
The Tecra 8200 Series notebook's modular design also lets you add, change, or update components at any time, making this computer one of powerful, portable, multimedia computing. Because you or your company's Information Technology (IT) personnel have been given the opportunity to the world of the most flexible tools you've ever owned. 23 Introduction Welcome to choose among so many options-you have a computer that truly meets your specific needs. Your new Toshiba Tecra 8200 Series notebook computer is designed just for you.

User Guide
Page 34
... Finding Your Way Around Finding where everything is located Left side PC Card ejection tabs PC Card slots Speaker Headphone jack Microphone jack Cooling vent Power button Power button cover PC Card ejection tabs-Allow easy removal of the computer's processor, make sure you don't block the cooling vent.
... Finding Your Way Around Finding where everything is located Left side PC Card ejection tabs PC Card slots Speaker Headphone jack Microphone jack Cooling vent Power button Power button cover PC Card ejection tabs-Allow easy removal of the computer's processor, make sure you don't block the cooling vent.
User Guide
Page 35
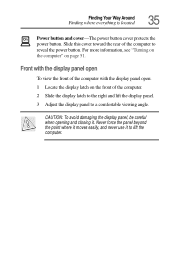
...it moves easily, and never use it . For more information, see "Turning on the computer" on the front of the computer to reveal the power button. CAUTION: To avoid damaging the display panel, be careful when opening and closing it to a comfortable viewing angle. Finding Your Way Around ...Finding where everything is located 35 On Power button and cover-The power button cover protects the power button. Front with the display panel open To view the front of the computer with the display panel open: 1 ...
...it moves easily, and never use it . For more information, see "Turning on the computer" on the front of the computer to reveal the power button. CAUTION: To avoid damaging the display panel, be careful when opening and closing it to a comfortable viewing angle. Finding Your Way Around ...Finding where everything is located 35 On Power button and cover-The power button cover protects the power button. Front with the display panel open To view the front of the computer with the display panel open: 1 ...

User Guide
Page 37
...-Lets you to your computer when a standard electrical outlet is located 37 System indicator panel-These lights provide status information about using the battery, see "Power Management" on page 115. For further information about various system functions. PC Card lock retaining screw-Prevents the PC Card lock from accidentally releasing the...
...-Lets you to your computer when a standard electrical outlet is located 37 System indicator panel-These lights provide status information about using the battery, see "Power Management" on page 115. For further information about various system functions. PC Card lock retaining screw-Prevents the PC Card lock from accidentally releasing the...

User Guide
Page 38
.../off light-Indicates whether the computer is on, off, or in a power down the computer using the Standby command. Main battery light-Indicates the status of the main battery. ❖ Flashes amber when you are running on battery power and the battery charge is running low. ❖ Does not glow when... you power down mode. ❖ Glows green when the computer is not running on battery power and the battery charge is on the front of your system. ...
.../off light-Indicates whether the computer is on, off, or in a power down the computer using the Standby command. Main battery light-Indicates the status of the main battery. ❖ Flashes amber when you are running on battery power and the battery charge is running low. ❖ Does not glow when... you power down mode. ❖ Glows green when the computer is not running on battery power and the battery charge is on the front of your system. ...

User Guide
Page 39
... to indicate that the device is available. Caps lock light-Glows when you are connected to AC power and the battery is fully charged. When this light is on, pressing a letter key on the...Way Around Indicator panel lights 39 ❖ Glows amber when you are connected to AC power and the battery is charging. ❖ Glows green when you press the caps lock key. For more information,... see "Monitoring battery power" on page 118. SelectBay battery light-Indicates the status of a disk drive in the SelectBay, if ...
... to indicate that the device is available. Caps lock light-Glows when you are connected to AC power and the battery is fully charged. When this light is on, pressing a letter key on the...Way Around Indicator panel lights 39 ❖ Glows amber when you are connected to AC power and the battery is charging. ❖ Glows green when you press the caps lock key. For more information,... see "Monitoring battery power" on page 118. SelectBay battery light-Indicates the status of a disk drive in the SelectBay, if ...
User Guide
Page 42
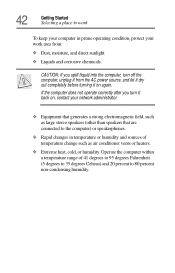
..., unplug it from : ❖ Dust, moisture, and direct sunlight. ❖ Liquids and corrosive chemicals. 42 Getting Started Selecting a place to work area from the AC power source, and let it dry out completely before turning it back on again.
..., unplug it from : ❖ Dust, moisture, and direct sunlight. ❖ Liquids and corrosive chemicals. 42 Getting Started Selecting a place to work area from the AC power source, and let it dry out completely before turning it back on again.

User Guide
Page 47
See "Connecting to a phone line" on page 81 Before starting to use external power or to charge the battery, you must attach the AC adapter. See "Using a mouse" on page 57 ❖ Connect a local printer. To register your computer ...
See "Connecting to a phone line" on page 81 Before starting to use external power or to charge the battery, you must attach the AC adapter. See "Using a mouse" on page 57 ❖ Connect a local printer. To register your computer ...

User Guide
Page 48
Connecting the power cable to the AC adapter. Power cable AC adapter Power cable and AC adapter To connect AC power to the computer: 1 Connect the power cable to the AC adapter 48 Getting Started Setting up your computer Connecting the AC adapter The AC adapter enables you to power the computer from an electrical outlet and to charge the computer's battery.
Connecting the power cable to the AC adapter. Power cable AC adapter Power cable and AC adapter To connect AC power to the computer: 1 Connect the power cable to the AC adapter 48 Getting Started Setting up your computer Connecting the AC adapter The AC adapter enables you to power the computer from an electrical outlet and to charge the computer's battery.

User Guide
Page 49
Never pull directly on top of, or apply heat to the power cable. If the electrical outlet is a risk of the computer. Never remove the power plug from the outlet. Toshiba assumes no liability for any damage in such cases. Getting Started Setting up your computer. Never modify, forcibly bend, place heavy objects on...
Never pull directly on top of, or apply heat to the power cable. If the electrical outlet is a risk of the computer. Never remove the power plug from the outlet. Toshiba assumes no liability for any damage in such cases. Getting Started Setting up your computer. Never modify, forcibly bend, place heavy objects on...
User Guide
Page 50
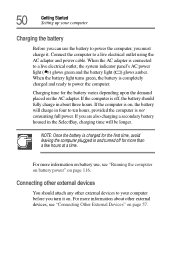
... leaving the computer plugged in the SelectBay, charging time will charge in about other external devices, see "Running the computer on battery power" on page 116. For more information about three hours. When the battery light turns green, the battery is connected to a live... electrical outlet, the system indicator panel's AC power light ( ) glows green and the battery light ( ) glows amber. Connecting other external devices to your computer Charging the battery Before you...
... leaving the computer plugged in the SelectBay, charging time will charge in about other external devices, see "Running the computer on battery power" on page 116. For more information about three hours. When the battery light turns green, the battery is connected to a live... electrical outlet, the system indicator panel's AC power light ( ) glows green and the battery light ( ) glows amber. Connecting other external devices to your computer Charging the battery Before you...
User Guide
Page 51
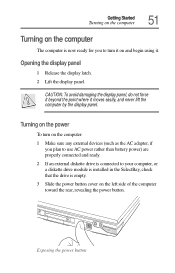
... turn it on the left side of the computer toward the rear, revealing the power button. Exposing the power button CAUTION: To avoid damaging the display panel, do not force it beyond the point where it . Opening the display panel 1 Release the display latch. 2 ... ready for you to turn on the computer: 1 Make sure any external devices (such as the AC adapter, if you plan to use AC power rather than battery power) are properly connected and ready. 2 If an external diskette drive is connected to your computer, or a diskette drive module is installed in the...
... turn it on the left side of the computer toward the rear, revealing the power button. Exposing the power button CAUTION: To avoid damaging the display panel, do not force it beyond the point where it . Opening the display panel 1 Release the display latch. 2 ... ready for you to turn on the computer: 1 Make sure any external devices (such as the AC adapter, if you plan to use AC power rather than battery power) are properly connected and ready. 2 If an external diskette drive is connected to your computer, or a diskette drive module is installed in the...
User Guide
Page 52
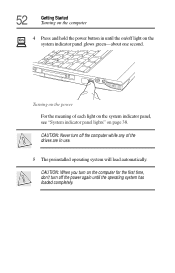
CAUTION: When you turn on the computer for the first time, don't turn off the power again until the on/off light on the system indicator panel glows green-about one second. CAUTION: Never turn off the computer while any of each light on the system indicator panel, see "System indicator panel lights" on page 38. 52 Getting Started Turning on the computer On 4 Press and hold the power button in use. 5 The preinstalled operating system will load automatically. Turning on the power For the meaning of the drives are in until the operating system has loaded completely.
CAUTION: When you turn on the computer for the first time, don't turn off the power again until the on/off light on the system indicator panel glows green-about one second. CAUTION: Never turn off the computer while any of each light on the system indicator panel, see "System indicator panel lights" on page 38. 52 Getting Started Turning on the computer On 4 Press and hold the power button in use. 5 The preinstalled operating system will load automatically. Turning on the power For the meaning of the drives are in until the operating system has loaded completely.


