User Manual
Page 5
... the lens or internal parts in fire, electric shock, or other closed installation state. Safety Check Upon completion of any other hazards. (Replacement of the remote control or direct the laser pointer toward a person or a mirror. Unauthorized substitutions may result in the instrument. Switzerland 200 - 240V 240V 6A North American 200...
... the lens or internal parts in fire, electric shock, or other closed installation state. Safety Check Upon completion of any other hazards. (Replacement of the remote control or direct the laser pointer toward a person or a mirror. Unauthorized substitutions may result in the instrument. Switzerland 200 - 240V 240V 6A North American 200...
User Manual
Page 6
...Incorporated. and other countries. • Adobe is a registered trademark and Acrobat Reader is a registered trademark of Microsoft Corporation in the U.S. REMOTE CONTROL BATTERIES Caution • Never throw batteries into the battery compartment. 11 Before Using If the fluid is only for EU-member states...or transmitting commercial imaging software or broadcast or cable-broad casting programs with local regulations. For example, if making a reference to Toshiba Corporation. If battery-leaking fluid contacts skin, wash the fluid off using tissue paper. (Dispose of the used lamps in ...
...Incorporated. and other countries. • Adobe is a registered trademark and Acrobat Reader is a registered trademark of Microsoft Corporation in the U.S. REMOTE CONTROL BATTERIES Caution • Never throw batteries into the battery compartment. 11 Before Using If the fluid is only for EU-member states...or transmitting commercial imaging software or broadcast or cable-broad casting programs with local regulations. For example, if making a reference to Toshiba Corporation. If battery-leaking fluid contacts skin, wash the fluid off using tissue paper. (Dispose of the used lamps in ...
User Manual
Page 7
...Using SAFETY PRECAUTIONS 2 IMPORTANT SAFETY INSTRUCTIONS 4 POWER SUPPLY CORD SELECTION 9 IMPORTANT PRECAUTIONS 9 EXEMPTION CLAUSES 10 OTHER CAUTIONS AND INFORMATIONS 10 REMOTE CONTROL BATTERIES 11 CONTENTS ...12 Preparations Checking the package contents 14 Names of each part on the main unit 15 Names of each ... 16 Label locations 17 Names of the terminals on the rear panel 18 Preparing and using the remote control 19 Operating a computer using the remote control 20 Placement ...21 Connection ...22 Operations Turning the power on and off 24 Basic operations 26 Using handy ...
...Using SAFETY PRECAUTIONS 2 IMPORTANT SAFETY INSTRUCTIONS 4 POWER SUPPLY CORD SELECTION 9 IMPORTANT PRECAUTIONS 9 EXEMPTION CLAUSES 10 OTHER CAUTIONS AND INFORMATIONS 10 REMOTE CONTROL BATTERIES 11 CONTENTS ...12 Preparations Checking the package contents 14 Names of each part on the main unit 15 Names of each ... 16 Label locations 17 Names of the terminals on the rear panel 18 Preparing and using the remote control 19 Operating a computer using the remote control 20 Placement ...21 Connection ...22 Operations Turning the power on and off 24 Basic operations 26 Using handy ...
User Manual
Page 8
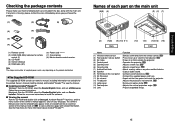
... part on the main unit (6)(5) (4) (3) (2) (1) (3) (7)(8) (9) (10) (11) Back (12) (13) (12)(14) (15) Front Name : Function (1) Infrared remote sensor (2) Foot adjuster release button (3) Air intake (4) Control panel (5) Zooming lever (6) Focusing ring (7) Antitheft lock hole (8) Speaker (9) Terminals on Start.pdf. p.27 : Remove ...run ar500enu.exe. Preparations Checking the package contents Please make sure that the following items are included in air from the remote control. See the Help menu for the printed Owner's manual (Getting started) and Acrobat® Reader™ to ...
... part on the main unit (6)(5) (4) (3) (2) (1) (3) (7)(8) (9) (10) (11) Back (12) (13) (12)(14) (15) Front Name : Function (1) Infrared remote sensor (2) Foot adjuster release button (3) Air intake (4) Control panel (5) Zooming lever (6) Focusing ring (7) Antitheft lock hole (8) Speaker (9) Terminals on Start.pdf. p.27 : Remove ...run ar500enu.exe. Preparations Checking the package contents Please make sure that the following items are included in air from the remote control. See the Help menu for the printed Owner's manual (Getting started) and Acrobat® Reader™ to ...
User Manual
Page 9
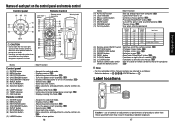
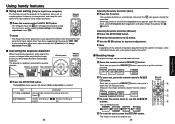
... buttons ⇒ ; p.24 : Displays whether power is on or off (standby). p.24 : Selects input. p.31 : Use when entering password. Remote Control Remote control transmitter Warning label (4) (3) (12) (26) Battery cover (1) (15) (16) (17) (18) (19) (27) Name Control panel.../STANDBY button (5) ON/STANDBY indicator (6) INPUT button (7) RETURN button (8) Selection button (9) LAMP indicator (10) TEMP indicator (11) FAN indicator Remote control (1) ENTER button (2) MENU button (3) KEYSTONE button (4) ON/STANDBY button (6) INPUT button (7) RETURN button (8) Selection button (12) LASER...
... buttons ⇒ ; p.24 : Displays whether power is on or off (standby). p.24 : Selects input. p.31 : Use when entering password. Remote Control Remote control transmitter Warning label (4) (3) (12) (26) Battery cover (1) (15) (16) (17) (18) (19) (27) Name Control panel.../STANDBY button (5) ON/STANDBY indicator (6) INPUT button (7) RETURN button (8) Selection button (9) LAMP indicator (10) TEMP indicator (11) FAN indicator Remote control (1) ENTER button (2) MENU button (3) KEYSTONE button (4) ON/STANDBY button (6) INPUT button (7) RETURN button (8) Selection button (12) LASER...
User Manual
Page 10
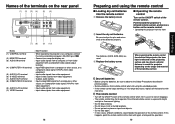
... (Y/PB/PR) from video equipment. : Input audio signals from video equipment. : Input video signals from video equipment with new ones. When operating the remote control from the front w Insert the dry-cell batteries. Names of the terminals on the rear panel (1) (2) (3) (4) (5) (6) (7) (8) (9)...(9) AUDIO (L/R) terminal (10) VIDEO terminal : Main Function : When operating the projector via a computer, connect this happens, point the remote control at the main unit again, and repeat the operation. 19 Preparations p.52 : Connect to the controlling computer's RS-232C port. Approx...
... (Y/PB/PR) from video equipment. : Input audio signals from video equipment. : Input video signals from video equipment with new ones. When operating the remote control from the front w Insert the dry-cell batteries. Names of the terminals on the rear panel (1) (2) (3) (4) (5) (6) (7) (8) (9)...(9) AUDIO (L/R) terminal (10) VIDEO terminal : Main Function : When operating the projector via a computer, connect this happens, point the remote control at the main unit again, and repeat the operation. 19 Preparations p.52 : Connect to the controlling computer's RS-232C port. Approx...
User Manual
Page 11
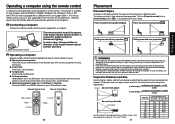
... note that Toshiba does not guarantee the operation of the projector know that is "floor-mounted front projection." In such a case, change position or direction of the mouse remote control receiver and retry. 2 Operating a computer Operate remote control's buttons towards the mouse remote control receiver.... Ceiling-mounted rear projection WARNING • Always obey the instructions listed in IMPORTANT SAFETY INSTRUCTIONS when placing the unit. Remote Control Front Remote Control Rear Mouse control PAGE - Set the [Projection mode] in the Default setting menu p.40 , in accordance ...
... note that Toshiba does not guarantee the operation of the projector know that is "floor-mounted front projection." In such a case, change position or direction of the mouse remote control receiver and retry. 2 Operating a computer Operate remote control's buttons towards the mouse remote control receiver.... Ceiling-mounted rear projection WARNING • Always obey the instructions listed in IMPORTANT SAFETY INSTRUCTIONS when placing the unit. Remote Control Front Remote Control Rear Mouse control PAGE - Set the [Projection mode] in the Default setting menu p.40 , in accordance ...
User Manual
Page 13
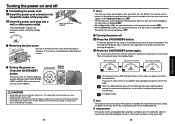
... into the AC IN socket of power in standby. If it is displayed after the message disappears.) 2 Press the ON/STANDBY button again. Control panel Remote Control Start-up screen appears. The screen turns off, but the internal cooling fan continues to remove the lens cover when the power is no...
... into the AC IN socket of power in standby. If it is displayed after the message disappears.) 2 Press the ON/STANDBY button again. Control panel Remote Control Start-up screen appears. The screen turns off, but the internal cooling fan continues to remove the lens cover when the power is no...
User Manual
Page 15
... The image is selected. For computer input, the icon will undergo keystone (trapezoidal) distortion. Before correction After correction Control panel Remote Control 1 Press the KEYSTONE button. By default, [Auto v-keystone] is reset to the original size. 29 Operations Item Description...Auto v-keystone Automatically corrects the vertical distortion. The icon appears during processing. You can keep 2 To zoom out, press the remote control's RESIZE button. The keystone distortion is up the projector to the optimum state such as well by selecting [Auto setting]...
... The image is selected. For computer input, the icon will undergo keystone (trapezoidal) distortion. Before correction After correction Control panel Remote Control 1 Press the KEYSTONE button. By default, [Auto v-keystone] is reset to the original size. 29 Operations Item Description...Auto v-keystone Automatically corrects the vertical distortion. The icon appears during processing. You can keep 2 To zoom out, press the remote control's RESIZE button. The keystone distortion is up the projector to the optimum state such as well by selecting [Auto setting]...
User Manual
Page 16
... the copyright protected by the copyright laws. ■ Freezing the image (Freeze) The image being projected can be used to be selected. Press the remote control's SCREEN SIZE button. Pressing the button switches Full/Thru/Wide in effect. • Operating any other equipment. • If you use this ...function on commercial video software, broadcast or cable-broadcasting except for the projected image can be frozen. Remote Control ■ Changing screen size The screen size for the purpose of the Image adjustment menu has the same function p.35...
... the copyright protected by the copyright laws. ■ Freezing the image (Freeze) The image being projected can be used to be selected. Press the remote control's SCREEN SIZE button. Pressing the button switches Full/Thru/Wide in effect. • Operating any other equipment. • If you use this ...function on commercial video software, broadcast or cable-broadcasting except for the projected image can be frozen. Remote Control ■ Changing screen size The screen size for the purpose of the Image adjustment menu has the same function p.35...

User Manual
Page 17
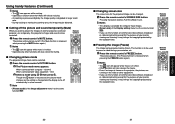
...the preset password at power-on the power. 2 The lamp lights and the password entry screen appears. 3 Enter the password using numeric keys of the remote control. Using handy features (Continued) ■ Password function When the password function is added and [Password] is displayed. ([OK] or [Cancel]) 2...use it after the power cord is wrong, repeat the procedure from [Off] to [On], image projection requires an entry of the remote control. If you to prompt you forgot password, please inquire your dealer. 33 Operations The password entry screen is complete and the password ...
...the preset password at power-on the power. 2 The lamp lights and the password entry screen appears. 3 Enter the password using numeric keys of the remote control. Using handy features (Continued) ■ Password function When the password function is added and [Password] is displayed. ([OK] or [Cancel]) 2...use it after the power cord is wrong, repeat the procedure from [Off] to [On], image projection requires an entry of the remote control. If you to prompt you forgot password, please inquire your dealer. 33 Operations The password entry screen is complete and the password ...
User Manual
Page 18
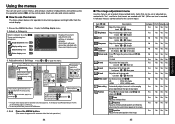
... call up on-screen menus, and conduct a number of adjustments and settings using the operation buttons p.16 on the control panel (main unit side) and remote control. ■ How to use the following four categories: Image adjustment menu p.35 Display setting menu p.37 Default setting menu p.40 Displays the current adjustments...
... call up on-screen menus, and conduct a number of adjustments and settings using the operation buttons p.16 on the control panel (main unit side) and remote control. ■ How to use the following four categories: Image adjustment menu p.35 Display setting menu p.37 Default setting menu p.40 Displays the current adjustments...

User Manual
Page 21
...32 Off On When [Password] is [On], the Password Setting screen is done. • You cannot operate the remote control if the codes of the projector. (The remote control operations are available.) Control panel operations are not reset.) Resets all Press . (The password and user logo are ...the [RETURN] button on . [Lamp power] When [Lamp power] is supplied when restored after the setting is displayed. The input from 4 types. Remote control code setting for 3 seconds.) 41 Operations p.21 (Standard) (Rear) (Ceiling) (Rear ceiling) No signal power off Set the time to ...
...32 Off On When [Password] is [On], the Password Setting screen is done. • You cannot operate the remote control if the codes of the projector. (The remote control operations are available.) Control panel operations are not reset.) Resets all Press . (The password and user logo are ...the [RETURN] button on . [Lamp power] When [Lamp power] is supplied when restored after the setting is displayed. The input from 4 types. Remote control code setting for 3 seconds.) 41 Operations p.21 (Standard) (Rear) (Ceiling) (Rear ceiling) No signal power off Set the time to ...
User Manual
Page 25
...remote sensor? 48 Connection terminal Others Specifications ■ List of its service life? relative humidity: 30% to the projector? • Is the outer lamp cover attached properly? p.35 • Is the lamp nearing the end of general specifications Item Specification Consumption Power TDP-T95: 310 W TDP-T100: 380 W Weight TDP-T95: 2.9 kg TDP...; Is the power cord plugged in the future. ■ Separately sold product Replacement Lamp for TDP-T95 Replacement Lamp for TDP-T100 Model TLPLW9 Model TLPLW10 49 p.27 • Are the connections set properly? p.35 &#...
...remote sensor? 48 Connection terminal Others Specifications ■ List of its service life? relative humidity: 30% to the projector? • Is the outer lamp cover attached properly? p.35 • Is the lamp nearing the end of general specifications Item Specification Consumption Power TDP-T95: 310 W TDP-T100: 380 W Weight TDP-T95: 2.9 kg TDP...; Is the power cord plugged in the future. ■ Separately sold product Replacement Lamp for TDP-T95 Replacement Lamp for TDP-T100 Model TLPLW9 Model TLPLW10 49 p.27 • Are the connections set properly? p.35 &#...


