
User Manual
Page 2
... or cords associated with accessories sold with USA only this product, will not occur in a particular installation. Disposal of mercury may be determined by turning the equipment off and on a circuit different from that may cause undesired operation. MODEL NAME: TDP-T95/TDP-T100 USA only TRADE NAME: DATA PROJECTOR Tested To Comply With FCC Standards FOR HOME OR OFFICE USE MODEL NAME: TDP-T95/TDP...
... or cords associated with accessories sold with USA only this product, will not occur in a particular installation. Disposal of mercury may be determined by turning the equipment off and on a circuit different from that may cause undesired operation. MODEL NAME: TDP-T95/TDP-T100 USA only TRADE NAME: DATA PROJECTOR Tested To Comply With FCC Standards FOR HOME OR OFFICE USE MODEL NAME: TDP-T95/TDP...
User Manual
Page 3
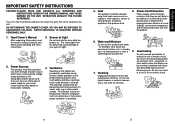
... of overheating, and these openings power supply to reduce the risk of Light Do not look into the lens while the lamp is fully transistorized and does not contain any parts that they exit from the wall outlet before cleaning. Power-Cord Protection The product should be blocked or covered. Use a soft cloth for example, near a 9. RETAIN THIS BOOKLET FOR FUTURE REFERENCE. Source of...
... of overheating, and these openings power supply to reduce the risk of Light Do not look into the lens while the lamp is fully transistorized and does not contain any parts that they exit from the wall outlet before cleaning. Power-Cord Protection The product should be blocked or covered. Use a soft cloth for example, near a 9. RETAIN THIS BOOKLET FOR FUTURE REFERENCE. Source of...
User Manual
Page 5
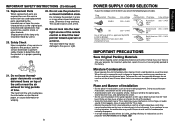
... air exhaust for at the factory. Place and Manner of the lamp only should be sure the service technician has used replacement parts specified by users.) 20. Doing so may cause a failure or shorten the life of the product. • Using this product, ask the service technician to perform safety checks to 240V, use the unit for long periods of cable. Ensure to the images or audio sound...
... air exhaust for at the factory. Place and Manner of the lamp only should be sure the service technician has used replacement parts specified by users.) 20. Doing so may cause a failure or shorten the life of the product. • Using this product, ask the service technician to perform safety checks to 240V, use the unit for long periods of cable. Ensure to the images or audio sound...
User Manual
Page 6
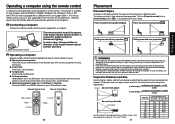
... Computer, Inc. • Windows is not related to pages with equipment or software that this product. REMOTE CONTROL BATTERIES Caution • Never throw batteries into the battery compartment. 11 Before Using Using the batteries improperly may not reflect your projector. located at the bottom of International Business Machines Corporation. • Digital Light Processing, Digital Micromirror Device and DMD are annotated as an...
... Computer, Inc. • Windows is not related to pages with equipment or software that this product. REMOTE CONTROL BATTERIES Caution • Never throw batteries into the battery compartment. 11 Before Using Using the batteries improperly may not reflect your projector. located at the bottom of International Business Machines Corporation. • Digital Light Processing, Digital Micromirror Device and DMD are annotated as an...
User Manual
Page 7
... operations 26 Using handy features 28 Using auto setting (Only for input from computer 28 Correcting the keystone distortion 28 Resizing image 29 Cutting off the picture and sound temporarily (Mute 30 Changing picture mode 30 Changing screen size 31 Freezing the image (Freeze 31 Password function 32 Using the menus 34 How to use the menus 34 The image adjustment menu 35 The display setting menu 37 The default setting menu 40 Displaying Information (Status display 42 Maintenance About lamp ...43 Lamp replacement 44 Lens...
... operations 26 Using handy features 28 Using auto setting (Only for input from computer 28 Correcting the keystone distortion 28 Resizing image 29 Cutting off the picture and sound temporarily (Mute 30 Changing picture mode 30 Changing screen size 31 Freezing the image (Freeze 31 Password function 32 Using the menus 34 How to use the menus 34 The image adjustment menu 35 The display setting menu 37 The default setting menu 40 Displaying Information (Status display 42 Maintenance About lamp ...43 Lamp replacement 44 Lens...
User Manual
Page 8
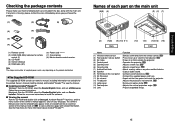
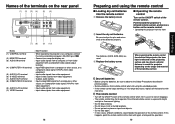
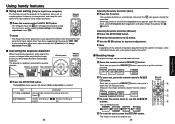
... audio sound. : Connects external devices. Follow the on p. The Owner's Manual cover and list of the Owner's manual appears. Click on -screen instructions. Macintosh: Run the CD-ROM, select the Reader/English folder, and run ar500enu.exe. p.16 : Adjusts screen size. Click on the rear panel (10) AC IN socket (11) Air exhaust (12) Tilt adjuster (13) Lamp cover (14) Foot adjuster (15) Lens : Senses commands from outside the projector. : Operates the projector. to view...
... audio sound. : Connects external devices. Follow the on p. The Owner's Manual cover and list of the Owner's manual appears. Click on -screen instructions. Macintosh: Run the CD-ROM, select the Reader/English folder, and run ar500enu.exe. p.16 : Adjusts screen size. Click on the rear panel (10) AC IN socket (11) Air exhaust (12) Tilt adjuster (13) Lamp cover (14) Foot adjuster (15) Lens : Senses commands from outside the projector. : Operates the projector. to view...
User Manual
Page 9
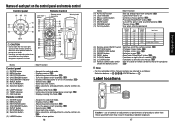
... power is too high. p.34 : Adjusts keystone distortion. p.26 : Goes back one screen. : Menu selections and adjustments, volume control, etc. p.20 (21) PICTURE button : Changes image mode. p.29 (24) PAGE- p.20 : Cuts off (standby). p.25 : Lights when internal temperature is on /off (standby). p.28 : Turns the power on or off (standby). p.20 (27) Remote control code switch : Sets the code of remote control to that of the projector. (inside the battery cover) p.41 Note • For the remainder of this manual, buttons...
... power is too high. p.34 : Adjusts keystone distortion. p.26 : Goes back one screen. : Menu selections and adjustments, volume control, etc. p.20 (21) PICTURE button : Changes image mode. p.29 (24) PAGE- p.20 : Cuts off (standby). p.25 : Lights when internal temperature is on /off (standby). p.28 : Turns the power on or off (standby). p.20 (27) Remote control code switch : Sets the code of remote control to that of the projector. (inside the battery cover) p.41 Note • For the remainder of this manual, buttons...
User Manual
Page 10
... ON/OFF switch of the remote control when not in use or to store in baggage. • The remote control may fail to operate if the infrared remote sensor is reflected on the projecting surface and may travel a shorter distance to a computer display, etc. : Input audio signals from a computer, or from video equipment with new ones. e Replace the battery cover. Be sure to bright sunlight or fluorescent lighting. •...
... ON/OFF switch of the remote control when not in use or to store in baggage. • The remote control may fail to operate if the infrared remote sensor is reflected on the projecting surface and may travel a shorter distance to a computer display, etc. : Input audio signals from a computer, or from video equipment with new ones. e Replace the battery cover. Be sure to bright sunlight or fluorescent lighting. •...
User Manual
Page 11
... factory setting is ceiling-mounted, install the breaker for turning off the power in case of all computers. 1 Connecting a computer Connect the mouse remote control receiver (supplied) to fall, resulting in 4 different styles. Mounting the projector on OS 9 or OS X for full-size picture with the use of the projector know that Toshiba does not guarantee the operation of anomaly. However, please note that fact. Floor-mounted front projection Floor-mounted rear projection Ceiling-mounted front projection Ceiling-mounted...
... factory setting is ceiling-mounted, install the breaker for turning off the power in case of all computers. 1 Connecting a computer Connect the mouse remote control receiver (supplied) to fall, resulting in 4 different styles. Mounting the projector on OS 9 or OS X for full-size picture with the use of the projector know that Toshiba does not guarantee the operation of anomaly. However, please note that fact. Floor-mounted front projection Floor-mounted rear projection Ceiling-mounted front projection Ceiling-mounted...
User Manual
Page 12
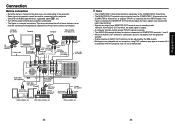
... supplied) To audio output To audio input White (L)/Red (R) Monitor cable Mini D-sub 15P-BNC (not supplied) To Y/CB/CR output Green (Y)/Blue (CB)/Red (CR) Conversion adapter BNC-pin (not supplied) To audio output White (L)/Red (R) AV cable (not supplied) To video output Audio amplifier, etc. However, from the COMPUTER 1 IN terminal or the COMPUTER 2 IN terminal, or outputs Y/PB/PR as selected with this projector. Connection Before connection • Read the owner's manual...
... supplied) To audio output To audio input White (L)/Red (R) Monitor cable Mini D-sub 15P-BNC (not supplied) To Y/CB/CR output Green (Y)/Blue (CB)/Red (CR) Conversion adapter BNC-pin (not supplied) To audio output White (L)/Red (R) AV cable (not supplied) To video output Audio amplifier, etc. However, from the COMPUTER 1 IN terminal or the COMPUTER 2 IN terminal, or outputs Y/PB/PR as selected with this projector. Connection Before connection • Read the owner's manual...
User Manual
Page 13
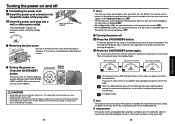
Control panel Remote Control Start-up screen appears. This message will disappear after a moment. Then, the projector goes into a wall or other objects near the air exhaust. In this by performing any operation. We recommend that you use the projector after purchase, after the Password entry screen disappears p.32 . ■ Turning the power off 1 Press the ON/STANDBY button. Power cord connector (Supplied) ■ Removing the lens cover Be sure to remove the lens cover when the power is...
Control panel Remote Control Start-up screen appears. This message will disappear after a moment. Then, the projector goes into a wall or other objects near the air exhaust. In this by performing any operation. We recommend that you use the projector after purchase, after the Password entry screen disappears p.32 . ■ Turning the power off 1 Press the ON/STANDBY button. Power cord connector (Supplied) ■ Removing the lens cover Be sure to remove the lens cover when the power is...
User Manual
Page 14
... output should be set via the Display setting menu p.37 and Lamp power via the Default setting menu p.40 . • This owner's manual assumes that these are constantly lit) on . • The language can be set to XGA resolution. • With some models of RGB signals p.50 , any resolutions not supported by the projector is input, the "Unsupport signal" will appear. • If an unavailable operation button is outputting video signals. The lamp power, if selected, will...
... output should be set via the Display setting menu p.37 and Lamp power via the Default setting menu p.40 . • This owner's manual assumes that these are constantly lit) on . • The language can be set to XGA resolution. • With some models of RGB signals p.50 , any resolutions not supported by the projector is input, the "Unsupport signal" will appear. • If an unavailable operation button is outputting video signals. The lamp power, if selected, will...
User Manual
Page 15
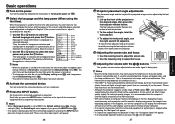
...; Resizing image The projected image can keep pressing. (However, the image cannot be smaller than those supported by the projector p.50 , p.51 . • If auto setting fails adjustment, adjust manually with [Position] in the Image adjustment menu p.35 . For fine adjustment, select [V-keystone] by the button and adjust image manually by using simple operations. button, zoom ratio is up the projector to the optimum state such as well by the button. 3 Use the buttons for input signals other than the original size.) Remote Control...
...; Resizing image The projected image can keep pressing. (However, the image cannot be smaller than those supported by the projector p.50 , p.51 . • If auto setting fails adjustment, adjust manually with [Position] in the Image adjustment menu p.35 . For fine adjustment, select [V-keystone] by the button and adjust image manually by using simple operations. button, zoom ratio is up the projector to the optimum state such as well by the button. 3 Use the buttons for input signals other than the original size.) Remote Control...

User Manual
Page 17
...] to the operating status or the standby mode. 2 Select and hold the button until the LAMP, TEMP, and FAN indicators light in the Default setting menu and press the or button. The input number appears as [****]. 4 Re-enter the same password for more than 5 times, the projector will automatically power off and enter standby mode. 32 How to cancel password (from step 2 . If the password is complete and the password becomes [On]. The password function is...
...] to the operating status or the standby mode. 2 Select and hold the button until the LAMP, TEMP, and FAN indicators light in the Default setting menu and press the or button. The input number appears as [****]. 4 Re-enter the same password for more than 5 times, the projector will automatically power off and enter standby mode. 32 How to cancel password (from step 2 . If the password is complete and the password becomes [On]. The password function is...
User Manual
Page 18
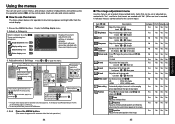
... the current input source. Toggle the picture mode with . Darker Brighter Color Adjust the color of the image. US : NTSC (US) mode JAPAN : NTSC (JAPAN) mode Auto setting Automatically adjusts items such as a reference. • To return to previous item, press the RETURN button. 4. Press the MENU button Display the Setting display menu. 2. Using the menus You can call up on-screen menus, and conduct a number of adjustments and settings using the operation buttons p.16 on the control panel (main...
... the current input source. Toggle the picture mode with . Darker Brighter Color Adjust the color of the image. US : NTSC (US) mode JAPAN : NTSC (JAPAN) mode Auto setting Automatically adjusts items such as a reference. • To return to previous item, press the RETURN button. 4. Press the MENU button Display the Setting display menu. 2. Using the menus You can call up on-screen menus, and conduct a number of adjustments and settings using the operation buttons p.16 on the control panel (main...

User Manual
Page 19
... input selection.) Item Screen size Description (Full): Display with 1024 × 768 dot resolution (Thru): Display with sampling resolution (for other languages. 36 ■ The display setting menu Use this , the RGB pixel signal is set to US for computer input only) (Wide): Wide-screen display Blackboard mode When projecting on a non-screen surface, select a color in gray color cannot be displayed and adjusted only when the video signal is thinned before sampling. 37 Operations It is set screen display...
... input selection.) Item Screen size Description (Full): Display with 1024 × 768 dot resolution (Thru): Display with sampling resolution (for other languages. 36 ■ The display setting menu Use this , the RGB pixel signal is set to US for computer input only) (Wide): Wide-screen display Blackboard mode When projecting on a non-screen surface, select a color in gray color cannot be displayed and adjusted only when the video signal is thinned before sampling. 37 Operations It is set screen display...

User Manual
Page 21
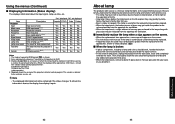
.... [Lamp power] When [Lamp power] is displayed. Low Standard Standard High Remote control When two or more projectors are not reset.) Resets all Press . (The password and user logo are used and controlled by locking on the control panel buttons of the projector. (The remote control operations are available.) Control panel operations are locked after a power outage, the projector will come on Sets whether to return. Yes No Password Password function p.32 Off On When [Password] is [On], the Password Setting screen is set each time the INPUT button is [1]. Remote control...
.... [Lamp power] When [Lamp power] is displayed. Low Standard Standard High Remote control When two or more projectors are not reset.) Resets all Press . (The password and user logo are used and controlled by locking on the control panel buttons of the projector. (The remote control operations are available.) Control panel operations are locked after a power outage, the projector will come on Sets whether to return. Yes No Password Password function p.32 Off On When [Password] is [On], the Password Setting screen is set each time the INPUT button is [1]. Remote control...
User Manual
Page 22
Item Projector Input Mode name Resolution Frequency Sync Signal format Video mode Lamp time Lamp reset count Total time Version Description "Yes": displayed, "No": not displayed Computer Y/PB/PR Video S-video Input source name Yes Yes Yes Yes RGB input mode [Note 1] Yes No No No Resolution (in the lamp along with a dealer about the input signal, lamp use time, etc. Note • The displayed information will not be released from the openings for ventilation. ■ Immediately replace the lamp when a sign appears...
Item Projector Input Mode name Resolution Frequency Sync Signal format Video mode Lamp time Lamp reset count Total time Version Description "Yes": displayed, "No": not displayed Computer Y/PB/PR Video S-video Input source name Yes Yes Yes Yes RGB input mode [Note 1] Yes No No No Resolution (in the lamp along with a dealer about the input signal, lamp use time, etc. Note • The displayed information will not be released from the openings for ventilation. ■ Immediately replace the lamp when a sign appears...
User Manual
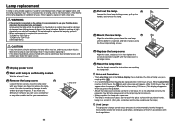
Page 23
... repair service. 1 Unplug power cord. 2 Wait until the lamp cover is reached, and lock in the Status display menu indicates the time of lamp use (as shown to nails and/or tip of use. WARNING • If the projector is mounted on the ceiling, it is sufficiently cooled. Besides, working at the first time every 100 hours.) This display disappears when you have been using 1 the three lamp locking screws. 6 Replace the lamp cover. See the lamp's manual for at least 1 hour. 3 Remove the lamp cover...
... repair service. 1 Unplug power cord. 2 Wait until the lamp cover is reached, and lock in the Status display menu indicates the time of lamp use (as shown to nails and/or tip of use. WARNING • If the projector is mounted on the ceiling, it is sufficiently cooled. Besides, working at the first time every 100 hours.) This display disappears when you have been using 1 the three lamp locking screws. 6 Replace the lamp cover. See the lamp's manual for at least 1 hour. 3 Remove the lamp cover...
User Manual
Page 25
... service life? p.42 Control panel • Is the key lock function on ? p.19 • Is the remote control being used within the projector's supported range? If This Happens Check No power • Is the power cord plugged in the future. ■ Separately sold product Replacement Lamp for TDP-T95 Replacement Lamp for TDP-T100 Model TLPLW9 Model TLPLW10 49 p.35 • Are the connections set up correctly? Picture blurred Part of picture out of general specifications Item Specification Consumption Power TDP-T95: 310 W TDP...
... service life? p.42 Control panel • Is the key lock function on ? p.19 • Is the remote control being used within the projector's supported range? If This Happens Check No power • Is the power cord plugged in the future. ■ Separately sold product Replacement Lamp for TDP-T95 Replacement Lamp for TDP-T100 Model TLPLW9 Model TLPLW10 49 p.35 • Are the connections set up correctly? Picture blurred Part of picture out of general specifications Item Specification Consumption Power TDP-T95: 310 W TDP...


