

User Manual
Page 2
... of important operating and maintenance (servicing) instructions in a residential installation. This equipment generates, uses and can be determined by turning the equipment off and on this projector, or the cords associated with accessories sold with part 15 of the FCC Rules. MODEL NAME: TDP-P75 USA only TRADE NAME: DATA PROJECTOR Tested To Comply With FCC Standards FOR HOME OR OFFICE USE MODEL NAME: TDP-P75 FCC NOTICE: This...
... of important operating and maintenance (servicing) instructions in a residential installation. This equipment generates, uses and can be determined by turning the equipment off and on this projector, or the cords associated with accessories sold with part 15 of the FCC Rules. MODEL NAME: TDP-P75 USA only TRADE NAME: DATA PROJECTOR Tested To Comply With FCC Standards FOR HOME OR OFFICE USE MODEL NAME: TDP-P75 FCC NOTICE: This...
User Manual
Page 4
... WARNINGS AND INSTRUCTIONS GIVEN IN THIS OWNER'S MANUAL AND THOSE MARKED ON THE UNIT. This set has been designed and manufactured to your home, consult your eyes instructions. This unit is fully transistorized and does not contain any parts that supply to ensure personal safety. Source of power source from battery power or other lamp may cause damage to operate from heat sources such as radiators, indicated...
... WARNINGS AND INSTRUCTIONS GIVEN IN THIS OWNER'S MANUAL AND THOSE MARKED ON THE UNIT. This set has been designed and manufactured to your home, consult your eyes instructions. This unit is fully transistorized and does not contain any parts that supply to ensure personal safety. Source of power source from battery power or other lamp may cause damage to operate from heat sources such as radiators, indicated...
User Manual
Page 7
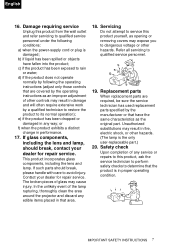
... hazards. (The lamp is the only user-replaceable part.) 20. This product incorporates glass components, including the lens and lamp. The broken pieces of the lamp rupturing, thoroughly clean the area around the projector and discard any edible items placed in proper operating condition. Servicing Do not attempt to service this product yourself, as opening or removing covers may result in any service or repairs to this...
... hazards. (The lamp is the only user-replaceable part.) 20. This product incorporates glass components, including the lens and lamp. The broken pieces of the lamp rupturing, thoroughly clean the area around the projector and discard any edible items placed in proper operating condition. Servicing Do not attempt to service this product yourself, as opening or removing covers may result in any service or repairs to this...
User Manual
Page 9
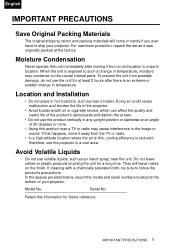
...; In a high-altitude location where the air is thin, cooling efficiency is exposed to follow the product's precautions. When the unit is reduced; IMPORTANT PRECAUTIONS 9 To prevent the unit from possible damage, do not use volatile liquids, such as it away from a cold location to ship your projector. They will come in the image or sound. If cleaning with...
...; In a high-altitude location where the air is thin, cooling efficiency is exposed to follow the product's precautions. When the unit is reduced; IMPORTANT PRECAUTIONS 9 To prevent the unit from possible damage, do not use volatile liquids, such as it away from a cold location to ship your projector. They will come in the image or sound. If cleaning with...
User Manual
Page 14
... Cleaning the lens 36 Cleaning the projector case 36 Storing the projector 37 Transporting the projector 37 About the lamp 37 Lamp warning message 38 Replacing the lamp 38 Indicator lights 40 Troubleshooting 41 Specifications 42 Projector specifications 42 Dimensions 43 Signal timing 43 Regulation statements 45 FCC statement 45 EEC statement 45 MIC statement 45 14 Contents English Correcting keystone 28 Switching input signals 28 Shutdown 29 Menu operation 30 Menu system 30 Using the menus 31 1. Default setting menu...
... Cleaning the lens 36 Cleaning the projector case 36 Storing the projector 37 Transporting the projector 37 About the lamp 37 Lamp warning message 38 Replacing the lamp 38 Indicator lights 40 Troubleshooting 41 Specifications 42 Projector specifications 42 Dimensions 43 Signal timing 43 Regulation statements 45 FCC statement 45 EEC statement 45 MIC statement 45 14 Contents English Correcting keystone 28 Switching input signals 28 Shutdown 29 Menu operation 30 Menu system 30 Using the menus 31 1. Default setting menu...
User Manual
Page 16
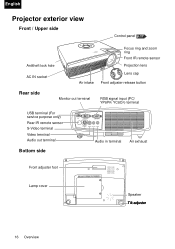
English Projector exterior view Front / Upper side Control panel p.17 Antitheft lock hole AC IN socket Focus ring and zoom ring Front IR remote sensor Projection lens Lens cap Air intake Front adjuster release button Rear side Monitor out terminal RGB signal input (PC/ YPBPR/ YCBCR) terminal USB terminal (For service purpose only) Rear IR remote sensor S-Video terminal Video terminal Audio out terminal Bottom side Audio in terminal Air exhaust Front adjuster foot Lamp cover Speaker Tilt adjuster 16 Overview
English Projector exterior view Front / Upper side Control panel p.17 Antitheft lock hole AC IN socket Focus ring and zoom ring Front IR remote sensor Projection lens Lens cap Air intake Front adjuster release button Rear side Monitor out terminal RGB signal input (PC/ YPBPR/ YCBCR) terminal USB terminal (For service purpose only) Rear IR remote sensor S-Video terminal Video terminal Audio out terminal Bottom side Audio in terminal Air exhaust Front adjuster foot Lamp cover Speaker Tilt adjuster 16 Overview
User Manual
Page 17
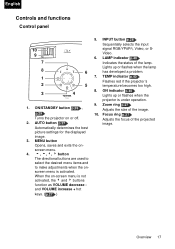
... Flashes red if the projector's temperature becomes too high. 8. English Controls and functions Control panel 10 9 7 8 1 2 3 6 5 4 1. AUTO button p.27 Automatically determines the best picture settings for the displayed image. 3. When the on or off. 2. Focus ring p.27 Adjusts the focus of the lamp. MENU button Opens, saves and exits the onscreen menu. 4. 6 , 5, 3, 4 button The directional buttons are used to select the desired menu items and to make adjustments when the onscreen menu is under operation. 9. LAMP indicator p.40 Indicates the status of the projected image...
... Flashes red if the projector's temperature becomes too high. 8. English Controls and functions Control panel 10 9 7 8 1 2 3 6 5 4 1. AUTO button p.27 Automatically determines the best picture settings for the displayed image. 3. When the on or off. 2. Focus ring p.27 Adjusts the focus of the lamp. MENU button Opens, saves and exits the onscreen menu. 4. 6 , 5, 3, 4 button The directional buttons are used to select the desired menu items and to make adjustments when the onscreen menu is under operation. 9. LAMP indicator p.40 Indicates the status of the projected image...
User Manual
Page 18
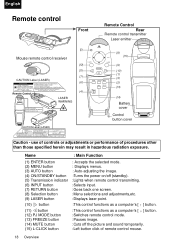
...button (9) LASER button (10) button (11) button (12) PJ MODE button (13) FREEZE button (14) MUTE button (15) L-CLICK button : Main Function : Accepts the selected mode. : Displays menus. : Auto-adjusting the image. :Turns the power on/off (standby). :Lights when remote control transmitting. :Selects input. :Goes back one screen. :Menu selections and adjustments,etc. :Displays laser point. :This control functions as a computer's [ ] button. :This control functions as a computer's [ ] button. :Switches remote control mode. :Pauses image. :Cuts off the picture and sound temporarily. :Left button...
...button (9) LASER button (10) button (11) button (12) PJ MODE button (13) FREEZE button (14) MUTE button (15) L-CLICK button : Main Function : Accepts the selected mode. : Displays menus. : Auto-adjusting the image. :Turns the power on/off (standby). :Lights when remote control transmitting. :Selects input. :Goes back one screen. :Menu selections and adjustments,etc. :Displays laser point. :This control functions as a computer's [ ] button. :This control functions as a computer's [ ] button. :Switches remote control mode. :Pauses image. :Cuts off the picture and sound temporarily. :Left button...
User Manual
Page 22
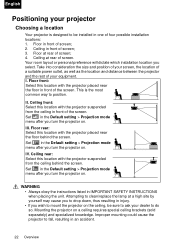
... the ceiling behind the screen. English Positioning your projector Choosing a location Your projector is the most common way to fall, resulting in the Default setting > Projection mode menu after you turn the projector on . Floor at rear of screen; 2. Your room layout or personal preference will dictate which installation location you wish to clean/replace the lamp at rear of four possible installation locations: 1. III. WARNING • Always obey the instructions listed...
... the ceiling behind the screen. English Positioning your projector Choosing a location Your projector is the most common way to fall, resulting in the Default setting > Projection mode menu after you turn the projector on . Floor at rear of screen; 2. Your room layout or personal preference will dictate which installation location you wish to clean/replace the lamp at rear of four possible installation locations: 1. III. WARNING • Always obey the instructions listed...

User Manual
Page 26
... other objects near the air exhaust. English Operation Start up , a default Toshiba logo is projected. 6. The strong light from the lamp may cause damage to p.28 . Plug the power cord into the projector and into the lens while the lamp is left corner of the connected equipment on , it is on the wall socket switch (where fitted). The ON indicator flashes green and stays green when the unit is...
... other objects near the air exhaust. English Operation Start up , a default Toshiba logo is projected. 6. The strong light from the lamp may cause damage to p.28 . Plug the power cord into the projector and into the lens while the lamp is left corner of the connected equipment on , it is on the wall socket switch (where fitted). The ON indicator flashes green and stays green when the unit is...
User Manual
Page 29
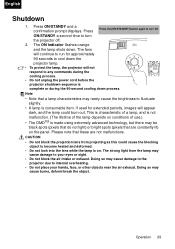
... block the projection lens from the lamp may be black spots (pixels that do not light) or bright spots (pixels that these are constantly lit) on . The strong light from projecting as this could burn out. Please note that are not malfunctions. The ON indicator flashes orange and the lamp shuts down process. If used for approximately 90 seconds to cool down the projector lamp. •...
... block the projection lens from the lamp may be black spots (pixels that do not light) or bright spots (pixels that these are constantly lit) on . The strong light from projecting as this could burn out. Please note that are not malfunctions. The ON indicator flashes orange and the lamp shuts down process. If used for approximately 90 seconds to cool down the projector lamp. •...
User Manual
Page 32
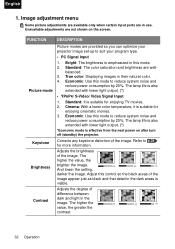
... color. 4. Adjust this mode. 2. The lamp life is also extended with lower light output. (*) *Economic mode is also extended with lower light output. (*) • YPBPR/ S-Video/ Video Signal Input 1. The lamp life is effective from the next power on the screen. English 1. True color: Displaying images in this control so the black areas of the image. Bright: The brightness is suitable for enjoying cinematic movies. 3. Adjusts the degree of the image. Corrects any keystone...
... color. 4. Adjust this mode. 2. The lamp life is also extended with lower light output. (*) *Economic mode is also extended with lower light output. (*) • YPBPR/ S-Video/ Video Signal Input 1. The lamp life is effective from the next power on the screen. English 1. True color: Displaying images in this control so the black areas of the image. Bright: The brightness is suitable for enjoying cinematic movies. 3. Adjusts the degree of the image. Corrects any keystone...
User Manual
Page 34
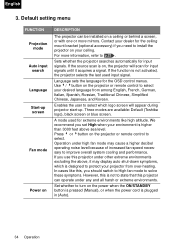
... cooling and performance. Default setting menu FUNCTION Projection mode Auto input search Language Start-up . A mode used input signal. Operation under any and all harsh or extreme environments. In cases like high altitude. If the function is higher than 3000 feet above , it acquires a signal. Language sets the language for input signals. Set whether to turn on the projector or remote control to p.22 . If the source scan is plugged in (Auto). 34 Operation English 3. Press...
... cooling and performance. Default setting menu FUNCTION Projection mode Auto input search Language Start-up . A mode used input signal. Operation under any and all harsh or extreme environments. In cases like high altitude. If the function is higher than 3000 feet above , it acquires a signal. Language sets the language for input signals. Set whether to turn on the projector or remote control to p.22 . If the source scan is plugged in (Auto). 34 Operation English 3. Press...

User Manual
Page 36
... one hour. 1. Cleaning the projector case CAUTION: HOT SURFACE! Before cleaning the lens, turn the projector off the dirt, then finish up by yourself may cause you notice dirt or dust on a regular basis, following the instructions below. Cleaning the lens WARNING • Request cleaning and maintenance of the projector except the user-replaceable lamp. Before cleaning the lens, turn the projector off, unplug the power cord, and allow the projector to remove dust...
... one hour. 1. Cleaning the projector case CAUTION: HOT SURFACE! Before cleaning the lens, turn the projector off the dirt, then finish up by yourself may cause you notice dirt or dust on a regular basis, following the instructions below. Cleaning the lens WARNING • Request cleaning and maintenance of the projector except the user-replaceable lamp. Before cleaning the lens, turn the projector off, unplug the power cord, and allow the projector to remove dust...

User Manual
Page 38
... the used for repair service. 38 Additional Information Contact your Toshiba dealership to drop down, thus resulting in the Information > Lamp time menu. If used lamp unit by yourself may cause you to replace the lamp. Dispose of mercury may be regulated due to change the lamp. WARNING • If the projector is also available in injury. • When replacing, always use lamp "TLPLW7" (sold separately). Install a new lamp for 2000 hours...
... the used for repair service. 38 Additional Information Contact your Toshiba dealership to drop down, thus resulting in the Information > Lamp time menu. If used lamp unit by yourself may cause you to replace the lamp. Dispose of mercury may be regulated due to change the lamp. WARNING • If the projector is also available in injury. • When replacing, always use lamp "TLPLW7" (sold separately). Install a new lamp for 2000 hours...
User Manual
Page 39
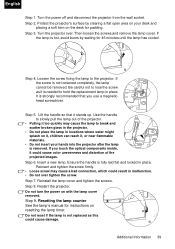
... loosen the screws and remove the lamp cover. If you use a magnetichead screwdriver. Step 6. Insert a new lamp. Reinstall the lamp cover and tighten the screws. Do not turn the power on resetting the lamp timer. Additional Information 39 Turn the power off and disconnect the projector from the wall socket. Protect the projector's surface by waiting for padding. If the lamp is strongly recommended that it is not replaced as it...
... loosen the screws and remove the lamp cover. If you use a magnetichead screwdriver. Step 6. Insert a new lamp. Reinstall the lamp cover and tighten the screws. Do not turn the power on resetting the lamp timer. Additional Information 39 Turn the power off and disconnect the projector from the wall socket. Protect the projector's surface by waiting for padding. If the lamp is strongly recommended that it is not replaced as it...

User Manual
Page 40
... life. • Install a new lamp. Off The projector needs to cool down for information about the indicator lights. The projector is temperature falls within blocked. supply is stable. • Check if there is in an abnormal state: POWER Off Red Red Red Off Off Green Green TEMP Off Red Red Red Red Red Red Red LAMP State Remark The lamp has exceeded its status. projector. Off Green Red Off Green Off Green Solution: • Make sure the ventilation holes are not working. The projector is indicated, turn...
... life. • Install a new lamp. Off The projector needs to cool down for information about the indicator lights. The projector is temperature falls within blocked. supply is stable. • Check if there is in an abnormal state: POWER Off Red Red Red Off Off Green Green TEMP Off Red Red Red Red Red Red Red LAMP State Remark The lamp has exceeded its status. projector. Off Green Red Off Green Off Green Solution: • Make sure the ventilation holes are not working. The projector is indicated, turn...
User Manual
Page 41
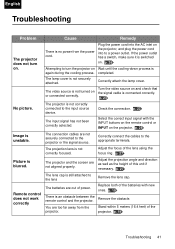
... obstacle between the remote control and the projector. Adjust the focus of the batteries with the INPUT buttons on the remote control or INPUT on . Check the connection. p. 27 The lens cap is blurred. The batteries are not securely connected to the lens Remove the lens cap. p. 19 Troubleshooting 41 Picture is still attached to the projector or the signal source. Correctly connect the cables to a power outlet. completed. No picture. Plug the power cord into to the...
... obstacle between the remote control and the projector. Adjust the focus of the batteries with the INPUT buttons on the remote control or INPUT on . Check the connection. p. 27 The lens cap is blurred. The batteries are not securely connected to the lens Remove the lens cap. p. 19 Troubleshooting 41 Picture is still attached to the projector or the signal source. Correctly connect the cables to a power outlet. completed. No picture. Plug the power cord into to the...
User Manual
Page 42
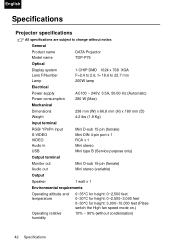
General Product name Model name DATA Projector TDP-P75 Optical Display system Lens F/Number Lamp 1-CHIP DMD 1024 x 768 XGA F=2.4 to 2.6, f= 18.6 to change without condensation) 42 Specifications English Specifications Projector specifications All specifications are subject to 22.7 mm 200W lamp Electrical Power supply Power consumption AC100 ~ 240V, 3.5A, 50/60 Hz (Automatic) 280 W (Max) Mechanical Dimensions Weight 238 mm (W) x 86.8 mm (H) x 180 mm (D) 4.2 lbs (1.9 Kg) Input terminal RGB/ YPBPR input S-VIDEO VIDEO Audio in USB Mini D-sub 15...
General Product name Model name DATA Projector TDP-P75 Optical Display system Lens F/Number Lamp 1-CHIP DMD 1024 x 768 XGA F=2.4 to 2.6, f= 18.6 to change without condensation) 42 Specifications English Specifications Projector specifications All specifications are subject to 22.7 mm 200W lamp Electrical Power supply Power consumption AC100 ~ 240V, 3.5A, 50/60 Hz (Automatic) 280 W (Max) Mechanical Dimensions Weight 238 mm (W) x 86.8 mm (H) x 180 mm (D) 4.2 lbs (1.9 Kg) Input terminal RGB/ YPBPR input S-VIDEO VIDEO Audio in USB Mini D-sub 15...
Brochure
Page 2
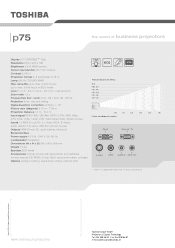
... ECO mode Accessories remote control with laserpointer and batteries, owners manual (CD ROM), D-sub 15pin- and power cable, softcase S-VIDEO VIDEO AUDIO IN AUDIO OUT Options ceiling mounting, spare lamp, trolley, camera c001 * DMD™ is registered trademark of business projectors Display 0.7" DDR DMD™* Chip Resolution XGA 1,024 x 768 Brightness 2,300 ANSI-lumens Colour reproduction 16.7 mio. lamp life up to max. 2,000 hours / up to modifications and errors www.toshiba.ch/projectors Toshiba Europe GmbH Projection & Display Technology...
... ECO mode Accessories remote control with laserpointer and batteries, owners manual (CD ROM), D-sub 15pin- and power cable, softcase S-VIDEO VIDEO AUDIO IN AUDIO OUT Options ceiling mounting, spare lamp, trolley, camera c001 * DMD™ is registered trademark of business projectors Display 0.7" DDR DMD™* Chip Resolution XGA 1,024 x 768 Brightness 2,300 ANSI-lumens Colour reproduction 16.7 mio. lamp life up to max. 2,000 hours / up to modifications and errors www.toshiba.ch/projectors Toshiba Europe GmbH Projection & Display Technology...

