
Brochure
Page 2
...; Lens -F = 2.6 with fixed zoom ratio Light Source • LED (Light Emitting Diodes) Brightness • 400 Lux Native Resolution • SVGA 800 x 600 Color Reproduction • Full 16.7 Million Colors Contrast Ratio • 1500:1 Projection Screen Size (Diagonal) • 11" - 68" Projection Distance • 1.3 ft - 8.2 ft Input Terminals • RGB -1 x D-sub 15-pin (dual use for analog RGB/component video) • Video -1 x RCA for composite video • USB -1 x USB (type A) • Audio...
...; Lens -F = 2.6 with fixed zoom ratio Light Source • LED (Light Emitting Diodes) Brightness • 400 Lux Native Resolution • SVGA 800 x 600 Color Reproduction • Full 16.7 Million Colors Contrast Ratio • 1500:1 Projection Screen Size (Diagonal) • 11" - 68" Projection Distance • 1.3 ft - 8.2 ft Input Terminals • RGB -1 x D-sub 15-pin (dual use for analog RGB/component video) • Video -1 x RCA for composite video • USB -1 x USB (type A) • Audio...

User Manual
Page 2
...turning the equipment off and on this product, will not occur in accordance with part 15 of the FCC Rules. This equipment has been tested and found to comply with this product or cords associated with accessories sold USA only with the limits for a Class B digital device, pursuant to part...including interference that may cause undesired operation. DO NOT OPEN THE CABINET. MODEL NAME: TDP-FF1 USA only TRADE NAME: LED PROJECTOR MODEL NAME: TDP-FF1 Tested To Comply With FCC Standards FOR HOME OR OFFICE USE FCC NOTICE: This device complies with the instructions, may be determined by one ...
...turning the equipment off and on this product, will not occur in accordance with part 15 of the FCC Rules. This equipment has been tested and found to comply with this product or cords associated with accessories sold USA only with the limits for a Class B digital device, pursuant to part...including interference that may cause undesired operation. DO NOT OPEN THE CABINET. MODEL NAME: TDP-FF1 USA only TRADE NAME: LED PROJECTOR MODEL NAME: TDP-FF1 Tested To Comply With FCC Standards FOR HOME OR OFFICE USE FCC NOTICE: This device complies with the instructions, may be determined by one ...

User Manual
Page 4
... the owner's manual carefully, and machine is provided or the manufacturer's instructions have been adhered to the operating instructions. 4. The strong light follow all the operating and other from the len may cause damage to protect it from overheating, and these openings must not be blocked or covered. your product dealer or local power company. Power Sources This product should be blocked by the user...
... the owner's manual carefully, and machine is provided or the manufacturer's instructions have been adhered to the operating instructions. 4. The strong light follow all the operating and other from the len may cause damage to protect it from overheating, and these openings must not be blocked or covered. your product dealer or local power company. Power Sources This product should be blocked by the user...

User Manual
Page 7
... damage and will often require extensive work by the operating instructions as opening or removing covers may cause to its normal operation. 18. b) If liquid has been spilled, or objects have fallen into the product. c) If the product has been exposed to qualified service personnel. 7 Before Using 15. Adjust only those controls that are covered by a qualified technician...
... damage and will often require extensive work by the operating instructions as opening or removing covers may cause to its normal operation. 18. b) If liquid has been spilled, or objects have fallen into the product. c) If the product has been exposed to qualified service personnel. 7 Before Using 15. Adjust only those controls that are covered by a qualified technician...

User Manual
Page 9
... the factory. When the unit is an extreme or sudden change in temperature, moisture may cause interference to ship your hands or lap. • Do not use the projector near a power source and the like a ship or vehicle that situation, the malfunction may lead to a high-temperature room may cause condensation on the lens and the crucial internal parts. If cleaning with...
... the factory. When the unit is an extreme or sudden change in temperature, moisture may cause interference to ship your hands or lap. • Do not use the projector near a power source and the like a ship or vehicle that situation, the malfunction may lead to a high-temperature room may cause condensation on the lens and the crucial internal parts. If cleaning with...

User Manual
Page 13
... Remote control keypad and functions 19 Using the battery pack with the projector 20 Using the remote control 22 Changing the new lithium battery 22 Operating the remote control 22 Placement 23 Connection 24 Turning the power on and off 25 Basic operations 26 Using handy features 27 Using auto setting (Only for computer input) 27 Correcting the keystone distortion 27 Freezing the image (Freeze) 28 Using USB Memory 29 Placement of the projection screen 34 Using the screen...
... Remote control keypad and functions 19 Using the battery pack with the projector 20 Using the remote control 22 Changing the new lithium battery 22 Operating the remote control 22 Placement 23 Connection 24 Turning the power on and off 25 Basic operations 26 Using handy features 27 Using auto setting (Only for computer input) 27 Correcting the keystone distortion 27 Freezing the image (Freeze) 28 Using USB Memory 29 Placement of the projection screen 34 Using the screen...
User Manual
Page 14
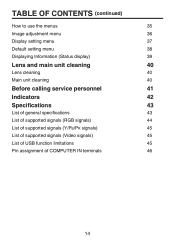
...) How to use the menus 35 Image adjustment menu 36 Display setting menu 37 Default setting menu 38 Displaying Information (Status display) 39 Lens and main unit cleaning 40 Lens cleaning 40 Main unit cleaning 40 Before calling service personnel 41 Indicators 42 Specifications 43 List of general specifications 43 List of supported signals (RGB signals) 44 List of supported signals (Y/PB/PR signals) 45 List of supported signals (Video signals) 45 List of USB function limitations...
...) How to use the menus 35 Image adjustment menu 36 Display setting menu 37 Default setting menu 38 Displaying Information (Status display) 39 Lens and main unit cleaning 40 Lens cleaning 40 Main unit cleaning 40 Before calling service personnel 41 Indicators 42 Specifications 43 List of general specifications 43 List of supported signals (RGB signals) 44 List of supported signals (Y/PB/PR signals) 45 List of supported signals (Video signals) 45 List of USB function limitations...
User Manual
Page 16
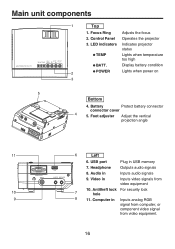
... audio signals 8. LED indicators Indicates projector status TEMP Lights when temperature too high BATT. Display battery condition 2 POWER Lights when power on 3 5 Bottom 4. USB port Plug in Inputs video signals from video equipment. 16 Antitheft lock For security lock 7 hole 9 8 11. Battery Protect battery connector connector cover 4 5. Video in USB memory 7. Foot adjuster Adjust the vertical projection angle 11 6 Left 6. Computer in Inputs audio signals 9. Focus Ring Adjusts the focus 2. Control Panel Operates...
... audio signals 8. LED indicators Indicates projector status TEMP Lights when temperature too high BATT. Display battery condition 2 POWER Lights when power on 3 5 Bottom 4. USB port Plug in Inputs video signals from video equipment. 16 Antitheft lock For security lock 7 hole 9 8 11. Battery Protect battery connector connector cover 4 5. Video in USB memory 7. Foot adjuster Adjust the vertical projection angle 11 6 Left 6. Computer in Inputs audio signals 9. Focus Ring Adjusts the focus 2. Control Panel Operates...

User Manual
Page 18
... displayed: Confirm screen menu selections Slideshow mode: • To pause or re-start the slide show 18 Input/Menu 2. + 3. AUTOSET / 1 23 Normal mode: • Change input source when pressing for less than 1 seconds. • Display menu system when pressing for longer than 1 seconds.) Sub-menu "Stop slideshow?" File view mode: • Same as Normal mode. Normal mode: • When OSD is not displayed: Volume control (Computer, Video input...
... displayed: Confirm screen menu selections Slideshow mode: • To pause or re-start the slide show 18 Input/Menu 2. + 3. AUTOSET / 1 23 Normal mode: • Change input source when pressing for less than 1 seconds. • Display menu system when pressing for longer than 1 seconds.) Sub-menu "Stop slideshow?" File view mode: • Same as Normal mode. Normal mode: • When OSD is not displayed: Volume control (Computer, Video input...
User Manual
Page 19
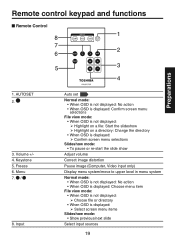
Remote control keypad and functions Remote Control 8 1 7 2 6 5 3 4 Preparations 1. Freeze 6. Menu 7. / 8. Input Auto set Normal mode: • When OSD is not displayed: No action • When OSD is displayed: Confirm screen menu selections File view mode: • When OSD is not displayed: Highlight on a file: Start the slideshow Highlight on a directory: Change the directory • When OSD is displayed: Confirm screen menu selections Slideshow mode: •...
Remote control keypad and functions Remote Control 8 1 7 2 6 5 3 4 Preparations 1. Freeze 6. Menu 7. / 8. Input Auto set Normal mode: • When OSD is not displayed: No action • When OSD is displayed: Confirm screen menu selections File view mode: • When OSD is not displayed: Highlight on a file: Start the slideshow Highlight on a directory: Change the directory • When OSD is displayed: Confirm screen menu selections Slideshow mode: •...

User Manual
Page 21
... use , otherwise the battery will work for approximate 2 hours with full charged battery at room temperature (25°C). • The battery is consumables, it can be recharged approximately 500 times. • It is recommended that you replace to a new battery when the operation time with the battery becomes significantly short. (contact reseller for TOSHIBA Li-ion battery • Model...
... use , otherwise the battery will work for approximate 2 hours with full charged battery at room temperature (25°C). • The battery is consumables, it can be recharged approximately 500 times. • It is recommended that you replace to a new battery when the operation time with the battery becomes significantly short. (contact reseller for TOSHIBA Li-ion battery • Model...
User Manual
Page 22
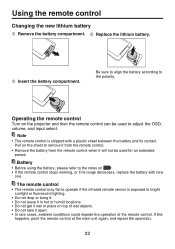
... and its contact. Using the remote control Changing the new lithium battery Remove the battery compartment. Replace the lithium battery. Insert the battery compartment. Operating the remote control Turn on the sheet to operate if the infrared remote sensor is shipped with new one. The remote control • The remote control may fail to remove it from the remote control. • Remove the battery from the remote control when it apart...
... and its contact. Using the remote control Changing the new lithium battery Remove the battery compartment. Replace the lithium battery. Insert the battery compartment. Operating the remote control Turn on the sheet to operate if the infrared remote sensor is shipped with new one. The remote control • The remote control may fail to remove it from the remote control. • Remove the battery from the remote control when it apart...

User Manual
Page 25
... power indicator on . Operations 25 Turning the power on and off the power immediately. You can also configure the start -up screen not to appear via the Default setting menu . 4 Switching the power off (O) Switch the power off will disappear after a moment. Doing so could cause a fire due to internal overheating. • Do not look into the DC IN socket of the projector or install...
... power indicator on . Operations 25 Turning the power on and off the power immediately. You can also configure the start -up screen not to appear via the Default setting menu . 4 Switching the power off (O) Switch the power off will disappear after a moment. Doing so could cause a fire due to internal overheating. • Do not look into the DC IN socket of the projector or install...

User Manual
Page 26
..., displaying images simultaneously on how to adjust the focus. 5 Adjust the vertical projection angle. If this projector (SVGA) will be black spots (pixels that do not light) or bright spots (pixels that these are constantly lit) on the power. Turn on . 6 Adjust the volume. Rotate the foot adjuster to native resolution of your computer. • If a signal not supported by following the instructions in the Default setting menu. 26 To view high-quality images, setting the...
..., displaying images simultaneously on how to adjust the focus. 5 Adjust the vertical projection angle. If this projector (SVGA) will be black spots (pixels that do not light) or bright spots (pixels that these are constantly lit) on the power. Turn on . 6 Adjust the volume. Rotate the foot adjuster to native resolution of your computer. • If a signal not supported by following the instructions in the Default setting menu. 26 To view high-quality images, setting the...

User Manual
Page 27
... against the screen is changed while projecting the image, the picture will appear during processing. Press the AUTOSET button on the projector. Operations 27 You can also select [Keystone] in the Image adjustment menu . Using handy features Using auto setting (Only for computer input) This function sets up the projector to the optimum state such as sampling phase, frequency and screen position, for each type of the input signal by the projector , . Remote Control Before...
... against the screen is changed while projecting the image, the picture will appear during processing. Press the AUTOSET button on the projector. Operations 27 You can also select [Keystone] in the Image adjustment menu . Using handy features Using auto setting (Only for computer input) This function sets up the projector to the optimum state such as sampling phase, frequency and screen position, for each type of the input signal by the projector , . Remote Control Before...
User Manual
Page 31
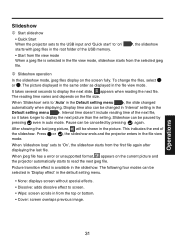
... 'Slideshow' sets to screen. • Wipe: screen scrolls in the file view mode, slideshow starts from the top or bottom. • Cover: screen overlaps previous image. Picture transition effect is selected in from the selected jpeg file. Slideshow operation In the slideshow mode, jpeg files display on the current picture and the projector automatically starts to display the next slide. To change the fi...
... 'Slideshow' sets to screen. • Wipe: screen scrolls in the file view mode, slideshow starts from the top or bottom. • Cover: screen overlaps previous image. Picture transition effect is selected in from the selected jpeg file. Slideshow operation In the slideshow mode, jpeg files display on the current picture and the projector automatically starts to display the next slide. To change the fi...

User Manual
Page 38
.../Español Svenska. Display start-up screen when power is Yes Yes turned on On Off Yes Yes Yes Yes Notes • None: displays screen without special effects. • Wipe: screen scrolls in from ceiling) Language Start-up screen Select one of the slideshow. Using the menus (continued) Default setting menu Item Quick Start Slideshow Interval Slideshow loop Description RGB Y/PB/PR Video USB Set to "Off", then...
.../Español Svenska. Display start-up screen when power is Yes Yes turned on On Off Yes Yes Yes Yes Notes • None: displays screen without special effects. • Wipe: screen scrolls in from ceiling) Language Start-up screen Select one of the slideshow. Using the menus (continued) Default setting menu Item Quick Start Slideshow Interval Slideshow loop Description RGB Y/PB/PR Video USB Set to "Off", then...

User Manual
Page 39
.... 2. [Firmware version] shows the version of the projector's internal control program. Displaying Information (Status display) This displays information about the input signal, battery life time, and so on. "Yes": displayed, "No": not displayed Item Description RGB Y/PB/PR Video USB Input Input source name Yes Yes Yes Yes Resolution Resolution (in dots) Yes No No No Video mode Battery info Version Display color method of supported RGB signals is referred to for customer service, etc. Operations 39 The mode of video signal...
.... 2. [Firmware version] shows the version of the projector's internal control program. Displaying Information (Status display) This displays information about the input signal, battery life time, and so on. "Yes": displayed, "No": not displayed Item Description RGB Y/PB/PR Video USB Input Input source name Yes Yes Yes Yes Resolution Resolution (in dots) Yes No No No Video mode Battery info Version Display color method of supported RGB signals is referred to for customer service, etc. Operations 39 The mode of video signal...

User Manual
Page 41
... the connections set up correctly? • Are all the connected devices functioning properly? • Are the connections set up correctly? • Are all the connected devices functioning properly? • Is the input signal supported by the projector? , • Is something is lost during use No picture No audio Picture not displayed correctly Picture blurred Part of picture out of focus Colors too light Bad shading Remote control doesn't work Check • Is the power cord or battery...
... the connections set up correctly? • Are all the connected devices functioning properly? • Are the connections set up correctly? • Are all the connected devices functioning properly? • Is the input signal supported by the projector? , • Is something is lost during use No picture No audio Picture not displayed correctly Picture blurred Part of picture out of focus Colors too light Bad shading Remote control doesn't work Check • Is the power cord or battery...
User Manual
Page 43
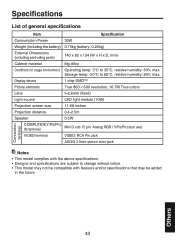
Display device 1 chip DMD™ Picture elements True 800 × 600 resolution, 16.7M True colors Lens f=2.6mm (fixed) Light source LED light module (10W) Projection screen size 11-68 inches Projection distance 0.4-2.5m Speaker 0.5W COMPUTER(Y/PB/PR) IN terminal Mini D sub 15 pin Analog RGB / Y/PB/PR (dual use) VIDEO terminal VIDEO: RCA Pin Jack AUDIO 3.5mm stereo mini-jack Notes • This model complies with the above speci...
Display device 1 chip DMD™ Picture elements True 800 × 600 resolution, 16.7M True colors Lens f=2.6mm (fixed) Light source LED light module (10W) Projection screen size 11-68 inches Projection distance 0.4-2.5m Speaker 0.5W COMPUTER(Y/PB/PR) IN terminal Mini D sub 15 pin Analog RGB / Y/PB/PR (dual use) VIDEO terminal VIDEO: RCA Pin Jack AUDIO 3.5mm stereo mini-jack Notes • This model complies with the above speci...

