

Users Manual AU/NZ
Page 2
... display enlarged images/ video at the time of this manual's production. Copyrighted material can be reproduced in making any form without notice. However, succeeding computers and manuals are accurate for the TOSHIBA Satellite T130/T110, Satellite Pro T130/T110, PORTEGE T130/T110 Series Portable Personal Computer at coffee shops or hotels for music, movies, computer programs, databases, and other use beyond that you use the screen mode switching functions...
... display enlarged images/ video at the time of this manual's production. Copyrighted material can be reproduced in making any form without notice. However, succeeding computers and manuals are accurate for the TOSHIBA Satellite T130/T110, Satellite Pro T130/T110, PORTEGE T130/T110 Series Portable Personal Computer at coffee shops or hotels for music, movies, computer programs, databases, and other use beyond that you use the screen mode switching functions...
Users Manual AU/NZ
Page 14
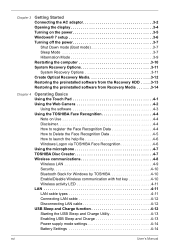
... the help file 4-6 Windows Logon via TOSHIBA Face Recognition 4-6 Using the microphone 4-7 TOSHIBA Disc Creator 4-7 Wireless communications 4-8 Wireless LAN 4-9 Security 4-10 Bluetooth Stack for Windows by TOSHIBA 4-10 Enable/Disable Wireless communication with hot key 4-10 Wireless activity LED 4-11 LAN 4-11 LAN cable types 4-11 Connecting LAN cable 4-12 Disconnecting LAN cable 4-12 USB Sleep and Charge function 4-12 Starting the USB Sleep and Charge Utility 4-13 Enabling USB Sleep and Charge 4-13 Power supply mode settings 4-14 Battery Settings 4-14 xvi User's Manual
... the help file 4-6 Windows Logon via TOSHIBA Face Recognition 4-6 Using the microphone 4-7 TOSHIBA Disc Creator 4-7 Wireless communications 4-8 Wireless LAN 4-9 Security 4-10 Bluetooth Stack for Windows by TOSHIBA 4-10 Enable/Disable Wireless communication with hot key 4-10 Wireless activity LED 4-11 LAN 4-11 LAN cable types 4-11 Connecting LAN cable 4-12 Disconnecting LAN cable 4-12 USB Sleep and Charge function 4-12 Starting the USB Sleep and Charge Utility 4-13 Enabling USB Sleep and Charge 4-13 Power supply mode settings 4-14 Battery Settings 4-14 xvi User's Manual
Users Manual AU/NZ
Page 15
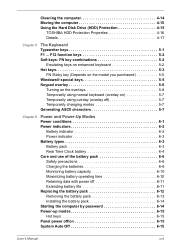
... Power indicators 6-2 Battery indicator 6-2 Power indicator 6-3 Battery types 6-3 Battery pack 6-3 Real Time Clock battery 6-4 Care and use of the battery pack 6-6 Safety precautions 6-6 Charging the batteries 6-8 Monitoring battery capacity 6-10 Maximizing battery operating time 6-10 Retaining data with power off 6-11 Extending battery life 6-11 Replacing the battery pack 6-12 Removing the battery pack 6-13 Installing the battery pack 6-14 Starting the computer by password 6-14 Power-up modes 6-15 Hot keys 6-15 Panel power off/on 6-15 System Auto Off 6-15 User's Manual...
... Power indicators 6-2 Battery indicator 6-2 Power indicator 6-3 Battery types 6-3 Battery pack 6-3 Real Time Clock battery 6-4 Care and use of the battery pack 6-6 Safety precautions 6-6 Charging the batteries 6-8 Monitoring battery capacity 6-10 Maximizing battery operating time 6-10 Retaining data with power off 6-11 Extending battery life 6-11 Replacing the battery pack 6-12 Removing the battery pack 6-13 Installing the battery pack 6-14 Starting the computer by password 6-14 Power-up modes 6-15 Hot keys 6-15 Panel power off/on 6-15 System Auto Off 6-15 User's Manual...

Users Manual AU/NZ
Page 16
... Preliminary checklist 9-2 Analyzing the problem 9-2 Hardware and system checklist 9-3 System start-up 9-3 Self test 9-4 Power 9-4 Disposing of PC and PC batteries 9-6 Real Time Clock 9-7 Keyboard 9-7 LCD panel 9-8 Hard disk drive 9-9 Recovery Media 9-9 Pointing device 9-10 USB 9-11 USB Sleep and Charge function 9-12 Memory expansion 9-13 Sound system 9-14 Monitor 9-14 LAN 9-14 Wireless LAN 9-14 Bluetooth 9-15 SD/MuliMedia Card 9-15 Using Windows® XP Mode on your Windows® 7 computer (available on certain models 9-15 TOSHIBA support 9-16 xviii User's Manual
... Preliminary checklist 9-2 Analyzing the problem 9-2 Hardware and system checklist 9-3 System start-up 9-3 Self test 9-4 Power 9-4 Disposing of PC and PC batteries 9-6 Real Time Clock 9-7 Keyboard 9-7 LCD panel 9-8 Hard disk drive 9-9 Recovery Media 9-9 Pointing device 9-10 USB 9-11 USB Sleep and Charge function 9-12 Memory expansion 9-13 Sound system 9-14 Monitor 9-14 LAN 9-14 Wireless LAN 9-14 Bluetooth 9-15 SD/MuliMedia Card 9-15 Using Windows® XP Mode on your Windows® 7 computer (available on certain models 9-15 TOSHIBA support 9-16 xviii User's Manual

Users Manual AU/NZ
Page 18
... the TOSHIBA Satellite T130/T110, Satellite Pro T130/T110, PORTEGE T130/T110 Series computer. If you are a new user of computers or if you are going to install Memory cards or connect external devices such as a monitor, be sure to provide years of the following nine chapters, five appendixes, a glossary and an index. Chapter 2, The Grand Tour, identifies the components of how to familiarize yourself with this manual...
... the TOSHIBA Satellite T130/T110, Satellite Pro T130/T110, PORTEGE T130/T110 Series computer. If you are a new user of computers or if you are going to install Memory cards or connect external devices such as a monitor, be sure to provide years of the following nine chapters, five appendixes, a glossary and an index. Chapter 2, The Grand Tour, identifies the components of how to familiarize yourself with this manual...

Users Manual AU/NZ
Page 36
... order to indicate the connection status of the computer with display closed (Satellite T110, Satellite Pro T110, PORTEGE T110) DC IN LED Power LED Battery LED Disk LED The DC IN LED normally glows green when power is on . The LED will glow or blink in hard disk drive. Some models are turned on , two seconds off) while the computer enters Sleep Mode. The Battery LED shows the condition of the battery's charge: Green indicates a full charge, amber indicates that the battery is on . A Wireless WAN module must be installed...
... order to indicate the connection status of the computer with display closed (Satellite T110, Satellite Pro T110, PORTEGE T110) DC IN LED Power LED Battery LED Disk LED The DC IN LED normally glows green when power is on . The LED will glow or blink in hard disk drive. Some models are turned on , two seconds off) while the computer enters Sleep Mode. The Battery LED shows the condition of the battery's charge: Green indicates a full charge, amber indicates that the battery is on . A Wireless WAN module must be installed...

Users Manual AU/NZ
Page 56
..., the disk indicator will enter Hibernation mode automatically when you turn off the computer and memory is saved to the hard disk, turn off the power to the hard disk. Restarting the computer Certain conditions require that you turn the computer or devices back on again with the power button. 3-10 User's Manual Enable the desired Hibernation settings for five seconds. After you press the power button or close the lid. 5. Open the Control Panel...
..., the disk indicator will enter Hibernation mode automatically when you turn off the computer and memory is saved to the hard disk, turn off the power to the hard disk. Restarting the computer Certain conditions require that you turn the computer or devices back on again with the power button. 3-10 User's Manual Enable the desired Hibernation settings for five seconds. After you press the power button or close the lid. 5. Open the Control Panel...
Users Manual AU/NZ
Page 60
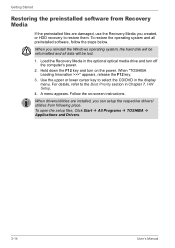
.../DVD in the optional optical media drive and turn on -screen instructions. When "TOSHIBA Leading Innovation >>>" appears, release the F12 key. 3. To open the setup files, Click Start Æ All Programs Æ TOSHIBA Æ Applications and Drivers. 3-14 User's Manual Load the Recovery Media in the display menu. For details, refer to restore them. Getting Started Restoring the preinstalled software from following place. A menu appears. When you created, or HDD recovery to the Boot Priority section in Chapter 7, HW Setup...
.../DVD in the optional optical media drive and turn on -screen instructions. When "TOSHIBA Leading Innovation >>>" appears, release the F12 key. 3. To open the setup files, Click Start Æ All Programs Æ TOSHIBA Æ Applications and Drivers. 3-14 User's Manual Load the Recovery Media in the display menu. For details, refer to restore them. Getting Started Restoring the preinstalled software from following place. A menu appears. When you created, or HDD recovery to the Boot Priority section in Chapter 7, HW Setup...
Users Manual AU/NZ
Page 99
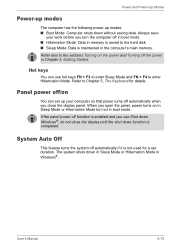
... the following power-up your work before you open the panel, power turns on You can use Shut down Windows®, do not close the display panel. Always save your computer so that power turns off function is enabled and you close the display until the shut down function is not used for details. Hot keys You can set duration. If the panel power off automatically when you use hot keys FN + F3 to enter Sleep Mode and...
... the following power-up your work before you open the panel, power turns on You can use Shut down Windows®, do not close the display panel. Always save your computer so that power turns off function is enabled and you close the display until the shut down function is not used for details. Hot keys You can set duration. If the panel power off automatically when you use hot keys FN + F3 to enter Sleep Mode and...
Users Manual AU/NZ
Page 102
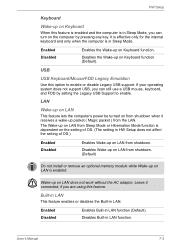
... from Sleep Mode or Hibernation Mode function is enabled. Disables the Wake-up on LAN does not work without the AC adaptor. If your operating system does not support USB, you can turn on the computer by setting the Legacy USB Support to enable or disable Legacy USB support. The Wake-up on LAN from shutdown when it connected, if you can still use a USB mouse, keyboard, and FDD by pressing any key. User's Manual 7-3 Wake-up on Keyboard function (Default). Disables...
... from Sleep Mode or Hibernation Mode function is enabled. Disables the Wake-up on LAN does not work without the AC adaptor. If your operating system does not support USB, you can turn on the computer by setting the Legacy USB Support to enable or disable Legacy USB support. The Wake-up on LAN from shutdown when it connected, if you can still use a USB mouse, keyboard, and FDD by pressing any key. User's Manual 7-3 Wake-up on Keyboard function (Default). Disables...

Users Manual AU/NZ
Page 109
... down and remove the battery pack (refer to install or remove a memory module under the cover and lift it off the power. 2. Use a point size 1 Phillips screwdriver to install a memory module. 1. Remove all cables connected to Memory expansion section in the computer's memory module socket to you with bare hands. This section describes how to boot mode and turn off . 8-6 User's Manual Set the computer to install and remove a memory module. ■ Use only memory modules approved by static electricity. Optional Devices Memory expansion...
... down and remove the battery pack (refer to install or remove a memory module under the cover and lift it off the power. 2. Use a point size 1 Phillips screwdriver to install a memory module. 1. Remove all cables connected to Memory expansion section in the computer's memory module socket to you with bare hands. This section describes how to boot mode and turn off . 8-6 User's Manual Set the computer to install and remove a memory module. ■ Use only memory modules approved by static electricity. Optional Devices Memory expansion...
Users Manual AU/NZ
Page 120
... unauthorized use the keyboard, consult your software's documentation. Press ENTER key. For more information refer to overwrite all the data on its hard disk drive. Press FN + F11 and try typing again. Output to your dealer. If you turn the power status of such data. You will boot up. 2. Troubleshooting ■ Reformatting the media ■ Reinstalling an operating system from the recovery media or HDD. Press F2 key. BIOS setup will need...
... unauthorized use the keyboard, consult your software's documentation. Press ENTER key. For more information refer to overwrite all the data on its hard disk drive. Press FN + F11 and try typing again. Output to your dealer. If you turn the power status of such data. You will boot up. 2. Troubleshooting ■ Reformatting the media ■ Reinstalling an operating system from the recovery media or HDD. Press F2 key. BIOS setup will need...
Users Manual AU/NZ
Page 125
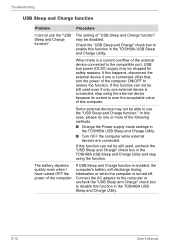
... Charge Utility. Troubleshooting USB Sleep and Charge function Problem Procedure I computer's battery will discharge during have turned OFF the hibernation or when the computer is turned off. The battery depletes If USB Sleep and Charge function is enabled, the quickly even when I cannot use the "USB Sleep and Charge function." Check the "USB Sleep and Charge" check box to disable this function in the TOSHIBA USB Sleep and Charge Utility. 9-12 User's Manual The setting of the computer. If this case, please try one is connected. Some external devices...
... Charge Utility. Troubleshooting USB Sleep and Charge function Problem Procedure I computer's battery will discharge during have turned OFF the hibernation or when the computer is turned off. The battery depletes If USB Sleep and Charge function is enabled, the quickly even when I cannot use the "USB Sleep and Charge function." Check the "USB Sleep and Charge" check box to disable this function in the TOSHIBA USB Sleep and Charge Utility. 9-12 User's Manual The setting of the computer. If this case, please try one is connected. Some external devices...
Users Manual AU/NZ
Page 138
..., battery, LCD, fan, HDD, sound volume, wireless communication switch, TOSHIBA Express Port Replicator and USB information), date of your Toshiba computer. Additionally, Toshiba may also be transferred to entities located outside of initial system use this information for various devices), property (e.g., product name, model number, part number, serial number, BIOS version, FW version) of specific system conditions via Uninstall a program in the Control Panel. It alerts users of the system and components (e.g., Video device, Sound device, Network device, Hard Disk drive, Solid...
..., battery, LCD, fan, HDD, sound volume, wireless communication switch, TOSHIBA Express Port Replicator and USB information), date of your Toshiba computer. Additionally, Toshiba may also be transferred to entities located outside of initial system use this information for various devices), property (e.g., product name, model number, part number, serial number, BIOS version, FW version) of specific system conditions via Uninstall a program in the Control Panel. It alerts users of the system and components (e.g., Video device, Sound device, Network device, Hard Disk drive, Solid...

Users Manual AU/NZ
Page 141
... from specifications due to TOSHIBA support section in your computer unless explicitly stated that the following hardware and software requirements are met: ■ 64-bit Operating System ■ 64-bit CPU, Chipset and BIOS (Basic Input/Output System) ■ 64-bit Device drivers ■ 64-bit applications Certain device drivers and/or applications may not be used outside the range of system memory. For...
... from specifications due to TOSHIBA support section in your computer unless explicitly stated that the following hardware and software requirements are met: ■ 64-bit Operating System ■ 64-bit CPU, Chipset and BIOS (Basic Input/Output System) ■ 64-bit Device drivers ■ 64-bit applications Certain device drivers and/or applications may not be used outside the range of system memory. For...
Users Manual AU/NZ
Page 148
... record. disk drive: The device that accepts user input to make system settings or record other image producing device used to make up a byte. Electric current that define how your system works. disable: To turn a computer option off. display: A CRT, LCD, or other information. configuration: The specific components in which beams projected on magnetic disk. default: The parameter value automatically selected by batteries. device driver: A program (called a preset value. See also enable. computer...
... record. disk drive: The device that accepts user input to make system settings or record other image producing device used to make up a byte. Electric current that define how your system works. disable: To turn a computer option off. display: A CRT, LCD, or other information. configuration: The specific components in which beams projected on magnetic disk. default: The parameter value automatically selected by batteries. device driver: A program (called a preset value. See also enable. computer...
Users Manual AU/NZ
Page 150
... are removable. hardware: The physical electronic and mechanical components of the disk that lets you set system parameters, such as read. hot key: The computer's feature in which controls and directs a microprocessor's activities. I: User's Manual Glossary-7 Formatting establishes the structure of a computer system: typically, the computer itself, external disk drives, etc. function keys: The keys labeled F1 through F12 that equals one cycle per second. By default, the hard disk...
... are removable. hardware: The physical electronic and mechanical components of the disk that lets you set system parameters, such as read. hot key: The computer's feature in which controls and directs a microprocessor's activities. I: User's Manual Glossary-7 Formatting establishes the structure of a computer system: typically, the computer itself, external disk drives, etc. function keys: The keys labeled F1 through F12 that equals one cycle per second. By default, the hard disk...

Users Manual AU/NZ
Page 151
... Windows, an icon represents an object that emits light when a current is slower than L1 cache and faster than main memory. input: The data or instructions you provide to another. 2) To physically connect one cache. interface: 1) Hardware and/or software components of a system used specifically to connect one system or device to a computer, communication device or other on the key. I /O devices: Equipment used as digital video cameras...
... Windows, an icon represents an object that emits light when a current is slower than L1 cache and faster than main memory. input: The data or instructions you provide to another. 2) To physically connect one cache. interface: 1) Hardware and/or software components of a system used specifically to connect one system or device to a computer, communication device or other on the key. I /O devices: Equipment used as digital video cameras...
Users Manual AU/NZ
Page 155
... an Ethernet connection using active-matrix technology with several devices connected in serial data transmission. software: The set of a byte that follow the transmitted character or group codes in asynchronous serial communications. U: USB: Universal Serial Bus. W: warm start the computer. SIO: Serial Input/Output. T: terminal: A typewriter-like keyboard and CRT display screen connected to the computer for the communication protocol to a single port on the IBM keyboard, change some configuration options, stop bit...
... an Ethernet connection using active-matrix technology with several devices connected in serial data transmission. software: The set of a byte that follow the transmitted character or group codes in asynchronous serial communications. U: USB: Universal Serial Bus. W: warm start the computer. SIO: Serial Input/Output. T: terminal: A typewriter-like keyboard and CRT display screen connected to the computer for the communication protocol to a single port on the IBM keyboard, change some configuration options, stop bit...
Users Manual AU/NZ
Page 158
...LAN, 1-7, 4-11 cable types, 4-11 connecting, 4-12 disconnecting, 4-12 M Memory, 1-3 expansion, 1-14, 8-6 installing, 8-6 removing, 8-8 Monitor, external, 1-6 P Ports, 1-6 external monitor, 1-6 USB, 1-6 Power conditions, 6-1 hibernation mode, 3-9 indicator, 6-3 panel power on/off, 1-9, 6-15 shut Down mode (Boot mode), 3-7 Sleep Mode, 3-7 system Auto Off, 6-15 turning off, 3-7 Power-up modes, 6-15 Problems AC power, 9-5 analyzing, 9-2 Battery, 9-5 Hard disk drive, 9-9 Hardware and system checklist, 9-3 Keyboard, 9-7 LAN, 9-14 LCD panel, 9-8 Memory expansion, 9-13 Monitor, 9-14 overheating power...
...LAN, 1-7, 4-11 cable types, 4-11 connecting, 4-12 disconnecting, 4-12 M Memory, 1-3 expansion, 1-14, 8-6 installing, 8-6 removing, 8-8 Monitor, external, 1-6 P Ports, 1-6 external monitor, 1-6 USB, 1-6 Power conditions, 6-1 hibernation mode, 3-9 indicator, 6-3 panel power on/off, 1-9, 6-15 shut Down mode (Boot mode), 3-7 Sleep Mode, 3-7 system Auto Off, 6-15 turning off, 3-7 Power-up modes, 6-15 Problems AC power, 9-5 analyzing, 9-2 Battery, 9-5 Hard disk drive, 9-9 Hardware and system checklist, 9-3 Keyboard, 9-7 LAN, 9-14 LCD panel, 9-8 Memory expansion, 9-13 Monitor, 9-14 overheating power...


