
Users Manual Canada; English
Page 3
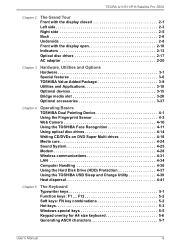
... Using the TOSHIBA Face Recognition 4-11 Using optical disc drives 4-14 Writing CD/DVDs on DVD Super Multi drives 4-18 Media care 4-24 Sound System 4-25 Modem 4-28 Wireless communications 4-31 LAN 4-34 Computer Handling 4-36 Using the Hard Disk Drive (HDD) Protection 4-37 Using the TOSHIBA USB Sleep and Charge Utility 4-39 Heat dispersal 4-41 Chapter 5 The Keyboard Typewriter keys 5-1 Function keys: F1 ... F12 5-2 Soft keys: FN key combinations 5-2 Hot keys 5-3 Windows special keys 5-5 Keypad overlay for A4 size keyboard 5-6 Generating ASCII characters 5-7 User's Manual...
... Using the TOSHIBA Face Recognition 4-11 Using optical disc drives 4-14 Writing CD/DVDs on DVD Super Multi drives 4-18 Media care 4-24 Sound System 4-25 Modem 4-28 Wireless communications 4-31 LAN 4-34 Computer Handling 4-36 Using the Hard Disk Drive (HDD) Protection 4-37 Using the TOSHIBA USB Sleep and Charge Utility 4-39 Heat dispersal 4-41 Chapter 5 The Keyboard Typewriter keys 5-1 Function keys: F1 ... F12 5-2 Soft keys: FN key combinations 5-2 Hot keys 5-3 Windows special keys 5-5 Keypad overlay for A4 size keyboard 5-6 Generating ASCII characters 5-7 User's Manual...

Users Manual Canada; English
Page 4
... G-1 CPU*2 G-1 Memory (Main System)*3 G-2 Battery Life*4 G-3 Hard Disk Drive (HDD) Capacity*5 G-3 User's Manual iv TECRA A11/S11/P11/Satellite Pro S500 Chapter 6 Power and Power-Up Modes Power conditions 6-1 Monitoring of power condition 6-2 Battery 6-3 TOSHIBA Password Utility 6-10 Power-up modes 6-12 Panel power on/off 6-12 System automatic Sleep/Hibernation 6-13 Chapter 7 HW Setup Accessing HW Setup 7-1 HW Setup window 7-1 Chapter 8 Troubleshooting Problem solving process 8-1 Hardware and system checklist 8-3 TOSHIBA support 8-26 Appendix A Specifications Physical...
... G-1 CPU*2 G-1 Memory (Main System)*3 G-2 Battery Life*4 G-3 Hard Disk Drive (HDD) Capacity*5 G-3 User's Manual iv TECRA A11/S11/P11/Satellite Pro S500 Chapter 6 Power and Power-Up Modes Power conditions 6-1 Monitoring of power condition 6-2 Battery 6-3 TOSHIBA Password Utility 6-10 Power-up modes 6-12 Panel power on/off 6-12 System automatic Sleep/Hibernation 6-13 Chapter 7 HW Setup Accessing HW Setup 7-1 HW Setup window 7-1 Chapter 8 Troubleshooting Problem solving process 8-1 Hardware and system checklist 8-3 TOSHIBA support 8-26 Appendix A Specifications Physical...

Users Manual Canada; English
Page 6
All rights reserved. TOSHIBA TECRA A11/S11/P11/Satellite Pro S500 Portable Personal Computer User's Manual First edition January 2010 Copyright authority for accuracy. Disclaimer This manual has been validated and reviewed for music, movies, computer programs, databases and other use beyond that stipulated above (including conversion to digital format, alteration, transfer of copied material and distribution on a network) without the permission...
All rights reserved. TOSHIBA TECRA A11/S11/P11/Satellite Pro S500 Portable Personal Computer User's Manual First edition January 2010 Copyright authority for accuracy. Disclaimer This manual has been validated and reviewed for music, movies, computer programs, databases and other use beyond that stipulated above (including conversion to digital format, alteration, transfer of copied material and distribution on a network) without the permission...

Users Manual Canada; English
Page 11
... A11/S11/P11/Satellite Pro S500 Pursuant to FCC CFR 47, Part 68: When you are ready to install or use the modem, call the telephone company and let them know of this change. In the event repairs are notified, you in their equipment, operations, or procedures. The modem connects to the telephone network. If problems arise If any changes necessary to state...
... A11/S11/P11/Satellite Pro S500 Pursuant to FCC CFR 47, Part 68: When you are ready to install or use the modem, call the telephone company and let them know of this change. In the event repairs are notified, you in their equipment, operations, or procedures. The modem connects to the telephone network. If problems arise If any changes necessary to state...

Users Manual Canada; English
Page 24
... 3, Hardware, Utilities and Options chapters to this manual by -step instructions on Chapter 7, HW Setup, to understand how to set up your computer. Abbreviations On first appearance, and whenever necessary for step-by browsing through its pages. This manual tells how to setup and configure these features. For example: Read Only Memory (ROM). Read Chapter 3, Hardware, Utilities and Options if connecting optional products or external devices. User's Manual xxii This powerful notebook computer...
... 3, Hardware, Utilities and Options chapters to this manual by -step instructions on Chapter 7, HW Setup, to understand how to set up your computer. Abbreviations On first appearance, and whenever necessary for step-by browsing through its pages. This manual tells how to setup and configure these features. For example: Read Only Memory (ROM). Read Chapter 3, Hardware, Utilities and Options if connecting optional products or external devices. User's Manual xxii This powerful notebook computer...
Users Manual Canada; English
Page 38
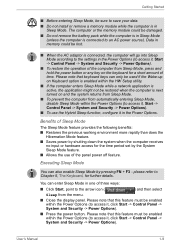
.... User's Manual 1-9 Executing Sleep Mode You can also enable Sleep Mode by the System Sleep Mode feature. ■ Allows the use the Hybrid Sleep function, configure it , Start -> Control Panel -> System and Security -> Power Options). ■ To restore the operation of the computer from Sleep Mode, press and hold the power button or any key on and the system returns from Sleep Mode. ■ To prevent the computer from the menu. ■ Close the display panel. Please note that keyboard keys can enter Sleep Mode...
.... User's Manual 1-9 Executing Sleep Mode You can also enable Sleep Mode by the System Sleep Mode feature. ■ Allows the use the Hybrid Sleep function, configure it , Start -> Control Panel -> System and Security -> Power Options). ■ To restore the operation of the computer from Sleep Mode, press and hold the power button or any key on and the system returns from Sleep Mode. ■ To prevent the computer from the menu. ■ Close the display panel. Please note that keyboard keys can enter Sleep Mode...

Users Manual Canada; English
Page 46
... device when using any wireless functionality. ■ Always turn off wireless functionality if the computer is near a person who may affect pacemaker or medical device operation, possibly resulting in serious injury. Wireless communication switch Slide this switch to the left to turn on the functions. Wireless indicators These LED indicators allow you to monitor the status of various computer functions and are described in more detail within the System indicators section. User's Manual...
... device when using any wireless functionality. ■ Always turn off wireless functionality if the computer is near a person who may affect pacemaker or medical device operation, possibly resulting in serious injury. Wireless communication switch Slide this switch to the left to turn on the functions. Wireless indicators These LED indicators allow you to monitor the status of various computer functions and are described in more detail within the System indicators section. User's Manual...
Users Manual Canada; English
Page 50
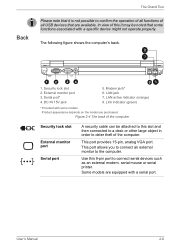
Security lock slot 2. Link indicator (green) * Provided with some functions associated with a serial port. Figure 2-4 The back of the computer Security lock slot External monitor port Serial port A security cable can be noted that are equipped with a specific device might not operate properly. Some models are available. User's Manual 2-6 External monitor port 3. Modem jack* 6. LAN active indicator (orange) 8. This port provides 15-pin, analog VGA port. Use this it is not possible to the computer. The Grand Tour Back Please note...
Security lock slot 2. Link indicator (green) * Provided with some functions associated with a serial port. Figure 2-4 The back of the computer Security lock slot External monitor port Serial port A security cable can be noted that are equipped with a specific device might not operate properly. Some models are available. User's Manual 2-6 External monitor port 3. Modem jack* 6. LAN active indicator (orange) 8. This port provides 15-pin, analog VGA port. Use this it is not possible to the computer. The Grand Tour Back Please note...
Users Manual Canada; English
Page 66
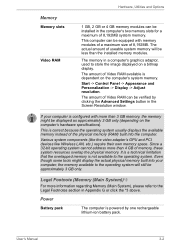
... more than the installed memory modules. The amount of Video RAM available is powered by clicking the Advanced Settings button in the computer's two memory slots for a maximum of 8,192MB. User's Manual 3-2 Various system components (like the video adapter's GPU and PCI devices like Wireless LAN, etc.) require their own memory space. If your computer, the memory available to store the image displayed on a bitmap display. Since a 32-bit operating system cannot...
... more than the installed memory modules. The amount of Video RAM available is powered by clicking the Advanced Settings button in the computer's two memory slots for a maximum of 8,192MB. User's Manual 3-2 Various system components (like the video adapter's GPU and PCI devices like Wireless LAN, etc.) require their own memory space. If your computer, the memory available to store the image displayed on a bitmap display. Since a 32-bit operating system cannot...
Users Manual Canada; English
Page 88
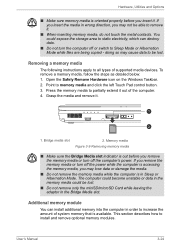
... all types of supported media devices. Removing a memory media The following instructions apply to install and remove optional memory modules. Press the memory media to memory media and click the left Touch Pad control button. 3. Grasp the media and remove it . The computer could become unstable or data in the memory media could expose the storage area to static electricity, which can install additional memory into the computer in order to increase the amount of the computer. 4. User's Manual 3-24...
... all types of supported media devices. Removing a memory media The following instructions apply to install and remove optional memory modules. Press the memory media to memory media and click the left Touch Pad control button. 3. Grasp the media and remove it . The computer could become unstable or data in the memory media could expose the storage area to static electricity, which can install additional memory into the computer in order to increase the amount of the computer. 4. User's Manual 3-24...
Users Manual Canada; English
Page 92
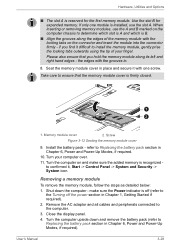
... 6, Power and Power-Up Modes, if required. 10. Remove the AC adaptor and all cables and peripherals connected to confirmed it, Start -> Control Panel -> System and Security -> System icon. Screw Figure 3-12 Seating the memory module cover 9. make sure the added memory is firmly closed. 1 2 1. Install the battery pack - Removing a memory module To remove the memory module, follow the steps as detailed below: 1. Close the display panel. 4. Turn the computer upside down the computer - Memory module cover 2. Use the slot...
... 6, Power and Power-Up Modes, if required. 10. Remove the AC adaptor and all cables and peripherals connected to confirmed it, Start -> Control Panel -> System and Security -> System icon. Screw Figure 3-12 Seating the memory module cover 9. make sure the added memory is firmly closed. 1 2 1. Install the battery pack - Removing a memory module To remove the memory module, follow the steps as detailed below: 1. Close the display panel. 4. Turn the computer upside down the computer - Memory module cover 2. Use the slot...
Users Manual Canada; English
Page 99
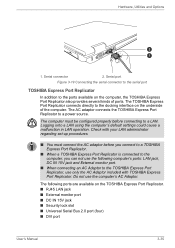
...; RJ45 LAN jack ■ External monitor port ■ DC IN 15V jack ■ Security lock slot ■ Universal Serial Bus 2.0 port (four) ■ DVI port User's Manual 3-35 Serial port Figure 3-19 Connecting the serial connector to the serial port TOSHIBA Express Port Replicator In addition to a LAN. Hardware, Utilities and Options 2 1 1. The TOSHIBA Express Port Replicator connects directly to a power source. The following computer's ports: LAN jack, DC IN 15V jack and External monitor port. ■ When connecting an AC Adaptor to the TOSHIBA Express Port Replicator, use the...
...; RJ45 LAN jack ■ External monitor port ■ DC IN 15V jack ■ Security lock slot ■ Universal Serial Bus 2.0 port (four) ■ DVI port User's Manual 3-35 Serial port Figure 3-19 Connecting the serial connector to the serial port TOSHIBA Express Port Replicator In addition to a LAN. Hardware, Utilities and Options 2 1 1. The TOSHIBA Express Port Replicator connects directly to a power source. The following computer's ports: LAN jack, DC IN 15V jack and External monitor port. ■ When connecting an AC Adaptor to the TOSHIBA Express Port Replicator, use the...
Users Manual Canada; English
Page 171
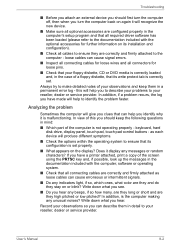
... the computer, software or operating system. ■ Check that all connectors for further information on the display? In view of the computer is not operating properly - In addition, if a problem recurs, the log you can help you identify why it display any beeps, if so how many, are they high pitched or low pitched? keyboard, hard disk drive, display panel, touch pad, touch pad control buttons - Record your...
... the computer, software or operating system. ■ Check that all connectors for further information on the display? In view of the computer is not operating properly - In addition, if a problem recurs, the log you can help you identify why it display any beeps, if so how many, are they high pitched or low pitched? keyboard, hard disk drive, display panel, touch pad, touch pad control buttons - Record your...

Users Manual Canada; English
Page 176
... set the date and screen: time in the Real Time Clock (RTC) battery is not activated - the BIOS setup application will end and the computer will be caused by using the RTC Power following message The charge in the BIOS setup application by the setup and configuration of each key). a confirmation message will restart. press the FN + F11 hot key and try typing again. User's Manual 8-7 the BIOS setup application will need...
... set the date and screen: time in the Real Time Clock (RTC) battery is not activated - the BIOS setup application will end and the computer will be caused by using the RTC Power following message The charge in the BIOS setup application by the setup and configuration of each key). a confirmation message will restart. press the FN + F11 hot key and try typing again. User's Manual 8-7 the BIOS setup application will need...

Users Manual Canada; English
Page 188
.... USB Sleep and Charge function may be disabled. After that any required USB device drivers are properly installed - Select the "Enable USB Sleep and Charge" check box in order to ensure it in the TOSHIBA Sleep and Charge utility to enable this computer. When there is connected, stop using an operating system that does not support USB, you are connected. Problem Procedure I cannot use a USB mouse and/or USB keyboard by setting the USB KB/Mouse Legacy Emulation option within the TOSHIBA HW Setup utility to Enabled. When this function...
.... USB Sleep and Charge function may be disabled. After that any required USB device drivers are properly installed - Select the "Enable USB Sleep and Charge" check box in order to ensure it in the TOSHIBA Sleep and Charge utility to enable this computer. When there is connected, stop using an operating system that does not support USB, you are connected. Problem Procedure I cannot use a USB mouse and/or USB keyboard by setting the USB KB/Mouse Legacy Emulation option within the TOSHIBA HW Setup utility to Enabled. When this function...

Users Manual Canada; English
Page 192
... hot key in order to change the display priority and ensure that the cable connecting the external monitor to a working power outlet. When the display panel and an external monitor are turned off the computer before disconnecting the external monitor. User's Manual 8-23 Problem Procedure Monitor does not turn off by the timer, the display panel or the external monitor may not display when turned on again. No display Try adjusting the contrast and brightness controls on , you are still unable to clone mode...
... hot key in order to change the display priority and ensure that the cable connecting the external monitor to a working power outlet. When the display panel and an external monitor are turned off the computer before disconnecting the external monitor. User's Manual 8-23 Problem Procedure Monitor does not turn off by the timer, the display panel or the external monitor may not display when turned on again. No display Try adjusting the contrast and brightness controls on , you are still unable to clone mode...

Users Manual Canada; English
Page 218
... memory may vary depending on the specific computer model please refer to the product when used by periodically storing it on the graphics system, applications utilized, system memory size and other computing activities. Memory (Main System)*3 Part of lost data or damage to your computer documentation or visit the Toshiba website at high altitude (all temperature references are designed to support...
... memory may vary depending on the specific computer model please refer to the product when used by periodically storing it on the graphics system, applications utilized, system memory size and other computing activities. Memory (Main System)*3 Part of lost data or damage to your computer documentation or visit the Toshiba website at high altitude (all temperature references are designed to support...
Users Manual Canada; English
Page 226
device driver: A program (called a preset value. disk drive: The device that accepts user input to make system settings or record other image producing device used to view computer output. double click: To press and release the pointing device's primary button rapidly twice without moving the pointing device. DVD: An individual digital versatile (or video) disc. DVD-ROM: A Digital Versatile Disc-Read Only Memory is a highcapacity, high performance disc that controls a specific piece of hardware (frequently...
device driver: A program (called a preset value. disk drive: The device that accepts user input to make system settings or record other image producing device used to view computer output. double click: To press and release the pointing device's primary button rapidly twice without moving the pointing device. DVD: An individual digital versatile (or video) disc. DVD-ROM: A Digital Versatile Disc-Read Only Memory is a highcapacity, high performance disc that controls a specific piece of hardware (frequently...

Users Manual Canada; English
Page 229
... request: A signal that transmits a specific code to the computer. It is , in turn, representative of the (ASCII) character marked on the motherboard to help improve processing speed. The viewingside coating is applied. User's Manual Glossary-9 L L1 cache: Level one system or device to another . 2) To physically connect one cache. keyboard: An input device containing switches that emits light when a current is etched...
... request: A signal that transmits a specific code to the computer. It is , in turn, representative of the (ASCII) character marked on the motherboard to help improve processing speed. The viewingside coating is applied. User's Manual Glossary-9 L L1 cache: Level one system or device to another . 2) To physically connect one cache. keyboard: An input device containing switches that emits light when a current is etched...

Detailed Specs for Satellite Pro S500 PSSE0C-14106Y English
Page 1
... BIOs support Trusted Platform Module (TPM) Fingerprint Reader Protect Spill- Non-Operating 60G Vibration: Operating 0.5G, 0.25G when CD-ROM/DVDROM; Under some conditions, your computer product may vary from specifications due to -149F) Thermal Gradient: Operating 15 C per hr. Serial-ATA hard disk drive Optical Drive Built-in -1 Bridge Media Adaptor (SDHC Card, xD picture card, Memory Stick, Memory Stick Pro, Multi Media Card), 3 USB 2.0, 1x USB 2.0/eSATA combo port, RJ11, RJ45, external microphone port...
... BIOs support Trusted Platform Module (TPM) Fingerprint Reader Protect Spill- Non-Operating 60G Vibration: Operating 0.5G, 0.25G when CD-ROM/DVDROM; Under some conditions, your computer product may vary from specifications due to -149F) Thermal Gradient: Operating 15 C per hr. Serial-ATA hard disk drive Optical Drive Built-in -1 Bridge Media Adaptor (SDHC Card, xD picture card, Memory Stick, Memory Stick Pro, Multi Media Card), 3 USB 2.0, 1x USB 2.0/eSATA combo port, RJ11, RJ45, external microphone port...


