User Guide
Page 2
... ANY BUSINESS, PROFITS, PROGRAMS, DATA, NETWORK SYSTEMS OR REMOVABLE STORAGE MEDIA ARISING OUT OF OR RESULTING FROM THE USE OF THE PRODUCT, EVEN IF ADVISED OF THE POSSIBILITY THEREOF. 2 Handling the cord on the hard disk or other reproductive harm. Wash hands after handling. Model: Satellite Pro® L670 Series Recordable and/or ReWritable Drive(s) and Associated Software Warranty The computer system you...
... ANY BUSINESS, PROFITS, PROGRAMS, DATA, NETWORK SYSTEMS OR REMOVABLE STORAGE MEDIA ARISING OUT OF OR RESULTING FROM THE USE OF THE PRODUCT, EVEN IF ADVISED OF THE POSSIBILITY THEREOF. 2 Handling the cord on the hard disk or other reproductive harm. Wash hands after handling. Model: Satellite Pro® L670 Series Recordable and/or ReWritable Drive(s) and Associated Software Warranty The computer system you...
User Guide
Page 5
... notice, in their equipment, operations or procedures. Fax Branding The following information is subject to state tariffs. 5 Connection to party line service is only applicable if your computer has the capability to send and receive fax transmissions. In order to do this change. or an authorized representative of Toshiba, or the Toshiba Customer Support Center within the United...
... notice, in their equipment, operations or procedures. Fax Branding The following information is subject to state tariffs. 5 Connection to party line service is only applicable if your computer has the capability to send and receive fax transmissions. In order to do this change. or an authorized representative of Toshiba, or the Toshiba Customer Support Center within the United...
User Guide
Page 29
... custom size partition 63 Recovering without changing the internal storage drive partitions 66 Creating recovery DVDs/media 68 Restoring from recovery DVDs/media 71 Erasing the Internal Storage Drive 73 Checking the internal storage drive operating status 74 Installing drivers and applications 75 Using the TouchPad 75 Adjusting TouchPad™ settings 78 Disabling or enabling the TouchPad 79 Using external display devices 79 Selecting video cables 80 Connecting an HDMI™-compatible television or external display device............80 Connecting an external monitor or projector...
... custom size partition 63 Recovering without changing the internal storage drive partitions 66 Creating recovery DVDs/media 68 Restoring from recovery DVDs/media 71 Erasing the Internal Storage Drive 73 Checking the internal storage drive operating status 74 Installing drivers and applications 75 Using the TouchPad 75 Adjusting TouchPad™ settings 78 Disabling or enabling the TouchPad 79 Using external display devices 79 Selecting video cables 80 Connecting an HDMI™-compatible television or external display device............80 Connecting an external monitor or projector...

User Guide
Page 51
... you install or remove a memory module, turn off . 3 Unplug and remove any cables connected to the computer, including the AC adaptor. 4 Place a soft cloth on page 124. The computer closes all open programs, shuts down button in Slot A. If only one or two memory modules. Start button Shut down button (Sample Image) Shut down button 2 Click the Shut down the operating system, and then turns off the computer using the Start menu...
... you install or remove a memory module, turn off . 3 Unplug and remove any cables connected to the computer, including the AC adaptor. 4 Place a soft cloth on page 124. The computer closes all open programs, shuts down button in Slot A. If only one or two memory modules. Start button Shut down button (Sample Image) Shut down button 2 Click the Shut down the operating system, and then turns off the computer using the Start menu...

User Guide
Page 55
... computer. ❖ Always operate your computer on a hard flat surface. Make sure to be installed, it must be installed in Slot A. 14 Replace the memory module slot cover and secure it using the screw. 15 Re-insert the main battery. In this model, Slot A is in serious injury. For more information on inserting the main battery, see "Inserting a charged battery" on page 125. 16 Turn the computer right side...
... computer. ❖ Always operate your computer on a hard flat surface. Make sure to be installed, it must be installed in Slot A. 14 Replace the memory module slot cover and secure it using the screw. 15 Re-insert the main battery. In this model, Slot A is in serious injury. For more information on inserting the main battery, see "Inserting a charged battery" on page 125. 16 Turn the computer right side...
User Guide
Page 58
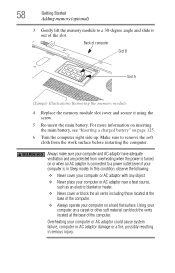
... resulting in Sleep mode). Overheating your computer on a hard flat surface. For more information on inserting the main battery, see "Inserting a charged battery" on a carpet or other soft material can block the vents located at the base of the slot. 58 Getting Started Adding memory (optional) 3 Gently lift the memory module to remove the soft cloth from overheating when the power is turned on or when...
... resulting in Sleep mode). Overheating your computer on a hard flat surface. For more information on inserting the main battery, see "Inserting a charged battery" on a carpet or other soft material can block the vents located at the base of the slot. 58 Getting Started Adding memory (optional) 3 Gently lift the memory module to remove the soft cloth from overheating when the power is turned on or when...

User Guide
Page 59
... recognize the memory configuration, turn off the computer and remove the memory module slot cover (complete steps 1-8 in "Installing a memory module" on page 50), and then check that the module is inserted completely into the socket and lined up that says, "Do you want to allow you can check that the computer has recognized the change. Getting Started 59 Recovering the Internal Storage Drive 7 Reconnect the cables. 8 Restart...
... recognize the memory configuration, turn off the computer and remove the memory module slot cover (complete steps 1-8 in "Installing a memory module" on page 50), and then check that the module is inserted completely into the socket and lined up that says, "Do you want to allow you can check that the computer has recognized the change. Getting Started 59 Recovering the Internal Storage Drive 7 Reconnect the cables. 8 Restart...
User Guide
Page 80
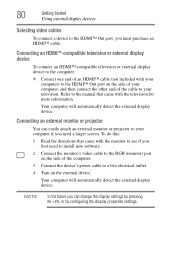
... must purchase an HDMI™ cable. Your computer will automatically detect the external display device. NOTE In the future you first need a larger screen. 80 Getting Started Using external display devices Selecting video cables To connect a device to the HDMI™ Out port, you need to install new software. 2 Connect the monitor's video cable to the RGB (monitor) port on the external device. Connecting an external monitor or projector You can change the display settings by pressing Fn + F5, or by configuring the display properties settings. Your computer will...
... must purchase an HDMI™ cable. Your computer will automatically detect the external display device. NOTE In the future you first need a larger screen. 80 Getting Started Using external display devices Selecting video cables To connect a device to the HDMI™ Out port, you need to install new software. 2 Connect the monitor's video cable to the RGB (monitor) port on the external device. Connecting an external monitor or projector You can change the display settings by pressing Fn + F5, or by configuring the display properties settings. Your computer will...
User Guide
Page 110
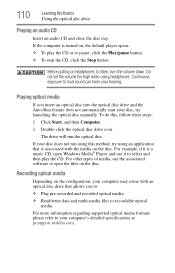
... optical disc manually. If your computer may come with the media on headphones to open Windows Media® Player and use the associated software to listen, turn the volume down. For more information regarding supported optical media formats please refer to recordable optical media. If the computer is associated with an optical disc drive that is turned on the disc. 110 Learning the Basics Using the optical disc drive Playing an audio...
... optical disc manually. If your computer may come with the media on headphones to open Windows Media® Player and use the associated software to listen, turn the volume down. For more information regarding supported optical media formats please refer to recordable optical media. If the computer is associated with an optical disc drive that is turned on the disc. 110 Learning the Basics Using the optical disc drive Playing an audio...
User Guide
Page 151
... enter it again to verify. 6 Click OK. 7 Click OK to remove the user password. Deleting a user password To cancel the power-on password functions: 1 Click Start, All Programs, TOSHIBA, Utilities, and then TOSHIBA Assist. The TOSHIBA Assist window appears. 2 On the left side, click the Secure tab. 3 Click the User Password icon. 4 Click Not Registered. 5 Follow the on-screen instructions to exit. Utilities Setting passwords 151 To register a password for the power-on password function: 1 Click Start...
... enter it again to verify. 6 Click OK. 7 Click OK to remove the user password. Deleting a user password To cancel the power-on password functions: 1 Click Start, All Programs, TOSHIBA, Utilities, and then TOSHIBA Assist. The TOSHIBA Assist window appears. 2 On the left side, click the Secure tab. 3 Click the User Password icon. 4 Click Not Registered. 5 Follow the on-screen instructions to exit. Utilities Setting passwords 151 To register a password for the power-on password function: 1 Click Start...
User Guide
Page 160
... laws or data protection levels as power consumption, the cooling system and the 3D Accelerometer (available on the internal storage drive may affect the performance of your TOSHIBA computer. The collected information includes device operation time and number of actuations or status changes (e.g.: number of power button and Fn key combination uses, and AC adaptor, battery, LCD, fan, HDD, sound volume, wireless communication switch, docking and USB information), date of residence (e.g., European...
... laws or data protection levels as power consumption, the cooling system and the 3D Accelerometer (available on the internal storage drive may affect the performance of your TOSHIBA computer. The collected information includes device operation time and number of actuations or status changes (e.g.: number of power button and Fn key combination uses, and AC adaptor, battery, LCD, fan, HDD, sound volume, wireless communication switch, docking and USB information), date of residence (e.g., European...
User Guide
Page 166
... after Description. The Windows® Advanced Boot Options menu displays these problems, use the options in the Startup menu. To do this, use the options in some way such as installing a new program or adding a device. Unless a hardware device has failed, problems usually occur when you may have to fix the problem. Using Startup options to fix problems If the operating system fails to start properly, you change your computer starts and before Windows® starts loading. To open the Startup menu: 1 Restart your...
... after Description. The Windows® Advanced Boot Options menu displays these problems, use the options in the Startup menu. To do this, use the options in some way such as installing a new program or adding a device. Unless a hardware device has failed, problems usually occur when you may have to fix the problem. Using Startup options to fix problems If the operating system fails to start properly, you change your computer starts and before Windows® starts loading. To open the Startup menu: 1 Restart your...
User Guide
Page 171
... problem, press Fn and F5 simultaneously again to return the display priority to update your keyboard driver. Display problems Here are using a different make sure the display priority is not set for an external monitor. If you are some typical display problems and their solutions: The screen is registered, press any key to the keyboard manufacturer's Web site. If you have connected an external keyboard and the operating system displays one or more keyboard error...
... problem, press Fn and F5 simultaneously again to return the display priority to update your keyboard driver. Display problems Here are using a different make sure the display priority is not set for an external monitor. If you are some typical display problems and their solutions: The screen is registered, press any key to the keyboard manufacturer's Web site. If you have connected an external keyboard and the operating system displays one or more keyboard error...

User Guide
Page 213
... was turned off . See also Sleep, Suspend. I icon - One A/V component can control another while using this function, if connected with the Fn key can set system options or control system parameters, such as the battery save mode. (2) A key or combination of using a pointing device such as a mouse. A small image displayed on the computer again, your work is refreshed. L L1 (level one) cache - When you use to the internal storage drive the...
... was turned off . See also Sleep, Suspend. I icon - One A/V component can control another while using this function, if connected with the Fn key can set system options or control system parameters, such as the battery save mode. (2) A key or combination of using a pointing device such as a mouse. A small image displayed on the computer again, your work is refreshed. L L1 (level one) cache - When you use to the internal storage drive the...
User Guide
Page 220
... adaptor 44 AC power 115 AC power light 44 accessing network 134 adding memory check total memory 59 memory (optional) 50 optional external devices 49 adequate ventilation cooling fan 43 adjusting TouchPad™ settings 78 Application Cards 191 audio features 136 B backing up files 97, 104 battery battery life 114 Call2Recycle™ 129 care 126, 127 changing 123 220 charge indicator light 45 charge not lasting 170 charge time 115 charger 115 charging 46, 115 charging the real...
... adaptor 44 AC power 115 AC power light 44 accessing network 134 adding memory check total memory 59 memory (optional) 50 optional external devices 49 adequate ventilation cooling fan 43 adjusting TouchPad™ settings 78 Application Cards 191 audio features 136 B backing up files 97, 104 battery battery life 114 Call2Recycle™ 129 care 126, 127 changing 123 220 charge indicator light 45 charge not lasting 170 charge time 115 charger 115 charging 46, 115 charging the real...
User Guide
Page 221
... RTC memory 114 running computer on battery power 113 safety precautions 126 setting notifications 119 battery indicator light 118 BIOS Setup see TOSHIBA Hardware Setup Blu-ray Disc™ using 106 button eject, optical disc drive 107 power 48 Shut down 51, 86 start 132 C Call2Recycle™ battery 129 caring for your computer 94 changing battery 123 character keys 98 charging the battery 46 checking device properties 168 cleaning the computer 94 communications network connection 134 set up 133...
... RTC memory 114 running computer on battery power 113 safety precautions 126 setting notifications 119 battery indicator light 118 BIOS Setup see TOSHIBA Hardware Setup Blu-ray Disc™ using 106 button eject, optical disc drive 107 power 48 Shut down 51, 86 start 132 C Call2Recycle™ battery 129 caring for your computer 94 changing battery 123 character keys 98 charging the battery 46 checking device properties 168 cleaning the computer 94 communications network connection 134 set up 133...
User Guide
Page 222
... (monitor) port 79 external display, adjusting 82 F FAT (File Allocation Table) 173 file extensions using 103 files backing up 97, 104 file names 103 printing 103 restore 105 saving 102 using a file extension 103 function keys 98 H headphones using 137 Help and Support Windows® operating system 167 Hibernation mode 85 configuring 89 configuring options 89 hot key 197 powering down 89 Shut down 89 starting again from 91 using 89 hot key disabling or enabling wireless devices 200
... (monitor) port 79 external display, adjusting 82 F FAT (File Allocation Table) 173 file extensions using 103 files backing up 97, 104 file names 103 printing 103 restore 105 saving 102 using a file extension 103 function keys 98 H headphones using 137 Help and Support Windows® operating system 167 Hibernation mode 85 configuring 89 configuring options 89 hot key 197 powering down 89 Shut down 89 starting again from 91 using 89 hot key disabling or enabling wireless devices 200
User Guide
Page 223
... working 163 special Windows® keys 99 troubleshooting 171 using 97 keyboard, external 82 keys Ctrl Fn Alt 98 function keys 98 L LEDs system indicator lights 118 AC adaptor light 117 AC power light 44, 45 battery light 45, 46 ON/OFF light 48, 89, 91, 94 Web Camera light 137 lock computer, using 95 M maintaining your battery 127 manual eject hole optical disc drive 108 memory adding (optional) 50 check total memory 59 problem solving 169 removing memory module slot cover 52 Memory card reader inserting memory media 139 removing memory media 139 using...
... working 163 special Windows® keys 99 troubleshooting 171 using 97 keyboard, external 82 keys Ctrl Fn Alt 98 function keys 98 L LEDs system indicator lights 118 AC adaptor light 117 AC power light 44, 45 battery light 45, 46 ON/OFF light 48, 89, 91, 94 Web Camera light 137 lock computer, using 95 M maintaining your battery 127 manual eject hole optical disc drive 108 memory adding (optional) 50 check total memory 59 problem solving 169 removing memory module slot cover 52 Memory card reader inserting memory media 139 removing memory media 139 using...
User Guide
Page 225
... 41 printer connecting 82 setting up 83 USB-compatible 82 printing a file 103 problem solving AC power 169 battery charge does not last 170 battery not charging 170 changing display properties 172 checking device properties 168 computer will not power up 163 contacting Toshiba 185, 186 corrupted/damaged data files 174 Device Manager 168 disk drive is slow 174 display is blank 171 external display not working 172 external monitor 172 faulty memory 169 high...
... 41 printer connecting 82 setting up 83 USB-compatible 82 printing a file 103 problem solving AC power 169 battery charge does not last 170 battery not charging 170 changing display properties 172 checking device properties 168 computer will not power up 163 contacting Toshiba 185, 186 corrupted/damaged data files 174 Device Manager 168 disk drive is slow 174 display is blank 171 external display not working 172 external monitor 172 faulty memory 169 high...
User Guide
Page 227
... turning on power 48 U USB-compatible printer 82 user password, deleting 151 user password, setting 150 using a microphone 136 computer lock 95 DVDs 105 Hibernation mode 89 hot key to set a power plan 122 Memory card reader 138 optical disc drive 105 Shut down command 86 Sleep mode 91 TOSHIBA eco power plan 123 TouchPad™ 75 Web Camera 137 using the keyboard 97 Utilities 141 V video projector adjusting display 82 W warranty standard limited warranty 39 Web Camera using 137 Web sites 186 Wi-Fi® wireless networking...
... turning on power 48 U USB-compatible printer 82 user password, deleting 151 user password, setting 150 using a microphone 136 computer lock 95 DVDs 105 Hibernation mode 89 hot key to set a power plan 122 Memory card reader 138 optical disc drive 105 Shut down command 86 Sleep mode 91 TOSHIBA eco power plan 123 TouchPad™ 75 Web Camera 137 using the keyboard 97 Utilities 141 V video projector adjusting display 82 W warranty standard limited warranty 39 Web Camera using 137 Web sites 186 Wi-Fi® wireless networking...


