
User Manual
Page 2
..., Windows, Windows NT and DirectX are trademarks of Motorola, Inc. Sound Blaster and Pro are registered trademarks of the information contained herein. RingCentral is assumed, with respect to change without the prior written permission of this manual's production. Centronics is a registered trademark of Centronics Data Computer Corporation. Under the copyright laws, this manual. Toshiba Satellite Pro 4200/4300 Series Portable Personal Computer User's Manual...
..., Windows, Windows NT and DirectX are trademarks of Motorola, Inc. Sound Blaster and Pro are registered trademarks of the information contained herein. RingCentral is assumed, with respect to change without the prior written permission of this manual's production. Centronics is a registered trademark of Centronics Data Computer Corporation. Under the copyright laws, this manual. Toshiba Satellite Pro 4200/4300 Series Portable Personal Computer User's Manual...
User Manual
Page 14
... Executing TSETUP 7-2 Changing values in the TSETUP menu 7-3 Accepting changes and exiting SYSTEM SETUP 7-3 Default configuration 7-3 TSETUP options 7-4 Memory 7-4 Password 7-4 Battery 7-4 Hard Disk Mode 7-7 Password security 7-15 How to set the passwords 7-16 How to reset the passwords 7-18 Enabling TSETUP access in user password mode 7-20 Making a password service diskette 7-22 Chapter 8: Optional Devices 8-1 PC Cards 8-1 Installing a PC Card 8-2 Removing a PC Card 8-4 Memory expansion 8-4 Installing memory module 8-5 Removing memory module 8-6 Clearing Hibernation files...
... Executing TSETUP 7-2 Changing values in the TSETUP menu 7-3 Accepting changes and exiting SYSTEM SETUP 7-3 Default configuration 7-3 TSETUP options 7-4 Memory 7-4 Password 7-4 Battery 7-4 Hard Disk Mode 7-7 Password security 7-15 How to set the passwords 7-16 How to reset the passwords 7-18 Enabling TSETUP access in user password mode 7-20 Making a password service diskette 7-22 Chapter 8: Optional Devices 8-1 PC Cards 8-1 Installing a PC Card 8-2 Removing a PC Card 8-4 Memory expansion 8-4 Installing memory module 8-5 Removing memory module 8-6 Clearing Hibernation files...
User Manual
Page 17
... or unique to learn how this manual by -step instructions on using the following devices: AccuPoint™ II, CD/DVD-ROM drive and internal modem. If you 're new to portable computing, first read over the Special features section of the Satellite Pro 4200 or 4300 Series computer. If you are a new user of the computer's features, capabilities, and options. Chapter 2, The Grand Tour, identifies the...
... or unique to learn how this manual by -step instructions on using the following devices: AccuPoint™ II, CD/DVD-ROM drive and internal modem. If you 're new to portable computing, first read over the Special features section of the Satellite Pro 4200 or 4300 Series computer. If you are a new user of the computer's features, capabilities, and options. Chapter 2, The Grand Tour, identifies the...
User Manual
Page 31
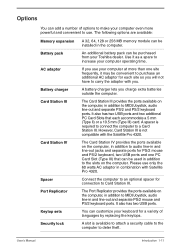
... sets Security lock A 32, 64, 128 or 256 MB memory module can be purchased from your Toshiba dealer. If you use your computer operating time. A battery charger lets you will not have to carry the adaptor with Satellite Pro 4320. The Card Station IV provides the ports available on the computer, in addition to audio line-in and line-out jacks and separate ports for connection...
... sets Security lock A 32, 64, 128 or 256 MB memory module can be purchased from your Toshiba dealer. If you use your computer operating time. A battery charger lets you will not have to carry the adaptor with Satellite Pro 4320. The Card Station IV provides the ports available on the computer, in addition to audio line-in and line-out jacks and separate ports for connection...

User Manual
Page 42
... SLOT EJECT BUTTON The diskette drive The 3 ½" diskette drive lets you use the diskette drive. The computer is configured as Regional Playback Control 2 (RPC2). To remove a diskette, push in -use indicator when you run either double density (720 KB) or high density (1.44 MB) 3 ½" diskettes for easy removal. The minimum (centre) and maximum (outer edge) for some Satellite Pro 4320 Series) A full-size DVD-ROM drive module...
... SLOT EJECT BUTTON The diskette drive The 3 ½" diskette drive lets you use the diskette drive. The computer is configured as Regional Playback Control 2 (RPC2). To remove a diskette, push in -use indicator when you run either double density (720 KB) or high density (1.44 MB) 3 ½" diskettes for easy removal. The minimum (centre) and maximum (outer edge) for some Satellite Pro 4320 Series) A full-size DVD-ROM drive module...
User Manual
Page 69
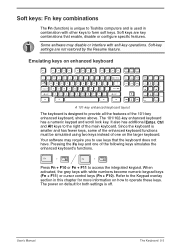
... scroll lock key. Some software may require you to use keys that enable, disable or configure specific features. Fn + F10 Fn + F11 Press Fn + F10 or Fn + F11 to access the integrated keypad. Soft keys: Fn key combinations The Fn (function) is unique to Toshiba computers and is used in this chapter for both settings is smaller and has fewer keys, some of the enhanced keyboard functions must be simulated using...
... scroll lock key. Some software may require you to use keys that enable, disable or configure specific features. Fn + F10 Fn + F11 Press Fn + F10 or Fn + F11 to access the integrated keypad. Soft keys: Fn key combinations The Fn (function) is unique to Toshiba computers and is used in this chapter for both settings is smaller and has fewer keys, some of the enhanced keyboard functions must be simulated using...
User Manual
Page 85
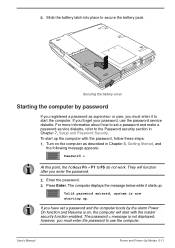
... function after you forget your password, use the computer. They will start up . Slide the battery latch into place to the Password security section in Chapter 3, Getting Started, and the following message appears: Password = At this point, the hotkeys Fn + F1 to F5 do not work. 6. Press Enter. The password = message is now starting up the computer with the instant security function enabled. User's Manual Power and Power-Up Modes...
... function after you forget your password, use the computer. They will start up . Slide the battery latch into place to the Password security section in Chapter 3, Getting Started, and the following message appears: Password = At this point, the hotkeys Fn + F1 to F5 do not work. 6. Press Enter. The password = message is now starting up the computer with the instant security function enabled. User's Manual Power and Power-Up Modes...
User Manual
Page 89
... turned off. Settings for the HDD Mode, CPU cache and level 2 cache explained in this chapter, cannot be made in memory that provides similar functions to default values. To charge the RTC battery, connect the AC adaptor and turn on your hard disk. The RTC battery does not charge when the computer is set security passwords. A checksum error is stored in the Windows subdirectory on the computer's power. The SYSTEM SETUP screen is displayed...
... turned off. Settings for the HDD Mode, CPU cache and level 2 cache explained in this chapter, cannot be made in memory that provides similar functions to default values. To charge the RTC battery, connect the AC adaptor and turn on your hard disk. The RTC battery does not charge when the computer is set security passwords. A checksum error is stored in the Windows subdirectory on the computer's power. The SYSTEM SETUP screen is displayed...

User Manual
Page 90
... SYSTEM SETUP (2/2). TSETUP displays the SYSTEM SETUP screen. OTHERS BATTERY Power-up Mode = Resume Battery Save Mode = Full power CPU Cache = Enabled PERIPHERAL Pointing Devices = Auto-Selected Level 2 Cache = Enabled Processor serial number = Disabled Ext Keyboard "Fn" = Disabled USB Legacy Emulation = Disabled Parallel Port Mode = ECP Hard Disk Mode = Enhanced IDE (Normal) Auto Power On Alarm Volume System Beep Panel Power On/Off = Disabled = High = Enabled = Disabled BOOT PRIORITY Boot Priority = FDD->HDD->CD-ROM Power On Boot Select = Enable CONFIGURATION Device...
... SYSTEM SETUP (2/2). TSETUP displays the SYSTEM SETUP screen. OTHERS BATTERY Power-up Mode = Resume Battery Save Mode = Full power CPU Cache = Enabled PERIPHERAL Pointing Devices = Auto-Selected Level 2 Cache = Enabled Processor serial number = Disabled Ext Keyboard "Fn" = Disabled USB Legacy Emulation = Disabled Parallel Port Mode = ECP Hard Disk Mode = Enhanced IDE (Normal) Auto Power On Alarm Volume System Beep Panel Power On/Off = Disabled = High = Enabled = Disabled BOOT PRIORITY Boot Priority = FDD->HDD->CD-ROM Power On Boot Select = Enable CONFIGURATION Device...
User Manual
Page 97
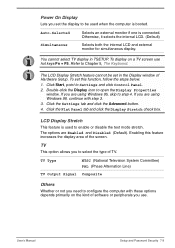
... display in the Display window of the screen. Otherwise, it selects the internal LCD. (Default) Simultaneous Selects both the internal LCD and external monitor for simultaneous display. Click Start, point to configure the computer with step 3. 3. If you use hot keys Fn + F5. Enabling this function, follow the steps below. 1. To display on the kind of TV. The options are using Windows 95, skip to select the type of software or peripherals you are Enabled and Disabled (Default...
... display in the Display window of the screen. Otherwise, it selects the internal LCD. (Default) Simultaneous Selects both the internal LCD and external monitor for simultaneous display. Click Start, point to configure the computer with step 3. 3. If you use hot keys Fn + F5. Enabling this function, follow the steps below. 1. To display on the kind of TV. The options are using Windows 95, skip to select the type of software or peripherals you are Enabled and Disabled (Default...
User Manual
Page 106
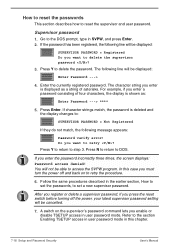
... how to set a new supervisor password. Press Y to the section Enabling TSETUP access in user password mode in user password mode. For example, if you enter is shown as a string of asterisks. You will be able to : SUPERVISOR PASSWORD = Not Registered If they do not match, the following line will be displayed: Enter Password ---> 4. If you enable or disable TSETUP access in this case you press the reset switch before turning off...
... how to set a new supervisor password. Press Y to the section Enabling TSETUP access in user password mode in user password mode. For example, if you enter is shown as a string of asterisks. You will be able to : SUPERVISOR PASSWORD = Not Registered If they do not match, the following line will be displayed: Enter Password ---> 4. If you enable or disable TSETUP access in this case you press the reset switch before turning off...
User Manual
Page 108
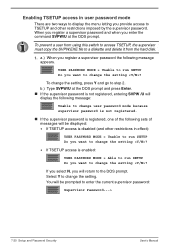
... change the setting ? To prevent a user from the hard disk. 1. If the supervisor password is registered, one of the following sets of messages will return to step 2. If you select N, you provide access to TSETUP and other restrictions in user password mode There are two ways to display the menu letting you will be prompted to enter the current supervisor password: Supervisor Password---> 7-20 Setup and Password Security User's Manual b.) Type...
... change the setting ? To prevent a user from the hard disk. 1. If the supervisor password is registered, one of the following sets of messages will return to step 2. If you select N, you provide access to TSETUP and other restrictions in user password mode There are two ways to display the menu letting you will be prompted to enter the current supervisor password: Supervisor Password---> 7-20 Setup and Password Security User's Manual b.) Type...
User Manual
Page 110
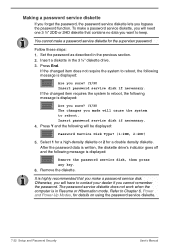
... system to keep. Insert password service disk if necessary. 4. Select 1 for a high-density diskette or 2 for details on using the password service diskette. 7-22 Setup and Password Security User's Manual Making a password service diskette If you forget the password, the password service diskette lets you will be displayed: Password Service Disk Type? (1:2HD, 2:2DD) 5. The password service diskette does not work when the computer is displayed: Remove the password service disk, then press any key. 6. Refer to reboot, the following message...
... system to keep. Insert password service disk if necessary. 4. Select 1 for a high-density diskette or 2 for details on using the password service diskette. 7-22 Setup and Password Security User's Manual Making a password service diskette If you forget the password, the password service diskette lets you will be displayed: Password Service Disk Type? (1:2HD, 2:2DD) 5. The password service diskette does not work when the computer is displayed: Remove the password service disk, then press any key. 6. Refer to reboot, the following message...
User Manual
Page 116
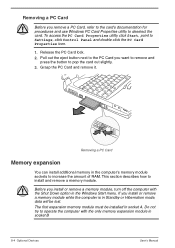
... access the PC Card Properties utility click Start, point to operate the computer with the Shut Down option in the computer's memory module sockets to install and remove a memory module. Pull out the eject button next to deselect the card. Grasp the PC Card and remove it. Do not try to Settings, click Control Panel and double click the PC Card Properties icon. 1. Removing a PC Card Memory expansion You can install additional memory in the Windows Start menu...
... access the PC Card Properties utility click Start, point to operate the computer with the Shut Down option in the computer's memory module sockets to install and remove a memory module. Pull out the eject button next to deselect the card. Grasp the PC Card and remove it. Do not try to Settings, click Control Panel and double click the PC Card Properties icon. 1. Removing a PC Card Memory expansion You can install additional memory in the Windows Start menu...
User Manual
Page 140
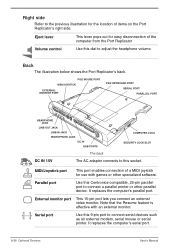
... the computer from the Port Replicator Volume control Use this dial to adjust the headphone volume. PS/2 MOUSE PORT MIDI/JOYSTICK EXTERNAL MONITOR PORT PS/2 KEYBOARD PORT SERIAL PORT PARALLEL PORT HEADPHONE JACK LINE-OUT JACK LINE-IN JACK MICROPHONE JACK DC IN USB PORTS COMPUTER LOCK SECURITY LOCK SLOT The back D C IN 15 V DC IN 15V MIDI/Joystick port The AC adaptor connects to connect serial devices such as an external modem, serial mouse or serial printer. It replaces the computer's parallel port. Note that the...
... the computer from the Port Replicator Volume control Use this dial to adjust the headphone volume. PS/2 MOUSE PORT MIDI/JOYSTICK EXTERNAL MONITOR PORT PS/2 KEYBOARD PORT SERIAL PORT PARALLEL PORT HEADPHONE JACK LINE-OUT JACK LINE-IN JACK MICROPHONE JACK DC IN USB PORTS COMPUTER LOCK SECURITY LOCK SLOT The back D C IN 15 V DC IN 15V MIDI/Joystick port The AC adaptor connects to connect serial devices such as an external modem, serial mouse or serial printer. It replaces the computer's parallel port. Note that the...
User Manual
Page 154
... Chapter 7, Setup and Password Security. If you are using is correct and try typing again. Keyboard Keyboard problems can use the keyboard, consult your dealer. 9-6 Troubleshooting User's Manual Make sure the software you did not make sure the External Keyboard Fn key is not selected. See your dealer. Problem Cannot enter password Procedure Refer to use your password service diskette to screen is garbled Procedure Check that the numeric keypad overlay is set to use the hotkeys, consult...
... Chapter 7, Setup and Password Security. If you are using is correct and try typing again. Keyboard Keyboard problems can use the keyboard, consult your dealer. 9-6 Troubleshooting User's Manual Make sure the software you did not make sure the External Keyboard Fn key is not selected. See your dealer. Problem Cannot enter password Procedure Refer to use your password service diskette to screen is garbled Procedure Check that the numeric keypad overlay is set to use the hotkeys, consult...
User Manual
Page 159
... the parallel port and a serial printer to the computer for damage. Make sure the outlet is configured to use both the AccuPoint II and an external mouse. Run the diagnostics program TDIAGS. If problems persist, contact your printer and software documentation. Make sure it is connected to use ). Make sure the ports are using a PS/2 or serial mouse, also refer to Chapter 8, Optional Devices, and to the troubleshooting and other...
... the parallel port and a serial printer to the computer for damage. Make sure the outlet is configured to use both the AccuPoint II and an external mouse. Run the diagnostics program TDIAGS. If problems persist, contact your printer and software documentation. Make sure it is connected to use ). Make sure the ports are using a PS/2 or serial mouse, also refer to Chapter 8, Optional Devices, and to the troubleshooting and other...
User Manual
Page 215
... image producing device used to print. diskette: A removable disk that controls a specific piece of hardware (frequently a peripheral device such as system functions. display: A CRT, LCD, or other data storage device. documentation: The set of manual and/or other instructions written for the users of power is factual, measurable or statistical that randomly accesses information on . See operating system. driver: A software program, generally part of the operating system, that stores magnetically encoded data. User's Manual Glossary 5
... image producing device used to print. diskette: A removable disk that controls a specific piece of hardware (frequently a peripheral device such as system functions. display: A CRT, LCD, or other data storage device. documentation: The set of manual and/or other instructions written for the users of power is factual, measurable or statistical that randomly accesses information on . See operating system. driver: A software program, generally part of the operating system, that stores magnetically encoded data. User's Manual Glossary 5
User Manual
Page 218
... , in the indicator panel. See also byte and kilobyte. keyboard: An input device containing switches that allows you provide to the 10th power. K K: Taken from the Greek word kilo, meaning 1000; Glossary 8 User's Manual infrared port: A cableless communications port capable of a system used as equivalent to 1024, or 2 raised to a computer, communication device or other peripheral device from the keyboard or external or internal storage devices. Refers...
... , in the indicator panel. See also byte and kilobyte. keyboard: An input device containing switches that allows you provide to the 10th power. K K: Taken from the Greek word kilo, meaning 1000; Glossary 8 User's Manual infrared port: A cableless communications port capable of a system used as equivalent to 1024, or 2 raised to a computer, communication device or other peripheral device from the keyboard or external or internal storage devices. Refers...

User Manual
Page 229
...Video out, 1-6, 2-5 Video RAM, 1-2 Views back side, 2-4 front with display closed, 2-1 left side, 2-2 right side, 2-3 User's Manual Index 5 See Display and LCD ScrLock (Fn + F12), 5-4 Security lock, 1-11, 2-2, 8-35 Self Test, 9-3 Serial port, 2-4. See Ports, serial Setting up, 3-1 Soft keys, 5-3 emulating enhanced keyboard Enter, 5-4 numeric mode, 5-3 right Alt key, 5-4 right Ctrl key, 5-4 ScrLock, 5-4 Soft Keys Alt Gr Key Combinations, 5-2 Software, A-5 Sound system, 1-5, A-5 Headphone jack, 2-2 problems, 9-14 volume control, 2-2 Spacer, 1-11, 8-19 Special features, 1-7 Specifications...
...Video out, 1-6, 2-5 Video RAM, 1-2 Views back side, 2-4 front with display closed, 2-1 left side, 2-2 right side, 2-3 User's Manual Index 5 See Display and LCD ScrLock (Fn + F12), 5-4 Security lock, 1-11, 2-2, 8-35 Self Test, 9-3 Serial port, 2-4. See Ports, serial Setting up, 3-1 Soft keys, 5-3 emulating enhanced keyboard Enter, 5-4 numeric mode, 5-3 right Alt key, 5-4 right Ctrl key, 5-4 ScrLock, 5-4 Soft Keys Alt Gr Key Combinations, 5-2 Software, A-5 Sound system, 1-5, A-5 Headphone jack, 2-2 problems, 9-14 volume control, 2-2 Spacer, 1-11, 8-19 Special features, 1-7 Specifications...


