
User Guide
Page 5
... them to make any person to use a computer or other number for which charges exceed local or long-distance transmission charges.) In order to program this information into your fax transmission, refer to maintain uninterrupted service. Telephone Company Procedures The goal of your right to provide you believe it unlawful for any changes necessary to the fax software instructions installed on...
... them to make any person to use a computer or other number for which charges exceed local or long-distance transmission charges.) In order to program this information into your fax transmission, refer to maintain uninterrupted service. Telephone Company Procedures The goal of your right to provide you believe it unlawful for any changes necessary to the fax software instructions installed on...

User Guide
Page 35
... without changing the internal storage drive partitions 71 Creating recovery DVDs/media 74 Restoring from recovery DVDs/media 75 Erasing the Internal Storage Drive 76 Checking the internal storage drive operating status 78 Installing drivers and applications 78 Using the TouchPad 78 Adjusting TouchPad™ settings 81 Disabling or enabling the TouchPad 82 Using external display devices 82 Connecting the display device 83 Directing the display output when you turn on the computer 84 Adjusting the quality of the external display......85 Using an external keyboard 85 Using a mouse...
... without changing the internal storage drive partitions 71 Creating recovery DVDs/media 74 Restoring from recovery DVDs/media 75 Erasing the Internal Storage Drive 76 Checking the internal storage drive operating status 78 Installing drivers and applications 78 Using the TouchPad 78 Adjusting TouchPad™ settings 81 Disabling or enabling the TouchPad 82 Using external display devices 82 Connecting the display device 83 Directing the display output when you turn on the computer 84 Adjusting the quality of the external display......85 Using an external keyboard 85 Using a mouse...

User Guide
Page 57
... replacing it. The computer has two memory slots-Slot A and Slot B. You can be lost. Before you install or remove a memory module while the computer is in the memory module slots on the base of today's popular applications. If you install or remove a memory module, turn off the computer using the Start menu. The surrounding area may damage the computer, the module, or both. See "Setting up your software. NOTE Before adding external devices or memory, Toshiba...
... replacing it. The computer has two memory slots-Slot A and Slot B. You can be lost. Before you install or remove a memory module while the computer is in the memory module slots on the base of today's popular applications. If you install or remove a memory module, turn off the computer using the Start menu. The surrounding area may damage the computer, the module, or both. See "Setting up your software. NOTE Before adding external devices or memory, Toshiba...

User Guide
Page 59
... memory module slot cover. 8 Place the screws and the cover in a safe place so that secure the memory module slot cover. Before you handle the module, touch a grounded metal surface to discharge any static electricity you may cause memory access problems. 9 Carefully remove the new memory module from its antistatic packaging, without touching its connector. 10 Locate an empty memory module slot on page 62. Static electricity can retrieve them later. Getting Started 59 Adding memory (optional) 6 Using...
... memory module slot cover. 8 Place the screws and the cover in a safe place so that secure the memory module slot cover. Before you handle the module, touch a grounded metal surface to discharge any static electricity you may cause memory access problems. 9 Carefully remove the new memory module from its antistatic packaging, without touching its connector. 10 Locate an empty memory module slot on page 62. Static electricity can retrieve them later. Getting Started 59 Adding memory (optional) 6 Using...
User Guide
Page 64
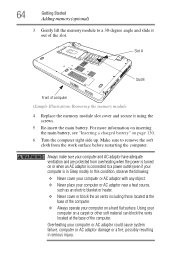
... Sleep mode). Overheating your computer is turned on page 130. 6 Turn the computer right side up. 64 Getting Started Adding memory (optional) 3 Gently lift the memory module to a 30-degree angle and slide it using the screws. 5 Re-insert the main battery. Always make sure your computer or AC adaptor near a heat source, such as an electric blanket or heater. ❖ Never cover...
... Sleep mode). Overheating your computer is turned on page 130. 6 Turn the computer right side up. 64 Getting Started Adding memory (optional) 3 Gently lift the memory module to a 30-degree angle and slide it using the screws. 5 Re-insert the main battery. Always make sure your computer or AC adaptor near a heat source, such as an electric blanket or heater. ❖ Never cover...

User Guide
Page 65
... internal storage drive, returning your permission. If the computer does not recognize the memory configuration, turn off the computer and remove the memory module slot cover (complete steps 1-8 in "Installing a memory module" on page 66. NOTE From time to this : ❖ Click Start, Control Panel, System and Security, and then System. If unsure, cancel and try again. The System window appears. The following program to make changes to time, Windows...
... internal storage drive, returning your permission. If the computer does not recognize the memory configuration, turn off the computer and remove the memory module slot cover (complete steps 1-8 in "Installing a memory module" on page 66. NOTE From time to this : ❖ Click Start, Control Panel, System and Security, and then System. If unsure, cancel and try again. The System window appears. The following program to make changes to time, Windows...
User Guide
Page 83
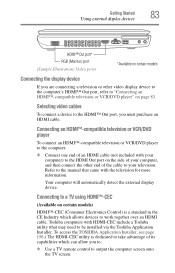
... which allows devices to work together over an HDMI cable. Refer to the manual that may need to be installed via the Toshiba Application Installer. Getting Started 83 Using external display devices HDMI™ Out port* RGB (Monitor) port (Sample Illustration) Video ports *Available on certain models Connecting the display device If you to: ❖ Use a TV remote control to output the computer screen onto the TV screen. Connecting an HDMI™-compatible television or VCR/DVD player To connect an HDMI™...
... which allows devices to work together over an HDMI cable. Refer to the manual that may need to be installed via the Toshiba Application Installer. Getting Started 83 Using external display devices HDMI™ Out port* RGB (Monitor) port (Sample Illustration) Video ports *Available on certain models Connecting the display device If you to: ❖ Use a TV remote control to output the computer screen onto the TV screen. Connecting an HDMI™-compatible television or VCR/DVD player To connect an HDMI™...
User Guide
Page 84
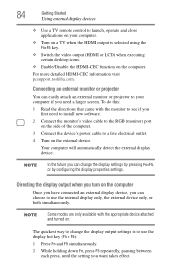
... the appropriate device attached and turned on. The quickest way to change the display settings by pressing Fn+F5, or by configuring the display properties settings. 84 Getting Started Using external display devices ❖ Use a TV remote control to launch, operate and close applications on your computer if you need to install new software. 2 Connect the monitor's video cable to the RGB (monitor) port on the side of the computer. 3 Connect the device's power cable to use the internal display only, the external device only...
... the appropriate device attached and turned on. The quickest way to change the display settings by pressing Fn+F5, or by configuring the display properties settings. 84 Getting Started Using external display devices ❖ Use a TV remote control to launch, operate and close applications on your computer if you need to install new software. 2 Connect the monitor's video cable to the RGB (monitor) port on the side of the computer. 3 Connect the device's power cable to use the internal display only, the external device only...
User Guide
Page 160
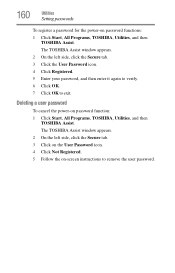
... side, click the Secure tab. 3 Click the User Password icon. 4 Click Registered. 5 Enter your password, and then enter it again to verify. 6 Click OK. 7 Click OK to remove the user password. 160 Utilities Setting passwords To register a password for the power-on -screen instructions to exit. Deleting a user password To cancel the power-on password function: 1 Click Start, All Programs, TOSHIBA, Utilities, and then TOSHIBA Assist. The TOSHIBA Assist window appears. 2 On the left side, click...
... side, click the Secure tab. 3 Click the User Password icon. 4 Click Registered. 5 Enter your password, and then enter it again to verify. 6 Click OK. 7 Click OK to remove the user password. 160 Utilities Setting passwords To register a password for the power-on -screen instructions to exit. Deleting a user password To cancel the power-on password function: 1 Click Start, All Programs, TOSHIBA, Utilities, and then TOSHIBA Assist. The TOSHIBA Assist window appears. 2 On the left side, click...
User Guide
Page 178
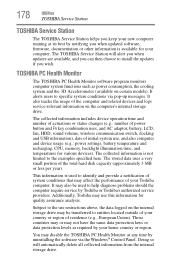
... Toshiba or Toshiba's authorized service providers. Subject to the use , and also computer and device usage (e.g.: power settings, battery temperature and recharging, CPU, memory, backlight illumination time, and temperatures for quality assurance analysis. It alerts users to the examples specified here. The collected information includes device operation time and number of actuations or status changes (e.g.: number of power button and Fn key combination uses, and AC adaptor, battery, LCD, fan, HDD, sound volume, wireless communication switch, docking and USB...
... Toshiba or Toshiba's authorized service providers. Subject to the use , and also computer and device usage (e.g.: power settings, battery temperature and recharging, CPU, memory, backlight illumination time, and temperatures for quality assurance analysis. It alerts users to the examples specified here. The collected information includes device operation time and number of actuations or status changes (e.g.: number of power button and Fn key combination uses, and AC adaptor, battery, LCD, fan, HDD, sound volume, wireless communication switch, docking and USB...
User Guide
Page 187
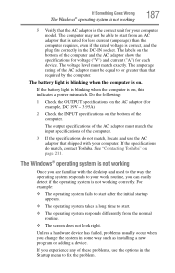
If the battery light is blinking when the computer is not working correctly. Do the following: 1 Check the OUTPUT specifications on the AC adaptor (for each device. The Windows® operating system is not working Once you are familiar with your computer model. Unless a hardware device has failed, problems usually occur when you experience any of the computer. 3 If the specifications do match, contact Toshiba. The...
If the battery light is blinking when the computer is not working correctly. Do the following: 1 Check the OUTPUT specifications on the AC adaptor (for each device. The Windows® operating system is not working Once you are familiar with your computer model. Unless a hardware device has failed, problems usually occur when you experience any of the computer. 3 If the specifications do match, contact Toshiba. The...
User Guide
Page 193
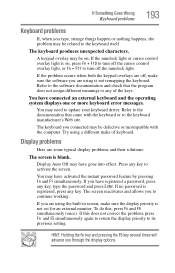
... operating system displays one or more keyboard error messages. You have registered a password, press any of keyboard. Press any key. If the problem occurs when both the keypad overlays are using a different make sure the software you are some typical display problems and their solutions: The screen is not set for an external monitor. If this , press Fn and F5 simultaneously (once). If the numlock light or cursor control...
... operating system displays one or more keyboard error messages. You have registered a password, press any of keyboard. Press any key. If the problem occurs when both the keypad overlays are using a different make sure the software you are some typical display problems and their solutions: The screen is not set for an external monitor. If this , press Fn and F5 simultaneously (once). If the numlock light or cursor control...
User Guide
Page 209
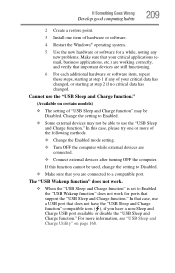
... certain models) ❖ The setting of "USB Sleep and Charge function" may not be used, change the setting to Disabled. ❖ Make sure that important devices are still functioning. 6 For each additional hardware or software item, repeat these steps, starting at step 2 if no critical data has changed , or starting at step 1 if any of the following methods. ❖ Change the Enabled mode setting. ❖ Turn OFF the computer while external devices are connected to a compatible port...
... certain models) ❖ The setting of "USB Sleep and Charge function" may not be used, change the setting to Disabled. ❖ Make sure that important devices are still functioning. 6 For each additional hardware or software item, repeat these steps, starting at step 2 if no critical data has changed , or starting at step 1 if any of the following methods. ❖ Change the Enabled mode setting. ❖ Turn OFF the computer while external devices are connected to a compatible port...

User Guide
Page 239
... image displayed on the screen that you turn on the network. Compare non-interlaced. See device. Internet - See also Sleep, Suspend. See also diskette. K keyboard shortcut - L L1 (level one) cache - hot key - (1) A feature in combination with any device to the internal storage drive the current state of data. Memory cache installed on the motherboard to perform a task instead of using a pointing device such as the battery save mode. (2) A key or combination...
... image displayed on the screen that you turn on the network. Compare non-interlaced. See device. Internet - See also Sleep, Suspend. See also diskette. K keyboard shortcut - L L1 (level one) cache - hot key - (1) A feature in combination with any device to the internal storage drive the current state of data. Memory cache installed on the motherboard to perform a task instead of using a pointing device such as the battery save mode. (2) A key or combination...
User Guide
Page 245
... keyboard 103 battery Call2Recycle™ 133 changing 128 charge indicator light 53, 121 charge not lasting 192 charging 53, 120 conserving power 124 disposal 133 installing 128, 130 low charge 123 maintaining 132 monitoring power 53, 121 not charging 192 notifications 123 power plan 221 power plan hot key 126 real-time clock (RTC) 118, 120 remaining power 122 removing 128 safety precautions 131 BIOS Setup see TOSHIBA Hardware Setup button power 55 start 137 buttons eject, optical drive 110 Media control buttons...
... keyboard 103 battery Call2Recycle™ 133 changing 128 charge indicator light 53, 121 charge not lasting 192 charging 53, 120 conserving power 124 disposal 133 installing 128, 130 low charge 123 maintaining 132 monitoring power 53, 121 not charging 192 notifications 123 power plan 221 power plan hot key 126 real-time clock (RTC) 118, 120 remaining power 122 removing 128 safety precautions 131 BIOS Setup see TOSHIBA Hardware Setup button power 55 start 137 buttons eject, optical drive 110 Media control buttons...
User Guide
Page 246
.../trouble accessing a drive 195 running slow 196 diskette drive cannot insert a diskette 196 cannot read a diskette 196 display does not look normal/flickers 194 external monitor not working 194 display device connecting 83 external 82 display output settings 84 display panel opening 54 display problems screen is blank 193 display, external adjusting 85 disposal information 33 disposing of used batteries 133 DVD using 109 DVD player general problems 203 DVD-ROM or multi-function drive inserting discs 112 removing 112 E eject button optical drive 110 eject, optical drive...
.../trouble accessing a drive 195 running slow 196 diskette drive cannot insert a diskette 196 cannot read a diskette 196 display does not look normal/flickers 194 external monitor not working 194 display device connecting 83 external 82 display output settings 84 display panel opening 54 display problems screen is blank 193 display, external adjusting 85 disposal information 33 disposing of used batteries 133 DVD using 109 DVD player general problems 203 DVD-ROM or multi-function drive inserting discs 112 removing 112 E eject button optical drive 110 eject, optical drive...
User Guide
Page 247
... keys 101 function keys 101 H HDMI™ Out Port 82 headphones using 144 Help and Support Windows® operating system 189 Hibernation mode 88 configuring 92 hot key 223 starting again from 94 hot key disabling or enabling TouchPad™ 227 disabling or enabling wireless devices 226 display brightness 225 Hibernation mode 223 keyboard overlays 229 Lock (Instant security) 220 Output (Display switch) 224 power plan 221 Sleep mode 222 volume mute 219 Zoom (Display resolution) 228 zooming in 229 zooming out 229 Hot Key Cards 214 Hot key functions 218 hot key power...
... keys 101 function keys 101 H HDMI™ Out Port 82 headphones using 144 Help and Support Windows® operating system 189 Hibernation mode 88 configuring 92 hot key 223 starting again from 94 hot key disabling or enabling TouchPad™ 227 disabling or enabling wireless devices 226 display brightness 225 Hibernation mode 223 keyboard overlays 229 Lock (Instant security) 220 Output (Display switch) 224 power plan 221 Sleep mode 222 volume mute 219 Zoom (Display resolution) 228 zooming in 229 zooming out 229 Hot Key Cards 214 Hot key functions 218 hot key power...
User Guide
Page 248
... Internet Service Providers ISPs 141 J jack RJ-11 140 K keyboard character keys 101 function keys 101 hot keys 229 not working 185 overlay keys 102 special Windows® keys 102 troubleshooting 193 unexpected characters 193 using 100 keyboard, external 85 keyboard, full-size 101 L light AC power 51 drive in-use indicator 110 lock computer, using 98 M main battery changing 128 installing 128, 130 removing 128 safety precautions 131 manual eject hole optical drive 111 memory adding 57 problem solving 191 removing memory module slot cover 59 Memory card reader inserting memory media...
... Internet Service Providers ISPs 141 J jack RJ-11 140 K keyboard character keys 101 function keys 101 hot keys 229 not working 185 overlay keys 102 special Windows® keys 102 troubleshooting 193 unexpected characters 193 using 100 keyboard, external 85 keyboard, full-size 101 L light AC power 51 drive in-use indicator 110 lock computer, using 98 M main battery changing 128 installing 128, 130 removing 128 safety precautions 131 manual eject hole optical drive 111 memory adding 57 problem solving 191 removing memory module slot cover 59 Memory card reader inserting memory media...
User Guide
Page 250
.../trouble accessing a drive 195 modem not receiving or transmitting 201 no sound 198 non-system disk or disk error 186 power and batteries 191 printer 200, 201 program not responding 183 program not working properly 196 screen does not look correct/ flickers 194 Startup options 188 URL address not found 189 USB Sleep and Charge cannot use 209 USB Wakeup function does not work 209 warning resume failure 185 Windows® operating...
.../trouble accessing a drive 195 modem not receiving or transmitting 201 no sound 198 non-system disk or disk error 186 power and batteries 191 printer 200, 201 program not responding 183 program not working properly 196 screen does not look correct/ flickers 194 Startup options 188 URL address not found 189 USB Sleep and Charge cannot use 209 USB Wakeup function does not work 209 warning resume failure 185 Windows® operating...

User Guide
Page 251
...Zooming Utility 171 TouchPad™ adjusting settings 81 disabling 82 enabling 82 traveling tips 134 troubleshooting DVD player general problems 203 external keyboard 193 keyboard 193 optical drive 197 turning on the computer 55 turning on the power 55 U USB Sleep and Charge cannot use 209 USB Sleep and Charge Utility 168 USB Wakeup function does not work 209 USB-compatible printer 86 user password, disabling 160 user password, setting 159 using TouchPad™ 78 using a file extension 107 Utilities 150 V video cables 83 video display device connecting 83 video projector adjusting display 85...
...Zooming Utility 171 TouchPad™ adjusting settings 81 disabling 82 enabling 82 traveling tips 134 troubleshooting DVD player general problems 203 external keyboard 193 keyboard 193 optical drive 197 turning on the computer 55 turning on the power 55 U USB Sleep and Charge cannot use 209 USB Sleep and Charge Utility 168 USB Wakeup function does not work 209 USB-compatible printer 86 user password, disabling 160 user password, setting 159 using TouchPad™ 78 using a file extension 107 Utilities 150 V video cables 83 video display device connecting 83 video projector adjusting display 85...


