
User Manual
Page 5
... the fax software instructions installed on the first page of your modem from its present line, please call the telephone company and let them to make any message unless such message clearly contains in advance that you in a margin at (949) 859-4273. Contact the state public utility commission, public service commission or corporation commission for repair or...
... the fax software instructions installed on the first page of your modem from its present line, please call the telephone company and let them to make any message unless such message clearly contains in advance that you in a margin at (949) 859-4273. Contact the state public utility commission, public service commission or corporation commission for repair or...

User Manual
Page 31
... without changing the internal storage drive partitions 68 Creating recovery DVDs/media 70 Restoring from recovery DVDs/media 71 Erasing the Internal Storage Drive 73 Checking the internal storage drive operating status 74 Installing drivers and applications 75 Using the TouchPad 75 Adjusting TouchPad™ settings 77 Disabling or enabling the TouchPad 78 Using external display devices 78 Connecting the display device 79 Directing the display output when you turn on the computer 80 Adjusting the quality of the external display......81 Using an external keyboard 81 Using a mouse...
... without changing the internal storage drive partitions 68 Creating recovery DVDs/media 70 Restoring from recovery DVDs/media 71 Erasing the Internal Storage Drive 73 Checking the internal storage drive operating status 74 Installing drivers and applications 75 Using the TouchPad 75 Adjusting TouchPad™ settings 77 Disabling or enabling the TouchPad 78 Using external display devices 78 Connecting the display device 79 Directing the display output when you turn on the computer 80 Adjusting the quality of the external display......81 Using an external keyboard 81 Using a mouse...
User Manual
Page 34
...Web Camera 139 Using the Memory card reader 140 Inserting memory media 141 Removing memory media 141 Using the eSATA/USB combo port 142 Chapter 5: Utilities 143 TOSHIBA Assist 144 Connect 145 Secure 146 Protect & Fix 147 Optimize 148 TOSHIBA Application Installer 149 Setting passwords 150 Using an instant password 150 Using a supervisor password 151 Using a user password 153 Deleting a user password 153 TOSHIBA Face Recognition Utility 154 TOSHIBA PC Diagnostic Tool Utility 155 Mouse Utility 156 TOSHIBA Hardware Setup 157 TOSHIBA Zooming Utility 159 TOSHIBA Button Support...
...Web Camera 139 Using the Memory card reader 140 Inserting memory media 141 Removing memory media 141 Using the eSATA/USB combo port 142 Chapter 5: Utilities 143 TOSHIBA Assist 144 Connect 145 Secure 146 Protect & Fix 147 Optimize 148 TOSHIBA Application Installer 149 Setting passwords 150 Using an instant password 150 Using a supervisor password 151 Using a user password 153 Deleting a user password 153 TOSHIBA Face Recognition Utility 154 TOSHIBA PC Diagnostic Tool Utility 155 Mouse Utility 156 TOSHIBA Hardware Setup 157 TOSHIBA Zooming Utility 159 TOSHIBA Button Support...
User Manual
Page 53
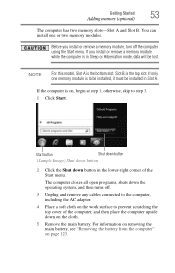
... down button in the lower-right corner of the Start menu. The computer closes all open programs, shuts down the operating system, and then turns off the computer using the Start menu. Getting Started Adding memory (optional) 53 The computer has two memory slots-Slot A and Slot B. If the computer is on the cloth. 5 Remove the main battery. otherwise, skip to be installed, it must be installed in Sleep or Hibernation mode...
... down button in the lower-right corner of the Start menu. The computer closes all open programs, shuts down the operating system, and then turns off the computer using the Start menu. Getting Started Adding memory (optional) 53 The computer has two memory slots-Slot A and Slot B. If the computer is on the cloth. 5 Remove the main battery. otherwise, skip to be installed, it must be installed in Sleep or Hibernation mode...

User Manual
Page 54
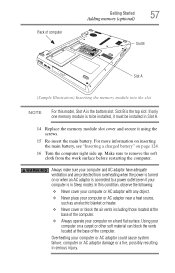
... metal surface to discharge any static electricity you can damage the memory module. 54 Getting Started Adding memory (optional) Memory module slot cover Front of computer (Sample Illustration) Removing the memory module slot cover 7 Remove the memory module slot cover. 8 Place the screws and the cover in a safe place so that secure the memory module slot cover. Front of computer (Sample Illustration) Locating the memory module slot cover 6 Using a small Phillips screwdriver, loosen the captive screws that you may have built...
... metal surface to discharge any static electricity you can damage the memory module. 54 Getting Started Adding memory (optional) Memory module slot cover Front of computer (Sample Illustration) Removing the memory module slot cover 7 Remove the memory module slot cover. 8 Place the screws and the cover in a safe place so that secure the memory module slot cover. Front of computer (Sample Illustration) Locating the memory module slot cover 6 Using a small Phillips screwdriver, loosen the captive screws that you may have built...
User Manual
Page 57
... cover or block the air vents including those located at the base of the computer. ❖ Always operate your computer on a hard flat surface. In this model, Slot A is in Sleep mode). Make sure to remove the soft cloth from overheating when the power is turned on or when an AC adaptor is connected to be installed in serious injury. If only one memory module is...
... cover or block the air vents including those located at the base of the computer. ❖ Always operate your computer on a hard flat surface. In this model, Slot A is in Sleep mode). Make sure to remove the soft cloth from overheating when the power is turned on or when an AC adaptor is connected to be installed in serious injury. If only one memory module is...
User Manual
Page 60
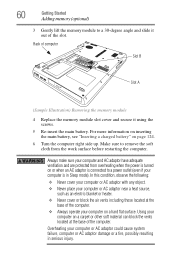
... inserting the main battery, see "Inserting a charged battery" on a hard flat surface. Always make sure your computer on page 124. 6 Turn the computer right side up. Back of computer Slot B Slot A (Sample Illustration) Removing the memory module 4 Replace the memory module slot cover and secure it out of the computer. 60 Getting Started Adding memory (optional) 3 Gently lift the memory module to a 30-degree angle and slide it using the screws. 5 Re...
... inserting the main battery, see "Inserting a charged battery" on a hard flat surface. Always make sure your computer on page 124. 6 Turn the computer right side up. Back of computer Slot B Slot A (Sample Illustration) Removing the memory module 4 Replace the memory module slot cover and secure it out of the computer. 60 Getting Started Adding memory (optional) 3 Gently lift the memory module to a 30-degree angle and slide it using the screws. 5 Re...

User Manual
Page 79
... easily attach an external monitor or projector to "Connecting an HDMI™-compatible television or VCR/DVD player" on page 79. Getting Started Using external display devices 79 Connecting the display device If you are connecting a television or other video display device to the computer's HDMI™ Out port, refer to your computer if you need to install new software. 2 Connect the monitor's video cable to the RGB (monitor) port on the side of the computer. 3 Connect the device's power cable to a live...
... easily attach an external monitor or projector to "Connecting an HDMI™-compatible television or VCR/DVD player" on page 79. Getting Started Using external display devices 79 Connecting the display device If you are connecting a television or other video display device to the computer's HDMI™ Out port, refer to your computer if you need to install new software. 2 Connect the monitor's video cable to the RGB (monitor) port on the side of the computer. 3 Connect the device's power cable to a live...
User Manual
Page 153
... on password function: 1 Click Start, All Programs, TOSHIBA, Utilities, and then TOSHIBA Assist. Utilities Setting passwords 153 Using a user password A user password provides power-on password functions: 1 Click Start, All Programs, TOSHIBA, Utilities, and then TOSHIBA Assist. The TOSHIBA Assist window appears. 2 On the left side, click the Secure tab. 3 Click the User Password icon. 4 Click Registered. 5 Enter your password, and then enter it should you , your organization or others as a result of the inability to access your password in a location...
... on password function: 1 Click Start, All Programs, TOSHIBA, Utilities, and then TOSHIBA Assist. Utilities Setting passwords 153 Using a user password A user password provides power-on password functions: 1 Click Start, All Programs, TOSHIBA, Utilities, and then TOSHIBA Assist. The TOSHIBA Assist window appears. 2 On the left side, click the Secure tab. 3 Click the User Password icon. 4 Click Registered. 5 Enter your password, and then enter it should you , your organization or others as a result of the inability to access your password in a location...
User Manual
Page 163
... above, the data logged on certain models). TOSHIBA PC Health Monitor The TOSHIBA PC Health Monitor software program monitors computer system functions such as required by uninstalling the software via pop-up messages. The collected information includes device operation time and number of actuations or status changes (e.g.: number of power button and Fn key combination uses, and AC adaptor, battery, LCD, fan, HDD, sound volume, wireless communication switch, docking and USB information), date of residence (e.g., European Union...
... above, the data logged on certain models). TOSHIBA PC Health Monitor The TOSHIBA PC Health Monitor software program monitors computer system functions such as required by uninstalling the software via pop-up messages. The collected information includes device operation time and number of actuations or status changes (e.g.: number of power button and Fn key combination uses, and AC adaptor, battery, LCD, fan, HDD, sound volume, wireless communication switch, docking and USB information), date of residence (e.g., European Union...
User Manual
Page 172
... , this indicates a power mismatch. The amperage rating of these problems, use the AC adapter that required by the computer. Do the following: 1 Check the OUTPUT specifications on the AC adapter (for each device. If the specifications do not match, locate and use the options in the Startup menu to start after the initial startup appears. ❖ The operating system takes a long time to fix the problem. The Windows® operating system...
... , this indicates a power mismatch. The amperage rating of these problems, use the AC adapter that required by the computer. Do the following: 1 Check the OUTPUT specifications on the AC adapter (for each device. If the specifications do not match, locate and use the options in the Startup menu to start after the initial startup appears. ❖ The operating system takes a long time to fix the problem. The Windows® operating system...
User Manual
Page 178
... the most recent software and hardware options for an external monitor. A keypad overlay may have connected an external keyboard and the operating system displays one or more information on maintaining battery power, see "Charging batteries" on , press Fn + F10 to turn off the cursor control overlay light, or Fn + F11 to activate the screen. If you are using is registered, press any key to turn off , make of the keys. The keyboard produces unexpected characters...
... the most recent software and hardware options for an external monitor. A keypad overlay may have connected an external keyboard and the operating system displays one or more information on maintaining battery power, see "Charging batteries" on , press Fn + F10 to turn off the cursor control overlay light, or Fn + F11 to activate the screen. If you are using is registered, press any key to turn off , make of the keys. The keyboard produces unexpected characters...
User Manual
Page 184
... Modem problems You may have connected the printer while the computer is firmly connected to the computer's modem port and the telephone line jack. Contact the software manufacturer for more information regarding your program has a print preview mode. The other system may be set up to print a short test file using Notepad. For more information. Turn the printer back on, make...
... Modem problems You may have connected the printer while the computer is firmly connected to the computer's modem port and the telephone line jack. Contact the software manufacturer for more information regarding your program has a print preview mode. The other system may be set up to print a short test file using Notepad. For more information. Turn the printer back on, make...
User Manual
Page 220
... the operating system automatically recognize the change. high-density diskette - A small image displayed on the network. internal device - See device. See also World Wide Web. I icon - K keyboard shortcut - See also cache, CPU cache, L2 cache. It is refreshed. A 3.5-inch diskette that saves to the internal storage drive the current state of keys that represents a function, file, or program. The ability to create a complete screen image. Internet...
... the operating system automatically recognize the change. high-density diskette - A small image displayed on the network. internal device - See device. See also World Wide Web. I icon - K keyboard shortcut - See also cache, CPU cache, L2 cache. It is refreshed. A 3.5-inch diskette that saves to the internal storage drive the current state of keys that represents a function, file, or program. The ability to create a complete screen image. Internet...

User Manual
Page 226
... changing 122 charge indicator light 48, 116 charge not lasting 177 charging 48, 115 conserving power 119 disposal 127 installing 122, 124 low charge 118 maintaining 126 monitoring power 48, 116 226 not charging 177 notifications 119 power plan 202 power plan hot key 121 real-time clock (RTC) 113, 115 remaining power 118 removing 123 safety precautions 125 BIOS Setup see TOSHIBA Hardware Setup Bridge Media Adapter inserting memory media 141 removing memory media 141 button power 50 start 131 buttons eject, optical drive...
... changing 122 charge indicator light 48, 116 charge not lasting 177 charging 48, 115 conserving power 119 disposal 127 installing 122, 124 low charge 118 maintaining 126 monitoring power 48, 116 226 not charging 177 notifications 119 power plan 202 power plan hot key 121 real-time clock (RTC) 113, 115 remaining power 118 removing 123 safety precautions 125 BIOS Setup see TOSHIBA Hardware Setup Bridge Media Adapter inserting memory media 141 removing memory media 141 button power 50 start 131 buttons eject, optical drive...
User Manual
Page 227
.../trouble accessing a drive 180 running slow 181 diskette drive cannot insert a diskette 181 cannot read a diskette 182 display does not look normal/flickers 179 external monitor not working 180 display device connecting 79 external 78 display output settings 80 display panel opening 49 display problems screen is blank 178 display, external adjusting 81 disposal information 29 disposing of used batteries 127 DVD using 105 DVD player general problems 186 E eject button optical drive 106 eject, optical drive 106 ENERGY STAR® 37 error...
.../trouble accessing a drive 180 running slow 181 diskette drive cannot insert a diskette 181 cannot read a diskette 182 display does not look normal/flickers 179 external monitor not working 180 display device connecting 79 external 78 display output settings 80 display panel opening 49 display problems screen is blank 178 display, external adjusting 81 disposal information 29 disposing of used batteries 127 DVD using 105 DVD player general problems 186 E eject button optical drive 106 eject, optical drive 106 ENERGY STAR® 37 error...
User Manual
Page 228
... keys 97 function keys 97 H HDMI™ Out Port 78 headphones using 139 Help and Support Windows® operating system 174 Hibernation mode 84 configuring 87 hot key 204 starting again from 89 hot key disabling or enabling TouchPad™ 208 disabling or enabling wireless devices 207 display brightness 206 Hibernation mode 204 keyboard overlays 210 Lock (Instant security) 201 Output (Display switch) 205 power plan 202 Sleep mode 203 volume mute 200 Zoom (Display resolution) 209 zooming in 210 zooming out 210 Hot Key Cards 196 Hot key functions 200 hot key power...
... keys 97 function keys 97 H HDMI™ Out Port 78 headphones using 139 Help and Support Windows® operating system 174 Hibernation mode 84 configuring 87 hot key 204 starting again from 89 hot key disabling or enabling TouchPad™ 208 disabling or enabling wireless devices 207 display brightness 206 Hibernation mode 204 keyboard overlays 210 Lock (Instant security) 201 Output (Display switch) 205 power plan 202 Sleep mode 203 volume mute 200 Zoom (Display resolution) 209 zooming in 210 zooming out 210 Hot Key Cards 196 Hot key functions 200 hot key power...

User Manual
Page 229
... problem solving 184 monitor 78 connecting 79 monitor problems monitor not working 179 mouse installing 81 mouse utility 156 N network accessing 133 Connect to the Internet 133 networking wireless 132 notification area 131 O optical disc handling 108 inserting 107 positioning 108 optical drive drive in-use indicator light 106 eject button 106 manual eject hole 106 problems 182 removing disc 110, 111 troubleshooting 182 using 105 optical media recording 110 other documentation 41 overlay keys 98 P password deleting a supervisor 152 disabling a user 153 setting a user 153 supervisor set...
... problem solving 184 monitor 78 connecting 79 monitor problems monitor not working 179 mouse installing 81 mouse utility 156 N network accessing 133 Connect to the Internet 133 networking wireless 132 notification area 131 O optical disc handling 108 inserting 107 positioning 108 optical drive drive in-use indicator light 106 eject button 106 manual eject hole 106 problems 182 removing disc 110, 111 troubleshooting 182 using 105 optical media recording 110 other documentation 41 overlay keys 98 P password deleting a supervisor 152 disabling a user 153 setting a user 153 supervisor set...
User Manual
Page 230
... Index passwords instant, using 150 setting 150 port RGB 78 power computer will not start 169 connecting cable to AC adaptor 47 cord/cable 47 cord/cable connectors 211 energy-saving features 112 problem solving 176 turning on 50 power button 50 power plan hot key 121 power plans 120 power source connecting 47 powering down using Hibernate 87 using Sleep 90 precautions 43 printer connecting 81 problem solving 183, 184 printing a file 103 problem solving accessing disk drives 170 battery charge...
... Index passwords instant, using 150 setting 150 port RGB 78 power computer will not start 169 connecting cable to AC adaptor 47 cord/cable 47 cord/cable connectors 211 energy-saving features 112 problem solving 176 turning on 50 power button 50 power plan hot key 121 power plans 120 power source connecting 47 powering down using Hibernate 87 using Sleep 90 precautions 43 printer connecting 81 problem solving 183, 184 printing a file 103 problem solving accessing disk drives 170 battery charge...
User Manual
Page 231
...; Start menu 100 starting up the computer from Shut down 87 from Sleep 93 Startup menu problem solving 173 supervisor password, deleting 152 supervisor password, set up 151 T taskbar 131 telephone line connecting to modem 133 television adjusting display 81 connecting 79 Toshiba registering computer 51 worldwide offices 194 TOSHIBA Accessibility 161 Toshiba accessories memory 52 TOSHIBA Application Installer 149 TOSHIBA Assist 144 TOSHIBA Button Support 160 TOSHIBA eco power plan Using 122 TOSHIBA eco Utility 162 TOSHIBA Face Recognition Utility 154 TOSHIBA Hardware Setup...
...; Start menu 100 starting up the computer from Shut down 87 from Sleep 93 Startup menu problem solving 173 supervisor password, deleting 152 supervisor password, set up 151 T taskbar 131 telephone line connecting to modem 133 television adjusting display 81 connecting 79 Toshiba registering computer 51 worldwide offices 194 TOSHIBA Accessibility 161 Toshiba accessories memory 52 TOSHIBA Application Installer 149 TOSHIBA Assist 144 TOSHIBA Button Support 160 TOSHIBA eco power plan Using 122 TOSHIBA eco Utility 162 TOSHIBA Face Recognition Utility 154 TOSHIBA Hardware Setup...


