User Guide
Page 29
Contents Introduction 36 This guide 38 Safety icons 39 Other icons used 39 Other documentation 40 Service options 40 Chapter 1: Getting Started 41 Selecting a place to work 41 Setting up a work environment 41 Keeping yourself comfortable 42 Precautions 42 Important information on your computer's cooling fan 44 Setting up your computer 44 Setting up your software 45 Registering your computer with Toshiba 46 Adding optional external devices 46 Connecting to a power source 47 Charging the main battery 49 29
Contents Introduction 36 This guide 38 Safety icons 39 Other icons used 39 Other documentation 40 Service options 40 Chapter 1: Getting Started 41 Selecting a place to work 41 Setting up a work environment 41 Keeping yourself comfortable 42 Precautions 42 Important information on your computer's cooling fan 44 Setting up your computer 44 Setting up your software 45 Registering your computer with Toshiba 46 Adding optional external devices 46 Connecting to a power source 47 Charging the main battery 49 29
User Guide
Page 31
... 90 Special Windows® keys 90 Overlay keys 91 Using the overlay to type numeric data 91 Starting a program 92 Starting a program from the Start menu...........92 Starting a program from Windows® Explorer ...93 Starting a program using the Start Search field 94 Saving your work 94 Printing your work 96 Backing up your work 97 Restoring... media 101 Recording optical media 101 Removing a disc with the computer on...........102 Removing a disc with the computer off ..........102 Caring for optical discs 103 Toshiba's online resources 103
... 90 Special Windows® keys 90 Overlay keys 91 Using the overlay to type numeric data 91 Starting a program 92 Starting a program from the Start menu...........92 Starting a program from Windows® Explorer ...93 Starting a program using the Start Search field 94 Saving your work 94 Printing your work 96 Backing up your work 97 Restoring... media 101 Recording optical media 101 Removing a disc with the computer on...........102 Removing a disc with the computer off ..........102 Caring for optical discs 103 Toshiba's online resources 103
User Guide
Page 34
34 Contents TOSHIBA Accessibility 158 Fingerprint Authentication Utility 159 Fingerprint utility limitations 159 Using the Fingerprint Authentication Utility.....159 Fingerprint Logon 160 Care and maintenance of your fingerprint reader 160 Fingerprint reader limitations 161 ConfigFree 162 Getting Started 162 ConfigFree® Utilities 163 Chapter 6: If Something Goes Wrong 166 Problems that are easy...
34 Contents TOSHIBA Accessibility 158 Fingerprint Authentication Utility 159 Fingerprint utility limitations 159 Using the Fingerprint Authentication Utility.....159 Fingerprint Logon 160 Care and maintenance of your fingerprint reader 160 Fingerprint reader limitations 161 ConfigFree 162 Getting Started 162 ConfigFree® Utilities 163 Chapter 6: If Something Goes Wrong 166 Problems that are easy...

User Guide
Page 41
... using your computer effectively, summarizes how to connect components, and explains what to do the first time you attempt to use your computer. Chapter 1 Getting Started This chapter provides tips for Safety and Comfort," that is shipped with your computer, contains important safety information. The "Instruction Manual for using , such as...
... using your computer effectively, summarizes how to connect components, and explains what to do the first time you attempt to use your computer. Chapter 1 Getting Started This chapter provides tips for Safety and Comfort," that is shipped with your computer, contains important safety information. The "Instruction Manual for using , such as...

User Guide
Page 42
... any part of your work environment and tips for setting up your work area from the power plug socket and computer. 3. 42 Getting Started Selecting a place to work To keep your computer in prime operating condition, protect your computer, and never expose the computer to rain,... water, seawater or moisture. Keeping yourself comfortable The Toshiba Instruction Manual for Safety and Comfort, included with the underside or surface of personal injury or damage to the computer. ❖ Avoid ...
... any part of your work environment and tips for setting up your work area from the power plug socket and computer. 3. 42 Getting Started Selecting a place to work To keep your computer in prime operating condition, protect your computer, and never expose the computer to rain,... water, seawater or moisture. Keeping yourself comfortable The Toshiba Instruction Manual for Safety and Comfort, included with the underside or surface of personal injury or damage to the computer. ❖ Avoid ...
User Guide
Page 43
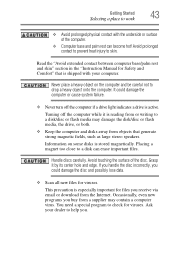
... disc and possibly lose data. ❖ Scan all new files for viruses. Grasp it is shipped with the underside or surface of the disc. Getting Started 43 Selecting a place to work ❖ Avoid prolonged physical contact with your dealer to help you. You need a special program to skin. Ask your computer...
... disc and possibly lose data. ❖ Scan all new files for viruses. Grasp it is shipped with the underside or surface of the disc. Getting Started 43 Selecting a place to work ❖ Avoid prolonged physical contact with your dealer to help you. You need a special program to skin. Ask your computer...

User Guide
Page 44
... battery that is in serious injury. In this condition, observe the following: ❖ Never cover your computer or AC adaptor with your computer. 44 Getting Started Setting up your computer Important information on the computer. Using your computer on a carpet or other soft material can use external power or to charge...
... battery that is in serious injury. In this condition, observe the following: ❖ Never cover your computer or AC adaptor with your computer. 44 Getting Started Setting up your computer Important information on the computer. Using your computer on a carpet or other soft material can use external power or to charge...

User Guide
Page 45
The Windows® operating system checks the system's performance, and then may vary according to your software setup choices. Getting Started 45 Setting up your computer NOTE Please handle your background and then click Next. 5 Click the appropriate option from the Help Protect... Windows Automatically screen. 6 Follow the remaining screen prompts to complete the setup process. 7 Click Start when the Thank You message appears. The first time you through steps to set up your computer. NOTE The names of windows displayed, and ...
The Windows® operating system checks the system's performance, and then may vary according to your software setup choices. Getting Started 45 Setting up your computer NOTE Please handle your background and then click Next. 5 Click the appropriate option from the Help Protect... Windows Automatically screen. 6 Follow the remaining screen prompts to complete the setup process. 7 Click Start when the Thank You message appears. The first time you through steps to set up your computer. NOTE The names of windows displayed, and ...
User Guide
Page 46
...time you must be completed during the initial start up your software" on page 45. Product registration can either double-click the Toshiba Registration icon on your desktop or go to the Toshiba Web site at www.register.toshiba.com at a later time. See ".... Failure to complete Product Registration will not diminish Customer rights under the Toshiba standard limited Warranty. 46 Getting Started Registering your computer with Toshiba Registering your computer with Toshiba Product registration is strongly recommended, and allows Toshiba to send you can be connected to the Internet.
...time you must be completed during the initial start up your software" on page 45. Product registration can either double-click the Toshiba Registration icon on your desktop or go to the Toshiba Web site at www.register.toshiba.com at a later time. See ".... Failure to complete Product Registration will not diminish Customer rights under the Toshiba standard limited Warranty. 46 Getting Started Registering your computer with Toshiba Registering your computer with Toshiba Product registration is strongly recommended, and allows Toshiba to send you can be connected to the Internet.
User Guide
Page 47
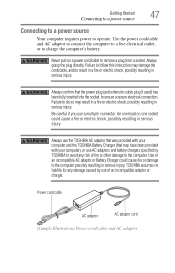
... damage to ensure a secure electrical connection. An overload on a power cord/cable to charge the computer's battery. TOSHIBA assumes no liability for any damage caused by TOSHIBA to avoid any risk of fire or other damage to follow this instruction may damage the cord/cable, and/or... adaptor that was provided with your computer and the TOSHIBA Battery Charger (that the power plug (and extension cable plug if used) has been fully inserted into the socket, to the computer possibly resulting in serious injury. Getting Started 47 Connecting to a power source Connecting to a power...
... damage to ensure a secure electrical connection. An overload on a power cord/cable to charge the computer's battery. TOSHIBA assumes no liability for any damage caused by TOSHIBA to avoid any risk of fire or other damage to follow this instruction may damage the cord/cable, and/or... adaptor that was provided with your computer and the TOSHIBA Battery Charger (that the power plug (and extension cable plug if used) has been fully inserted into the socket, to the computer possibly resulting in serious injury. Getting Started 47 Connecting to a power source Connecting to a power...
User Guide
Page 48
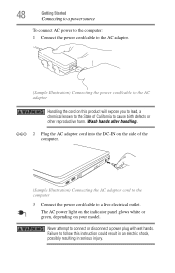
48 Getting Started Connecting to a power source To connect AC power to the computer: 1 Connect the power cord/cable to the AC adaptor. (Sample Illustration) Connecting the power ...
48 Getting Started Connecting to a power source To connect AC power to the computer: 1 Connect the power cord/cable to the AC adaptor. (Sample Illustration) Connecting the power ...
User Guide
Page 49
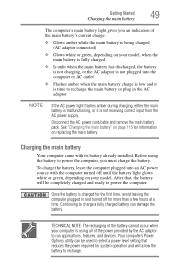
... remove the main battery pack. See "Changing the main battery" on replacing the main battery. Your computer's Power Options utility can damage the battery. Getting Started 49 Charging the main battery The computer's main battery light gives you must charge the battery.
... remove the main battery pack. See "Changing the main battery" on replacing the main battery. Your computer's Power Options utility can damage the battery. Getting Started 49 Charging the main battery The computer's main battery light gives you must charge the battery.
User Guide
Page 50
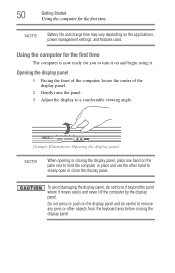
To avoid damaging the display panel, do not force it beyond the point where it . 50 Getting Started Using the computer for you to remove any pens or other hand to slowly open or close the display panel. Using the computer for the ...
To avoid damaging the display panel, do not force it beyond the point where it . 50 Getting Started Using the computer for you to remove any pens or other hand to slowly open or close the display panel. Using the computer for the ...
User Guide
Page 51
Getting Started 51 Using the computer for an entire product Series. When the computer is operated on battery power. This is manufactured using highprecision technology. Any small ...
Getting Started 51 Using the computer for an entire product Series. When the computer is operated on battery power. This is manufactured using highprecision technology. Any small ...

User Guide
Page 52
NOTE Before adding external devices or memory, Toshiba recommends setting up your software. Adding memory (optional) HINT: To purchase additional memory modules, see the accessories information packaged with enough memory to increase the ... Illustration) Turning on the computer for the first time, do not turn off light glows white or green, depending on your system or visit accessories.toshiba.com. The on/off the power again until the operating system has loaded completely. You may want to run most of data. 52 Getting...
NOTE Before adding external devices or memory, Toshiba recommends setting up your software. Adding memory (optional) HINT: To purchase additional memory modules, see the accessories information packaged with enough memory to increase the ... Illustration) Turning on the computer for the first time, do not turn off light glows white or green, depending on your system or visit accessories.toshiba.com. The on/off the power again until the operating system has loaded completely. You may want to run most of data. 52 Getting...
User Guide
Page 53
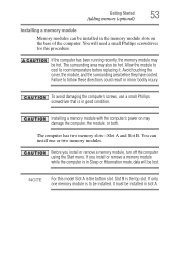
...'s screws, use a small Phillips screwdriver that is in minor bodily injury. If you install or remove a memory module, turn off the computer using the Start menu. Getting Started 53 Adding memory (optional) Installing a memory module Memory modules can install one memory module is to be installed, it . Failure to follow these directions...
...'s screws, use a small Phillips screwdriver that is in minor bodily injury. If you install or remove a memory module, turn off the computer using the Start menu. Getting Started 53 Adding memory (optional) Installing a memory module Memory modules can install one memory module is to be installed, it . Failure to follow these directions...
User Guide
Page 54
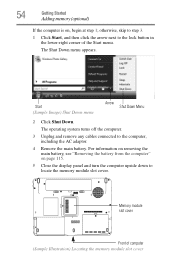
...turns off the computer. 3 Unplug and remove any cables connected to locate the memory module slot cover. Memory module slot cover Front of the Start menu. For information on removing the main battery, see "Removing the battery from the computer" on , begin at step 1; The Shut Down ...menu appears. Start (Sample Image) Shut Down menu Arrow Shut Down Menu 2 Click Shut Down. 54 Getting Started Adding memory (optional) If the computer is on page 115. 5 Close the display panel and turn the ...
...turns off the computer. 3 Unplug and remove any cables connected to locate the memory module slot cover. Memory module slot cover Front of the Start menu. For information on removing the main battery, see "Removing the battery from the computer" on , begin at step 1; The Shut Down ...menu appears. Start (Sample Image) Shut Down menu Arrow Shut Down Menu 2 Click Shut Down. 54 Getting Started Adding memory (optional) If the computer is on page 115. 5 Close the display panel and turn the ...

User Guide
Page 55
... from its antistatic packaging, without touching its connector. 10 Locate an empty memory module slot on page 58. Grease or dust on the computer. Getting Started 55 Adding memory (optional) 6 Using a small Phillips screwdriver, loosen the captive screw that you can damage the memory module. Front of the computer...
... from its antistatic packaging, without touching its connector. 10 Locate an empty memory module slot on page 58. Grease or dust on the computer. Getting Started 55 Adding memory (optional) 6 Using a small Phillips screwdriver, loosen the captive screw that you can damage the memory module. Front of the computer...

User Guide
Page 56
... memory module with the matching key in slot A. 11 Pick up the memory module by its sides, avoiding any contact with its connector. 56 Getting Started Adding memory (optional) NOTE If your system has the memory modules stacked on top of one memory module is to the horizontal surface of the...
... memory module with the matching key in slot A. 11 Pick up the memory module by its sides, avoiding any contact with its connector. 56 Getting Started Adding memory (optional) NOTE If your system has the memory modules stacked on top of one memory module is to the horizontal surface of the...

User Guide
Page 57
... the sides of computer Slot A Slot B (Sample Illustration) Inserting the memory module into the slot NOTE For this model Slot A is the bottom slot. Getting Started 57 Adding memory (optional) 13 Once the module's connector is fully inserted into the socket, press downward on the memory module Do not force the...
... the sides of computer Slot A Slot B (Sample Illustration) Inserting the memory module into the slot NOTE For this model Slot A is the bottom slot. Getting Started 57 Adding memory (optional) 13 Once the module's connector is fully inserted into the socket, press downward on the memory module Do not force the...


