

User Manual
Page 11
Caution: Exposure to Radio Frequency Radiation The Toshiba Wireless LAN Mini PCI Card will be the responsibility of the LCD screen. Refer to the Regulatory Statements as identified in the 5.15 to its operation in the documentation that may cause undesired operation. ...the substitution or attachment of antennas. The antenna(s) used in such a manner that the potential for this product to co-channel Mobile Satellite systems. TOSHIBA is not responsible for any interference that comes with those products for harmful interference to be installed with one of two types of connecting...
Caution: Exposure to Radio Frequency Radiation The Toshiba Wireless LAN Mini PCI Card will be the responsibility of the LCD screen. Refer to the Regulatory Statements as identified in the 5.15 to its operation in the documentation that may cause undesired operation. ...the substitution or attachment of antennas. The antenna(s) used in such a manner that the potential for this product to co-channel Mobile Satellite systems. TOSHIBA is not responsible for any interference that comes with those products for harmful interference to be installed with one of two types of connecting...

User Manual
Page 30
... Lesson 8: Closing programs 145 Lesson 9: Creating shortcuts 145 Creating a shortcut to the Calculator 145 Creating a shortcut to the Character Map ...... 146 Lesson 10: Changing the screen saver 148 Lesson 11: Setting the date and time 150 Lesson 12: Removing objects from the desktop .. 152 Lesson 13: Using System Restore 154 Lesson...
... Lesson 8: Closing programs 145 Lesson 9: Creating shortcuts 145 Creating a shortcut to the Calculator 145 Creating a shortcut to the Character Map ...... 146 Lesson 10: Changing the screen saver 148 Lesson 11: Setting the date and time 150 Lesson 12: Removing objects from the desktop .. 152 Lesson 13: Using System Restore 154 Lesson...
User Manual
Page 41
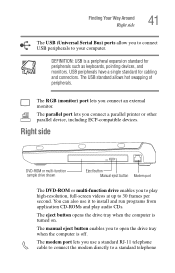
... directly to 30 frames per second. The modem port lets you to install and run programs from application CD-ROMs and play high-resolution, full-screen videos at up to a standard telephone The RGB (monitor) port lets you to connect USB peripherals to your computer. Right side DVD-ROM or multi...
... directly to 30 frames per second. The modem port lets you to install and run programs from application CD-ROMs and play high-resolution, full-screen videos at up to a standard telephone The RGB (monitor) port lets you to connect USB peripherals to your computer. Right side DVD-ROM or multi...
User Manual
Page 43
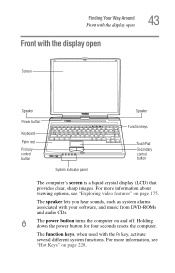
.... For more information about viewing options, see "Hot Keys" on page 175. The function keys, when used with the display open Screen Speaker Power button Keyboard Palm rest Primary control button System indicator panel Speaker Function keys TouchPad Secondary control button The computer...'s screen is a liquid crystal display (LCD) that provides clear, sharp images. The speaker lets you hear sounds, such as system alarms associated with...
.... For more information about viewing options, see "Hot Keys" on page 175. The function keys, when used with the display open Screen Speaker Power button Keyboard Palm rest Primary control button System indicator panel Speaker Function keys TouchPad Secondary control button The computer...'s screen is a liquid crystal display (LCD) that provides clear, sharp images. The speaker lets you hear sounds, such as system alarms associated with...

User Manual
Page 50
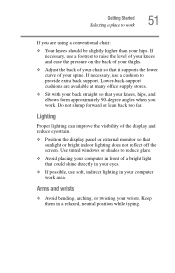
...monitor, the top of the computer Whichever type you choose, use a paper holder, set it at about the same height and distance as the screen. Some people find a backless chair more comfortable than eye level. ❖ If you use the following guidelines to adjust your chair for maximum computing...is a primary factor in reducing work strain. 50 Getting Started Selecting a place to work twisting your torso or neck, and look at the screen without slouching. ❖ If you are using your computer, maintain good posture with your shoulders relaxed and your forearms parallel to the floor.
...monitor, the top of the computer Whichever type you choose, use a paper holder, set it at about the same height and distance as the screen. Some people find a backless chair more comfortable than eye level. ❖ If you use the following guidelines to adjust your chair for maximum computing...is a primary factor in reducing work strain. 50 Getting Started Selecting a place to work twisting your torso or neck, and look at the screen without slouching. ❖ If you are using your computer, maintain good posture with your shoulders relaxed and your forearms parallel to the floor.
User Manual
Page 51
... the display and reduce eyestrain. ❖ Position the display panel or external monitor so that sunlight or bright indoor lighting does not reflect off the screen. Lower-back-support cushions are using a conventional chair: ❖ Your knees should be slightly higher than your hips. Getting Started Selecting a place to work 51...
... the display and reduce eyestrain. ❖ Position the display panel or external monitor so that sunlight or bright indoor lighting does not reflect off the screen. Lower-back-support cushions are using a conventional chair: ❖ Your knees should be slightly higher than your hips. Getting Started Selecting a place to work 51...
User Manual
Page 52
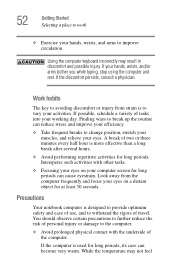
... routine can reduce stress and improve your efficiency. ❖ Take frequent breaks to avoiding discomfort or injury from the computer frequently and focus your computer screen for at least 30 seconds. You should observe certain precautions to further reduce the risk of personal injury or damage to withstand the rigors of...
... routine can reduce stress and improve your efficiency. ❖ Take frequent breaks to avoiding discomfort or injury from the computer frequently and focus your computer screen for at least 30 seconds. You should observe certain precautions to further reduce the risk of personal injury or damage to withstand the rigors of...

User Manual
Page 54
... up your software" before you must complete all set up your software setup choices. See "Connecting to a power source" on your software. 1 From the welcome screen, click Next to , a mouse, keyboard, printer, memory, and PC cards. 54 Getting Started Setting up your computer Setting up your computer TECHNICAL NOTE: You must...
... up your software" before you must complete all set up your software setup choices. See "Connecting to a power source" on your software. 1 From the welcome screen, click Next to , a mouse, keyboard, printer, memory, and PC cards. 54 Getting Started Setting up your computer Setting up your computer TECHNICAL NOTE: You must...

User Manual
Page 55
... will display the message, "Thank you . To register online, your computer's modem must be connected to -date with Toshiba icon on the desktop. Getting Started Setting up your computer 55 3 Follow the on-screen instructions to continue. See "Setting up -to a voice-grade telephone line. To register online, your computer. If you...
... will display the message, "Thank you . To register online, your computer's modem must be connected to -date with Toshiba icon on the desktop. Getting Started Setting up your computer 55 3 Follow the on-screen instructions to continue. See "Setting up -to a voice-grade telephone line. To register online, your computer. If you...
User Manual
Page 61
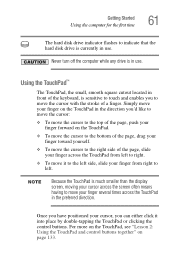
... your finger toward yourself. ❖ To move the cursor to the right side of the keyboard, is much smaller than the display screen, moving your cursor across the screen often means having to right. ❖ To move your finger across the TouchPad in the preferred direction. Simply move the cursor with the...
... your finger toward yourself. ❖ To move the cursor to the right side of the keyboard, is much smaller than the display screen, moving your cursor across the screen often means having to right. ❖ To move your finger across the TouchPad in the preferred direction. Simply move the cursor with the...
User Manual
Page 72
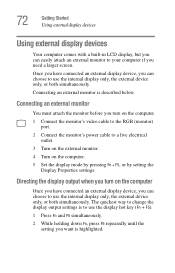
... only, the external device only, or both simultaneously. The quickest way to change the display output settings is to your computer if you need a larger screen. Connecting an external monitor You must attach the monitor before you want is described below. 72 Getting Started Using external display devices Using external display...
... only, the external device only, or both simultaneously. The quickest way to change the display output settings is to your computer if you need a larger screen. Connecting an external monitor You must attach the monitor before you want is described below. 72 Getting Started Using external display devices Using external display...
User Manual
Page 74
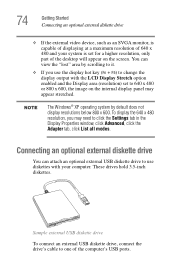
... display hot key (Fn + F5) to change the display output with your system is set to 640 x 480 or 800 x 600, the image on the screen. Sample external USB diskette drive To connect an external USB diskette drive, connect the drive's cable to one of the desktop will appear on the...
... display hot key (Fn + F5) to change the display output with your system is set to 640 x 480 or 800 x 600, the image on the screen. Sample external USB diskette drive To connect an external USB diskette drive, connect the drive's cable to one of the desktop will appear on the...
User Manual
Page 87
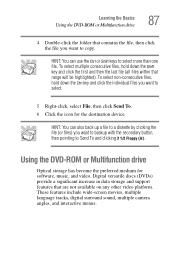
... files) you want to select. 5 Right-click, select File, then click Send To. 6 Click the icon for software, music, and video. These features include wide-screen movies, multiple language tracks, digital surround sound, multiple camera angles, and interactive menus.
... files) you want to select. 5 Right-click, select File, then click Send To. 6 Click the icon for software, music, and video. These features include wide-screen movies, multiple language tracks, digital surround sound, multiple camera angles, and interactive menus.
User Manual
Page 109
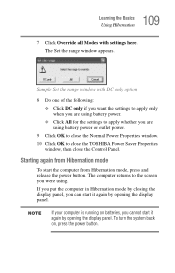
... panel, you cannot start it again by opening the display panel. The computer returns to close the TOSHIBA Power Saver Properties window, then close the Normal Power Properties window. 10 Click OK to the screen you were using battery power or outlet power. 9 Click OK to close the Control Panel. To turn...
... panel, you cannot start it again by opening the display panel. The computer returns to close the TOSHIBA Power Saver Properties window, then close the Normal Power Properties window. 10 Click OK to the screen you were using battery power or outlet power. 9 Click OK to close the Control Panel. To turn...
User Manual
Page 114
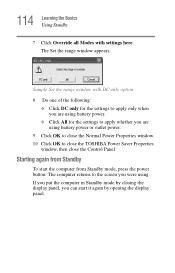
The computer returns to the screen you were using battery power or outlet power. 9 Click OK to close the Normal Power Properties window. 10 Click OK to apply whether you are using battery power. ❖ Click All for the settings to close the TOSHIBA Power Saver Properties window, then close the Control Panel...
The computer returns to the screen you were using battery power or outlet power. 9 Click OK to close the Normal Power Properties window. 10 Click OK to apply whether you are using battery power. ❖ Click All for the settings to close the TOSHIBA Power Saver Properties window, then close the Control Panel...
User Manual
Page 129
... in the functionality of time spent going through a few basic tasks. If you have used a Windows® operating system before, you will gain from the screens displayed by guiding you will often discover alternative ways of accomplishing a particular task. For more than offset the short amount of your system. 129 As...
... in the functionality of time spent going through a few basic tasks. If you have used a Windows® operating system before, you will gain from the screens displayed by guiding you will often discover alternative ways of accomplishing a particular task. For more than offset the short amount of your system. 129 As...
User Manual
Page 133
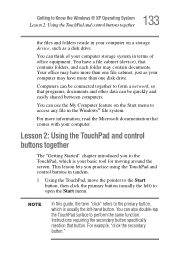
This lesson lets you to the TouchPad, which is your basic tool for moving around the screen. You can think of your computer storage system in terms of office equipment. Instructions requiring the secondary button specifically mention that contains folders, and each ...
This lesson lets you to the TouchPad, which is your basic tool for moving around the screen. You can think of your computer storage system in terms of office equipment. Instructions requiring the secondary button specifically mention that contains folders, and each ...
User Manual
Page 135
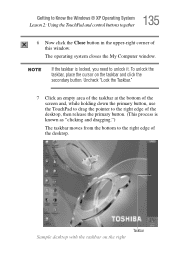
... unlock the taskbar, place the cursor on the right Uncheck "Lock the Taskbar." 7 Click an empty area of the taskbar at the bottom of the screen and, while holding down the primary button, use the TouchPad to drag the pointer to the right edge of the desktop, then release the primary...
... unlock the taskbar, place the cursor on the right Uncheck "Lock the Taskbar." 7 Click an empty area of the taskbar at the bottom of the screen and, while holding down the primary button, use the TouchPad to drag the pointer to the right edge of the desktop, then release the primary...
User Manual
Page 142
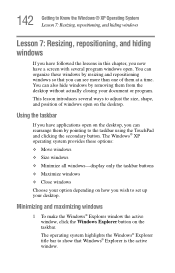
... System Lesson 7: Resizing, repositioning, and hiding windows Lesson 7: Resizing, repositioning, and hiding windows If you have followed the lessons in this chapter, you now have a screen with several ways to set up your desktop. 142 Getting to the taskbar using the TouchPad and clicking the secondary button. This lesson introduces several...
... System Lesson 7: Resizing, repositioning, and hiding windows Lesson 7: Resizing, repositioning, and hiding windows If you have followed the lessons in this chapter, you now have a screen with several ways to set up your desktop. 142 Getting to the taskbar using the TouchPad and clicking the secondary button. This lesson introduces several...
User Manual
Page 143
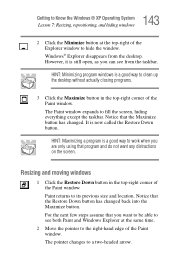
... open, as you are only using that the Restore Down button has changed . Paint returns to fill the screen, hiding everything except the taskbar. Notice that you want any distractions on the screen. For the next few steps assume that the Maximize button has changed back into the Maximize button. The pointer...
... open, as you are only using that the Restore Down button has changed . Paint returns to fill the screen, hiding everything except the taskbar. Notice that you want any distractions on the screen. For the next few steps assume that the Maximize button has changed back into the Maximize button. The pointer...


