Owners Manual
Page 4
... & other intellectual property rights. EN - 4 - Installation Location For safety and optimum performance of this unit: • Install the unit in this manual. : Description refers to video cassette tapes. : Description refers to playback of DVD-Video. : Description refers to playback of Audio CDs. : Description ... Off and Screen Saver Function (DVD Only) If the player is prohibited under conditions of this 480p DVD recorder, please contact Toshiba Customer Service. Manufactured under U.S. Avoid places with 480 progressive scan output, it away from devices of the TV. • Shield...
... & other intellectual property rights. EN - 4 - Installation Location For safety and optimum performance of this unit: • Install the unit in this manual. : Description refers to video cassette tapes. : Description refers to playback of DVD-Video. : Description refers to playback of Audio CDs. : Description ... Off and Screen Saver Function (DVD Only) If the player is prohibited under conditions of this 480p DVD recorder, please contact Toshiba Customer Service. Manufactured under U.S. Avoid places with 480 progressive scan output, it away from devices of the TV. • Shield...
Owners Manual
Page 5
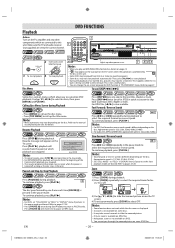
... 29 Reset to out. AUTO HEAD CLEANING • Automatically cleans video heads as you insert or remove a cassette tape, so you can cause this Manual 4 Maintenance ...5 SETUP Choosing a Disc / Cassette Tape 6 Playable Media...6 Unplayable Media 6 Index to Parts and Controls 7 Front Panel ...7 Rear Panel...for Progressive Scan Output 4 Auto Power Off and Screen Saver Function (DVD Only 4 Supplied Accessories 4 Symbols Used in this Owner's Manual, the laser optical pickup unit may become blurred or interrupted while the TV program reception is provided to call our help line to Article...
... 29 Reset to out. AUTO HEAD CLEANING • Automatically cleans video heads as you insert or remove a cassette tape, so you can cause this Manual 4 Maintenance ...5 SETUP Choosing a Disc / Cassette Tape 6 Playable Media...6 Unplayable Media 6 Index to Parts and Controls 7 Front Panel ...7 Rear Panel...for Progressive Scan Output 4 Auto Power Off and Screen Saver Function (DVD Only 4 Supplied Accessories 4 Symbols Used in this Owner's Manual, the laser optical pickup unit may become blurred or interrupted while the TV program reception is provided to call our help line to Article...
Owners Manual
Page 6
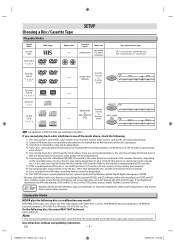
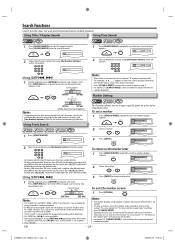
... region codes other color systems such as PAL cannot be played back because of incompatible recording conditions, characteristics of DVD and CD discs, Toshiba cannot assure that can be compromised. *6: You may not play back a disc which bear the marks above , check the following. ...result! Windows Media and the Windows logo are played back, the sound or video quality will successfully play the following discs as described in this manual due to the NTSC color system. Choosing a Disc / Cassette Tape Playable Media Type of media cassette tape Mark (logo) Region code DVD-video...
... region codes other color systems such as PAL cannot be played back because of incompatible recording conditions, characteristics of DVD and CD discs, Toshiba cannot assure that can be compromised. *6: You may not play back a disc which bear the marks above , check the following. ...result! Windows Media and the Windows logo are played back, the sound or video quality will successfully play the following discs as described in this manual due to the NTSC color system. Choosing a Disc / Cassette Tape Playable Media Type of media cassette tape Mark (logo) Region code DVD-video...
Owners Manual
Page 8
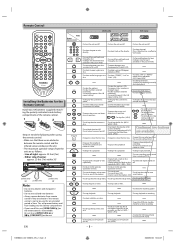
... current disc mode. • To select "HIFI" or "MONO" mode during playback. (Hi-Fi tapes only) • To change channels . • To adjust the tracking manually during clock and timer recording. • To open or close the disc tray. • To open or close the disc tray. • To eject the...
... current disc mode. • To select "HIFI" or "MONO" mode during playback. (Hi-Fi tapes only) • To change channels . • To adjust the tracking manually during clock and timer recording. • To open or close the disc tray. • To open or close the disc tray. • To eject the...
Owners Manual
Page 10
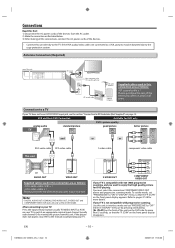
... the connection as illustrated below. 3) After making all the connections, connect the AC power cords of the devices. • Connect this unit directly to the manual accompanying your TV. DIGITAL AUDIO OUT DVD AUDIO OUT S-VIDEO OUT COMPONENT VIDEO OUT DIGITAL AUDIO OUT DVD AUDIO OUT S-VIDEO OUT COMPONENT VIDEO OUT...
... the connection as illustrated below. 3) After making all the connections, connect the AC power cords of the devices. • Connect this unit directly to the manual accompanying your TV. DIGITAL AUDIO OUT DVD AUDIO OUT S-VIDEO OUT COMPONENT VIDEO OUT DIGITAL AUDIO OUT DVD AUDIO OUT S-VIDEO OUT COMPONENT VIDEO OUT...
Owners Manual
Page 11
... as follows: • RCA audio cable (L/R) x 1 Please purchase the rest of all components in the system before connecting another component. • Refer to the Instruction Manuals for your ears or the speakers is generated when a DVD recorded in DTS is played while using a decoder, etc., that is not DTS-compatible. •...
... as follows: • RCA audio cable (L/R) x 1 Please purchase the rest of all components in the system before connecting another component. • Refer to the Instruction Manuals for your ears or the speakers is generated when a DVD recorded in DTS is played while using a decoder, etc., that is not DTS-compatible. •...
Owners Manual
Page 12
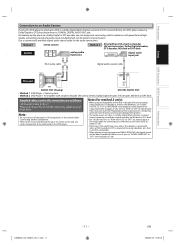
... one channel while watching another channel. Be sure that the cable/satellite box is still possible to . If not, it according to your RF modulator's manual. 4) Plug in this unit to an RF modulator. With this unit ANT-IN ANT. IN This connection is connected to your local store. E8EB6CD_SD-V398KC_EN_v1...
... one channel while watching another channel. Be sure that the cable/satellite box is still possible to . If not, it according to your RF modulator's manual. 4) Plug in this unit to an RF modulator. With this unit ANT-IN ANT. IN This connection is connected to your local store. E8EB6CD_SD-V398KC_EN_v1...
Owners Manual
Page 13
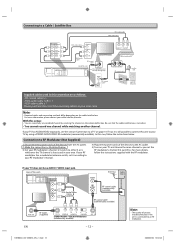
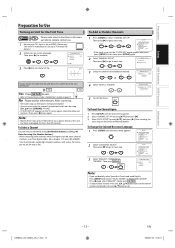
...to VIDEO. (Name may vary with a zero. (for the First Time VCR Please note: most instructions in this case, press [SETUP] again. 2 Select "MANUAL SET UP". Then, press [B] once again. M E N U - After scanning, the tuner stops on page 12. or LANGUAGE SELECT B ENGLISH [ON] ...: 117, press [1], [1], [7]) • You must precede single-digit channel numbers with TV manufacturer. or - CHANNEL SET UP AUTO SET UP B MANUAL SET UP or 3 Select the channel to next step. To Preset the Channel Again 1) Press [SETUP] until the main menu appears. - Then press...
...to VIDEO. (Name may vary with a zero. (for the First Time VCR Please note: most instructions in this case, press [SETUP] again. 2 Select "MANUAL SET UP". Then, press [B] once again. M E N U - After scanning, the tuner stops on page 12. or LANGUAGE SELECT B ENGLISH [ON] ...: 117, press [1], [1], [7]) • You must precede single-digit channel numbers with TV manufacturer. or - CHANNEL SET UP AUTO SET UP B MANUAL SET UP or 3 Select the channel to next step. To Preset the Channel Again 1) Press [SETUP] until the main menu appears. - Then press...
Owners Manual
Page 15
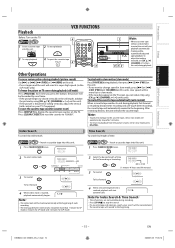
... the still mode, stabilize the picture by using [CH. VCR FUNCTIONS 4 3 To stop after 5 minutes. • To return to the beginning. To adjust the tracking manually, use [CH. Other Operations To cue or review picture during playback, then press [g] ([ g (FWD)] on your search will automatically rewind to the cassette tape, still...
... the still mode, stabilize the picture by using [CH. VCR FUNCTIONS 4 3 To stop after 5 minutes. • To return to the beginning. To adjust the tracking manually, use [CH. Other Operations To cue or review picture during playback, then press [g] ([ g (FWD)] on your search will automatically rewind to the cassette tape, still...
Owners Manual
Page 17
...] to exit. 6) Press [T-SET] to return to a year in the unit or does not have the erase-protection tab, TIMER REC and " " indicator on this manual. To cancel a timer recording in this unit lights up to the timer standby mode. Note: • You cannot stop a started Timer Recording with the other...
...] to exit. 6) Press [T-SET] to return to a year in the unit or does not have the erase-protection tab, TIMER REC and " " indicator on this manual. To cancel a timer recording in this unit lights up to the timer standby mode. Note: • You cannot stop a started Timer Recording with the other...
Owners Manual
Page 18
...; Insert a cassette tape in the disc tray. • Turn on the TV and set it to the correct Video In channel. (Check your TV owner's manual for recording. 3) Press [SPEED] on the DISC front panel. Note: • A Timer Recording is found before the lowest memorized channel. (Example: CH02) DVD to play...
...; Insert a cassette tape in the disc tray. • Turn on the TV and set it to the correct Video In channel. (Check your TV owner's manual for recording. 3) Press [SPEED] on the DISC front panel. Note: • A Timer Recording is found before the lowest memorized channel. (Example: CH02) DVD to play...
Owners Manual
Page 20
... the track at which playback was stopped. Resume Playback DVD Press [STOP C] during playback. 2) Press [ZOOM] repeatedly to customize DVD playback. Press 'PLAY' to the manual accompanying the disc for a moment. To continue playback, press [PLAY B]. To continue playback, press [PLAY B]. Refer to slide the zoomed picture. • Only 2x zoom...
... the track at which playback was stopped. Resume Playback DVD Press [STOP C] during playback. 2) Press [ZOOM] repeatedly to customize DVD playback. Press 'PLAY' to the manual accompanying the disc for a moment. To continue playback, press [PLAY B]. To continue playback, press [PLAY B]. Refer to slide the zoomed picture. • Only 2x zoom...
Owners Manual
Page 24
...". 3 Press [ENTER] at step 2 in quick succession to skip to other than 10 tracks. or Using [SKIP H , G] 1 During playback, press [SKIP G] to skip to the manual accompanying the disc. TOTAL 1:29:00 Using [SKIP H , G] 1 During playback, press [SKIP G] to skip to the marker later" and then press [CLEAR/C.RESET]. • Opening...
...". 3 Press [ENTER] at step 2 in quick succession to skip to other than 10 tracks. or Using [SKIP H , G] 1 During playback, press [SKIP G] to skip to the manual accompanying the disc. TOTAL 1:29:00 Using [SKIP H , G] 1 During playback, press [SKIP G] to skip to the marker later" and then press [CLEAR/C.RESET]. • Opening...

Owners Manual
Page 26
...displayed every time you choose a language that has a 3-letter language code, the code will be down sampled to 48kHz. Refer to the manual accompanying the discs for details. 2 Press [ENTER] for details. Some DVD may not have that language. ON: makes the dark areas brighter... the sound will not appear. However, some discs allow you press [SUBTITLE], subtitle language changes as recorded. 3 Press [RETURN] to the manual accompanying the discs for the desired effect. 1: natural effect ENTER 1 2: emphasized effect OFF: no subtitle is active) Audio Language DVD This unit...
...displayed every time you choose a language that has a 3-letter language code, the code will be down sampled to 48kHz. Refer to the manual accompanying the discs for details. 2 Press [ENTER] for details. Some DVD may not have that language. ON: makes the dark areas brighter... the sound will not appear. However, some discs allow you press [SUBTITLE], subtitle language changes as recorded. 3 Press [RETURN] to the manual accompanying the discs for the desired effect. 1: natural effect ENTER 1 2: emphasized effect OFF: no subtitle is active) Audio Language DVD This unit...
Owners Manual
Page 31
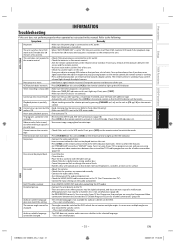
... / ]] on the audio component. TV programs cannot be changed . Cannot remove the cassette • Check if this unit is not a malfunction. This is in this manual. This is lit. Distorted picture. • Connect this unit directly to activate it on only if your pressing buttons on the remote control to an...
... / ]] on the audio component. TV programs cannot be changed . Cannot remove the cassette • Check if this unit is not a malfunction. This is in this manual. This is lit. Distorted picture. • Connect this unit directly to activate it on only if your pressing buttons on the remote control to an...

Owners Manual
Page 32
... your receiver capabilities. when disc is selected. • Check the "PARENTAL" setting. Playback does not start -up screen • Reset the unit by this Owner's Manual for details on correct operations. • Playback from the AC outlet for repair. The password for finger prints/scratches and clean with the above Jacks...
... your receiver capabilities. when disc is selected. • Check the "PARENTAL" setting. Playback does not start -up screen • Reset the unit by this Owner's Manual for details on correct operations. • Playback from the AC outlet for repair. The password for finger prints/scratches and clean with the above Jacks...


