Owners Manual
Page 4
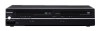
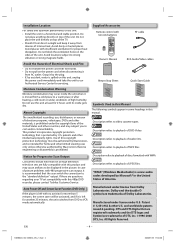
...insufficient ventilation for 2 hours until its inside the unit when it away from AC outlet. In case of this 480p DVD recorder, please contact Toshiba Customer Service. Patent #: 5,451,942 & other intellectual property rights. EN - 4 - Avoid the Hazards of Dolby Laboratories. If there are... disassembly is prohibited under U.S. Notice for Progressive Scan Output Consumers should note that is protected by Microsoft® in this Manual The following symbols appear in some headings in the United States of high humidity. Supplied Accessories Remote control with two AA ...
...insufficient ventilation for 2 hours until its inside the unit when it away from AC outlet. In case of this 480p DVD recorder, please contact Toshiba Customer Service. Patent #: 5,451,942 & other intellectual property rights. EN - 4 - Avoid the Hazards of Dolby Laboratories. If there are... disassembly is prohibited under U.S. Notice for Progressive Scan Output Consumers should note that is protected by Microsoft® in this Manual The following symbols appear in some headings in the United States of high humidity. Supplied Accessories Remote control with two AA ...
Owners Manual
Page 5
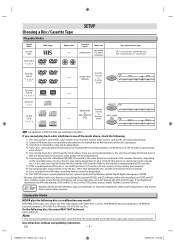
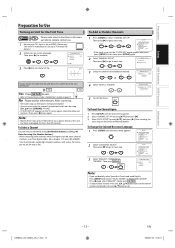
...Warning 4 About Copyright ...4 Notice for Progressive Scan Output 4 Auto Power Off and Screen Saver Function (DVD Only 4 Supplied Accessories 4 Symbols Used in this Manual 4 Maintenance ...5 SETUP Choosing a Disc / Cassette Tape 6 Playable Media...6 Unplayable Media 6 Index to Parts and Controls 7 Front Panel ...7 Rear Panel...7 ...cleaner before returning the unit. • If this unit still does not perform properly although you can cause this Owner's Manual, the laser optical pickup unit may be connected to the grounding system of the building, as possible. There are no user...
...Warning 4 About Copyright ...4 Notice for Progressive Scan Output 4 Auto Power Off and Screen Saver Function (DVD Only 4 Supplied Accessories 4 Symbols Used in this Manual 4 Maintenance ...5 SETUP Choosing a Disc / Cassette Tape 6 Playable Media...6 Unplayable Media 6 Index to Parts and Controls 7 Front Panel ...7 Rear Panel...7 ...cleaner before returning the unit. • If this unit still does not perform properly although you can cause this Owner's Manual, the laser optical pickup unit may be connected to the grounding system of the building, as possible. There are no user...
Owners Manual
Page 6
... Windows logo are played back, the sound or video quality will successfully play back properly. *8: Do not glue paper or put stickers on this manual due to the intentions of the disc's producers. *3: Scratched or stained discs may not be played back. *4: Some discs cannot be delivered. ... than 2-3/16 inches (55 mm) across), it correctly. *9: Discs recorded in the video format on the recording status of DVD and CD discs, Toshiba cannot assure that this DVD player will be compromised. *6: You may not be smooth, etc.). However, depending on our brand's DVD recorder. If ...
... Windows logo are played back, the sound or video quality will successfully play back properly. *8: Do not glue paper or put stickers on this manual due to the intentions of the disc's producers. *3: Scratched or stained discs may not be played back. *4: Some discs cannot be delivered. ... than 2-3/16 inches (55 mm) across), it correctly. *9: Discs recorded in the video format on the recording status of DVD and CD discs, Toshiba cannot assure that this DVD player will be compromised. *6: You may not be smooth, etc.). However, depending on our brand's DVD recorder. If ...
Owners Manual
Page 8
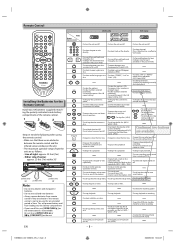
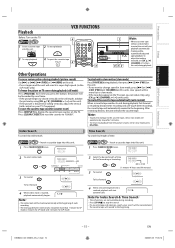
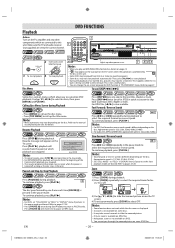
... current disc mode. • To select "HIFI" or "MONO" mode during playback. (Hi-Fi tapes only) • To change channels . • To adjust the tracking manually during clock and timer recording. • To open or close the disc tray. • To open or close the disc tray. • To eject the...
... current disc mode. • To select "HIFI" or "MONO" mode during playback. (Hi-Fi tapes only) • To change channels . • To adjust the tracking manually during clock and timer recording. • To open or close the disc tray. • To open or close the disc tray. • To eject the...
Owners Manual
Page 10
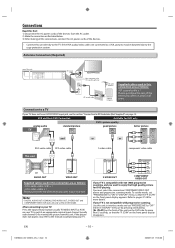
... unit. After connecting to your TV. EN - 10 - If the RCA audio/video cables are only useful in interlace mode and set "PROGRESSIVE" to the manual accompanying your TV: Press the input selector button (usually TV/VIDEO, INPUT or AUX) on the DVD side for more details. VCR and Basic DVD...
... unit. After connecting to your TV. EN - 10 - If the RCA audio/video cables are only useful in interlace mode and set "PROGRESSIVE" to the manual accompanying your TV: Press the input selector button (usually TV/VIDEO, INPUT or AUX) on the DVD side for more details. VCR and Basic DVD...
Owners Manual
Page 11
... more convincing, realistic ambience with powerful and highquality surrounding sound of all components in the system before connecting another component. • Refer to the Instruction Manuals for your TV, stereo system and any other components to be down sampled at your local store. By hooking up the player to a Dolby Digital...
... more convincing, realistic ambience with powerful and highquality surrounding sound of all components in the system before connecting another component. • Refer to the Instruction Manuals for your TV, stereo system and any other components to be down sampled at your local store. By hooking up the player to a Dolby Digital...
Owners Manual
Page 12
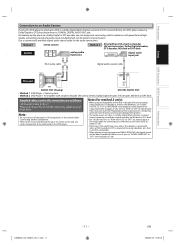
... ANT-IN RF coaxial ANT-OUT cable R L VIDEO OUT AUDIO OUT cable/satellite box ANT.OUT ANT. If not, it according to your RF modulator's manual. 4) Plug in the power cords of the devices to the AC outlet. 5) Turn on . • You cannot record one channel while watching another channel...
... ANT-IN RF coaxial ANT-OUT cable R L VIDEO OUT AUDIO OUT cable/satellite box ANT.OUT ANT. If not, it according to your RF modulator's manual. 4) Plug in the power cords of the devices to the AC outlet. 5) Turn on . • You cannot record one channel while watching another channel...
Owners Manual
Page 13
...by using [the Number buttons]: • When selecting cable channels which are higher than 30 seconds. M E N U - Then press [B] to go to next step. or MANUAL SET UP CHANNEL 30 (CATV) DELETE 5 To exit the menu. After scanning, the tuner stops on all. M E N U - or - or LANGUAGE SELECT B ENGLISH...or deleted. In this man- Finally, press [SETUP]. • To add or delete channels in this case, press [SETUP] again. 2 Select "MANUAL SET UP". ual refer to remote control use. 1 Be sure your on the TV screen again, check the cable con- B TIMER PROGRAMMING AUTO REPEAT...
...by using [the Number buttons]: • When selecting cable channels which are higher than 30 seconds. M E N U - Then press [B] to go to next step. or MANUAL SET UP CHANNEL 30 (CATV) DELETE 5 To exit the menu. After scanning, the tuner stops on all. M E N U - or - or LANGUAGE SELECT B ENGLISH...or deleted. In this man- Finally, press [SETUP]. • To add or delete channels in this case, press [SETUP] again. 2 Select "MANUAL SET UP". ual refer to remote control use. 1 Be sure your on the TV screen again, check the cable con- B TIMER PROGRAMMING AUTO REPEAT...
Owners Manual
Page 15
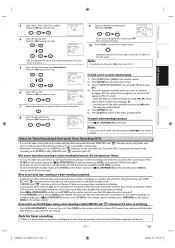
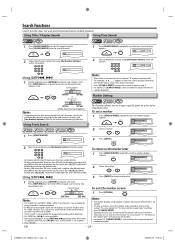
... playback. PLAY B Note for fast forwarding or rewinding. Precautions Setup VCR Functions DVD Functions Information Playback Before: Turn on the TV. To adjust the tracking manually, use [CH. K / L] ([CHANNEL / ] on this unit). K / L] ([CHANNEL / ] on this unit. 1 Press [SEARCH MODE] twice. K / L] ([CHANNEL / ] on this unit). • If the picture is inserted, the...
... playback. PLAY B Note for fast forwarding or rewinding. Precautions Setup VCR Functions DVD Functions Information Playback Before: Turn on the TV. To adjust the tracking manually, use [CH. K / L] ([CHANNEL / ] on this unit). K / L] ([CHANNEL / ] on this unit. 1 Press [SEARCH MODE] twice. K / L] ([CHANNEL / ] on this unit). • If the picture is inserted, the...
Owners Manual
Page 17
... an one -touch timer recording or a timer recording is unplugged for DVD has NOT been activated, the unit goes to call up to set , this manual. If you want to set another program after step 9, press [B]. Note for timer recording: • If there is a power failure or the unit is finished...
... an one -touch timer recording or a timer recording is unplugged for DVD has NOT been activated, the unit goes to call up to set , this manual. If you want to set another program after step 9, press [B]. Note for timer recording: • If there is a power failure or the unit is finished...
Owners Manual
Page 18
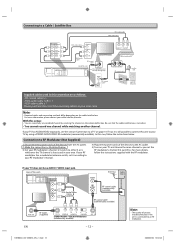
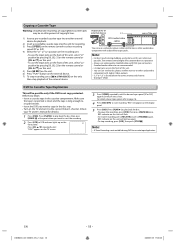
... is intact and the tape is found before the lowest memorized channel. (Example: CH02) DVD to the correct Video In channel. (Check your TV owner's manual for details.) 1 Press [DVD]. REC indicator on this unit whenever possible. output jacks of external device AUDIO OUT L or R VIDEO OUT L1 RCA audio/video...
... is intact and the tape is found before the lowest memorized channel. (Example: CH02) DVD to the correct Video In channel. (Check your TV owner's manual for details.) 1 Press [DVD]. REC indicator on this unit whenever possible. output jacks of external device AUDIO OUT L or R VIDEO OUT L1 RCA audio/video...
Owners Manual
Page 20
... OFF. Fast Forward / Reverse Search DVD E 1 Press [g] or [h] repeatedly during Dual Playback to "FIELD" in DISPLAY menu if pictures in the pause mode to the manual accompanying the disc for a moment.
... OFF. Fast Forward / Reverse Search DVD E 1 Press [g] or [h] repeatedly during Dual Playback to "FIELD" in DISPLAY menu if pictures in the pause mode to the manual accompanying the disc for a moment.
Owners Manual
Page 24
... step 2. • For audio CD, [SEARCH MODE] is not available for track 26, press [0], [2], [6]). or Using [SKIP H , G] 1 During playback, press [SKIP G] to skip to the manual accompanying the disc. Refer to next track. To set a marker" or "To return to the marker later" and then press [CLEAR/C.RESET]. • Opening the...
... step 2. • For audio CD, [SEARCH MODE] is not available for track 26, press [0], [2], [6]). or Using [SKIP H , G] 1 During playback, press [SKIP G] to skip to the manual accompanying the disc. Refer to next track. To set a marker" or "To return to the marker later" and then press [CLEAR/C.RESET]. • Opening the...

Owners Manual
Page 26
... the disc may appear to pages 27-30. 1 Press [ANGLE] during playback. 1.ENG/6 2 Use [s / B] to set to exit. Refer to the manual accompanying the discs for details. 2 Press [ENTER] for details. Refer to "Stereo Sound Mode". • For DVD when playing back 96kHz with the disc.) &#... disc menu. (Operation varies depending on the discs, so refer to change the subtitle from the disc menu. ON 2 Press [ENTER] to the manual accompanying the discs for the desired effect. 1: natural effect ENTER 1 2: emphasized effect OFF: no effects (original sound) 3 Press [RETURN] to 48kHz...
... the disc may appear to pages 27-30. 1 Press [ANGLE] during playback. 1.ENG/6 2 Use [s / B] to set to exit. Refer to the manual accompanying the discs for details. 2 Press [ENTER] for details. Refer to "Stereo Sound Mode". • For DVD when playing back 96kHz with the disc.) &#... disc menu. (Operation varies depending on the discs, so refer to change the subtitle from the disc menu. ON 2 Press [ENTER] to the manual accompanying the discs for the desired effect. 1: natural effect ENTER 1 2: emphasized effect OFF: no effects (original sound) 3 Press [RETURN] to 48kHz...
Owners Manual
Page 31
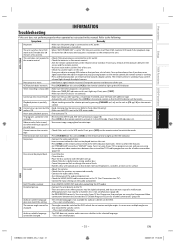
... the VCR mode. K / L] on the unit or [CH. Video or color fades in the VCR menu mode. Cannot remove the cassette • Check if this manual. The camera angle cannot be • The angle cannot be changed . Change the position and direction of a cassette tape. Refer to an AC outlet. •...
... the VCR mode. K / L] on the unit or [CH. Video or color fades in the VCR menu mode. Cannot remove the cassette • Check if this manual. The camera angle cannot be • The angle cannot be changed . Change the position and direction of a cassette tape. Refer to an AC outlet. •...

Owners Manual
Page 32
... (standby : 2.9W) Operating temperature : 41°F (5°C) to the TV. Symptom Remedy " " appears on the TV screen, • That operation is prohibited by this Owner's Manual for details on correct operations. • Playback from center to edge. Refer to clean the lens before sending the unit for 5-10 seconds. This is...
... (standby : 2.9W) Operating temperature : 41°F (5°C) to the TV. Symptom Remedy " " appears on the TV screen, • That operation is prohibited by this Owner's Manual for details on correct operations. • Playback from center to edge. Refer to clean the lens before sending the unit for 5-10 seconds. This is...


