User Manual
Page 5
... long-distance transmission charges.) In order to the telephone network, the telephone company will be a 900 number or any changes necessary to file a complaint with the FCC if you believe it unlawful for any message unless such message clearly contains in their equipment, operations or procedures. or an authorized representative of Toshiba, or the Toshiba Customer Support Center within the...
... long-distance transmission charges.) In order to the telephone network, the telephone company will be a 900 number or any changes necessary to file a complaint with the FCC if you believe it unlawful for any message unless such message clearly contains in their equipment, operations or procedures. or an authorized representative of Toshiba, or the Toshiba Customer Support Center within the...
User Manual
Page 31
... without changing the internal storage drive partitions 66 Creating recovery DVDs/media 69 Restoring from recovery DVDs/media 70 Erasing the Internal Storage Drive 71 Checking the internal storage drive operating status 73 Installing drivers and applications 73 Using the TouchPad 73 Adjusting TouchPad™ settings 76 Disabling or enabling the TouchPad 77 Using external display devices 77 Connecting the display device 78 Directing the display output when you turn on the computer 80 Adjusting the quality of the external display......81 Using an external keyboard 81 Using a mouse...
... without changing the internal storage drive partitions 66 Creating recovery DVDs/media 69 Restoring from recovery DVDs/media 70 Erasing the Internal Storage Drive 71 Checking the internal storage drive operating status 73 Installing drivers and applications 73 Using the TouchPad 73 Adjusting TouchPad™ settings 76 Disabling or enabling the TouchPad 77 Using external display devices 77 Connecting the display device 78 Directing the display output when you turn on the computer 80 Adjusting the quality of the external display......81 Using an external keyboard 81 Using a mouse...
User Manual
Page 35
... Charge Utility.......158 USB Sleep and Charge 158 Enabling USB Sleep and Charge 160 Power supply mode settings 160 Battery settings 160 TOSHIBA Zooming Utility 161 TOSHIBA Button Support 162 TOSHIBA Accessibility 163 TOSHIBA eco Utility 164 TOSHIBA Service Station 165 TOSHIBA PC Health Monitor 165 ConfigFree 166 Getting Started 166 ConfigFree® Utilities 167 Chapter 6: If Something Goes Wrong 170 Problems that are easy to fix 170 Problems when you turn on the computer............171 The Windows® operating system is not working 174 Using Startup options to fix problems...
... Charge Utility.......158 USB Sleep and Charge 158 Enabling USB Sleep and Charge 160 Power supply mode settings 160 Battery settings 160 TOSHIBA Zooming Utility 161 TOSHIBA Button Support 162 TOSHIBA Accessibility 163 TOSHIBA eco Utility 164 TOSHIBA Service Station 165 TOSHIBA PC Health Monitor 165 ConfigFree 166 Getting Started 166 ConfigFree® Utilities 167 Chapter 6: If Something Goes Wrong 170 Problems that are easy to fix 170 Problems when you turn on the computer............171 The Windows® operating system is not working 174 Using Startup options to fix problems...

User Manual
Page 53
... the operating system, and then turns off the computer using the Start menu. If you install or remove a memory module, turn off . 3 Unplug and remove any cables connected to the computer, including the AC adaptor. 4 Place a soft cloth on , begin at step 1; The computer closes all open programs, shuts down on the cloth. Getting Started 53 Adding memory (optional) The computer has two memory slots-Slot A and Slot B. You can install one memory module...
... the operating system, and then turns off the computer using the Start menu. If you install or remove a memory module, turn off . 3 Unplug and remove any cables connected to the computer, including the AC adaptor. 4 Place a soft cloth on , begin at step 1; The computer closes all open programs, shuts down on the cloth. Getting Started 53 Adding memory (optional) The computer has two memory slots-Slot A and Slot B. You can install one memory module...
User Manual
Page 57
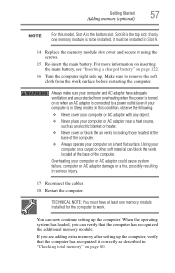
... Replace the memory module slot cover and secure it using the screws. 15 Re-insert the main battery. Getting Started 57 Adding memory (optional) NOTE For this condition, observe the following: ❖ Never cover your computer or AC adaptor with any object. ❖ Never place your computer or AC adaptor near a heat source, such as described in Sleep mode). You can now continue setting...
... Replace the memory module slot cover and secure it using the screws. 15 Re-insert the main battery. Getting Started 57 Adding memory (optional) NOTE For this condition, observe the following: ❖ Never cover your computer or AC adaptor with any object. ❖ Never place your computer or AC adaptor near a heat source, such as described in Sleep mode). You can now continue setting...
User Manual
Page 58
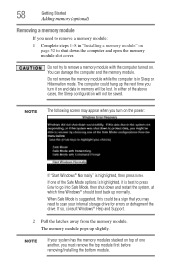
... the power: If "Start Windows® Normally" is highlighted, then press Enter. The computer could be lost. NOTE The following screen may need to remove a memory module: 1 Complete steps 1-8 in Sleep or Hibernation mode. In either of the Safe Mode options is in "Installing a memory module" on . Do not try to remove a memory module with the computer turned on page 52 to go into Safe Mode, then shut down the computer and open the memory module slot cover...
... the power: If "Start Windows® Normally" is highlighted, then press Enter. The computer could be lost. NOTE The following screen may need to remove a memory module: 1 Complete steps 1-8 in Sleep or Hibernation mode. In either of the Safe Mode options is in "Installing a memory module" on . Do not try to remove a memory module with the computer turned on page 52 to go into Safe Mode, then shut down the computer and open the memory module slot cover...
User Manual
Page 59
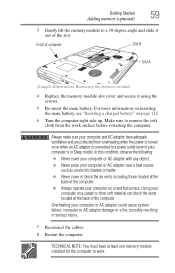
... AC adaptor have at the base of computer Slot B Slot A (Sample Illustration) Removing the memory module 4 Replace the memory module slot cover and secure it out of the computer. ❖ Always operate your computer on a hard flat surface. For more information on inserting the main battery, see "Inserting a charged battery" on or when an AC adaptor is connected to a power outlet (even if your computer or AC...
... AC adaptor have at the base of computer Slot B Slot A (Sample Illustration) Removing the memory module 4 Replace the memory module slot cover and secure it out of the computer. ❖ Always operate your computer on a hard flat surface. For more information on inserting the main battery, see "Inserting a charged battery" on or when an AC adaptor is connected to a power outlet (even if your computer or AC...

User Manual
Page 79
... HDMI™-CEC (Consumer Electronics Control) is dedicated to take advantage of the computer. 3 Connect the device's power cable to a live electrical outlet. 4 Turn on the external device. Toshiba computers with HDMI-CEC include a Toshiba utility (that came with the monitor to see page 146. Getting Started 79 Using external display devices Connecting to a TV using the Fn+F5 key. ❖ Switch the video output (HDMI or LCD) when executing certain desktop icons. ❖ Enable/Disable the HDMI-CEC function...
... HDMI™-CEC (Consumer Electronics Control) is dedicated to take advantage of the computer. 3 Connect the device's power cable to a live electrical outlet. 4 Turn on the external device. Toshiba computers with HDMI-CEC include a Toshiba utility (that came with the monitor to see page 146. Getting Started 79 Using external display devices Connecting to a TV using the Fn+F5 key. ❖ Switch the video output (HDMI or LCD) when executing certain desktop icons. ❖ Enable/Disable the HDMI-CEC function...
User Manual
Page 165
... changes (e.g.: number of power button and Fn key combination uses, and AC adaptor, battery, LCD, fan, HDD, sound volume, wireless communication switch, docking and USB information), date of initial system use this information for various devices). The stored data uses a very small portion of your Toshiba computer. You may disable the TOSHIBA PC Health Monitor at its best by notifying you when updated software, firmware, documentation or other information is used to specific system conditions via the Windows...
... changes (e.g.: number of power button and Fn key combination uses, and AC adaptor, battery, LCD, fan, HDD, sound volume, wireless communication switch, docking and USB information), date of initial system use this information for various devices). The stored data uses a very small portion of your Toshiba computer. You may disable the TOSHIBA PC Health Monitor at its best by notifying you when updated software, firmware, documentation or other information is used to specific system conditions via the Windows...
User Manual
Page 174
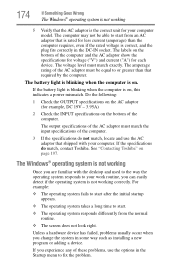
... the computer. The battery light is blinking when the computer is correct, and the plug fits correctly in the Startup menu to start after the initial startup appears. ❖ The operating system takes a long time to fix the problem. The computer may not be equal to start from the normal routine. ❖ The screen does not look right. See "Contacting Toshiba" on . If...
... the computer. The battery light is blinking when the computer is correct, and the plug fits correctly in the Startup menu to start after the initial startup appears. ❖ The operating system takes a long time to fix the problem. The computer may not be equal to start from the normal routine. ❖ The screen does not look right. See "Contacting Toshiba" on . If...
User Manual
Page 180
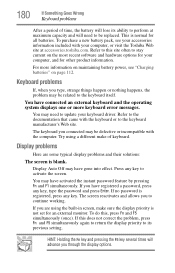
...-in screen, make of time, the battery will lose its previous setting. If you connected may be defective or incompatible with your keyboard driver. To purchase a new battery pack, see "Charging batteries" on page 112. Keyboard problems If, when you through the display options. This is registered, press any key. You may have connected an external keyboard and the operating system displays one or more information on the most recent software and hardware options...
...-in screen, make of time, the battery will lose its previous setting. If you connected may be defective or incompatible with your keyboard driver. To purchase a new battery pack, see "Charging batteries" on page 112. Keyboard problems If, when you through the display options. This is registered, press any key. You may have connected an external keyboard and the operating system displays one or more information on the most recent software and hardware options...
User Manual
Page 194
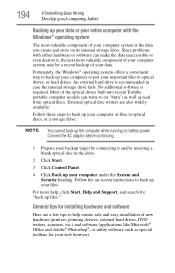
... may be a recent backup of your computer system is the data you create and store on -screen instructions to back up files." General tips for your files. External optical disc writers are a few tips to (or 'burn') as well as special toolbars for installing hardware and software Here are also widely available. Most of new hardware (printers, pointing devices, external hard drives, DVD writers, scanners, etc...
... may be a recent backup of your computer system is the data you create and store on -screen instructions to back up files." General tips for your files. External optical disc writers are a few tips to (or 'burn') as well as special toolbars for installing hardware and software Here are also widely available. Most of new hardware (printers, pointing devices, external hard drives, DVD writers, scanners, etc...

User Manual
Page 225
.... Internet - Memory cache built into the processor to help improve processing speed. See also cache, CPU cache, L2 cache. hot key - (1) A feature in combination with any device to create a complete screen image. Memory cache installed on the computer again, your work is running and have the operating system automatically recognize the change. Interlaced monitors take two passes to interact with the Fn key can set system options...
.... Internet - Memory cache built into the processor to help improve processing speed. See also cache, CPU cache, L2 cache. hot key - (1) A feature in combination with any device to create a complete screen image. Memory cache installed on the computer again, your work is running and have the operating system automatically recognize the change. Interlaced monitors take two passes to interact with the Fn key can set system options...

User Manual
Page 231
... changing 120 charge indicator light 48, 114 charge not lasting 179 charging 48, 113 conserving power 117 disposal 125 installing 120, 122 low charge 116 maintaining 124 monitoring power 48, 114 not charging 179 notifications 116 power plan 207 power plan hot key 119 real-time clock (RTC) 111, 113 remaining power 115 removing 121 safety precautions 123 BIOS Setup see TOSHIBA Hardware Setup button power 50 start 129 buttons eject, optical drive 104 Media control buttons 105 C Call2Recycle™ battery 125 changing...
... changing 120 charge indicator light 48, 114 charge not lasting 179 charging 48, 113 conserving power 117 disposal 125 installing 120, 122 low charge 116 maintaining 124 monitoring power 48, 114 not charging 179 notifications 116 power plan 207 power plan hot key 119 real-time clock (RTC) 111, 113 remaining power 115 removing 121 safety precautions 123 BIOS Setup see TOSHIBA Hardware Setup button power 50 start 129 buttons eject, optical drive 104 Media control buttons 105 C Call2Recycle™ battery 125 changing...
User Manual
Page 232
... Disk Defragmenter 183 disk drive corrupted/damaged data files 183 missing files/trouble accessing a drive 182 running slow 183 diskette drive cannot insert a diskette 183 cannot read a diskette 183 display does not look normal/flickers 181 external monitor not working 181 display device connecting 78 external 77 display output settings 80 display panel opening 49 display problems screen is blank 180 display, external adjusting 81 disposal information 29 disposing of used batteries 125 DVD using 103 DVD player general problems 190 E eject button...
... Disk Defragmenter 183 disk drive corrupted/damaged data files 183 missing files/trouble accessing a drive 182 running slow 183 diskette drive cannot insert a diskette 183 cannot read a diskette 183 display does not look normal/flickers 181 external monitor not working 181 display device connecting 78 external 77 display output settings 80 display panel opening 49 display problems screen is blank 180 display, external adjusting 81 disposal information 29 disposing of used batteries 125 DVD using 103 DVD player general problems 190 E eject button...

User Manual
Page 233
... keys 96 function keys 96 H HDMI™ Out Port 77 headphones using 135 Help and Support Windows® operating system 176 Hibernation mode 83 configuring 87 hot key 209 starting again from 89 hot key disabling or enabling TouchPad™ 213 disabling or enabling wireless devices 212 display brightness 211 Hibernation mode 209 keyboard overlays 215 Lock (Instant security) 206 Output (Display switch) 210 power plan 207 Sleep mode 208 volume mute 205 Zoom (Display resolution) 214 zooming in 215 zooming out 215 Hot Key Cards 200 Hot key functions 204 hot key power...
... keys 96 function keys 96 H HDMI™ Out Port 77 headphones using 135 Help and Support Windows® operating system 176 Hibernation mode 83 configuring 87 hot key 209 starting again from 89 hot key disabling or enabling TouchPad™ 213 disabling or enabling wireless devices 212 display brightness 211 Hibernation mode 209 keyboard overlays 215 Lock (Instant security) 206 Output (Display switch) 210 power plan 207 Sleep mode 208 volume mute 205 Zoom (Display resolution) 214 zooming in 215 zooming out 215 Hot Key Cards 200 Hot key functions 204 hot key power...
User Manual
Page 234
...; keys 97 troubleshooting 180 using 95 keyboard, external 81 L light AC power 46 drive in-use indicator 104 lock computer, using 93 M main battery changing 120 installing 120, 122 removing 121 safety precautions 123 manual eject hole optical drive 104 memory adding 52 problem solving 178 removing memory module slot cover 54 Memory card reader inserting memory media 137 removing memory media 138 memory module installation 52 installing inserting into socket 55 removing 58, 59 memory module slot 54 microphone using 134 monitor 77 connecting 78, 79 monitor problems monitor not working 181 mouse...
...; keys 97 troubleshooting 180 using 95 keyboard, external 81 L light AC power 46 drive in-use indicator 104 lock computer, using 93 M main battery changing 120 installing 120, 122 removing 121 safety precautions 123 manual eject hole optical drive 104 memory adding 52 problem solving 178 removing memory module slot cover 54 Memory card reader inserting memory media 137 removing memory media 138 memory module installation 52 installing inserting into socket 55 removing 58, 59 memory module slot 54 microphone using 134 monitor 77 connecting 78, 79 monitor problems monitor not working 181 mouse...
User Manual
Page 235
... features 110 problem solving 178 turning on 50 power button 50 power plan hot key 119 power plans 118 power source connecting 47 powering down using Hibernate 87 using Sleep 89 precautions 43 printer connecting 81 problem solving 187, 188 printing a file 101 problem solving AC power 179 accessing disk drives 172 battery charge does not last 179 battery not charging 179 cannot insert diskette in drive 183 cannot read a diskette 183 changing display properties 181 checking device properties...
... features 110 problem solving 178 turning on 50 power button 50 power plan hot key 119 power plans 118 power source connecting 47 powering down using Hibernate 87 using Sleep 89 precautions 43 printer connecting 81 problem solving 187, 188 printing a file 101 problem solving AC power 179 accessing disk drives 172 battery charge does not last 179 battery not charging 179 cannot insert diskette in drive 183 cannot read a diskette 183 changing display properties 181 checking device properties...
User Manual
Page 236
...98 Windows® Start menu 98 starting up the computer from Shut down 87 from Sleep 92 Startup menu problem solving 175 supervisor password, deleting 149 supervisor password, set up 148 T taskbar 129 television adjusting display 81 connecting 78 Toshiba registering computer 51 worldwide offices 198 TOSHIBA Accessibility 163 Toshiba accessories memory 52 TOSHIBA Application Installer 146 TOSHIBA Assist 141 TOSHIBA Button Support 162 TOSHIBA eco power plan Using 120 TOSHIBA eco Utility 164 TOSHIBA Face Recognition Utility 151 TOSHIBA Hardware Setup 155 TOSHIBA HDD Protection Utility 153 Toshiba...
...98 Windows® Start menu 98 starting up the computer from Shut down 87 from Sleep 92 Startup menu problem solving 175 supervisor password, deleting 149 supervisor password, set up 148 T taskbar 129 television adjusting display 81 connecting 78 Toshiba registering computer 51 worldwide offices 198 TOSHIBA Accessibility 163 Toshiba accessories memory 52 TOSHIBA Application Installer 146 TOSHIBA Assist 141 TOSHIBA Button Support 162 TOSHIBA eco power plan Using 120 TOSHIBA eco Utility 164 TOSHIBA Face Recognition Utility 151 TOSHIBA Hardware Setup 155 TOSHIBA HDD Protection Utility 153 Toshiba...
User Manual
Page 237
... Health Monitor 165 TOSHIBA Service Station 165 TOSHIBA Zooming Utility 161 TouchPad™ adjusting settings 76 disabling 77 enabling 77 using 73 traveling tips 126 troubleshooting DVD player general problems 190 external keyboard 180 keyboard 180 optical drive 184 turning on the computer 50 turning on the power 50 U USB Sleep and Charge cannot use 196 USB Sleep and Charge Utility 158 USB Wakeup function does not work 196 USB-compatible printer 81 user password, disabling 150 user password, setting 149 using a file extension 101 Utilities 140 V video cables 78 video display device connecting...
... Health Monitor 165 TOSHIBA Service Station 165 TOSHIBA Zooming Utility 161 TouchPad™ adjusting settings 76 disabling 77 enabling 77 using 73 traveling tips 126 troubleshooting DVD player general problems 190 external keyboard 180 keyboard 180 optical drive 184 turning on the computer 50 turning on the power 50 U USB Sleep and Charge cannot use 196 USB Sleep and Charge Utility 158 USB Wakeup function does not work 196 USB-compatible printer 81 user password, disabling 150 user password, setting 149 using a file extension 101 Utilities 140 V video cables 78 video display device connecting...


