

Users Manual AU/NZ
Page 2
... liability for the purposes of TOSHIBA. Any other intellectual property rights. Disclaimer This manual has been validated and reviewed for personal use or use the screen mode switching functions (e.g. Under the copyright laws, this copyright protection technology must be authorized by U.S. The instructions and descriptions it contains are subject to the author or the copyright owner. Copyright © 2009 by the...
... liability for the purposes of TOSHIBA. Any other intellectual property rights. Disclaimer This manual has been validated and reviewed for personal use or use the screen mode switching functions (e.g. Under the copyright laws, this copyright protection technology must be authorized by U.S. The instructions and descriptions it contains are subject to the author or the copyright owner. Copyright © 2009 by the...

Users Manual AU/NZ
Page 8
... to make changes in their equipment, operations, or procedures. Pursuant to FCC CFR 47, Part 68: When you are ready to install or use the modem, call the telephone company and let them know of this information upon request. Connection to party lines service is subject to telephone company-provided coin service (central office implemented systems) is prohibited. Type of service...
... to make changes in their equipment, operations, or procedures. Pursuant to FCC CFR 47, Part 68: When you are ready to install or use the modem, call the telephone company and let them know of this information upon request. Connection to party lines service is subject to telephone company-provided coin service (central office implemented systems) is prohibited. Type of service...
Users Manual AU/NZ
Page 29
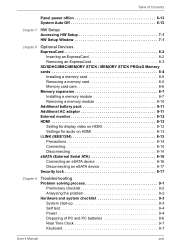
... Accessing HW Setup 7-1 HW Setup Window 7-1 Chapter 8 Optional Devices ExpressCard 8-2 Inserting an ExpressCard 8-2 Removing an ExpressCard 8-3 SD/SDHC/MMC/MEMORY STICK / MEMORY STICK PRO/xD Memory cards 8-4 Installing a memory card 8-5 Removing a memory card 8-5 Memory card care 8-6 Memory expansion 8-7 Installing a memory module 8-7 Removing a memory module 8-10 Additional battery pack 8-11 Additional AC adaptor 8-11 External monitor 8-12 HDMI 8-12 Setting for display video on HDMI 8-13 Settings for audio on HDMI 8-13 i.LINK (IEEE1394 8-13 Precautions 8-14 Connecting...
... Accessing HW Setup 7-1 HW Setup Window 7-1 Chapter 8 Optional Devices ExpressCard 8-2 Inserting an ExpressCard 8-2 Removing an ExpressCard 8-3 SD/SDHC/MMC/MEMORY STICK / MEMORY STICK PRO/xD Memory cards 8-4 Installing a memory card 8-5 Removing a memory card 8-5 Memory card care 8-6 Memory expansion 8-7 Installing a memory module 8-7 Removing a memory module 8-10 Additional battery pack 8-11 Additional AC adaptor 8-11 External monitor 8-12 HDMI 8-12 Setting for display video on HDMI 8-13 Settings for audio on HDMI 8-13 i.LINK (IEEE1394 8-13 Precautions 8-14 Connecting...

Users Manual AU/NZ
Page 31
... an experienced computer user, please continue reading the preface to learn about features that are going to install ExpressCards or connect external devices such as a monitor, be sure to familiarize yourself with this manual is composed of the TOSHIBA Satellite P500 / Satellite P505 / Satellite P507, Qosmio X505, Qosmio X500, Qosmio G60, Satellite P500D / Satellite P505D / Satellite P507D Series Series computer. Chapter 1, Introduction, is designed to begin using optional devices and troubleshooting. This powerful notebook computer provides...
... an experienced computer user, please continue reading the preface to learn about features that are going to install ExpressCards or connect external devices such as a monitor, be sure to familiarize yourself with this manual is composed of the TOSHIBA Satellite P500 / Satellite P505 / Satellite P507, Qosmio X505, Qosmio X500, Qosmio G60, Satellite P500D / Satellite P505D / Satellite P507D Series Series computer. Chapter 1, Introduction, is designed to begin using optional devices and troubleshooting. This powerful notebook computer provides...

Users Manual AU/NZ
Page 35
..., Qosmio X505, Qosmio X500, Qosmio G60, Satellite P500D / Satellite P505D / Satellite P507D Series Series Personal Computer User Information Guide ■ International Limited Warranty (ILW) Instruction (This instruction is preinstalled: ■ Windows® 7 ■ Microsoft Internet Explorer ■ TOSHIBA Value Added Package ■ TOSHIBA Hardware Setup ■ TOSHIBA Supervisor Password ■ TOSHIBA Assist ■ TOSHIBA ConfigFree ■ TOSHIBA HDD Protection ■ TOSHIBA DVD PLAYER ■ TOSHIBA FingerPrint Utility (FingerPrint support model only) ■ TOSHIBA Disc...
..., Qosmio X505, Qosmio X500, Qosmio G60, Satellite P500D / Satellite P505D / Satellite P507D Series Series Personal Computer User Information Guide ■ International Limited Warranty (ILW) Instruction (This instruction is preinstalled: ■ Windows® 7 ■ Microsoft Internet Explorer ■ TOSHIBA Value Added Package ■ TOSHIBA Hardware Setup ■ TOSHIBA Supervisor Password ■ TOSHIBA Assist ■ TOSHIBA ConfigFree ■ TOSHIBA HDD Protection ■ TOSHIBA DVD PLAYER ■ TOSHIBA FingerPrint Utility (FingerPrint support model only) ■ TOSHIBA Disc...
Users Manual AU/NZ
Page 42
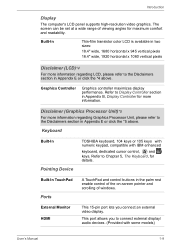
... TouchPad Ports External Monitor HDMI TOSHIBA keyboard, 104 keys or 105 keys with numeric keypad, compatible with some models) User's Manual 1-9 This port allows you connect an external video display. Introduction Display The computer's LCD panel supports high-resolution video graphics. Graphics Controller Graphics controller maximizes display performance. A TouchPad and control buttons in Appendix E or click the *5 above . The screen can be set at a wide range of windows. This 15-pin port lets you to the Disclaimers section in the palm rest enable control...
... TouchPad Ports External Monitor HDMI TOSHIBA keyboard, 104 keys or 105 keys with numeric keypad, compatible with some models) User's Manual 1-9 This port allows you connect an external video display. Introduction Display The computer's LCD panel supports high-resolution video graphics. Graphics Controller Graphics controller maximizes display performance. A TouchPad and control buttons in Appendix E or click the *5 above . The screen can be set at a wide range of windows. This 15-pin port lets you to the Disclaimers section in the palm rest enable control...
Users Manual AU/NZ
Page 43
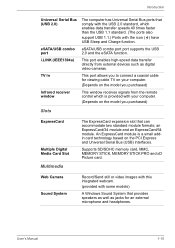
... USB Sleep and Charge function. TV In This port allows you purchased) Slots ExpressCard Multiple Digital Media Card Slot Multimedia The ExpressCard expansion slot that can accommodate two standard module formats; User's Manual 1-10 eSATA/USB combo eSATA/USB combo port port supports the USB port 2.0 and the eSATA function. i.LINK (IEEE1394a) This port enables high-speed data transfer directly from external devices such as jacks for viewing cable TV on your computer. (Depends on the model you to connect...
... USB Sleep and Charge function. TV In This port allows you purchased) Slots ExpressCard Multiple Digital Media Card Slot Multimedia The ExpressCard expansion slot that can accommodate two standard module formats; User's Manual 1-10 eSATA/USB combo eSATA/USB combo port port supports the USB port 2.0 and the eSATA function. i.LINK (IEEE1394a) This port enables high-speed data transfer directly from external devices such as jacks for viewing cable TV on your computer. (Depends on the model you to connect...
Users Manual AU/NZ
Page 52
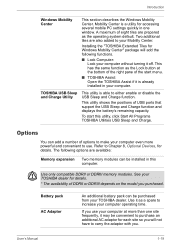
... enable or disable the USB Sleep and Charge function. Installing the "TOSHIBA Extended Tiles for details. If you use . User's Manual 1-19 Two additional tiles are available: Memory expansion Two memory modules can be purchased from your computer. This has the same function as a spare to use your computer even more than one window. The following functions. ■ Lock Computer: Lock your computer without turning it is a utility for accessing several mobile PC settings quickly...
... enable or disable the USB Sleep and Charge function. Installing the "TOSHIBA Extended Tiles for details. If you use . User's Manual 1-19 Two additional tiles are available: Memory expansion Two memory modules can be purchased from your computer. This has the same function as a spare to use your computer even more than one window. The following functions. ■ Lock Computer: Lock your computer without turning it is a utility for accessing several mobile PC settings quickly...
Users Manual AU/NZ
Page 83
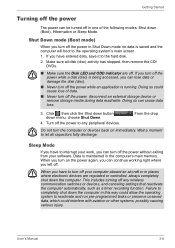
... have to let all disk (disc) activity has stopped, then remove the CD/ DVDs. ■ Make sure the Disk LED and ODD indicator are regulated or controlled, always completely shut down (Boot), Hibernation or Sleep Mode. Sleep Mode If you have to the hard disk. 2. Failure to any wireless communication switches or devices, and canceling settings that reactivate the computer automatically, such as a timer recording function. Turn off the power to completely shut down...
... have to let all disk (disc) activity has stopped, then remove the CD/ DVDs. ■ Make sure the Disk LED and ODD indicator are regulated or controlled, always completely shut down (Boot), Hibernation or Sleep Mode. Sleep Mode If you have to the hard disk. 2. Failure to any wireless communication switches or devices, and canceling settings that reactivate the computer automatically, such as a timer recording function. Turn off the power to completely shut down...
Users Manual AU/NZ
Page 89
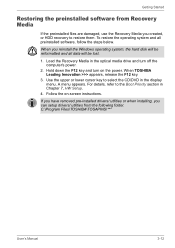
.../DVD in the display menu. C:\Program Files\TOSHIBA\TOSAPINS\*** User's Manual 3-12 Use the upper or lower cursor key to the Boot Priority section in the optical media drive and turn on -screen instructions. If you have removed pre-installed drivers/ utilities or when installing, you reinstall the Windows operating system, the hard disk will be lost. 1. Hold down the F12 key and turn off the computer's power. 2. Follow the on the power. When you can setup drivers/ utilities from Recovery Media...
.../DVD in the display menu. C:\Program Files\TOSHIBA\TOSAPINS\*** User's Manual 3-12 Use the upper or lower cursor key to the Boot Priority section in the optical media drive and turn on -screen instructions. If you have removed pre-installed drivers/ utilities or when installing, you reinstall the Windows operating system, the hard disk will be lost. 1. Hold down the F12 key and turn off the computer's power. 2. Follow the on the power. When you can setup drivers/ utilities from Recovery Media...
Users Manual AU/NZ
Page 155
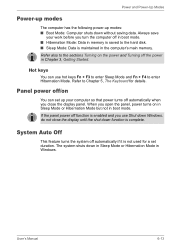
... hard disk. ■ Sleep Mode: Data is maintained in memory is saved to enter Hibernation Mode. Refer to the sections Turning on the power and Turning off the power in Chapter 3, Getting Started. Hot keys You can set duration. When you close the display until the shut down function is not used for details. The system shuts down without saving data. User's Manual 6-13 Refer also to Chapter 5, The Keyboard for a set...
... hard disk. ■ Sleep Mode: Data is maintained in memory is saved to enter Hibernation Mode. Refer to the sections Turning on the power and Turning off the power in Chapter 3, Getting Started. Hot keys You can set duration. When you close the display until the shut down function is not used for details. The system shuts down without saving data. User's Manual 6-13 Refer also to Chapter 5, The Keyboard for a set...
Users Manual AU/NZ
Page 166
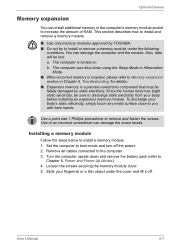
.... Installing a memory module Follow the steps below to boot mode and turn off . Set the computer to install a memory module. 1. You can damage the screw heads. b. To discharge your body's static electricity, simply touch any metal surface close to the computer. 3. User's Manual 8-7 a. Remove all cables connected to you with bare hands. Also, data will be sure to Chapter 6, Power and Power-Up Modes). 4. Loosen the screws securing the memory module cover...
.... Installing a memory module Follow the steps below to boot mode and turn off . Set the computer to install a memory module. 1. You can damage the screw heads. b. To discharge your body's static electricity, simply touch any metal surface close to the computer. 3. User's Manual 8-7 a. Remove all cables connected to you with bare hands. Also, data will be sure to Chapter 6, Power and Power-Up Modes). 4. Loosen the screws securing the memory module cover...
Users Manual AU/NZ
Page 179
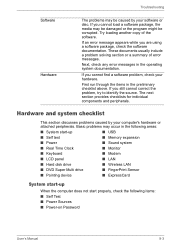
...; Memory expansion ■ Power ■ Sound system ■ Real Time Clock ■ Monitor ■ Keyboard ■ Modem ■ LCD panel ■ LAN ■ Hard disk drive ■ Wireless LAN ■ DVD Super Multi drive ■ FingerPrint Sensor ■ Pointing device ■ ExpressCard System start-up When the computer does not start properly, check the following items: ■ Self Test ■ Power Sources ■ Power-on Password User's Manual 9-3 Basic problems may occur in the operating...
...; Memory expansion ■ Power ■ Sound system ■ Real Time Clock ■ Monitor ■ Keyboard ■ Modem ■ LCD panel ■ LAN ■ Hard disk drive ■ Wireless LAN ■ DVD Super Multi drive ■ FingerPrint Sensor ■ Pointing device ■ ExpressCard System start-up When the computer does not start properly, check the following items: ■ Self Test ■ Power Sources ■ Power-on Password User's Manual 9-3 Basic problems may occur in the operating...

Users Manual AU/NZ
Page 183
... the BIOS setup screen using is garbled Make sure the software you are lost. Press Enter key. This makes the file invisible to the operating system, but the data can be caused by specialized utilities. Procedure Charge in System Time. 4. Press F2 key. Set the time in the RTC battery is charged. User's Manual 9-7 If you dispose of the PC, please delete all data ■ Take the hard disk drive to...
... the BIOS setup screen using is garbled Make sure the software you are lost. Press Enter key. This makes the file invisible to the operating system, but the data can be caused by specialized utilities. Procedure Charge in System Time. 4. Press F2 key. Set the time in the RTC battery is charged. User's Manual 9-7 If you dispose of the PC, please delete all data ■ Take the hard disk drive to...
Users Manual AU/NZ
Page 190
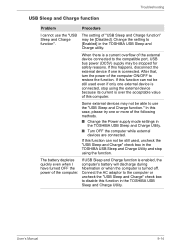
... Charge function". Connect the AC adaptor to the computer or uncheck the "USB Sleep and Charge" check box to [Enabled] in the TOSHIBA USB Sleep and Charge Utility. Troubleshooting USB Sleep and Charge function Problem Procedure I have turned OFF the power of "USB Sleep and Charge function" may not be [Disabled]. Change the setting to disable this case, please try one or more of the external device connected to restore the function. The setting of the computer. The battery depletes quickly even when I cannot use the "USB Sleep and Charge function...
... Charge function". Connect the AC adaptor to the computer or uncheck the "USB Sleep and Charge" check box to [Enabled] in the TOSHIBA USB Sleep and Charge Utility. Troubleshooting USB Sleep and Charge function Problem Procedure I have turned OFF the power of "USB Sleep and Charge function" may not be [Disabled]. Change the setting to disable this case, please try one or more of the external device connected to restore the function. The setting of the computer. The battery depletes quickly even when I cannot use the "USB Sleep and Charge function...

Users Manual AU/NZ
Page 209
... device operation time and number of actuations or status changes (i.e.: number of power button and FN key combination uses, AC adaptor, battery, LCD, fan, HDD, sound volume, wireless communication switch, TOSHIBA Express Port Replicator and USB information), date of initial system use restrictions above , the HDD data logged may be used to identify and provide a notification of residence (e.g., European Union). User's Manual Appendix F-1 Appendix F TOSHIBA PC Health Monitor TOSHIBA PC Health Monitor The TOSHIBA Health Monitor software program monitors computer system functions...
... device operation time and number of actuations or status changes (i.e.: number of power button and FN key combination uses, AC adaptor, battery, LCD, fan, HDD, sound volume, wireless communication switch, TOSHIBA Express Port Replicator and USB information), date of initial system use restrictions above , the HDD data logged may be used to identify and provide a notification of residence (e.g., European Union). User's Manual Appendix F-1 Appendix F TOSHIBA PC Health Monitor TOSHIBA PC Health Monitor The TOSHIBA Health Monitor software program monitors computer system functions...
Users Manual AU/NZ
Page 215
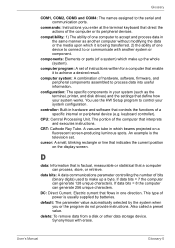
... you enter at the terminal keyboard that define how your system works. data bits: A data communications parameter controlling the number of hardware, software, firmware, and peripheral components assembled to achieve a desired result. cursor: A small, blinking rectangle or line that enable it is being transferred. 2) the ability of power is the television set of a specific internal or peripheral device (e.g. Electric current that interprets and executes instructions. The...
... you enter at the terminal keyboard that define how your system works. data bits: A data communications parameter controlling the number of hardware, software, firmware, and peripheral components assembled to achieve a desired result. cursor: A small, blinking rectangle or line that enable it is being transferred. 2) the ability of power is the television set of a specific internal or peripheral device (e.g. Electric current that interprets and executes instructions. The...
Users Manual AU/NZ
Page 218
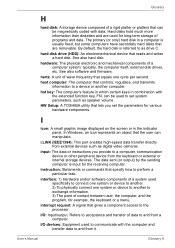
... to a device or another to as speaker volume. User's Manual Glossary-8 Hard disks hold much more information than diskettes and are removable. See also software and firmware. host computer: The computer that reads and writes a hard disk. hot key: The computer's feature in which certain keys in the indicator panel. input: The data or instructions you set system parameters, such as drive C. I icon: A small graphic image displayed on the screen or...
... to a device or another to as speaker volume. User's Manual Glossary-8 Hard disks hold much more information than diskettes and are removable. See also software and firmware. host computer: The computer that reads and writes a hard disk. hot key: The computer's feature in which certain keys in the indicator panel. input: The data or instructions you set system parameters, such as drive C. I icon: A small graphic image displayed on the screen or...
Users Manual AU/NZ
Page 219
... each key, the transmitted code is etched into character forming segments with the Labelflash™ function can burn pictures directly into the processor to help improve processing speed. See also byte and megabyte. L2 cache: Memory cache installed on the key. keyboard: An input device containing switches that extend to the 10th power. The viewing-side coating is , in turn, representative...
... each key, the transmitted code is etched into character forming segments with the Labelflash™ function can burn pictures directly into the processor to help improve processing speed. See also byte and megabyte. L2 cache: Memory cache installed on the key. keyboard: An input device containing switches that extend to the 10th power. The viewing-side coating is , in turn, representative...

Users Manual AU/NZ
Page 223
SIO: Serial Input/Output. software: The set of digital interface for audio. A system disk is an industry standard interface for data input/output. SD/SDHC Card: Secure Digital cards are flash memory widely used in asynchronous serial communications. See also hardware. T terminal: A typewriter-like keyboard and CRT display screen connected to a single port on the IBM keyboard, change some configuration options, stop bit: One or more bits of a byte that follow the...
SIO: Serial Input/Output. software: The set of digital interface for audio. A system disk is an industry standard interface for data input/output. SD/SDHC Card: Secure Digital cards are flash memory widely used in asynchronous serial communications. See also hardware. T terminal: A typewriter-like keyboard and CRT display screen connected to a single port on the IBM keyboard, change some configuration options, stop bit: One or more bits of a byte that follow the...


