User Guide
Page 29
... 60 Hard Disk Drive Recovery options 61 Hard Disk Drive Recovery using the Recovery media 66 Checking the HDD operating status 69 Installing drivers and applications 69 Using the TouchPad 69 Scrolling with the TouchPad 70 Control buttons 70 Disabling or enabling the TouchPad 70 Using external display devices 71 Connecting the...
... 60 Hard Disk Drive Recovery options 61 Hard Disk Drive Recovery using the Recovery media 66 Checking the HDD operating status 69 Installing drivers and applications 69 Using the TouchPad 69 Scrolling with the TouchPad 70 Control buttons 70 Disabling or enabling the TouchPad 70 Using external display devices 71 Connecting the...
User Guide
Page 30
... up your work 98 Restoring your work 99 Using the optical drive 99 Optical drive components 100 Media control buttons 101 Inserting an optical disc 102 Playing an audio CD 103 Playing optical media 103 Recording optical media 104 Removing a disc with the computer on...........104 Removing a disc with the computer off ..........105 Caring...
... up your work 98 Restoring your work 99 Using the optical drive 99 Optical drive components 100 Media control buttons 101 Inserting an optical disc 102 Playing an audio CD 103 Playing optical media 103 Recording optical media 104 Removing a disc with the computer on...........104 Removing a disc with the computer off ..........105 Caring...
User Guide
Page 32
... 134 Inserting an ExpressCard 134 Removing an ExpressCard 134 Using the Bridge Media Adapter Slot 135 Inserting memory media 135 Removing memory media 136 Using the i.LINK® port 136 Chapter 5: Utilities 137 TOSHIBA Assist 138 Connect 139 Secure 140 Protect & Fix 141 Optimize 142 ... Using an instant password 143 Using a supervisor password 144 Using a user password 145 Deleting a user password 146 TOSHIBA PC Diagnostic Tool Utility 147 Mouse Utility 148 TOSHIBA Hardware Setup 149 TOSHIBA Zooming Utility 153 TOSHIBA Button Support 154 CD/DVD Drive Acoustic Silencer 155...
... 134 Inserting an ExpressCard 134 Removing an ExpressCard 134 Using the Bridge Media Adapter Slot 135 Inserting memory media 135 Removing memory media 136 Using the i.LINK® port 136 Chapter 5: Utilities 137 TOSHIBA Assist 138 Connect 139 Secure 140 Protect & Fix 141 Optimize 142 ... Using an instant password 143 Using a supervisor password 144 Using a user password 145 Deleting a user password 146 TOSHIBA PC Diagnostic Tool Utility 147 Mouse Utility 148 TOSHIBA Hardware Setup 149 TOSHIBA Zooming Utility 153 TOSHIBA Button Support 154 CD/DVD Drive Acoustic Silencer 155...
User Guide
Page 101
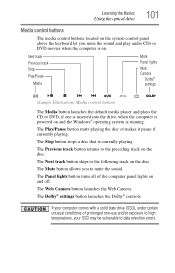
Next track Previous track Stop Play/Pause Media Mute Panel lights Web Camera Dolby® settings (Sample Illustration) Media control buttons The Media button launches the default media player and plays the CD or DVD, if one is inserted into the drive, when the computer is powered on ...and the Windows® operating system is currently playing. The Panel lights button turns all of prolonged non...
Next track Previous track Stop Play/Pause Media Mute Panel lights Web Camera Dolby® settings (Sample Illustration) Media control buttons The Media button launches the default media player and plays the CD or DVD, if one is inserted into the drive, when the computer is powered on ...and the Windows® operating system is currently playing. The Panel lights button turns all of prolonged non...

User Guide
Page 103
...on, the default player opens. ❖ To play the CD. Do not touch the surface of media, use the associated software to pause, click the Play/Pause button. ❖ To stop the CD, click the Stop button. If you insert the disc incorrectly, it to select and then play the CD or to... open Windows Media® Player and use the disc. If this , follow these steps: 1 Click Start, and then Computer. 2 Click the optical drive icon. Before putting on headphones to use it may jam the drive. Do not stack discs. To do this happens, contact Toshiba support for assistance. 9 ...
...on, the default player opens. ❖ To play the CD. Do not touch the surface of media, use the associated software to pause, click the Play/Pause button. ❖ To stop the CD, click the Stop button. If you insert the disc incorrectly, it to select and then play the CD or to... open Windows Media® Player and use the disc. If this , follow these steps: 1 Click Start, and then Computer. 2 Click the optical drive icon. Before putting on headphones to use it may jam the drive. Do not stack discs. To do this happens, contact Toshiba support for assistance. 9 ...
User Guide
Page 104
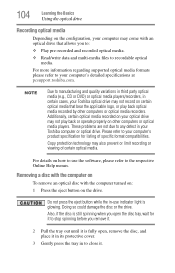
... on: 1 Press the eject button on the drive. These problems are not due to any defect in to close it to stop spinning before you to: ❖ Play pre-recorded and recorded optical media. ❖ Read/write data and multi-media files to your computer's detailed specifications at pcsupport.toshiba.com. Please refer to...
... on: 1 Press the eject button on the drive. These problems are not due to any defect in to close it to stop spinning before you to: ❖ Play pre-recorded and recorded optical media. ❖ Read/write data and multi-media files to your computer's detailed specifications at pcsupport.toshiba.com. Please refer to...

User Guide
Page 111
When the on the computer before trying to monitor the remaining battery power. Power button System Indicator Lights AC power light On/off light Battery light Bridge Media Adapter light Internal storage drive light (Sample Illustration) Power and battery light locations Determining ...remaining battery power NOTE Wait at least 16 seconds after turning on /off light ( ), and the power button light. Mobile Computing Monitoring...
When the on the computer before trying to monitor the remaining battery power. Power button System Indicator Lights AC power light On/off light Battery light Bridge Media Adapter light Internal storage drive light (Sample Illustration) Power and battery light locations Determining ...remaining battery power NOTE Wait at least 16 seconds after turning on /off light ( ), and the power button light. Mobile Computing Monitoring...

User Guide
Page 124
... the desktop Your computer's desktop includes several standard features: icons, Start button, Taskbar, Notification Area, and background pattern. Icons Start button Taskbar Notification Area (Sample Image) Windows® operating system desktop Icons ...An icon represents a folder, file, or program that can create a new desktop icon for example: Recycle Bin-Holds files you empty the Recycle Bin. You may be quickly activated by dragging the element's icon from a diskette or flash media...
... the desktop Your computer's desktop includes several standard features: icons, Start button, Taskbar, Notification Area, and background pattern. Icons Start button Taskbar Notification Area (Sample Image) Windows® operating system desktop Icons ...An icon represents a folder, file, or program that can create a new desktop icon for example: Recycle Bin-Holds files you empty the Recycle Bin. You may be quickly activated by dragging the element's icon from a diskette or flash media...

User Guide
Page 154
... located on the system control panel directly above the keyboard. The TOSHIBA Button Support window appears. (Sample Image) TOSHIBA Button Support screen 2 Under Button Name, select the button whose function is to customize the Mute and Media buttons. 154 Utilities TOSHIBA Button Support The zoom in and zoom out hot keys will now work with the applications you to be...
... located on the system control panel directly above the keyboard. The TOSHIBA Button Support window appears. (Sample Image) TOSHIBA Button Support screen 2 Under Button Name, select the button whose function is to customize the Mute and Media buttons. 154 Utilities TOSHIBA Button Support The zoom in and zoom out hot keys will now work with the applications you to be...
User Guide
Page 179
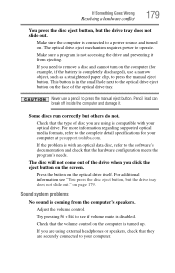
... the face of the drive when you are securely connected to press the manual eject button. If you need to a power source and turned on the computer (for your computer at pcsupport.toshiba.com. Some discs run correctly but the drive tray does not slide out." If ... 179. on the optical drive itself. Try pressing Fn + Esc to see "You press the disc eject button, but others do not. For more information regarding supported optical media formats, refer to operate. The optical drive eject mechanism requires power to the complete detail specifications for example,...
... the face of the drive when you are securely connected to press the manual eject button. If you need to a power source and turned on the computer (for your computer at pcsupport.toshiba.com. Some discs run correctly but the drive tray does not slide out." If ... 179. on the optical drive itself. Try pressing Fn + Esc to see "You press the disc eject button, but others do not. For more information regarding supported optical media formats, refer to operate. The optical drive eject mechanism requires power to the complete detail specifications for example,...

User Guide
Page 226
... notifications 112 power plan 202 power plan hot key 115 real-time clock (RTC) 107 removing 116 BIOS Setup see TOSHIBA Hardware Setup Bridge Media Adapter inserting memory media 135 removing memory media 136 button power 51, 61 start 125 C character keys 92 charging the battery 48 checking device properties 171 click 70 communications network...
... notifications 112 power plan 202 power plan hot key 115 real-time clock (RTC) 107 removing 116 BIOS Setup see TOSHIBA Hardware Setup Bridge Media Adapter inserting memory media 135 removing memory media 136 button power 51, 61 start 125 C character keys 92 charging the battery 48 checking device properties 171 click 70 communications network...
User Guide
Page 229
...disc positioning 102 optical discs caring for 105 handling 103 inserting 102 removing 104, 105 optical drive DVD, using 99 problems 178 troubleshooting 178 optical media recording 104 other documentation 39 P password deleting a supervisor 145 disabling a user 146 setting a user 145 supervisor set up 144 types 143 passwords...not start 165 connecting cable to AC adaptor 47 cord/cable connectors 211 energy-saving features 106 problem solving 173 turning on 50 power button 51, 61 power plan hot key 115 power plans 114 power source 46 connecting 47 powering down using Hibernation 82 using Shut Down...
...disc positioning 102 optical discs caring for 105 handling 103 inserting 102 removing 104, 105 optical drive DVD, using 99 problems 178 troubleshooting 178 optical media recording 104 other documentation 39 P password deleting a supervisor 145 disabling a user 146 setting a user 145 supervisor set up 144 types 143 passwords...not start 165 connecting cable to AC adaptor 47 cord/cable connectors 211 energy-saving features 106 problem solving 173 turning on 50 power button 51, 61 power plan hot key 115 power plans 114 power source 46 connecting 47 powering down using Hibernation 82 using Shut Down...

