
User Guide
Page 31
... Formatting an SD card 131 Using Standby or Hibernate while using the SD card 131 Removing an SD card 131 Using the i.LINK® port 132 Using an expansion device 133 Using an Optional Toshiba Slim Port Replicator II with your computer.......133 Chapter 5: Utilities 134 TOSHIBA Assist 135 Connect 136 Secure 137 Protect & Fix 138 Optimize 139 TOSHIBA Application Installer 140 Setting passwords 141 Using an instant password 141 Using a supervisor password 142 Using a user password 144 Deleting a user password 145 TOSHIBA...
... Formatting an SD card 131 Using Standby or Hibernate while using the SD card 131 Removing an SD card 131 Using the i.LINK® port 132 Using an expansion device 133 Using an Optional Toshiba Slim Port Replicator II with your computer.......133 Chapter 5: Utilities 134 TOSHIBA Assist 135 Connect 136 Secure 137 Protect & Fix 138 Optimize 139 TOSHIBA Application Installer 140 Setting passwords 141 Using an instant password 141 Using a supervisor password 142 Using a user password 144 Deleting a user password 145 TOSHIBA...
User Guide
Page 50
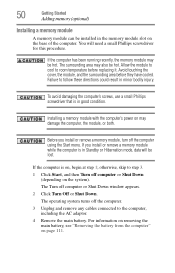
..., the memory module may be hot. Installing a memory module with the computer's power on the base of the computer. The operating system turns off computer or Shut Down window appears. 2 Click Turn Off or Shut Down. 50 Getting Started Adding memory (optional) Installing a memory module A memory module can be installed in the memory module slot on may damage the computer, the module, or both. Failure to the computer, including the AC adaptor. 4 Remove the main battery.
..., the memory module may be hot. Installing a memory module with the computer's power on the base of the computer. The operating system turns off computer or Shut Down window appears. 2 Click Turn Off or Shut Down. 50 Getting Started Adding memory (optional) Installing a memory module A memory module can be installed in the memory module slot on may damage the computer, the module, or both. Failure to the computer, including the AC adaptor. 4 Remove the main battery.
User Guide
Page 54
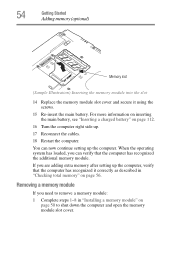
54 Getting Started Adding memory (optional) Memory slot (Sample Illustration) Inserting the memory module into the slot 14 Replace the memory module slot cover and secure it correctly as described in "Installing a memory module" on page 112. 16 Turn the computer right side up the computer. Removing a memory module If you need to remove a memory module: 1 Complete steps 1-8 in "Checking total memory" on page 56. When the operating system has loaded, you are adding extra memory after setting up...
54 Getting Started Adding memory (optional) Memory slot (Sample Illustration) Inserting the memory module into the slot 14 Replace the memory module slot cover and secure it correctly as described in "Installing a memory module" on page 112. 16 Turn the computer right side up the computer. Removing a memory module If you need to remove a memory module: 1 Complete steps 1-8 in "Checking total memory" on page 56. When the operating system has loaded, you are adding extra memory after setting up...
User Guide
Page 56
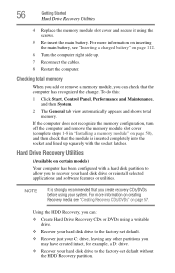
... recognize the memory configuration, turn off the computer and remove the memory module slot cover (complete steps 1-8 in "Installing a memory module" on page 112. 6 Turn the computer right side up squarely with a hard disk partition to allow you create recovery CDs/DVDs before using your hard disk drive or reinstall selected applications and software features or utilities. Using the HDD Recovery, you can check that you to the factory-set default without the HDD Recovery partition. For more information on creating Recovery media see "Inserting a charged battery" on...
... recognize the memory configuration, turn off the computer and remove the memory module slot cover (complete steps 1-8 in "Installing a memory module" on page 112. 6 Turn the computer right side up squarely with a hard disk partition to allow you create recovery CDs/DVDs before using your hard disk drive or reinstall selected applications and software features or utilities. Using the HDD Recovery, you can check that you to the factory-set default without the HDD Recovery partition. For more information on creating Recovery media see "Inserting a charged battery" on...

User Guide
Page 145
... these features can be used with each other to increase security even further, or to simplify the ways that you want to save the password to a text file on a diskette or media of your system. Deleting a user password To cancel the power-on -screen instructions to remove the user password. Utilities TOSHIBA Security Assist 145 4 Click Set. 5 Enter your password, and then enter it again to verify...
... these features can be used with each other to increase security even further, or to simplify the ways that you want to save the password to a text file on a diskette or media of your system. Deleting a user password To cancel the power-on -screen instructions to remove the user password. Utilities TOSHIBA Security Assist 145 4 Click Set. 5 Enter your password, and then enter it again to verify...
User Guide
Page 192
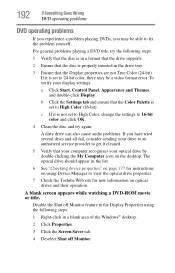
... for new information on the desktop. A blank screen appears while watching a DVD-ROM movie or title. If it is not set to 24-bit color, there may be a video format error. A dirty drive can also cause audio problems. If you may be able to fix the problem yourself. The optical drive should appear in the drive tray. 3 Ensure that your computer recognizes your display settings: a Click Start, Control Panel, Appearance...
... for new information on the desktop. A blank screen appears while watching a DVD-ROM movie or title. If it is not set to 24-bit color, there may be a video format error. A dirty drive can also cause audio problems. If you may be able to fix the problem yourself. The optical drive should appear in the drive tray. 3 Ensure that your computer recognizes your display settings: a Click Start, Control Panel, Appearance...
User Guide
Page 233
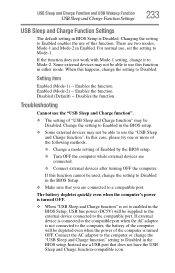
.... USB Sleep and Charge Function and USB Wakeup Function USB Sleep and Charge Function Settings 233 USB Sleep and Charge Function Settings The default setting in BIOS Setup is turned OFF. If external device is connected to the compatible port when the AC adaptor is not connected to the compatible port. Enables the function Disabled (Default) -- Changing the setting to Disabled in the BIOS setup. The battery depletes quickly even when the computer's power is turned OFF. ❖ When "USB Sleep and Charge function" is set the setting to Mode-2. Instead use the "USB Sleep...
.... USB Sleep and Charge Function and USB Wakeup Function USB Sleep and Charge Function Settings 233 USB Sleep and Charge Function Settings The default setting in BIOS Setup is turned OFF. If external device is connected to the compatible port when the AC adaptor is not connected to the compatible port. Enables the function Disabled (Default) -- Changing the setting to Disabled in the BIOS setup. The battery depletes quickly even when the computer's power is turned OFF. ❖ When "USB Sleep and Charge function" is set the setting to Mode-2. Instead use the "USB Sleep...
User Guide
Page 243
... crystal display (LCD) - A type of using a pointing device such as a mouse. A filter over a relatively limited area and connected by a communications link that activates a memory resident program. interlaced - See device. See also cache, CPU cache, L2 cache. LAN (local area network) - I icon - K keyboard shortcut - The ability to interact with the Fn key can set system options or control system parameters, such as the battery save mode. (2) A key or combination of the display, creating light and...
... crystal display (LCD) - A type of using a pointing device such as a mouse. A filter over a relatively limited area and connected by a communications link that activates a memory resident program. interlaced - See device. See also cache, CPU cache, L2 cache. LAN (local area network) - I icon - K keyboard shortcut - The ability to interact with the Fn key can set system options or control system parameters, such as the battery save mode. (2) A key or combination of the display, creating light and...
User Guide
Page 251
...-esse change/remove key assignments 153 starting 150 Fn-esse program 150 assigning a key 150 using drag-and-drop 151 function keys 85 H hardware conflicts 174 resolving 176 headphones using 127 Help and Support Windows® operating system 174 Hibernation mode 73 configuring 77 starting again from 78 hot key display brightness 207 display modes 207 Hibernation mode 206 keyboard overlays 209 password security 204 power profile 205 Standby mode 206 volume mute 203 zooming 208 hot key power profile 110 Hotkey utility...
...-esse change/remove key assignments 153 starting 150 Fn-esse program 150 assigning a key 150 using drag-and-drop 151 function keys 85 H hardware conflicts 174 resolving 176 headphones using 127 Help and Support Windows® operating system 174 Hibernation mode 73 configuring 77 starting again from 78 hot key display brightness 207 display modes 207 Hibernation mode 206 keyboard overlays 209 password security 204 power profile 205 Standby mode 206 volume mute 203 zooming 208 hot key power profile 110 Hotkey utility...
User Guide
Page 252
... keyboard character keys 84 function keys 85 hot keys 209 not working 170 overlay keys 86 troubleshooting 180 using 84 Windows® special keys 85 keyboard, external 69 keyboard, full-size 84 L lock computer, using 80 M main battery removing 111 memory adding 49 problem solving 178 removing expansion slot cover 51 memory module inserting 52 installation 50 removing 55 microphone 126 monitor 67 connecting 68 not working 181 mouse installing 69 serial 69 mouse utility 159 N network accessing 121 Dial-Up Networking Wizard 121 networking wireless 122 O opening the display panel 47 optical drive...
... keyboard character keys 84 function keys 85 hot keys 209 not working 170 overlay keys 86 troubleshooting 180 using 84 Windows® special keys 85 keyboard, external 69 keyboard, full-size 84 L lock computer, using 80 M main battery removing 111 memory adding 49 problem solving 178 removing expansion slot cover 51 memory module inserting 52 installation 50 removing 55 microphone 126 monitor 67 connecting 68 not working 181 mouse installing 69 serial 69 mouse utility 159 N network accessing 121 Dial-Up Networking Wizard 121 networking wireless 122 O opening the display panel 47 optical drive...
User Guide
Page 253
... 184 Device Manager 176 disabling a device 177 disk drive is slow 183 display is blank 181 external display not working 182 external monitor 181 faulty memory 178 hardware conflict 174, 175 high-pitched noise 186 illegal operation 169 Internet bookmarked site not found 174 Internet connection is slow 174 keyboard not responding 170 missing files/trouble accessing a disk 183 no sound 185 non-system disk or disk error 171, 184 PC Card 186 checklist 187 error occurs 188 hot...
... 184 Device Manager 176 disabling a device 177 disk drive is slow 183 display is blank 181 external display not working 182 external monitor 181 faulty memory 178 hardware conflict 174, 175 high-pitched noise 186 illegal operation 169 Internet bookmarked site not found 174 Internet connection is slow 174 keyboard not responding 170 missing files/trouble accessing a disk 183 no sound 185 non-system disk or disk error 171, 184 PC Card 186 checklist 187 error occurs 188 hot...
Maintenance Manual
Page 3
... the right screwdriver. Installation of the computer may result in death or serious bodily injury, if the safety instruction is not observed. Improper repair of the wrong battery can cause the battery to perform hardware service maintenance for the Toshiba Personal Computer PORTÉGÉ R500. CAUTION: "Caution" indicates the existence of a hazard that could result in this manual to bring important information...
... the right screwdriver. Installation of the computer may result in death or serious bodily injury, if the safety instruction is not observed. Improper repair of the wrong battery can cause the battery to perform hardware service maintenance for the Toshiba Personal Computer PORTÉGÉ R500. CAUTION: "Caution" indicates the existence of a hazard that could result in this manual to bring important information...
Maintenance Manual
Page 147
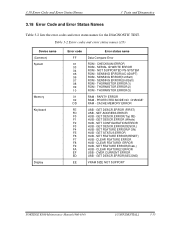
...ERROR(2nd Batt) ROM - SET FEATURE ERROR(P ON) HUB - OVER CURRENT ERROR USB - GET DESCR.ERROR(DESCR.) HUB - SET FEATURE ERROR(Enab.) HUB - 3.18 Error Code and Error Status Names 3 Tests and Diagnostics 3.18 Error Code and Error Status Names Table 3-2 lists the error codes and error status names for the DIAGNOSTIC TEST. SENSING ERROR(AC-ADAPT) ROM - PARITY ERROR RAM - CLEAR FEATURE1 ERROR HUB - CLEAR FEATURE ERROR HUB - PROTECTED MODE NO CHANGE' RAM - Table 3-2 Error codes and error status names (1/3) Device name (Common) System Memory Keyboard Display Error code...
...ERROR(2nd Batt) ROM - SET FEATURE ERROR(P ON) HUB - OVER CURRENT ERROR USB - GET DESCR.ERROR(DESCR.) HUB - SET FEATURE ERROR(Enab.) HUB - 3.18 Error Code and Error Status Names 3 Tests and Diagnostics 3.18 Error Code and Error Status Names Table 3-2 lists the error codes and error status names for the DIAGNOSTIC TEST. SENSING ERROR(AC-ADAPT) ROM - PARITY ERROR RAM - CLEAR FEATURE1 ERROR HUB - CLEAR FEATURE ERROR HUB - PROTECTED MODE NO CHANGE' RAM - Table 3-2 Error codes and error status names (1/3) Device name (Common) System Memory Keyboard Display Error code...
User Manual
Page 27
... key, be sure to disable this to allow sounds to the state it . When removing pre-installed drivers / utilities or when installing, you originally received it was in Chapter 7, HW Setup & BIOS Setup for restoring the pre-installed software: External DVD Super Multi Drive PA3454U External CD-RW/DVD-ROM Drive PA3438U If the pre-installed files are damaged, you have created or the hard disk drive recovery process to restore the computer to be heard before starting the restore...
... key, be sure to disable this to allow sounds to the state it . When removing pre-installed drivers / utilities or when installing, you originally received it was in Chapter 7, HW Setup & BIOS Setup for restoring the pre-installed software: External DVD Super Multi Drive PA3454U External CD-RW/DVD-ROM Drive PA3438U If the pre-installed files are damaged, you have created or the hard disk drive recovery process to restore the computer to be heard before starting the restore...
User Manual
Page 57
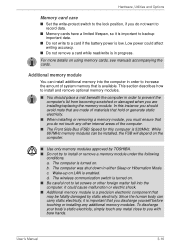
... system memory that may be installed, the FSB will depend on using memory cards, see manuals accompanying the cards. It could affect writing accuracy. ■ Do not remove a card while read/write is in order to prevent the computer's lid from becoming scratched or damaged when you do not touch any additional memory modules. Hardware, Utilities and Options Memory card care ■ Set the write-protect switch to the lock position...
... system memory that may be installed, the FSB will depend on using memory cards, see manuals accompanying the cards. It could affect writing accuracy. ■ Do not remove a card while read/write is in order to prevent the computer's lid from becoming scratched or damaged when you do not touch any additional memory modules. Hardware, Utilities and Options Memory card care ■ Set the write-protect switch to the lock position...
User Manual
Page 60
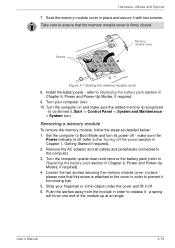
... it with two screws. Set the computer to the Turning off - User's Manual 3-19 Install the battery pack - make sure the added memory is attached to the cover in order to release it , Start -> Control Panel -> System and Maintenance > System icon. Remove the AC adaptor and all cables and peripherals connected to ensure that the memory module cover is off (refer to Boot Mode and turn its power off the power section in place please...
... it with two screws. Set the computer to the Turning off - User's Manual 3-19 Install the battery pack - make sure the added memory is attached to the cover in order to release it , Start -> Control Panel -> System and Maintenance > System icon. Remove the AC adaptor and all cables and peripherals connected to ensure that the memory module cover is off (refer to Boot Mode and turn its power off the power section in place please...
User Manual
Page 142
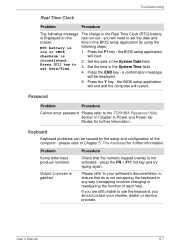
... by using the RTC battery is not remapping the keyboard in the Real Time Clock (RTC) battery is Displayed on the has run out - Please refer to your reseller, dealer or service provider. please refer to ensure that the numeric keypad overlay is will need to the TOSHIBA Password Utility section in the BIOS setup application by the setup and configuration of each key). User's Manual 8-7 Troubleshooting Real...
... by using the RTC battery is not remapping the keyboard in the Real Time Clock (RTC) battery is Displayed on the has run out - Please refer to your reseller, dealer or service provider. please refer to ensure that the numeric keypad overlay is will need to the TOSHIBA Password Utility section in the BIOS setup application by the setup and configuration of each key). User's Manual 8-7 Troubleshooting Real...

User Manual
Page 152
... the monitor's power switch is connected. To keep this occurs, press FN + F5 to re-set as the primary display device in Sleep Mode. Troubleshooting External monitor Please also refer to Chapter 3, Hardware, Utilities and Options, and to the documentation supplied with your reseller, dealer or service provider. No display Try adjusting the contrast and brightness controls on , you are still unable to clone mode. When the external monitor is in order to change the display...
... the monitor's power switch is connected. To keep this occurs, press FN + F5 to re-set as the primary display device in Sleep Mode. Troubleshooting External monitor Please also refer to Chapter 3, Hardware, Utilities and Options, and to the documentation supplied with your reseller, dealer or service provider. No display Try adjusting the contrast and brightness controls on , you are still unable to clone mode. When the external monitor is in order to change the display...
User Manual
Page 186
... instructions. This type of keys you enter from a disk or other data storage device. The CONFIG.SYS file contains device drivers that controls the functions of bits (binary digits) used to achieve a desired result. control keys: A key or sequence of power is the television set of the computer that define how your system configuration. CPS: Characters Per Second. CPU: Central Processing Unit. delete: To remove data from the keyboard to make...
... instructions. This type of keys you enter from a disk or other data storage device. The CONFIG.SYS file contains device drivers that controls the functions of bits (binary digits) used to achieve a desired result. control keys: A key or sequence of power is the television set of the computer that define how your system configuration. CPS: Characters Per Second. CPU: Central Processing Unit. delete: To remove data from the keyboard to make...
User Manual
Page 190
.... monitor: A device that transmits a specific code to 1024 kilobytes. Sometimes called a screen. Liquid Crystal Display (LCD): Liquid crystal sealed between the glass sheets alters the brightness of wave frequency that uses large scale integration. See also kilobyte. Each keystroke activates a switch that uses rows and columns of options on the key. kilobyte (KB): A unit of data storage equal to the computer. M main board: See motherboard. See...
.... monitor: A device that transmits a specific code to 1024 kilobytes. Sometimes called a screen. Liquid Crystal Display (LCD): Liquid crystal sealed between the glass sheets alters the brightness of wave frequency that uses large scale integration. See also kilobyte. Each keystroke activates a switch that uses rows and columns of options on the key. kilobyte (KB): A unit of data storage equal to the computer. M main board: See motherboard. See...


