User Guide
Page 28
... first time 47 Opening the display panel 47 Your computer's features and specifications ....48 Turning on the power 48 Adding memory (optional 49 Installing a memory module 50 Removing a memory module 54 Checking total memory 56 Hard Drive Recovery Utilities 56 Creating Recovery CDs/DVDs 57 Hard Disk Drive Recovery using the recovery partition 58...
... first time 47 Opening the display panel 47 Your computer's features and specifications ....48 Turning on the power 48 Adding memory (optional 49 Installing a memory module 50 Removing a memory module 54 Checking total memory 56 Hard Drive Recovery Utilities 56 Creating Recovery CDs/DVDs 57 Hard Disk Drive Recovery using the recovery partition 58...

User Guide
Page 32
... assign a key 151 Viewing existing key assignments 153 Changing or removing existing key assignments 153 TOSHIBA Hotkey Utility 153 TOSHIBA SD™ Memory Card Format Utility .........154 TOSHIBA SD™ Memory Boot Utility 155 Booting from a bootable SD card 156 TOSHIBA Power Saver 157 Preset Power Profiles 158 Quickly creating a new power profile 158 Customizing a power...
... assign a key 151 Viewing existing key assignments 153 Changing or removing existing key assignments 153 TOSHIBA Hotkey Utility 153 TOSHIBA SD™ Memory Card Format Utility .........154 TOSHIBA SD™ Memory Boot Utility 155 Booting from a bootable SD card 156 TOSHIBA Power Saver 157 Preset Power Profiles 158 Quickly creating a new power profile 158 Customizing a power...
User Guide
Page 33
...conflict 174 A plan of action 175 Resolving hardware conflicts on your own .....175 Fixing a problem with Device Manager ...........176 Memory problems 178 Power and the batteries 179 Keyboard problems 180 Display problems 181 Disk drive problems 183 Optical drive problems 184 Sound... backup in the Windows® operating system 195 If you need further assistance 200 Before you contact Toshiba 200 Contacting Toshiba 200 Other Toshiba Internet Web sites 201 Toshiba's worldwide offices 201 Appendix A: Hot Keys 203 Volume Mute 203 Password security 204 Without a password ...
...conflict 174 A plan of action 175 Resolving hardware conflicts on your own .....175 Fixing a problem with Device Manager ...........176 Memory problems 178 Power and the batteries 179 Keyboard problems 180 Display problems 181 Disk drive problems 183 Optical drive problems 184 Sound... backup in the Windows® operating system 195 If you need further assistance 200 Before you contact Toshiba 200 Contacting Toshiba 200 Other Toshiba Internet Web sites 201 Toshiba's worldwide offices 201 Appendix A: Hot Keys 203 Volume Mute 203 Password security 204 Without a password ...
User Guide
Page 42
... adding external or internal components to be chosen." Your computer contains a rechargeable main battery that needs to your computer. Click Next to , a mouse, keyboard, printer, memory, and PC Cards. The first time you turn off the power again until the operating system has loaded completely. The computer will display the message...
... adding external or internal components to be chosen." Your computer contains a rechargeable main battery that needs to your computer. Click Next to , a mouse, keyboard, printer, memory, and PC Cards. The first time you turn off the power again until the operating system has loaded completely. The computer will display the message...
User Guide
Page 43
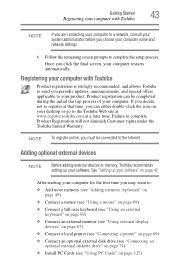
.... Failure to the Internet. Adding optional external devices NOTE Before adding external devices or memory, Toshiba recommends setting up your software" on page 127) Getting Started 43 Registering your computer with Toshiba Product registration is strongly recommended, and allows Toshiba to send you periodic updates, announcements, and special offers applicable to your product. Once...
.... Failure to the Internet. Adding optional external devices NOTE Before adding external devices or memory, Toshiba recommends setting up your software" on page 127) Getting Started 43 Registering your computer with Toshiba Product registration is strongly recommended, and allows Toshiba to send you periodic updates, announcements, and special offers applicable to your product. Once...

User Guide
Page 49
... devices or memory, Toshiba recommends setting up your software" on the computer for the first time, do not turn on page 42. Adding memory (optional) HINT: To purchase additional memory modules, see the accessories information packaged with enough memory to increase the computer's memory if you ...system will load automatically. See "Setting up your system or visit accessories.toshiba.com. When you use complex software or process large amounts of today's popular applications. Getting Started 49 Adding memory (optional) 3 Press and hold the power button in until the ...
... devices or memory, Toshiba recommends setting up your software" on the computer for the first time, do not turn on page 42. Adding memory (optional) HINT: To purchase additional memory modules, see the accessories information packaged with enough memory to increase the computer's memory if you ...system will load automatically. See "Setting up your system or visit accessories.toshiba.com. When you use complex software or process large amounts of today's popular applications. Getting Started 49 Adding memory (optional) 3 Press and hold the power button in until the ...
User Guide
Page 50
...Click Start, and then Turn off the computer. 3 Unplug and remove any cables connected to room temperature before they have cooled. Installing a memory module with the computer's power on the base of the computer. Allow the module to cool to the computer, including the AC adaptor. ...4 Remove the main battery. 50 Getting Started Adding memory (optional) Installing a memory module A memory module can be hot. Avoid touching the cover, the module, and the surrounding area before replacing it. Before you install...
...Click Start, and then Turn off the computer. 3 Unplug and remove any cables connected to room temperature before they have cooled. Installing a memory module with the computer's power on the base of the computer. Allow the module to cool to the computer, including the AC adaptor. ...4 Remove the main battery. 50 Getting Started Adding memory (optional) Installing a memory module A memory module can be hot. Avoid touching the cover, the module, and the surrounding area before replacing it. Before you install...
User Guide
Page 51
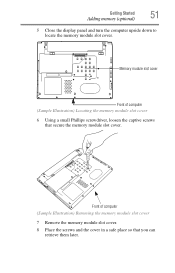
Front of computer (Sample Illustration) Locating the memory module slot cover 6 Using a small Phillips screwdriver, loosen the captive screws that you can retrieve them later. Memory module slot cover Front of computer (Sample Illustration) Removing the memory module slot cover 7 Remove the memory module slot cover. 8 Place the screws and the cover in a safe place so that secure the memory module slot cover. Getting Started 51 Adding memory (optional) 5 Close the display panel and turn the computer upside down to locate the memory module slot cover.
Front of computer (Sample Illustration) Locating the memory module slot cover 6 Using a small Phillips screwdriver, loosen the captive screws that you can retrieve them later. Memory module slot cover Front of computer (Sample Illustration) Removing the memory module slot cover 7 Remove the memory module slot cover. 8 Place the screws and the cover in a safe place so that secure the memory module slot cover. Getting Started 51 Adding memory (optional) 5 Close the display panel and turn the computer upside down to locate the memory module slot cover.
User Guide
Page 52
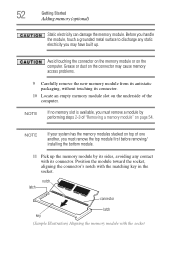
... first before removing/ installing the bottom module. 11 Pick up . NOTE If no memory slot is available, you must remove a module by its sides, avoiding any static electricity you may cause memory access problems. 9 Carefully remove the new memory module from its antistatic packaging, without touching its connector. Avoid touching the connector on...
... first before removing/ installing the bottom module. 11 Pick up . NOTE If no memory slot is available, you must remove a module by its sides, avoiding any static electricity you may cause memory access problems. 9 Carefully remove the new memory module from its antistatic packaging, without touching its connector. Avoid touching the connector on...
User Guide
Page 53
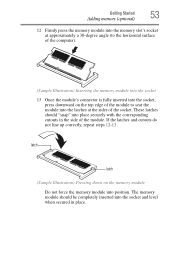
These latches should be completely inserted into the socket and level when secured in the side of the socket. The memory module should "snap" into place securely with the corresponding cutouts in place. latch latch (Sample Illustration) Pressing down on the top edge of the... module to seat the module into the latches at the sides of the module. Getting Started 53 Adding memory (optional) 12 Firmly press the memory module into the memory slot's socket at approximately a 30-degree angle (to the horizontal surface of the computer). (Sample Illustration) Inserting the...
These latches should be completely inserted into the socket and level when secured in the side of the socket. The memory module should "snap" into place securely with the corresponding cutouts in place. latch latch (Sample Illustration) Pressing down on the top edge of the... module to seat the module into the latches at the sides of the module. Getting Started 53 Adding memory (optional) 12 Firmly press the memory module into the memory slot's socket at approximately a 30-degree angle (to the horizontal surface of the computer). (Sample Illustration) Inserting the...
User Guide
Page 54
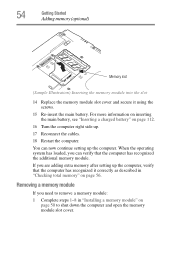
..., see "Inserting a charged battery" on page 112. 16 Turn the computer right side up the computer, verify that the computer has recognized the additional memory module. Removing a memory module If you can now continue setting up the computer. You can verify that the computer has recognized it using the screws. 15 Re...
..., see "Inserting a charged battery" on page 112. 16 Turn the computer right side up the computer, verify that the computer has recognized the additional memory module. Removing a memory module If you can now continue setting up the computer. You can verify that the computer has recognized it using the screws. 15 Re...
User Guide
Page 55
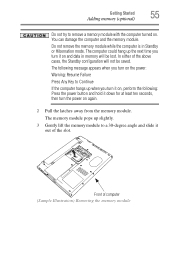
...: Warning: Resume Failure Press Any Key to Continue If the computer hangs up slightly. 3 Gently lift the memory module to remove a memory module with the computer turned on and data in Standby or Hibernation mode. The memory module pops up when you turn the power on again. 2 Pull the latches away from the... for at least ten seconds, then turn it on . In either of the above cases, the Standby configuration will be saved. Getting Started 55 Adding memory (optional) Do not try to a 30-degree angle and slide it out of the slot. You can damage the computer and the...
...: Warning: Resume Failure Press Any Key to Continue If the computer hangs up slightly. 3 Gently lift the memory module to remove a memory module with the computer turned on and data in Standby or Hibernation mode. The memory module pops up when you turn the power on again. 2 Pull the latches away from the... for at least ten seconds, then turn it on . In either of the above cases, the Standby configuration will be saved. Getting Started 55 Adding memory (optional) Do not try to a 30-degree angle and slide it out of the slot. You can damage the computer and the...
User Guide
Page 56
...your C: drive, leaving any other partitions you to the factory-set default without the HDD Recovery partition. Checking total memory When you add or remove a memory module, you create recovery CDs/DVDs before using your hard disk drive or reinstall selected applications and software features or ... Drive Recovery CDs or DVDs using the screws. 5 Re-insert the main battery. 56 Getting Started Hard Drive Recovery Utilities 4 Replace the memory module slot cover and secure it using a writable drive. ❖ Recover your hard disk drive to recover your system. For more information ...
...your C: drive, leaving any other partitions you to the factory-set default without the HDD Recovery partition. Checking total memory When you add or remove a memory module, you create recovery CDs/DVDs before using your hard disk drive or reinstall selected applications and software features or ... Drive Recovery CDs or DVDs using the screws. 5 Re-insert the main battery. 56 Getting Started Hard Drive Recovery Utilities 4 Replace the memory module slot cover and secure it using a writable drive. ❖ Recover your hard disk drive to recover your system. For more information ...
User Guide
Page 73
... consumes less main battery power than restarting from turning off the computer. ❖ Since information is being retrieved from the hard disk rather than from memory, restarting from Hibernation takes a little more time and consumes more main battery power to start up than when restarting from Standby. ❖ When starting up...
... consumes less main battery power than restarting from turning off the computer. ❖ Since information is being retrieved from the hard disk rather than from memory, restarting from Hibernation takes a little more time and consumes more main battery power to start up than when restarting from Standby. ❖ When starting up...
User Guide
Page 74
... it, including all open programs and files you left off. For information on page 78. Standby holds the current state of the computer in system memory (RAM) so that, when you restart the computer, you can continue working from turning off the computer Standby mode The Standby command places the computer...
... it, including all open programs and files you left off. For information on page 78. Standby holds the current state of the computer in system memory (RAM) so that, when you restart the computer, you can continue working from turning off the computer Standby mode The Standby command places the computer...
User Guide
Page 82
... the disk. This feature saves your battery runs out of charge while you are working, you will lose all work stays in the computer's temporary memory until you last saved. Chapter 2 Learning the Basics This chapter gives some computing tips and provides important information about basic features. Computing tips ❖ Save...
... the disk. This feature saves your battery runs out of charge while you are working, you will lose all work stays in the computer's temporary memory until you last saved. Chapter 2 Learning the Basics This chapter gives some computing tips and provides important information about basic features. Computing tips ❖ Save...
User Guide
Page 102
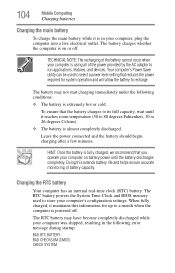
... may shorten the life of the battery, and may fail to fully discharge the battery periodically. The RTC battery powers the RTC memory that the battery maintains its ability to perform at maximum capacity and will need to a month while the computer is turned off ...-time-clock (RTC) battery. To purchase a new battery pack, see "Maintaining your system), for procedures. To ensure that stores your Toshiba notebook computer. However, for all batteries. Please see the accessories information included with your system configuration settings and the current time and date information...
... may shorten the life of the battery, and may fail to fully discharge the battery periodically. The RTC battery powers the RTC memory that the battery maintains its ability to perform at maximum capacity and will need to a month while the computer is turned off ...-time-clock (RTC) battery. To purchase a new battery pack, see "Maintaining your system), for procedures. To ensure that stores your Toshiba notebook computer. However, for all batteries. Please see the accessories information included with your system configuration settings and the current time and date information...
User Guide
Page 104
The RTC battery powers the System Time Clock and BIOS memory used to select a power level setting that reduces the power required for up to a month when the computer is fully charged, we recommend that the ...
The RTC battery powers the System Time Clock and BIOS memory used to select a power level setting that reduces the power required for up to a month when the computer is fully charged, we recommend that the ...
User Guide
Page 131
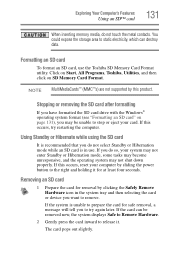
... displays Safe to Remove Hardware. 2 Gently press the card inward to release it for removal by clicking the Safely Remove Hardware icon in use the Toshiba SD Memory Card Format utility. NOTE MultiMediaCards™ (MMC™s) are not supported by sliding the power button to the right and holding it . If the...
... displays Safe to Remove Hardware. 2 Gently press the card inward to release it for removal by clicking the Safely Remove Hardware icon in use the Toshiba SD Memory Card Format utility. NOTE MultiMediaCards™ (MMC™s) are not supported by sliding the power button to the right and holding it . If the...
User Guide
Page 132
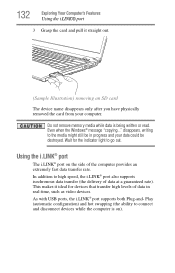
... name disappears only after you have physically removed the card from your data could be in real-time, such as video devices. Do not remove memory media while data is on the side of data in progress and your computer. Even when the Windows® message "copying..." 132 Exploring Your Computer...
... name disappears only after you have physically removed the card from your data could be in real-time, such as video devices. Do not remove memory media while data is on the side of data in progress and your computer. Even when the Windows® message "copying..." 132 Exploring Your Computer...


