User Manual
Page 2
... instructions and descriptions it contains are accurate for accuracy. TOSHIBA assumes no liability for personal use or use within the home. Intel, Intel SpeedStep and Intel Core and Centrino are trademarks of this manual. ii User's Manual Trademarks IBM is a trademark of Intel Corporation or its subsidiaries in the United States and other intellectual property covered by TOSHIBA Corporation. Windows...
... instructions and descriptions it contains are accurate for accuracy. TOSHIBA assumes no liability for personal use or use within the home. Intel, Intel SpeedStep and Intel Core and Centrino are trademarks of this manual. ii User's Manual Trademarks IBM is a trademark of Intel Corporation or its subsidiaries in the United States and other intellectual property covered by TOSHIBA Corporation. Windows...

User Manual
Page 10
...-up Modes Power conditions 6-1 Power indicators 6-2 Battery types 6-3 Care and use of the battery pack 6-5 Replacing the battery pack 6-11 Starting the computer by password 6-13 Power-up modes 6-13 Chapter 7 HW Setup and Passwords HW Setup 7-1 Chapter 8 Optional Devices PC Card/ExpressCard 8-2 Multiple digital media card slot (optional 8-3 Memory expansion 8-6 Additional battery pack (3 cell, 6 Cell and 9 Cell 8-9 Additional AC adaptor 8-9 USB FDD Kit 8-9 External monitor 8-9 HDMI (optional 8-10 Security lock 8-11 x User's Manual L300/L300D series Chapter 4 Operating...
...-up Modes Power conditions 6-1 Power indicators 6-2 Battery types 6-3 Care and use of the battery pack 6-5 Replacing the battery pack 6-11 Starting the computer by password 6-13 Power-up modes 6-13 Chapter 7 HW Setup and Passwords HW Setup 7-1 Chapter 8 Optional Devices PC Card/ExpressCard 8-2 Multiple digital media card slot (optional 8-3 Memory expansion 8-6 Additional battery pack (3 cell, 6 Cell and 9 Cell 8-9 Additional AC adaptor 8-9 USB FDD Kit 8-9 External monitor 8-9 HDMI (optional 8-10 Security lock 8-11 x User's Manual L300/L300D series Chapter 4 Operating...
User Manual
Page 26
... switch Security Security lock slot Software Operating system TOSHIBA Utilities Plug and Play Some models are equipped with some models) This switch turns wireless devices RF transmission(Wireless LAN) functions on the analog telephone line conditions. (Provided with some models) Connects a security lock to anchor the computer to the telephone line. Please note that support the V.90 (V.92) standards and includes a modem jack for connection to a desk or other regions. Microsoft® Windows Vista...
... switch Security Security lock slot Software Operating system TOSHIBA Utilities Plug and Play Some models are equipped with some models) This switch turns wireless devices RF transmission(Wireless LAN) functions on the analog telephone line conditions. (Provided with some models) Connects a security lock to anchor the computer to the telephone line. Please note that support the V.90 (V.92) standards and includes a modem jack for connection to a desk or other regions. Microsoft® Windows Vista...
User Manual
Page 27
... in sleep mode or hibernation mode when there is no input or hardware access for a time specified. This can be specified in the Power Options. To access the Power Options, click Start -> Control Panel -> System and Maintenance -> Power Options. Refer to use. User's Manual 1-9 Instant security A hot key function blanks the screen and disables the computer providing data security. This can be specified in the Power Options. HDD automatic power off This feature automatically cuts off power to the hard disk drive...
... in sleep mode or hibernation mode when there is no input or hardware access for a time specified. This can be specified in the Power Options. To access the Power Options, click Start -> Control Panel -> System and Maintenance -> Power Options. Refer to use. User's Manual 1-9 Instant security A hot key function blanks the screen and disables the computer providing data security. This can be specified in the Power Options. HDD automatic power off This feature automatically cuts off power to the hard disk drive...
User Manual
Page 34
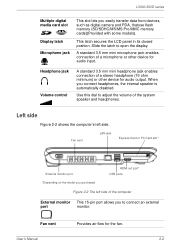
Fan vent LAN jack Express Card or PC Card slot * External monitor port *Depending on the model you purchased HDMI out port* USB ports Figure 2-2 The left side. When you to connect an external port monitor. Slide the latch to adjust the volume of the computer External monitor This 15-pin port allows you connect headphones, the internal speaker is automatically disabled. Headphone jack Volume control A standard 3.5 mm mini headphone jack enables connection of a microphone or other device for audio output. Fan vent Provides air flow for...
Fan vent LAN jack Express Card or PC Card slot * External monitor port *Depending on the model you purchased HDMI out port* USB ports Figure 2-2 The left side. When you to connect an external port monitor. Slide the latch to adjust the volume of the computer External monitor This 15-pin port allows you connect headphones, the internal speaker is automatically disabled. Headphone jack Volume control A standard 3.5 mm mini headphone jack enables connection of a microphone or other device for audio output. Fan vent Provides air flow for...
User Manual
Page 54
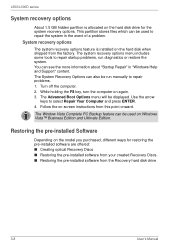
... recovery options. The Window Vista Complete PC Backup feature can also be displayed. You can be used to select Repair Your Computer and press ENTER. 4. Use the arrow keys to repair the system in "Windows Help and Support" content. L300/L300D series System recovery options About 1.5 GB hidden partition is installed on the hard disk when shipped from the factory. Follow the on the hard disk drive for restoring the pre-installed software are offered: ■ Creating optical Recovery Discs ■ Restoring...
... recovery options. The Window Vista Complete PC Backup feature can also be displayed. You can be used to select Repair Your Computer and press ENTER. 4. Use the arrow keys to repair the system in "Windows Help and Support" content. L300/L300D series System recovery options About 1.5 GB hidden partition is installed on the hard disk when shipped from the factory. Follow the on the hard disk drive for restoring the pre-installed software are offered: ■ Creating optical Recovery Discs ■ Restoring...
User Manual
Page 66
... open the DVD Super Multi (+-R DL) drive tray. ■ Set the computer on the CPU. ■ Operate the computer in the background. ■ Do not use power-saving features. ■ Do not write while virus check software is a write error. 4-8 User's Manual Do not use an unstable surface such as a SD/SDHC memory card, PC card/ExpressCard, Memory Stick/ Memory Stick Pro, MultiMediaCard, USB device, external monitor, or an optical digital device. ■ Use the Audio/Video control button...
... open the DVD Super Multi (+-R DL) drive tray. ■ Set the computer on the CPU. ■ Operate the computer in the background. ■ Do not use power-saving features. ■ Do not write while virus check software is a write error. 4-8 User's Manual Do not use an unstable surface such as a SD/SDHC memory card, PC card/ExpressCard, Memory Stick/ Memory Stick Pro, MultiMediaCard, USB device, external monitor, or an optical digital device. ■ Use the Audio/Video control button...
User Manual
Page 70
.... ■ Use the Mode control button and Audio/Video control button to ensure you capture all other function, including using DVD MovieFactory. ■ Operate the computer at Full Power. Please wait until all Disc Drive activity has stopped. ■ When recording to a DV-Camcorder, to reproduce music or voice. ■ Open the DVD drive. ■ Install, remove or connect external devices, including such items as a SD/SDHC memory card, PC Card/ExpressCard, Memory Stick/Memory Stick Pro, MultiMediaCard, USB device, external monitor, or an...
.... ■ Use the Mode control button and Audio/Video control button to ensure you capture all other function, including using DVD MovieFactory. ■ Operate the computer at Full Power. Please wait until all Disc Drive activity has stopped. ■ When recording to a DV-Camcorder, to reproduce music or voice. ■ Open the DVD drive. ■ Install, remove or connect external devices, including such items as a SD/SDHC memory card, PC Card/ExpressCard, Memory Stick/Memory Stick Pro, MultiMediaCard, USB device, external monitor, or an...
User Manual
Page 86
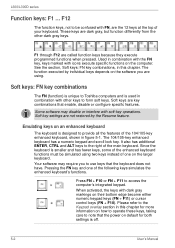
... scroll lock key. Your software may disable or interfere with soft-key operations. Soft keys are dark gray, but function differently from the other keys to note that the power on default for both settings is used in combination with dark gray markings on the computer. It also has additional ENTER, CTRL and ALT keys to Toshiba computers and is off. 5-2 User's Manual Since the keyboard is designed to use keys that enable, disable...
... scroll lock key. Your software may disable or interfere with soft-key operations. Soft keys are dark gray, but function differently from the other keys to note that the power on default for both settings is used in combination with dark gray markings on the computer. It also has additional ENTER, CTRL and ALT keys to Toshiba computers and is off. 5-2 User's Manual Since the keyboard is designed to use keys that enable, disable...
User Manual
Page 109
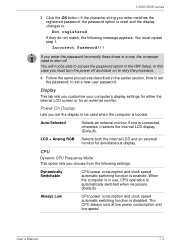
... is reset and the display changes to retry the procedure. 4. When the computer is in a row, the computer need to shut off and back on to : Not registered If they do not match, the following settings: Dynamically Switchable CPU power consumption and clock speed automatic switching function is disabled. User's Manual 7-3 If you enter matches the registered password, the password option is connected, otherwise, it selects the internal LCD display (Default). LCD...
... is reset and the display changes to retry the procedure. 4. When the computer is in a row, the computer need to shut off and back on to : Not registered If they do not match, the following settings: Dynamically Switchable CPU power consumption and clock speed automatic switching function is disabled. User's Manual 7-3 If you enter matches the registered password, the password option is connected, otherwise, it selects the internal LCD display (Default). LCD...
User Manual
Page 111
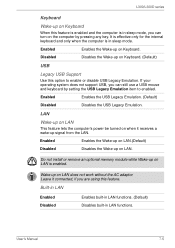
... connected, if you are using this feature. Do not install or remove an optional memory module while Wake-up on LAN is in sleep mode. User's Manual 7-5 It is effective only for the internal keyboard and only when the computer is enabled. Disabled Disables the Wake-up on Keyboard. (Default) USB Legacy USB Support Use this option to enabled. Enabled Enables the USB Legacy Emulation. (Default) Disabled Disables the USB Legacy Emulation. LAN Wake-up on LAN This feature lets the computer's power be turned on LAN...
... connected, if you are using this feature. Do not install or remove an optional memory module while Wake-up on LAN is in sleep mode. User's Manual 7-5 It is effective only for the internal keyboard and only when the computer is enabled. Disabled Disables the Wake-up on Keyboard. (Default) USB Legacy USB Support Use this option to enabled. Enabled Enables the USB Legacy Emulation. (Default) Disabled Disables the USB Legacy Emulation. LAN Wake-up on LAN This feature lets the computer's power be turned on LAN...
User Manual
Page 118
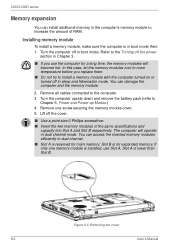
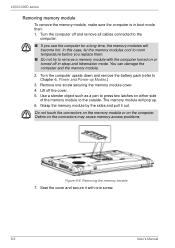
... Slot B respectively. You can access the inserted memory modules efficiently in sleep and hibernation mode. Remove all cables connected to Chapter 6, Power and Power-up Modes.) 4. Turn the computer upside down and remove the battery pack (refer to the computer. 3. Figure 8-5 Removing the cover 8-6 User's Manual Lift off in dual channel mode. The computer will become hot. Remove one memory module is installed, use the computer for main memory; Slot B is reserved for a long time, the memory modules will operate in boot mode...
... Slot B respectively. You can access the inserted memory modules efficiently in sleep and hibernation mode. Remove all cables connected to Chapter 6, Power and Power-up Modes.) 4. Turn the computer upside down and remove the battery pack (refer to the computer. 3. Figure 8-5 Removing the cover 8-6 User's Manual Lift off in dual channel mode. The computer will become hot. Remove one memory module is installed, use the computer for main memory; Slot B is reserved for a long time, the memory modules will operate in boot mode...
User Manual
Page 120
... and the memory module. 2. Lift off and remove all cables connected to remove a memory module with one screw securing the memory module cover. 4. Grasp the memory module by the sides and pull it with the computer turned on either side of the memory module to Chapter 6, Power and Power-up . 6. L300/L300D series Removing memory module To remove the memory module, make sure the computer is in sleep and hibernation mode. The memory module will become hot. Seat the cover and secure...
... and the memory module. 2. Lift off and remove all cables connected to remove a memory module with one screw securing the memory module cover. 4. Grasp the memory module by the sides and pull it with the computer turned on either side of the memory module to Chapter 6, Power and Power-up . 6. L300/L300D series Removing memory module To remove the memory module, make sure the computer is in sleep and hibernation mode. The memory module will become hot. Seat the cover and secure...
User Manual
Page 135
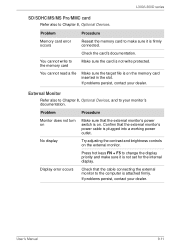
... that the cable connecting the external monitor to change the display priority and make sure it is not set for the internal display. Press hot keys FN + F5 to the computer is attached firmly. Problem Procedure Monitor does not turn on Make sure that the external monitor's power switch is on the external monitor. User's Manual 9-11 Problem Procedure Memory card error occurs Reseat the memory card to Chapter 8, Optional Devices. External Monitor Refer also to Chapter 8, Optional Devices, and to the memory card Make sure the card is not...
... that the cable connecting the external monitor to change the display priority and make sure it is not set for the internal display. Press hot keys FN + F5 to the computer is attached firmly. Problem Procedure Monitor does not turn on Make sure that the external monitor's power switch is on the external monitor. User's Manual 9-11 Problem Procedure Memory card error occurs Reseat the memory card to Chapter 8, Optional Devices. External Monitor Refer also to Chapter 8, Optional Devices, and to the memory card Make sure the card is not...
User Manual
Page 161
... computer that enable it to process data into the processor that define how your system configuration. You use the HW Setup program to initiate a particular function within a program. CRT: Cathode Ray Tube. Electric current that indicates the current position on the display screen. delete: To remove data from the keyboard to control your system works. User's Manual Glossary-5 L300/L300D series components: Elements or parts (of...
... computer that enable it to process data into the processor that define how your system configuration. You use the HW Setup program to initiate a particular function within a program. CRT: Cathode Ray Tube. Electric current that indicates the current position on the display screen. delete: To remove data from the keyboard to control your system works. User's Manual Glossary-5 L300/L300D series components: Elements or parts (of...
User Manual
Page 164
... computer itself, external disk drives, etc. HW Setup: A TOSHIBA utility that lets you provide to a computer, communication device or other peripheral device from external devices such as drive C. I/O devices: Equipment used to communicate with the extended function key, FN, can be used specifically to connect one system or device to another computer. See also software and firmware. input: The data or instructions you set system parameters, such as speaker volume. Glossary-8 User's Manual Also called fixed disk. hardware: The...
... computer itself, external disk drives, etc. HW Setup: A TOSHIBA utility that lets you provide to a computer, communication device or other peripheral device from external devices such as drive C. I/O devices: Equipment used to communicate with the extended function key, FN, can be used specifically to connect one system or device to another computer. See also software and firmware. input: The data or instructions you set system parameters, such as speaker volume. Glossary-8 User's Manual Also called fixed disk. hardware: The...
User Manual
Page 165
... of wave frequency that uses large scale integration. M main board: See motherboard. Also called the central processing unit (CPU), one of the main parts of the computer. L300/L300D series IrDA 1.1: An industry standard that allows you to change the hardware characteristics by manually pressing marked keys. J jumper: A small clip or wire that enables cableless infrared serial data transfer at speeds of...
... of wave frequency that uses large scale integration. M main board: See motherboard. Also called the central processing unit (CPU), one of the main parts of the computer. L300/L300D series IrDA 1.1: An industry standard that allows you to change the hardware characteristics by manually pressing marked keys. J jumper: A small clip or wire that enables cableless infrared serial data transfer at speeds of...
User Manual
Page 168
... standard used in ROM. serial interface: Refer to send bits one after another. soft key: Key combinations that uses as few as digital cameras and Personal Digital Assistants. Specifically refers to transmit high-quality video signals. Glossary-12 User's Manual L300/L300D series restart: Resetting a computer without turning it off (also called an operating system disk. serial communications: A communications technique that emulate keys on the color LCD. software: The set of brightness...
... standard used in ROM. serial interface: Refer to send bits one after another. soft key: Key combinations that uses as few as digital cameras and Personal Digital Assistants. Specifically refers to transmit high-quality video signals. Glossary-12 User's Manual L300/L300D series restart: Resetting a computer without turning it off (also called an operating system disk. serial communications: A communications technique that emulate keys on the color LCD. software: The set of brightness...
User Manual
Page 173
...lock M Main battery, See Battery pack Memory, 1-3, 10-2 expansion, 1-13, 8-6 installing module, 8-6 removing module, 8-8 Microphone, 1-6 problems, 9-12 using, 4-15 Microprocessor, See Processor L300/L300D series Modem, 1-8, 4-19, A-2 connecting, 4-21 disconnecting, 4-21 problems, 9-13 properties menu, 4-20 region selection, 4-19 Moving the computer, 4-25 Multiple digital media card slot using, 8-3 N Numeric keypad, See Keypad overlay O Optical disc drives using, 4-2 P Password power on, 1-9 problems, 9-6 starting the computer with, 6-13 user, 7-2 PC card location of slots, 2-2 Pointing device...
...lock M Main battery, See Battery pack Memory, 1-3, 10-2 expansion, 1-13, 8-6 installing module, 8-6 removing module, 8-8 Microphone, 1-6 problems, 9-12 using, 4-15 Microprocessor, See Processor L300/L300D series Modem, 1-8, 4-19, A-2 connecting, 4-21 disconnecting, 4-21 problems, 9-13 properties menu, 4-20 region selection, 4-19 Moving the computer, 4-25 Multiple digital media card slot using, 8-3 N Numeric keypad, See Keypad overlay O Optical disc drives using, 4-2 P Password power on, 1-9 problems, 9-6 starting the computer with, 6-13 user, 7-2 PC card location of slots, 2-2 Pointing device...
User Manual
Page 174
... system start-up, 9-3 TOSHIBA support, 9-15 touchpad, 9-9 USB, 9-12 USB mouse, 9-10 Wireless LAN, 9-14 Processor, 1-2 R Real Time Clock battery, See Battery Recovery Discs, 3-10 Recovery hard disk drive, 3-8, 3-10 Restarting the computer, 3-7 S Security lock attaching, 8-11 location, 2-4 Sleep mode, 1-10 problems, 9-14 setting, 3-6 Soft keys emulating keys on enhanced keyboard, 5-2 ENTER, 5-3 right ALT key, 5-3 right CTRL key, 5-3 scroll lock, 5-3 Sound system, 1-7 headphone, 1-6, 2-2 microphone, 2-2 speaker, 2-7 volume control, 2-2 T TOSHIBA Assist, 1-12 TOSHIBA Disc Creator, 4-9 TOSHIBA PC...
... system start-up, 9-3 TOSHIBA support, 9-15 touchpad, 9-9 USB, 9-12 USB mouse, 9-10 Wireless LAN, 9-14 Processor, 1-2 R Real Time Clock battery, See Battery Recovery Discs, 3-10 Recovery hard disk drive, 3-8, 3-10 Restarting the computer, 3-7 S Security lock attaching, 8-11 location, 2-4 Sleep mode, 1-10 problems, 9-14 setting, 3-6 Soft keys emulating keys on enhanced keyboard, 5-2 ENTER, 5-3 right ALT key, 5-3 right CTRL key, 5-3 scroll lock, 5-3 Sound system, 1-7 headphone, 1-6, 2-2 microphone, 2-2 speaker, 2-7 volume control, 2-2 T TOSHIBA Assist, 1-12 TOSHIBA Disc Creator, 4-9 TOSHIBA PC...


