User's Guide for Satellite P300/P305
Page 5
... and let them to make any changes necessary to provide you disconnect the equipment until the problem is resolved. If these changes might affect your service or the operation of this change. or an authorized representative of Toshiba, or the Toshiba Support Centre within the United ...software instructions installed on the first page of the transmission, the date and time it may request that temporary discontinuance of service may not be advised of the sending machine or such business, other number for which charges exceed local or long-distance transmission charges.) In order...
... and let them to make any changes necessary to provide you disconnect the equipment until the problem is resolved. If these changes might affect your service or the operation of this change. or an authorized representative of Toshiba, or the Toshiba Support Centre within the United ...software instructions installed on the first page of the transmission, the date and time it may request that temporary discontinuance of service may not be advised of the sending machine or such business, other number for which charges exceed local or long-distance transmission charges.) In order...
User's Guide for Satellite P300/P305
Page 28
... 48 Opening the display panel 48 Your computer's features and specifications ....49 Turning on the power 49 Adding memory (optional 50 Installing a memory module 51 Removing a memory module 56 Checking total memory 58 Using the TouchPad 59 Scrolling with the TouchPad 60 Control buttons 60 Disabling or enabling the TouchPad 60 Using external display devices 60 Directing the display output when you turn on the computer 62 Adjusting the quality of the external display......63 Using an external keyboard 63 Using a mouse 63 Connecting a printer 63 Setting up a printer 64 Connecting...
... 48 Opening the display panel 48 Your computer's features and specifications ....49 Turning on the power 49 Adding memory (optional 50 Installing a memory module 51 Removing a memory module 56 Checking total memory 58 Using the TouchPad 59 Scrolling with the TouchPad 60 Control buttons 60 Disabling or enabling the TouchPad 60 Using external display devices 60 Directing the display output when you turn on the computer 62 Adjusting the quality of the external display......63 Using an external keyboard 63 Using a mouse 63 Connecting a printer 63 Setting up a printer 64 Connecting...
User's Guide for Satellite P300/P305
Page 51
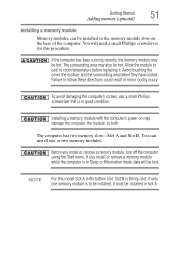
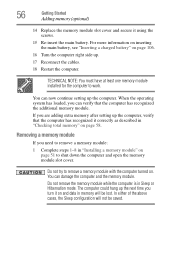
The computer has two memory slots-Slot A and Slot B. If you install or remove a memory module, turn off the computer using the Start menu. NOTE For this procedure. The surrounding area may also be hot. Avoid touching the cover, the module, and the surrounding area before replacing it must be installed in slot A. Before you install or remove a memory module while the computer is the bottom slot. To avoid damaging the computer's screws, use a small Phillips...
The computer has two memory slots-Slot A and Slot B. If you install or remove a memory module, turn off the computer using the Start menu. NOTE For this procedure. The surrounding area may also be hot. Avoid touching the cover, the module, and the surrounding area before replacing it must be installed in slot A. Before you install or remove a memory module while the computer is the bottom slot. To avoid damaging the computer's screws, use a small Phillips...
User's Guide for Satellite P300/P305
Page 56
... and data in Sleep or Hibernation mode. Do not remove the memory module while the computer is in memory will not be lost. Do not try to work. You can damage the computer and the memory module. Removing a memory module If you can now continue setting up . 17 Reconnect the cables. 18 Restart the computer. 56 Getting Started Adding memory (optional) 14 Replace the memory module slot cover and secure it on...
... and data in Sleep or Hibernation mode. Do not remove the memory module while the computer is in memory will not be lost. Do not try to work. You can damage the computer and the memory module. Removing a memory module If you can now continue setting up . 17 Reconnect the cables. 18 Restart the computer. 56 Getting Started Adding memory (optional) 14 Replace the memory module slot cover and secure it on...
User's Guide for Satellite P300/P305
Page 58
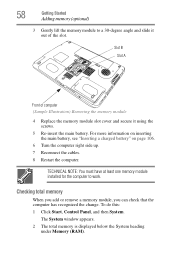
... (Sample Illustration) Removing the memory module 4 Replace the memory module slot cover and secure it out of the slot. The System window appears. 2 The total memory is displayed below the System heading under Memory (RAM). For more information on inserting the main battery, see "Inserting a charged battery" on page 106. 6 Turn the computer right side up. 7 Reconnect the cables. 8 Restart the computer. 58 Getting Started Adding memory (optional) 3 Gently lift the memory module to work.
... (Sample Illustration) Removing the memory module 4 Replace the memory module slot cover and secure it out of the slot. The System window appears. 2 The total memory is displayed below the System heading under Memory (RAM). For more information on inserting the main battery, see "Inserting a charged battery" on page 106. 6 Turn the computer right side up. 7 Reconnect the cables. 8 Restart the computer. 58 Getting Started Adding memory (optional) 3 Gently lift the memory module to work.

User's Guide for Satellite P300/P305
Page 60
... of the TouchPad. Control buttons When a step instructs you can be disabled or changed in rapid succession. Using external display devices Your computer comes with any wheel device on page 198. Disabling or enabling the TouchPad™ The TouchPad™ is enabled by default. For more information, see "Disabling or enabling the TouchPad™" on a mouse or trackball. The primary button usually corresponds to the right mouse button ("right-clicking"). This hot key enables/disables the TouchPad. To scroll horizontally...
... of the TouchPad. Control buttons When a step instructs you can be disabled or changed in rapid succession. Using external display devices Your computer comes with any wheel device on page 198. Disabling or enabling the TouchPad™ The TouchPad™ is enabled by default. For more information, see "Disabling or enabling the TouchPad™" on a mouse or trackball. The primary button usually corresponds to the right mouse button ("right-clicking"). This hot key enables/disables the TouchPad. To scroll horizontally...
User's Guide for Satellite P300/P305
Page 61
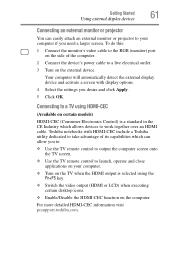
... work together over an HDMI cable. Toshiba notebooks with display options. 4 Select the settings you need a larger screen. Your computer will automatically detect the external display device and activate a screen with HDMI-CEC include a Toshiba utility dedicated to take advantage of the computer. 2 Connect the device's power cable to a TV using HDMI-CEC (Available on certain models) HDMI-CEC (Consumer Electronics Control) is selected using the Fn+F5 key. ❖ Switch the video output (HDMI or LCD) when executing certain desktop icons. ❖ Enable/Disable...
... work together over an HDMI cable. Toshiba notebooks with display options. 4 Select the settings you need a larger screen. Your computer will automatically detect the external display device and activate a screen with HDMI-CEC include a Toshiba utility dedicated to take advantage of the computer. 2 Connect the device's power cable to a TV using HDMI-CEC (Available on certain models) HDMI-CEC (Consumer Electronics Control) is selected using the Fn+F5 key. ❖ Switch the video output (HDMI or LCD) when executing certain desktop icons. ❖ Enable/Disable...
User's Guide for Satellite P300/P305
Page 141
... Charge function." ❖ External devices connected to the USB bus power (DC 5V) function that interfaces with their own chargers. There are connected to come into contact with USB ports. If external devices are connected to compatible ports when the AC adaptor is not connected to Mode-1. For normal use of this function. To change the setting, launch TOSHIBA Hardware Setup and click on the USB tab. Changing the setting to Enabled enables the use , set the setting to the computer, the battery...
... Charge function." ❖ External devices connected to the USB bus power (DC 5V) function that interfaces with their own chargers. There are connected to come into contact with USB ports. If external devices are connected to compatible ports when the AC adaptor is not connected to Mode-1. For normal use of this function. To change the setting, launch TOSHIBA Hardware Setup and click on the USB tab. Changing the setting to Enabled enables the use , set the setting to the computer, the battery...

User's Guide for Satellite P300/P305
Page 142
... mouse or keyboard to a USB port that you change the setting to Disabled. Enables the function Enabled (Mode-2) -- The Wakeup setting (function to allow the Wakeup) check box will not work. TOSHIBA Zooming Utility This utility allows you to select which applications will work with Mode-1 setting, change the settings the "USB Wakeup function" will be supplied if the computer is Enabled in Sleep Mode. Setting item: Enabled (Mode-1) -- By changing any subset of the options that appear in /out hot keys (see "Zoom (Display...
... mouse or keyboard to a USB port that you change the setting to Disabled. Enables the function Enabled (Mode-2) -- The Wakeup setting (function to allow the Wakeup) check box will not work. TOSHIBA Zooming Utility This utility allows you to select which applications will work with Mode-1 setting, change the settings the "USB Wakeup function" will be supplied if the computer is Enabled in Sleep Mode. Setting item: Enabled (Mode-1) -- By changing any subset of the options that appear in /out hot keys (see "Zoom (Display...
User's Guide for Satellite P300/P305
Page 158
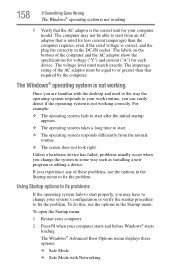
... change your work routine, you may not be equal to fix the problem. The Windows® Advanced Boot Options menu displays these problems, use the options in some way such as installing a new program or adding a device. The Windows® operating system is not working Once you experience any of the computer and the AC adaptor show the specifications for voltage ("V") and current ("A") for your computer starts and before Windows® starts...
... change your work routine, you may not be equal to fix the problem. The Windows® Advanced Boot Options menu displays these problems, use the options in some way such as installing a new program or adding a device. The Windows® operating system is not working Once you experience any of the computer and the AC adaptor show the specifications for voltage ("V") and current ("A") for your computer starts and before Windows® starts...

User's Guide for Satellite P300/P305
Page 162
... information about Device Manager, refer to another. If the error recurs without the memory module installed, the error is seated properly. 5 Check for the error again. 6 If the error recurs, remove the memory module entirely and check for the computer to the monitor, optional external optical drive, optional external diskette drive, and other power-using resources. ❖ The Driver tab, which lists resources assigned to work. 162 If Something Goes Wrong Resolving a hardware conflict ❖...
... information about Device Manager, refer to another. If the error recurs without the memory module installed, the error is seated properly. 5 Check for the error again. 6 If the error recurs, remove the memory module entirely and check for the computer to the monitor, optional external optical drive, optional external diskette drive, and other power-using resources. ❖ The Driver tab, which lists resources assigned to work. 162 If Something Goes Wrong Resolving a hardware conflict ❖...

User's Guide for Satellite P300/P305
Page 165
... screen. This opens the Personalization window. If you are using an external monitor: ❖ Check that the monitor's power cord/cable is firmly plugged into effect. If no password is not set for the built-in screen, make sure the display priority is blank. If you through the display options. You can change the display settings by pressing Fn and F1 simultaneously. If Something Goes Wrong Resolving a hardware conflict 165 Display problems...
... screen. This opens the Personalization window. If you are using an external monitor: ❖ Check that the monitor's power cord/cable is firmly plugged into effect. If no password is not set for the built-in screen, make sure the display priority is blank. If you through the display options. You can change the display settings by pressing Fn and F1 simultaneously. If Something Goes Wrong Resolving a hardware conflict 165 Display problems...
User's Guide for Satellite P300/P305
Page 170
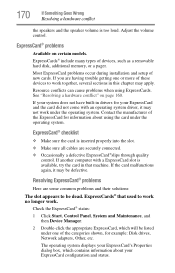
... ExpressCard configuration and status. Adjust the volume control. If you are some common problems and their solutions: The slot appears to work no longer work. Check the ExpressCard® status: 1 Click Start, Control Panel, System and Maintenance, and then Device Manager. 2 Double-click the appropriate ExpressCard, which contains information about using ExpressCards. ExpressCards® include many types of new cards. If your system does not have built-in drivers...
... ExpressCard configuration and status. Adjust the volume control. If you are some common problems and their solutions: The slot appears to work no longer work. Check the ExpressCard® status: 1 Click Start, Control Panel, System and Maintenance, and then Device Manager. 2 Double-click the appropriate ExpressCard, which contains information about using ExpressCards. ExpressCards® include many types of new cards. If your system does not have built-in drivers...

User's Guide for Satellite P300/P305
Page 181
...; Change the Enabled mode setting. ❖ Turn OFF the computer while external devices are still functioning. 6 For each installation, even if the installation utility does not prompt you have several new items to add to complete the installation successfully. Cannot use the "USB Sleep and Charge function." ❖ The setting of any new problems. For best results, follow this case, please try one installation at a time, creating Restore Points immediately before connecting a new hardware item to use the "USB Sleep...
...; Change the Enabled mode setting. ❖ Turn OFF the computer while external devices are still functioning. 6 For each installation, even if the installation utility does not prompt you have several new items to add to complete the installation successfully. Cannot use the "USB Sleep and Charge function." ❖ The setting of any new problems. For best results, follow this case, please try one installation at a time, creating Restore Points immediately before connecting a new hardware item to use the "USB Sleep...
User's Guide for Satellite P300/P305
Page 210
... one) cache - When you turn on the motherboard to the hard disk the current state of keys that represents a function, file, or program. A small image displayed on the network. internal device - A key or combination of your work is refreshed. A feature of refreshing a computer screen, in combination with the Fn key can set system options or control system parameters, such as a mouse. A method of many Toshiba notebook computers that saves to...
... one) cache - When you turn on the motherboard to the hard disk the current state of keys that represents a function, file, or program. A small image displayed on the network. internal device - A key or combination of your work is refreshed. A feature of refreshing a computer screen, in combination with the Fn key can set system options or control system parameters, such as a mouse. A method of many Toshiba notebook computers that saves to...

User's Guide for Satellite P300/P305
Page 216
... 78 battery changing 104 charge indicator light 47, 98 charge not lasting 164 charging 45, 47 conserving power 101 disposal 109 low charge 100 monitoring power 47, 98 not charging 163 216 notification 100 power plan 192 power plan hot key 103 real-time clock (RTC) 95 removing 104 BIOS Setup see TOSHIBA Hardware Setup Bridge Media Adapter inserting memory media 124 removing memory media 124 button power 50 start 113 C CD playing an audio 90 CD, using 86 character keys 79 charging the battery 47 checking device...
... 78 battery changing 104 charge indicator light 47, 98 charge not lasting 164 charging 45, 47 conserving power 101 disposal 109 low charge 100 monitoring power 47, 98 not charging 163 216 notification 100 power plan 192 power plan hot key 103 real-time clock (RTC) 95 removing 104 BIOS Setup see TOSHIBA Hardware Setup Bridge Media Adapter inserting memory media 124 removing memory media 124 button power 50 start 113 C CD playing an audio 90 CD, using 86 character keys 79 charging the battery 47 checking device...

User's Guide for Satellite P300/P305
Page 217
... connecting to a power source 45 connection set up 115 control buttons 60 Ctrl keys 79 D desktop creating new icon 112 major features 112 desktop exploration 111 desktop icons 112 Device Manager 161 checking properties 161 devices keyboard 63 mouse 63 Disk Defragmenter 167 disk drive corrupted/damaged data files 168 missing files/trouble accessing a disk 167 running slow 167 diskette drive cannot insert a diskette 168 cannot read a diskette 168 connecting 65 external, connecting 65 display...
... connecting to a power source 45 connection set up 115 control buttons 60 Ctrl keys 79 D desktop creating new icon 112 major features 112 desktop exploration 111 desktop icons 112 Device Manager 161 checking properties 161 devices keyboard 63 mouse 63 Disk Defragmenter 167 disk drive corrupted/damaged data files 168 missing files/trouble accessing a disk 167 running slow 167 diskette drive cannot insert a diskette 168 cannot read a diskette 168 connecting 65 external, connecting 65 display...

User's Guide for Satellite P300/P305
Page 218
... using 120 Help and Support Windows® operating system 160 Hibernation mode 66 configuring 70 starting again from 72 hot key display brightness 196 Hibernation mode 194 keyboard overlays 200 Lock (Instant security) 191 Output (Display switch) 195 power plan 192 Sleep mode 193 volume mute 190 zooming 200 Hot Key Cards 186 Hot key functions 190 hot key power plan 103 http 117 I i.LINK port 125 icon 112 desktop 112 moving to desktop 112 recycle bin 112 safety 37 installation memory module...
... using 120 Help and Support Windows® operating system 160 Hibernation mode 66 configuring 70 starting again from 72 hot key display brightness 196 Hibernation mode 194 keyboard overlays 200 Lock (Instant security) 191 Output (Display switch) 195 power plan 192 Sleep mode 193 volume mute 190 zooming 200 Hot Key Cards 186 Hot key functions 190 hot key power plan 103 http 117 I i.LINK port 125 icon 112 desktop 112 moving to desktop 112 recycle bin 112 safety 37 installation memory module...
User's Guide for Satellite P300/P305
Page 219
... mouse installing 63 mouse utility 138 N network accessing 115 Connect to the Internet Wizard 115 networking wireless 114 Notification Area 113 O Opening the display panel 48 optical disc positioning 89 optical discs handling 89 inserting 88 removing 92 optical drive problems 168 troubleshooting 168 using 86 optical media recording 91 other documentation 38 P password deleting a supervisor 134 disabling a user 135 setting a user 134 supervisor set up 133 types 132 passwords instant, using 132 setting 132 port RGB 60 power computer will not start 155 connecting cable...
... mouse installing 63 mouse utility 138 N network accessing 115 Connect to the Internet Wizard 115 networking wireless 114 Notification Area 113 O Opening the display panel 48 optical disc positioning 89 optical discs handling 89 inserting 88 removing 92 optical drive problems 168 troubleshooting 168 using 86 optical media recording 91 other documentation 38 P password deleting a supervisor 134 disabling a user 135 setting a user 134 supervisor set up 133 types 132 passwords instant, using 132 setting 132 port RGB 60 power computer will not start 155 connecting cable...

User's Guide for Satellite P300/P305
Page 220
... files 168 Device Manager 161 disk drive is slow 167 display is blank 165 ExpressCard® 170 checklist 170 error occurs 171 hot swapping fails 171 not recognized 171 slot appears dead 170 external display not working 166 external monitor 165 faulty memory 162 hardware conflict 160 high-pitched noise 169 Internet bookmarked site not found 159 Internet connection is slow 159 keyboard not responding 156 missing files/trouble accessing a disk 167...
... files 168 Device Manager 161 disk drive is slow 167 display is blank 165 ExpressCard® 170 checklist 170 error occurs 171 hot swapping fails 171 not recognized 171 slot appears dead 170 external display not working 166 external monitor 165 faulty memory 162 hardware conflict 160 high-pitched noise 169 Internet bookmarked site not found 159 Internet connection is slow 159 keyboard not responding 156 missing files/trouble accessing a disk 167...


