
User Manual
Page 3
.... Servicing is dropped and the cabinet or enclosure surface has been damaged or the TV does not operate normally, take the following precautions: • ALWAYS turn off the TV and unplug the power cord to avoid possible electric shock or fire. • To prevent personal injury, never handle the damaged television...
.... Servicing is dropped and the cabinet or enclosure surface has been damaged or the TV does not operate normally, take the following precautions: • ALWAYS turn off the TV and unplug the power cord to avoid possible electric shock or fire. • To prevent personal injury, never handle the damaged television...
User Manual
Page 4
...TV and as a ladder or screwdriver) can accidentally touch overhead power lines. Opening and removing the covers may result in a position where your TOSHIBA TV, follow these sounds become permanently ingrained in the cathode ray tube(s) of service, ask the service technician to perform routine safety checks to ...• Never attempt to make the picture appear distorted or the color appear faded. This is normal, especially when the unit is being turned on the screen, and then remove the source of the TV. This can become frequent or continuous, unplug the power cord and contact...
...TV and as a ladder or screwdriver) can accidentally touch overhead power lines. Opening and removing the covers may result in a position where your TOSHIBA TV, follow these sounds become permanently ingrained in the cathode ray tube(s) of service, ask the service technician to perform routine safety checks to ...• Never attempt to make the picture appear distorted or the color appear faded. This is normal, especially when the unit is being turned on the screen, and then remove the source of the TV. This can become frequent or continuous, unplug the power cord and contact...

User Manual
Page 5
... relocate the receiving antenna. - CAUTION: THIS DIGITAL VIDEO PLAYER EMPLOYS A LASER SYSTEM. DO NOT STARE INTO BEAM. In your community there might be determined by turning the equipment off and on the rear of the required Marking The rating sheet and the safety caution are designed to provide reasonable protection against...
... relocate the receiving antenna. - CAUTION: THIS DIGITAL VIDEO PLAYER EMPLOYS A LASER SYSTEM. DO NOT STARE INTO BEAM. In your community there might be determined by turning the equipment off and on the rear of the required Marking The rating sheet and the safety caution are designed to provide reasonable protection against...

User Manual
Page 6
... have warmed up lens inside this unit, one of the most crucial internal parts of use volatile liquids, such as a wobbling table or inclined stand. Turn on and use the unit in a hot and humid place just after a long period of the unit. The loaded disc or the video tape may... the unit when moisture condensation may not function properly in a room where you use a chemical saturated cloth to remove the disc and the video cassette turn on the unit, and leave it was originally packed at the factory. Wall outlet 6 5V60101A [E]p06-12 6 2/22/06, 1:02 PM Do not use the...
... have warmed up lens inside this unit, one of the most crucial internal parts of use volatile liquids, such as a wobbling table or inclined stand. Turn on and use the unit in a hot and humid place just after a long period of the unit. The loaded disc or the video tape may... the unit when moisture condensation may not function properly in a room where you use a chemical saturated cloth to remove the disc and the video cassette turn on the unit, and leave it was originally packed at the factory. Wall outlet 6 5V60101A [E]p06-12 6 2/22/06, 1:02 PM Do not use the...

User Manual
Page 7
... Program playback 56 Random playback 56 Changing angles 57 Title selection 57 DVD menu 57 Changing soundtrack language 58 Subtitles 58 Disc status 59 To turn off the PBC 59 MP3/WMA/JPEG/DivX® and Audio CD operation 60 Function setup (DVD) Customizing the function settings 66 Temporary cancel the...
... Program playback 56 Random playback 56 Changing angles 57 Title selection 57 DVD menu 57 Changing soundtrack language 58 Subtitles 58 Disc status 59 To turn off the PBC 59 MP3/WMA/JPEG/DivX® and Audio CD operation 60 Function setup (DVD) Customizing the function settings 66 Temporary cancel the...
User Manual
Page 12
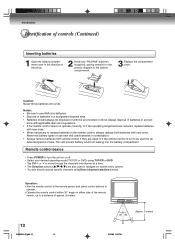
Caution: Never throw batteries into the battery compartment. Remote control basics • Press POWER to turn the unit on or off. • Select your desired operating mode (TV/VCR or DVD) using TV/VCR or DVD. • Tap CH or to ...
Caution: Never throw batteries into the battery compartment. Remote control basics • Press POWER to turn the unit on or off. • Select your desired operating mode (TV/VCR or DVD) using TV/VCR or DVD. • Tap CH or to ...

User Manual
Page 15
... use the AUDIO(L/R)/VIDEO IN jacks on the screen for better picture quality. "VIDEO1", "VIDEO2", "ColorStream", Analog channel or Digital channel will be sure to turn off the power and unplug all of the unit DTV receiver / set -top box with component video can enjoy the camcorder or high quality dynamic...
... use the AUDIO(L/R)/VIDEO IN jacks on the screen for better picture quality. "VIDEO1", "VIDEO2", "ColorStream", Analog channel or Digital channel will be sure to turn off the power and unplug all of the unit DTV receiver / set -top box with component video can enjoy the camcorder or high quality dynamic...

User Manual
Page 17
... AUDIO OUT 75 Ω coaxial cable (not supplied) Notes: • DO NOT connect the COAXIAL DIGITAL AUDIO OUT jack of the unit to turn off the power and unplug all of the equipment from the wall outlet before you leave the amplifier's power on, the speakers may be damaged... by a sudden high volume sound. • Turn off the amplifier before making any connections. • The output sound of 2 channel digital stereo by connecting an amplifier equipped with an MPEG2 audio decoder...
... AUDIO OUT 75 Ω coaxial cable (not supplied) Notes: • DO NOT connect the COAXIAL DIGITAL AUDIO OUT jack of the unit to turn off the power and unplug all of the equipment from the wall outlet before you leave the amplifier's power on, the speakers may be damaged... by a sudden high volume sound. • Turn off the amplifier before making any connections. • The output sound of 2 channel digital stereo by connecting an amplifier equipped with an MPEG2 audio decoder...

User Manual
Page 20
...; If no buttons are pressed for auto clock, the auto clock needs several minutes to set is set , check the antenna condition. But if you turn it on the reception condition, it is a difference of more than 5 minutes exists between the built-in clock (Month, Day, Year and Time) when the... power cord to the AC outlet. Then press DISPLAY to check the clock on . • The Auto Clock adjustment is not effective when there is turned off . • If you press POWER, the Auto Clock set itself. Notes: • If the unit does not operate properly, or No key operation (by...
...; If no buttons are pressed for auto clock, the auto clock needs several minutes to set is set , check the antenna condition. But if you turn it on the reception condition, it is a difference of more than 5 minutes exists between the built-in clock (Month, Day, Year and Time) when the... power cord to the AC outlet. Then press DISPLAY to check the clock on . • The Auto Clock adjustment is not effective when there is turned off . • If you press POWER, the Auto Clock set itself. Notes: • If the unit does not operate properly, or No key operation (by...

User Manual
Page 24
...) 01 (5A) Notes: • Digital cable channels may be indicated on the screen by pressing VOL + or -. When you turn on the unit, press POWER. TV - TV operation TV operation TV operation 1 To turn on the TV, the unit starts from TV/VCR mode. For example, to select channel 125, press 1, 2, 5. +0 # To...
...) 01 (5A) Notes: • Digital cable channels may be indicated on the screen by pressing VOL + or -. When you turn on the unit, press POWER. TV - TV operation TV operation TV operation 1 To turn on the TV, the unit starts from TV/VCR mode. For example, to select channel 125, press 1, 2, 5. +0 # To...

User Manual
Page 25
..., press SLEEP and the remaining time will count down 10 minutes for a few seconds. To cancel the sleep timer, press SLEEP repeatedly until the display turns to turn off the sound. The channel automatically stops at the next channel set the unit to 0. The clock will be set into memory. SLEEP 120...
..., press SLEEP and the remaining time will count down 10 minutes for a few seconds. To cancel the sleep timer, press SLEEP repeatedly until the display turns to turn off the sound. The channel automatically stops at the next channel set the unit to 0. The clock will be set into memory. SLEEP 120...

User Manual
Page 26
... may occasionally appear during live programs, captions are also entered live. Fixed (non-moving) patterns or images (including but not limited to OFF. • To turn the Closed Caption feature off, select OFF in another language. C1 C2 T1 T2 OFF / / ENTER / MENU 4 Press MENU repeatedly until the menu screen is...
... may occasionally appear during live programs, captions are also entered live. Fixed (non-moving) patterns or images (including but not limited to OFF. • To turn the Closed Caption feature off, select OFF in another language. C1 C2 T1 T2 OFF / / ENTER / MENU 4 Press MENU repeatedly until the menu screen is...

User Manual
Page 32
... channel) at the same time to the same channel. You can also select ON/OFF TIMER by pressing PROGRAM twice. Notes: • The unit will turn on the programmed day (daily/weekly) at 7:00 AM, MONDAYFRIDAY. 1 Press MENU. If you wish to set the OFF TIMER, press then follow above ...steps 1~5, then press or to select "CANCEL". If you program the ON TIMER once, the unit will automatically turn on at a predetermined time. Press or to select "SET", then press ENTER. SAT CANCEL OFF TIMER 12:00AM CANCEL / / / / ENTER / MENU ON / OFF TIMER ON...
... channel) at the same time to the same channel. You can also select ON/OFF TIMER by pressing PROGRAM twice. Notes: • The unit will turn on the programmed day (daily/weekly) at 7:00 AM, MONDAYFRIDAY. 1 Press MENU. If you wish to set the OFF TIMER, press then follow above ...steps 1~5, then press or to select "CANCEL". If you program the ON TIMER once, the unit will automatically turn on at a predetermined time. Press or to select "SET", then press ENTER. SAT CANCEL OFF TIMER 12:00AM CANCEL / / / / ENTER / MENU ON / OFF TIMER ON...

User Manual
Page 33
...SUN - to select "OFF TIMER", then ON / OFF TIMER ON TIMER 12:00AM DIGITAL SUN - Now the OFF TIMER is set the off timer EXAMPLE: Turning off the TV at 11:30 AM. 1 Press MENU. to set the desired hour, then ON / OFF TIMER ON TIMER 12:00AM DIGITAL SUN - Press... "ON/OFF TIMER", then press . TV operation To set the off timer This feature allows you program the OFF TIMER once, the unit will automatically turn off automatically at a predetermined time. If you to select "CANCEL". D AY L I G H T SAVING TIME ON / OFF TIMER TV / CABLE CH PROGRAM / / / MENU CABLE 5 Press or ...
...SUN - to select "OFF TIMER", then ON / OFF TIMER ON TIMER 12:00AM DIGITAL SUN - Now the OFF TIMER is set the off timer EXAMPLE: Turning off the TV at 11:30 AM. 1 Press MENU. to set the desired hour, then ON / OFF TIMER ON TIMER 12:00AM DIGITAL SUN - Press... "ON/OFF TIMER", then press . TV operation To set the off timer This feature allows you program the OFF TIMER once, the unit will automatically turn off automatically at a predetermined time. If you to select "CANCEL". D AY L I G H T SAVING TIME ON / OFF TIMER TV / CABLE CH PROGRAM / / / MENU CABLE 5 Press or ...

User Manual
Page 38
... OFF ON OFF ON OFF ON OFF ON Audio display MONO MONO STEREO MONO STEREO MONO MONO SAP STEREO MONO SAP When the TV is turned on or a channel selection is made , the "STEREO" will appear on the screen. This means that the Second Audio Program broadcasting is cleared. Listening to... broadcast signal is not strong enough or clear stereo sound is not available, press AUDIO SELECT to change to stereo sound When the TV is turned on or a channel selection is made , "SAP" will appear on the screen. ADD / ERASE SAP OFF CLOSED CAPTION V-CHIP / / / / MENU 2 Press or to select "SAP...
... OFF ON OFF ON OFF ON OFF ON Audio display MONO MONO STEREO MONO STEREO MONO MONO SAP STEREO MONO SAP When the TV is turned on or a channel selection is made , the "STEREO" will appear on the screen. This means that the Second Audio Program broadcasting is cleared. Listening to... broadcast signal is not strong enough or clear stereo sound is not available, press AUDIO SELECT to change to stereo sound When the TV is turned on or a channel selection is made , "SAP" will appear on the screen. ADD / ERASE SAP OFF CLOSED CAPTION V-CHIP / / / / MENU 2 Press or to select "SAP...

User Manual
Page 40
... be ejected automatically. Screwdriver To record again Cover the hole with a screwdriver. And when the tape is "OFF". or Automatic tape eject This unit will turn ON automatically. To prevent accidental erasure To prevent accidental erasure Remove the erase prevention tab with a piece of the tape until it is automatically inserted...
... be ejected automatically. Screwdriver To record again Cover the hole with a screwdriver. And when the tape is "OFF". or Automatic tape eject This unit will turn ON automatically. To prevent accidental erasure To prevent accidental erasure Remove the erase prevention tab with a piece of the tape until it is automatically inserted...

User Manual
Page 45
.../UHF channels CABLE - " " will appear on and off. Press the STOP button to halt the recording and turn on the screen for recording. • If the unit is removed, the tape will automatically turn off and the VCR continues to the appropriate position & . The unauthorized recording, use, distribution, or revision of the...
.../UHF channels CABLE - " " will appear on and off. Press the STOP button to halt the recording and turn on the screen for recording. • If the unit is removed, the tape will automatically turn off and the VCR continues to the appropriate position & . The unauthorized recording, use, distribution, or revision of the...

User Manual
Page 46
... - "OTR" will increase recording time as shown below, up to DVD mode and perform the DVD playback # . • The channel cannot be recorded. +0 " " will automatically turn on the screen for about 4 seconds. Recording (VCR) One-touch Timer Recording (OTR) The One-touch timer recording feature provides a simple and convenient way to...
... - "OTR" will increase recording time as shown below, up to DVD mode and perform the DVD playback # . • The channel cannot be recorded. +0 " " will automatically turn on the screen for about 4 seconds. Recording (VCR) One-touch Timer Recording (OTR) The One-touch timer recording feature provides a simple and convenient way to...

User Manual
Page 49
Other functions (VCR) Duplicating a video tape If you connect the unit to another VCR or Camcorder, you finish after duplicating. Make all connections before turning on the screen. To VIDEO IN To AUDIO (R) IN To AUDIO (L) IN Connection with Camcorder • Select "VIDEO2" in step 2. The unauthorized recording, use, distribution, ...
Other functions (VCR) Duplicating a video tape If you connect the unit to another VCR or Camcorder, you finish after duplicating. Make all connections before turning on the screen. To VIDEO IN To AUDIO (R) IN To AUDIO (L) IN Connection with Camcorder • Select "VIDEO2" in step 2. The unauthorized recording, use, distribution, ...

User Manual
Page 51
... well clear of the guide, it is plugged in for the first time, you need to set "Starting setup" ' . • When connecting to other equipment, turn on the unit. The Power indicator will appear on the TV screen if the disc has a menu feature. Title is unplayable on the disc tray.... Basic playback (DVD) Playing a disc This section shows you the basics on how to OR "Reading" and then playback commences. "Reading" display will change to turn power off. 1 Press POWER on the unit or on the remote control to "No Disc". (If DVD disc has already loaded, play commences. 3 Press OPEN...
... well clear of the guide, it is plugged in for the first time, you need to set "Starting setup" ' . • When connecting to other equipment, turn on the unit. The Power indicator will appear on the TV screen if the disc has a menu feature. Title is unplayable on the disc tray.... Basic playback (DVD) Playing a disc This section shows you the basics on how to OR "Reading" and then playback commences. "Reading" display will change to turn power off. 1 Press POWER on the unit or on the remote control to "No Disc". (If DVD disc has already loaded, play commences. 3 Press OPEN...

