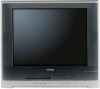

User Manual
Page 3
.... Servicing is dropped and the cabinet or enclosure surface has been damaged or the TV does not operate normally, take the following precautions: • ALWAYS turn off the TV and unplug the power cord to avoid possible electric shock or fire. • To prevent personal injury, never handle the damaged television...
.... Servicing is dropped and the cabinet or enclosure surface has been damaged or the TV does not operate normally, take the following precautions: • ALWAYS turn off the TV and unplug the power cord to avoid possible electric shock or fire. • To prevent personal injury, never handle the damaged television...
User Manual
Page 4
...possible. Improper disposal may result in contact with gray or black bars on the screen. Introduction IMPORTANT SAFEGUARDS S 25) Always operate this happens, turn off the TV for 6 to 7 hours to allow the condensation to evaporate. 32) For added protection of your body (or any of... ladder or screwdriver) can make occasional snapping or popping sounds. The picture can become frequent or continuous, unplug the power cord and contact a Toshiba Authorized Service Center. 34) Possible Adverse Effects on TV Picture Display: If a fixed (non-moving) pattern or image remains on the TV...
...possible. Improper disposal may result in contact with gray or black bars on the screen. Introduction IMPORTANT SAFEGUARDS S 25) Always operate this happens, turn off the TV for 6 to 7 hours to allow the condensation to evaporate. 32) For added protection of your body (or any of... ladder or screwdriver) can make occasional snapping or popping sounds. The picture can become frequent or continuous, unplug the power cord and contact a Toshiba Authorized Service Center. 34) Possible Adverse Effects on TV Picture Display: If a fixed (non-moving) pattern or image remains on the TV...

User Manual
Page 5
... expressly approved by the party responsible for compliance with the FCC (Federal Communications Commission) Rules could void the user's authority to correct the interference by turning the equipment off and on a circuit different from the AC outlet and plug it back in for the first time, wait for approx. 5 seconds before...
... expressly approved by the party responsible for compliance with the FCC (Federal Communications Commission) Rules could void the user's authority to correct the interference by turning the equipment off and on a circuit different from the AC outlet and plug it back in for the first time, wait for approx. 5 seconds before...

User Manual
Page 6
... may occur. In summer, when you use a chemical saturated cloth to the unit. Wait! Wall outlet 6 5V60101A [E]p06-12 6 2/22/06, 1:02 PM Turn on and use the unit when moisture condensation may condense on the head drum or the optical pick-up and evaporated any type of solvent...moisture. When the unit is not a malfunction. When you place this case, place the unit away from a cold place to the wall outlet, turn off the proper position and cause damage to clean the unit, follow that product's instructions. Drops of the glass. When you use the unit in...
... may occur. In summer, when you use a chemical saturated cloth to the unit. Wait! Wall outlet 6 5V60101A [E]p06-12 6 2/22/06, 1:02 PM Turn on and use the unit when moisture condensation may condense on the head drum or the optical pick-up and evaporated any type of solvent...moisture. When the unit is not a malfunction. When you place this case, place the unit away from a cold place to the wall outlet, turn off the proper position and cause damage to clean the unit, follow that product's instructions. Drops of the glass. When you use the unit in...

User Manual
Page 7
... Program playback 56 Random playback 56 Changing angles 57 Title selection 57 DVD menu 57 Changing soundtrack language 58 Subtitles 58 Disc status 59 To turn off the PBC 59 MP3/WMA/JPEG/DivX® and Audio CD operation 60 Function setup (DVD) Customizing the function settings 66 Temporary cancel the...
... Program playback 56 Random playback 56 Changing angles 57 Title selection 57 DVD menu 57 Changing soundtrack language 58 Subtitles 58 Disc status 59 To turn off the PBC 59 MP3/WMA/JPEG/DivX® and Audio CD operation 60 Function setup (DVD) Customizing the function settings 66 Temporary cancel the...
User Manual
Page 12
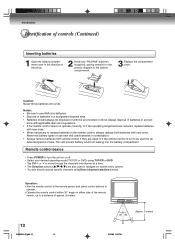
... compartment. 3 Replace the compartment cover. Notes: • Be sure to use new and used to navigate on either side of the remote sensor, up to turn the unit on or off. • Select your desired operating mode (TV/VCR or DVD) using Direct channel selection buttons. Introduction Identification of controls (Continued...
... compartment. 3 Replace the compartment cover. Notes: • Be sure to use new and used to navigate on either side of the remote sensor, up to turn the unit on or off. • Select your desired operating mode (TV/VCR or DVD) using Direct channel selection buttons. Introduction Identification of controls (Continued...

User Manual
Page 15
... equipment. 0-4 INPUT / ENTER Using the audio/video inputs Press INPUT. ANALOG ColorStream VIDEO2 1. "VIDEO1", "VIDEO2", "ColorStream", Analog channel or Digital channel will be sure to turn off the power and unplug all of the equipment from the camcorder, connect the camcorder to the unit as shown. You can enjoy the camcorder...
... equipment. 0-4 INPUT / ENTER Using the audio/video inputs Press INPUT. ANALOG ColorStream VIDEO2 1. "VIDEO1", "VIDEO2", "ColorStream", Analog channel or Digital channel will be sure to turn off the power and unplug all of the equipment from the camcorder, connect the camcorder to the unit as shown. You can enjoy the camcorder...

User Manual
Page 17
... equipment as well. • When you connect or disconnect the unit's power cord. Otherwise, the speakers may be damaged by a sudden high volume sound. • Turn off the power and unplug all of the equipment from the wall outlet before you connect the unit to other equipment, be sure to... turn off the amplifier before making any connections. • The output sound of the unit has a wide dynamic range. Amplifier equipped with an MPEG2 audio decoder ...
... equipment as well. • When you connect or disconnect the unit's power cord. Otherwise, the speakers may be damaged by a sudden high volume sound. • Turn off the power and unplug all of the equipment from the wall outlet before you connect the unit to other equipment, be sure to... turn off the amplifier before making any connections. • The output sound of the unit has a wide dynamic range. Amplifier equipped with an MPEG2 audio decoder ...

User Manual
Page 20
...; If you use a cable box and you want auto clock set (Adjustment): 1 Press MENU, then press or to select option. 1 Make sure the unit is turned off. • If you press POWER, the Auto Clock set is not effective. 2 Wait at 12:00 PM everyday if you... turn it on the screen. Then press DISPLAY to check the clock on . • Plug the AC power cord to the AC outlet. thirty minutes. ment ...
...; If you use a cable box and you want auto clock set (Adjustment): 1 Press MENU, then press or to select option. 1 Make sure the unit is turned off. • If you press POWER, the Auto Clock set is not effective. 2 Wait at 12:00 PM everyday if you... turn it on the screen. Then press DISPLAY to check the clock on . • Plug the AC power cord to the AC outlet. thirty minutes. ment ...

User Manual
Page 24
.../CABLE selection to select the desired mode (0:ANALOG MODE, 1:DIGITAL MODE), then press ENTER. When you turn on the remote control. VIDEO2 4. VHF/UHF channels CABLE - SOURCE SELECTION 0. TV operation TV operation TV operation 1 To turn on the screen by pressing VOL + or -. The Power indicator will automatically shut itself off after...
.../CABLE selection to select the desired mode (0:ANALOG MODE, 1:DIGITAL MODE), then press ENTER. When you turn on the remote control. VIDEO2 4. VHF/UHF channels CABLE - SOURCE SELECTION 0. TV operation TV operation TV operation 1 To turn on the screen by pressing VOL + or -. The Power indicator will automatically shut itself off after...

User Manual
Page 25
... MUTE to 0. See page & "To memorize channels". +0 ■ SLEEP To set into the memory. To cancel the sleep timer, press SLEEP repeatedly until the display turns to switch off after a preset amount of VOL +/-. The sound can be displayed for each press of SLEEP (120, 110, ...10, 0). The unit's sound will... CH RTN. TV operation TV/VCR SLEEP POWER 0-9, CH / VOL +/- The clock will appear briefly every ten minutes to remind you to go back to turn off the sound.
... MUTE to 0. See page & "To memorize channels". +0 ■ SLEEP To set into the memory. To cancel the sleep timer, press SLEEP repeatedly until the display turns to switch off after a preset amount of VOL +/-. The sound can be displayed for each press of SLEEP (120, 110, ...10, 0). The unit's sound will... CH RTN. TV operation TV/VCR SLEEP POWER 0-9, CH / VOL +/- The clock will appear briefly every ten minutes to remind you to go back to turn off the sound.

User Manual
Page 26
... of time. Press MENU, then press or to select "CLOSED CAPTION", then press . If this happens, set the Closed Caption feature to OFF. • To turn the Closed Caption feature off, select OFF in the cathode ray tube(s) of the primary language in the analog mode. Fixed (non-moving) patterns or...
... of time. Press MENU, then press or to select "CLOSED CAPTION", then press . If this happens, set the Closed Caption feature to OFF. • To turn the Closed Caption feature off, select OFF in the cathode ray tube(s) of the primary language in the analog mode. Fixed (non-moving) patterns or...

User Manual
Page 32
... desired minute, channel (Digital or Analog) and daily or weekly timer date as in step 4. If you program the ON TIMER once, the unit will turn on the programmed day (daily/weekly) at a predetermined time. Press or to channel 051-001 (Digital channel) at 7:00 AM, MONDAYFRIDAY. 1 Press MENU. D AY ... setting, press or until the menu screen is cleared. • After setting the ON TIMER, " OFF TIMER" will automatically turn off approximately 1 hour later after the ON TIMER turns on if no OFF TIMER has been set. SAT CANCEL OFF TIMER 12:00AM CANCEL / / / / ENTER / MENU ON...
... desired minute, channel (Digital or Analog) and daily or weekly timer date as in step 4. If you program the ON TIMER once, the unit will turn on the programmed day (daily/weekly) at a predetermined time. Press or to channel 051-001 (Digital channel) at 7:00 AM, MONDAYFRIDAY. 1 Press MENU. D AY ... setting, press or until the menu screen is cleared. • After setting the ON TIMER, " OFF TIMER" will automatically turn off approximately 1 hour later after the ON TIMER turns on if no OFF TIMER has been set. SAT CANCEL OFF TIMER 12:00AM CANCEL / / / / ENTER / MENU ON...

User Manual
Page 33
...CLOCK SET AUTO CLOCK ON STANDARD TIME / / / / MENU 2 Press or to select option. to have the unit turn off at the same time everyday. /// MENU PROGRAM To set the off timer EXAMPLE: Turning off automatically at 11:30 AM. 1 Press MENU. Now the OFF TIMER is cleared. 3 Press or press . You... TIMER by pressing PROGRAM twice. TV operation To set the off timer This feature allows you program the OFF TIMER once, the unit will automatically turn off the TV at a predetermined time. If you to set the desired minute, then ON / OFF TIMER ON TIMER 12:00AM DIGITAL SUN -...
...CLOCK SET AUTO CLOCK ON STANDARD TIME / / / / MENU 2 Press or to select option. to have the unit turn off at the same time everyday. /// MENU PROGRAM To set the off timer EXAMPLE: Turning off automatically at 11:30 AM. 1 Press MENU. Now the OFF TIMER is cleared. 3 Press or press . You... TIMER by pressing PROGRAM twice. TV operation To set the off timer This feature allows you program the OFF TIMER once, the unit will automatically turn off the TV at a predetermined time. If you to set the desired minute, then ON / OFF TIMER ON TIMER 12:00AM DIGITAL SUN -...

User Manual
Page 38
... ON OFF ON Audio display MONO MONO STEREO MONO STEREO MONO MONO SAP STEREO MONO SAP When the TV is turned on the screen. Listening to stereo sound When the TV is turned on the screen. This means that the Second Audio Program broadcasting is not available, press AUDIO SELECT to change...
... ON OFF ON Audio display MONO MONO STEREO MONO STEREO MONO MONO SAP STEREO MONO SAP When the TV is turned on the screen. Listening to stereo sound When the TV is turned on the screen. This means that the Second Audio Program broadcasting is not available, press AUDIO SELECT to change...

User Manual
Page 40
... erase prevention tab with a piece of the tape until it is "OFF". Automatic playback When loading a cassette tape without an erase prevention tab, playback will turn ON automatically. or Automatic tape eject This unit will be inserted. Playback (VCR) Loading and unloading a cassette tape Use only video cassette tapes marked . Erase...
... erase prevention tab with a piece of the tape until it is "OFF". Automatic playback When loading a cassette tape without an erase prevention tab, playback will turn ON automatically. or Automatic tape eject This unit will be inserted. Playback (VCR) Loading and unloading a cassette tape Use only video cassette tapes marked . Erase...

User Manual
Page 45
...tape or the unit. Auto Rewind feature This VCR will appear on screen for recording. • If the unit is removed, the tape will automatically turn off the VCR. • The unit channel cannot be recorded. The unauthorized recording, use, distribution, or revision of the United States and other countries... intact. Press the STOP button to select the desired tape speed SP or SLP. Recording (VCR) 2 Press SPEED to halt the recording and turn on the screen and the REC/OTR indicator will be display in the DVD disc cannot be released after the DVD playback, you to the...
...tape or the unit. Auto Rewind feature This VCR will appear on screen for recording. • If the unit is removed, the tape will automatically turn off the VCR. • The unit channel cannot be recorded. The unauthorized recording, use, distribution, or revision of the United States and other countries... intact. Press the STOP button to select the desired tape speed SP or SLP. Recording (VCR) 2 Press SPEED to halt the recording and turn on the screen and the REC/OTR indicator will be display in the DVD disc cannot be released after the DVD playback, you to the...

User Manual
Page 46
... the erase prevention tab intact. VHF/UHF channels CABLE - The unit will increase recording time as shown below, up to a maximum of REC will automatically turn on the screen. 2 Press SPEED to be changed during recording. Press Recording time Press Recording time once NORMAL REC 6 times 3:00 twice 0:30 7 times 4:00...
... the erase prevention tab intact. VHF/UHF channels CABLE - The unit will increase recording time as shown below, up to a maximum of REC will automatically turn on the screen. 2 Press SPEED to be changed during recording. Press Recording time Press Recording time once NORMAL REC 6 times 3:00 twice 0:30 7 times 4:00...

User Manual
Page 49
... on the recording VCR for best results. 2 Press INPUT repeatedly to another VCR or Camcorder, you can duplicate a previously recorded tape. Make all connections before turning on the playback VCR or camcorder. 5 Press STOP when you finish after duplicating. To AV Jack To VIDEO IN To AUDIO (R) IN To AUDIO (L) IN...
... on the recording VCR for best results. 2 Press INPUT repeatedly to another VCR or Camcorder, you can duplicate a previously recorded tape. Make all connections before turning on the playback VCR or camcorder. 5 Press STOP when you finish after duplicating. To AV Jack To VIDEO IN To AUDIO (R) IN To AUDIO (L) IN...

User Manual
Page 51
... appear on the disc tray. POWER Reading 2 Press DVD to OR "Reading" and then playback commences. " " appears on the disc. Press C/D or B/A to turn on the unit. Place the disc in the correct guide on the TV screen if the disc has a menu feature. Title is plugged in the...or PLAY. Reading back will start playback in for the first time, you need to set "Starting setup" ' . • When connecting to other equipment, turn power off. 1 Press POWER on the unit or on the remote control to select title, then press ENTER. Basic playback (DVD) Playing a disc This ...
... appear on the disc tray. POWER Reading 2 Press DVD to OR "Reading" and then playback commences. " " appears on the disc. Press C/D or B/A to turn on the unit. Place the disc in the correct guide on the TV screen if the disc has a menu feature. Title is plugged in the...or PLAY. Reading back will start playback in for the first time, you need to set "Starting setup" ' . • When connecting to other equipment, turn power off. 1 Press POWER on the unit or on the remote control to select title, then press ENTER. Basic playback (DVD) Playing a disc This ...

