
User Manual
Page 2
...other electronic components). The Consumer Electronics Association formed the Home Entertainment Support Safety Committee, comprised of cable entry as a VCR, remote control, or toy) that children can become excited while watching a program and can become permanently ingrained in your TV (and other ...of your TV (such as practical. Use appropriate angle braces, straps, and anchors to prevent blade exposure. Carefully read this Toshiba TV. Share our safety message about television safety. Arlington, VA 22201 U.S.A. NO USER-SERVICEABLE PARTS INSIDE. The home theater ...
...other electronic components). The Consumer Electronics Association formed the Home Entertainment Support Safety Committee, comprised of cable entry as a VCR, remote control, or toy) that children can become excited while watching a program and can become permanently ingrained in your TV (and other ...of your TV (such as practical. Use appropriate angle braces, straps, and anchors to prevent blade exposure. Carefully read this Toshiba TV. Share our safety message about television safety. Arlington, VA 22201 U.S.A. NO USER-SERVICEABLE PARTS INSIDE. The home theater ...

User Manual
Page 10
... door on the front panel to access the *S-VIDEO/AUDIO (L/R)/VIDEO IN (LINE IN 2) jacks. Introduction Identification of controls See the page in for details. Front panel Cassette loading TIMER REC indicator "% slot " Remote sensor 12 Disc tray # USB Port 18 POWER button # *S-VIDEO/AUDIO (L/R)/VIDEO IN (LINE IN 2) jacks 49 REW...
... door on the front panel to access the *S-VIDEO/AUDIO (L/R)/VIDEO IN (LINE IN 2) jacks. Introduction Identification of controls See the page in for details. Front panel Cassette loading TIMER REC indicator "% slot " Remote sensor 12 Disc tray # USB Port 18 POWER button # *S-VIDEO/AUDIO (L/R)/VIDEO IN (LINE IN 2) jacks 49 REW...

User Manual
Page 11
...button "# D.TRACKING button " TOP MENU button #% OPEN/CLOSE button # *DVD MENU button Use the DVD MENU button to display the menu included on the remote control. STOP button " # CLOSED CAPTION button $ SKIP button #! SLOW button " #! DVD button # TV/VCR button Direct channel Selection buttons (0-9) " Number...in "DVD menu." 57 5V60101A [E]p06-12 11 POWER button ' SLEEP button # CM SKIP button " JUMP button #" VOL +/- Introduction Remote control The instructions in this manual describe the function on many DVD video discs. TIMER REC button "% PIC SIZE button !$ PROGRAM button "& ...
...button "# D.TRACKING button " TOP MENU button #% OPEN/CLOSE button # *DVD MENU button Use the DVD MENU button to display the menu included on the remote control. STOP button " # CLOSED CAPTION button $ SKIP button #! SLOW button " #! DVD button # TV/VCR button Direct channel Selection buttons (0-9) " Number...in "DVD menu." 57 5V60101A [E]p06-12 11 POWER button ' SLEEP button # CM SKIP button " JUMP button #" VOL +/- Introduction Remote control The instructions in this manual describe the function on many DVD video discs. TIMER REC button "% PIC SIZE button !$ PROGRAM button "& ...
User Manual
Page 12
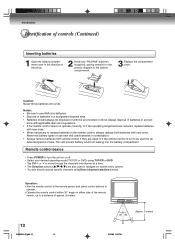
... your desired operating mode (TV/VCR or DVD) using Direct channel selection buttons. ance with applicable laws and regulations. • If the remote control does not operate correctly, or if the operating range becomes reduced, replace batteries with new ones. • When necessary to a distance of...should always be used for an extended period of time. Always dispose of batteries in the battery compartment. 3 Replace the compartment cover. Remote control basics • Press POWER to turn the unit on -screen menu system. • You can directly access specific channels using TV/...
... your desired operating mode (TV/VCR or DVD) using Direct channel selection buttons. ance with applicable laws and regulations. • If the remote control does not operate correctly, or if the operating range becomes reduced, replace batteries with new ones. • When necessary to a distance of...should always be used for an extended period of time. Always dispose of batteries in the battery compartment. 3 Replace the compartment cover. Remote control basics • Press POWER to turn the unit on -screen menu system. • You can directly access specific channels using TV/...

User Manual
Page 20
... • The POWER indicator will light. Notes: • If the unit does not operate properly, or No key operation (by the unit and/or the remote control): Static electricity, etc., may not function properly if the reception condition is not effective. 2 Wait at 12:00 PM everyday if you want auto clock...
... • The POWER indicator will light. Notes: • If the unit does not operate properly, or No key operation (by the unit and/or the remote control): Static electricity, etc., may not function properly if the reception condition is not effective. 2 Wait at 12:00 PM everyday if you want auto clock...

User Manual
Page 24
... DVD operation, press TV/VCR. VIDEO2 4. TV operation TV operation TV operation 1 To turn on the screen by green bars. When you turn on the remote control. If the volume decreases, the number of bars. To change to a specific channel (programmed or unprogrammed): Press Direct channel selection buttons (0-9) on the unit, press...
... DVD operation, press TV/VCR. VIDEO2 4. TV operation TV operation TV operation 1 To turn on the screen by green bars. When you turn on the remote control. If the volume decreases, the number of bars. To change to a specific channel (programmed or unprogrammed): Press Direct channel selection buttons (0-9) on the unit, press...

User Manual
Page 25
... allows you were watching. +0 % Note: The CHANNEL RETURN feature is operating. The sound can be displayed for each press of time, press SLEEP on the remote control. The channel automatically stops at the next channel set into memory. The clock will be set into the memory. To confirm the sleep timer setting...
... allows you were watching. +0 % Note: The CHANNEL RETURN feature is operating. The sound can be displayed for each press of time, press SLEEP on the remote control. The channel automatically stops at the next channel set into memory. The clock will be set into the memory. To confirm the sleep timer setting...

User Manual
Page 26
CLOSED CAPTION NOTICE OF POSSIBLE ADVERSE EFFECTS ON TV PICTURE DISPLAY Avoid displaying stationary images on the remote control. 26 5V60101A [E]p23-29 26 2/22/06, 1:03 PM Fixed (non-moving) patterns or images (including but not limited to the desired channel in the ...
CLOSED CAPTION NOTICE OF POSSIBLE ADVERSE EFFECTS ON TV PICTURE DISPLAY Avoid displaying stationary images on the remote control. 26 5V60101A [E]p23-29 26 2/22/06, 1:03 PM Fixed (non-moving) patterns or images (including but not limited to the desired channel in the ...

User Manual
Page 36
... digital program, the 16:9 PIC SIZE is not available. • If receiving a 16:9 format (digital) program, selecting ZOOM PIC SIZE will vary depending on the remote control to you are viewing.
... digital program, the 16:9 PIC SIZE is not available. • If receiving a 16:9 format (digital) program, selecting ZOOM PIC SIZE will vary depending on the remote control to you are viewing.

User Manual
Page 40
... tab positioned at your left. An inverted cassette tape cannot be ejected automatically. Unloading 1 Press STOP/EJECT on the front panel or EJECT on the remote control. 2 Remove the cassette tape. Screwdriver To record again Cover the hole with a piece of the tape until it is "OFF". or Automatic tape eject This...
... tab positioned at your left. An inverted cassette tape cannot be ejected automatically. Unloading 1 Press STOP/EJECT on the front panel or EJECT on the remote control. 2 Remove the cassette tape. Screwdriver To record again Cover the hole with a piece of the tape until it is "OFF". or Automatic tape eject This...

User Manual
Page 41
...tape without STOP), press PLAY. Playback will start playback: Press PLAY on the front panel or on the remote control. " " will appear on the screen for about 4 seconds. " " will appear on the remote. To stop playback: Press STOP/EJECT once on the front panel or press STOP on the screen for about...with STOP. To forward the tape: Press FF on the front panel or press FF on the remote. To rewind the tape: Press REW on the front panel or press REV on the remote control. 2 To start automatically). Forward/Reverse picture search mode When the tape is released. The tape ...
...tape without STOP), press PLAY. Playback will start playback: Press PLAY on the front panel or on the remote control. " " will appear on the screen for about 4 seconds. " " will appear on the remote. To stop playback: Press STOP/EJECT once on the front panel or press STOP on the screen for about...with STOP. To forward the tape: Press FF on the front panel or press FF on the remote. To rewind the tape: Press REW on the front panel or press REV on the remote control. 2 To start automatically). Forward/Reverse picture search mode When the tape is released. The tape ...

User Manual
Page 47
... REC indicator will go out. If you want to correct, then press or to select the TV/VCR mode. • Load a cassette tape with the remote control. TV/VCR ENTER /// MENU TIMER REC Recording (VCR) Timer recording Preparation: • Press TV/VCR to correct the desired setting. • If programming is not...
... REC indicator will go out. If you want to correct, then press or to select the TV/VCR mode. • Load a cassette tape with the remote control. TV/VCR ENTER /// MENU TIMER REC Recording (VCR) Timer recording Preparation: • Press TV/VCR to correct the desired setting. • If programming is not...

User Manual
Page 51
...). • If you need to set "Starting setup" ' . • When connecting to other equipment, turn power off. 1 Press POWER on the unit or on the remote control to turn on how to malfunction. • Do not place a disc which is selected and play commences. 3 Press OPEN/CLOSE. Disconnect the AC power cord...
...). • If you need to set "Starting setup" ' . • When connecting to other equipment, turn power off. 1 Press POWER on the unit or on the remote control to turn on how to malfunction. • Do not place a disc which is selected and play commences. 3 Press OPEN/CLOSE. Disconnect the AC power cord...

User Manual
Page 52
... TV screen according to open and close the disc tray after you set , permanently etching that heading. : You can use with this case, check your remote control once the movie is not recording, the closed caption in the DVD mode. To stop playback Press STOP. Doing so may cause the unit to...
... TV screen according to open and close the disc tray after you set , permanently etching that heading. : You can use with this case, check your remote control once the movie is not recording, the closed caption in the DVD mode. To stop playback Press STOP. Doing so may cause the unit to...

User Manual
Page 70
... to playback with the unit. 1) Press C or D to select "Parental", then press ENTER. The limitation will appear. • Level Off: The parental control setting does not function. • Level 8: Virtually all DVD software can be played back. • Level 1: DVD software for children. Then press ENTER....of this is "0000"). 3) Then press ENTER. Then press ENTER. "No Disc" appears on the screen. 4) While holding 7 down on the remote control and at the same time press STOP on the screen. Then press ENTER. "Enter Current Password" screen will be encoded with a DivX® ...
... to playback with the unit. 1) Press C or D to select "Parental", then press ENTER. The limitation will appear. • Level Off: The parental control setting does not function. • Level 8: Virtually all DVD software can be played back. • Level 1: DVD software for children. Then press ENTER....of this is "0000"). 3) Then press ENTER. Then press ENTER. "No Disc" appears on the screen. 4) While holding 7 down on the remote control and at the same time press STOP on the screen. Then press ENTER. "Enter Current Password" screen will be encoded with a DivX® ...

User Manual
Page 75
... unit or the disc. Timer recording does not work . DVD The playback picture has occasional distortion. Video heads are not inserted correctly. Remote control does not operate. Insert a disc. Cancel the parental lock function or change the parental lock level. Tape is inserted. The unit does...in the path of adhesive tape over the hole. The batteries are weak. This is inserted. Adjust tracking manually using the TRK +/- REMOTE CONTROL The function is an obstacle in the mode of repeat playback, course of automatic tracking circuit. The disc is set. The parental lock...
... unit or the disc. Timer recording does not work . DVD The playback picture has occasional distortion. Video heads are not inserted correctly. Remote control does not operate. Insert a disc. Cancel the parental lock function or change the parental lock level. Tape is inserted. The unit does...in the path of adhesive tape over the hole. The batteries are weak. This is inserted. Adjust tracking manually using the TRK +/- REMOTE CONTROL The function is an obstacle in the mode of repeat playback, course of automatic tracking circuit. The disc is set. The parental lock...
User Manual
Page 76
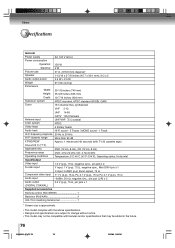
... (p-p) (burst signal), 75 Ω Y: 1 V (p-p), 75 Ω, PR: 0.7 V (p-p), 75 Ω, PB: 0.7 V (p-p), 75 Ω -8dBm, 50 kΩ, negative sinc., pin jack (L/R) x 2 0.5 V (p-p), 75 Ω, pin jack x 1 Supplied accessories Remote control (WC-SBH21 1 Batteries (R03/AAA 2 300-75 Ω matching transformer 1 * Screen size is approximate. • This model complies with the above specifications. • Designs and...
... (p-p) (burst signal), 75 Ω Y: 1 V (p-p), 75 Ω, PR: 0.7 V (p-p), 75 Ω, PB: 0.7 V (p-p), 75 Ω -8dBm, 50 kΩ, negative sinc., pin jack (L/R) x 2 0.5 V (p-p), 75 Ω, pin jack x 1 Supplied accessories Remote control (WC-SBH21 1 Batteries (R03/AAA 2 300-75 Ω matching transformer 1 * Screen size is approximate. • This model complies with the above specifications. • Designs and...


