Owners Manual
Page 2
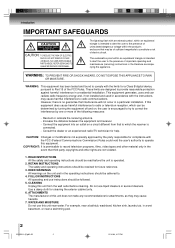
... the receiver is intended to alert the user to Part 15 of important operating and maintenance (servicing) instructions in the literature accompanying the appliance. WATER AND MOISTURE Do not use liquid cleaners or aerosol cleaners. This equipment generates, uses and can be of sufficient magnitude to constitute a risk of this unit does not make any recommendations for a Class B digital device, pursuant...
... the receiver is intended to alert the user to Part 15 of important operating and maintenance (servicing) instructions in the literature accompanying the appliance. WATER AND MOISTURE Do not use liquid cleaners or aerosol cleaners. This equipment generates, uses and can be of sufficient magnitude to constitute a risk of this unit does not make any recommendations for a Class B digital device, pursuant...

Owners Manual
Page 4
... often require extensive work by following the operating instructions. SERVICING Do not attempt to determine that have fallen into the unit. When the unit exhibits a distinct change in proper operating condition. 21. Introduction IMPORTANT SAFEGUARDS (Continued) 18. f. NOTE TO CABLE TV SYSTEM INSTALLER This reminder is damaged. c. If the unit has been exposed to qualified service personnel. Adjust only those...
... often require extensive work by following the operating instructions. SERVICING Do not attempt to determine that have fallen into the unit. When the unit exhibits a distinct change in proper operating condition. 21. Introduction IMPORTANT SAFEGUARDS (Continued) 18. f. NOTE TO CABLE TV SYSTEM INSTALLER This reminder is damaged. c. If the unit has been exposed to qualified service personnel. Adjust only those...
Owners Manual
Page 6
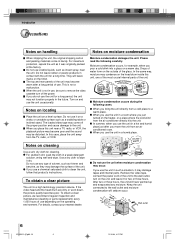
... the unit directly from an air conditioned room. When you use depending on the operating environment. Use a dry cloth to remove the video cassette turn on the unit, and leave it for a long time. If you use . To obtain a clear picture, we recommend regular inspection and maintenance (cleaning or parts replacement) every 1,000 hours of the unit. Remove the video tape, connect the power cord of use the...
... the unit directly from an air conditioned room. When you use depending on the operating environment. Use a dry cloth to remove the video cassette turn on the unit, and leave it for a long time. If you use . To obtain a clear picture, we recommend regular inspection and maintenance (cleaning or parts replacement) every 1,000 hours of the unit. Remove the video tape, connect the power cord of use the...

Owners Manual
Page 7
... of controls 8 Others Reception disturbances 37 Troubleshooting 38 Video head cleaning 39 Specifications 40 Limited warranty 41 Connections Antenna connections 11 Cable TV connections 12 Basic setup Starting setup 13 Clock setting 14 Setting the language 17 TV/VCR operation status 17 TV operation TV operation 18 Closed captions 20 To memorize channels 21 Setting the V-Chip 22 To set the on timer 24 To set the off timer 25 Picture control adjustment 26 Adjusting the picture preference 26 Playback Loading and unloading...
... of controls 8 Others Reception disturbances 37 Troubleshooting 38 Video head cleaning 39 Specifications 40 Limited warranty 41 Connections Antenna connections 11 Cable TV connections 12 Basic setup Starting setup 13 Clock setting 14 Setting the language 17 TV/VCR operation status 17 TV operation TV operation 18 Closed captions 20 To memorize channels 21 Setting the V-Chip 22 To set the on timer 24 To set the off timer 25 Picture control adjustment 26 Adjusting the picture preference 26 Playback Loading and unloading...

Owners Manual
Page 9
... button 31 POWER button 13 SLEEP button 19 CM SKIP button 29 D.TRACKING button 29 VOL +/- EJECT button 27 TV MONITOR button 31 Direct channel selection buttons (0-9) 18 Number buttons (0-9) 22 DISPLAY button 17 PROGRAM button 24 CH / button 19 INPUT button 36 CH RTN button 19 Direction buttons ( / / / ) 13 MENU button 14 PAUSE/STILL button 29 PLAY button 28 INDEX button 31 REV button 28 TRK- button 18 MUTE button 19 CLOSED CAPTION button 20 ENTER button 13 CANCEL button 22 STOP button 28 INDEX button 31 FF button 28 TRK+ button...
... button 31 POWER button 13 SLEEP button 19 CM SKIP button 29 D.TRACKING button 29 VOL +/- EJECT button 27 TV MONITOR button 31 Direct channel selection buttons (0-9) 18 Number buttons (0-9) 22 DISPLAY button 17 PROGRAM button 24 CH / button 19 INPUT button 36 CH RTN button 19 Direction buttons ( / / / ) 13 MENU button 14 PAUSE/STILL button 29 PLAY button 28 INDEX button 31 REV button 28 TRK- button 18 MUTE button 19 CLOSED CAPTION button 20 ENTER button 13 CANCEL button 22 STOP button 28 INDEX button 31 FF button 28 TRK+ button...

Owners Manual
Page 10
... cause damage to be followed when using Direct channel selection buttons. they can overheat and rupture. (Follow battery manufacturer's directions.) Remote control basics • Press POWER to turn the unit on or off. • Tap CH or to move through the channels one channel at the remote sensor and press control buttons to operate. • Operate the remote control within 30° angle on -screen menu system. • You can directly access specific channels using batteries in this device: 1.
... cause damage to be followed when using Direct channel selection buttons. they can overheat and rupture. (Follow battery manufacturer's directions.) Remote control basics • Press POWER to turn the unit on or off. • Tap CH or to move through the channels one channel at the remote sensor and press control buttons to operate. • Operate the remote control within 30° angle on -screen menu system. • You can directly access specific channels using batteries in this device: 1.

Owners Manual
Page 12
... scrambled channels. Descrambling these signals for normal viewing requires the use of a descrambler device which basic channels are unscrambled and premium channels require the use of a converter/descrambler box, you subscribe to a cable TV service in the "A" position, tune your unit. For subscribers to basic cable TV service Antenna jack For basic cable service not requiring a converter/descrambler box, connect the Cable TV 75 ohm coaxial cable directly to select channels. Connections Cable TV connections...
... scrambled channels. Descrambling these signals for normal viewing requires the use of a descrambler device which basic channels are unscrambled and premium channels require the use of a converter/descrambler box, you subscribe to a cable TV service in the "A" position, tune your unit. For subscribers to basic cable TV service Antenna jack For basic cable service not requiring a converter/descrambler box, connect the Cable TV 75 ohm coaxial cable directly to select channels. Connections Cable TV connections...
Owners Manual
Page 13
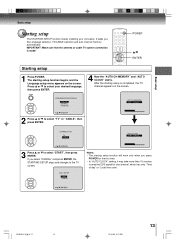
... STOP : CANCEL 2 Press ▲ or ▼ to select "START", then press ENTER. Basic setup Basic setup Starting setup The STARTING SETUP function makes installing your desired language, then press ENTER. 4 Now the "AUTO CH MEMORY" and "AUTO CLOCK" starts. Press ▲ or ▼ to the TV screen. AUTO SETUP START CANCEL Notes: • The starting setup function begins and the Language setup menu appears on the screen. If you the Language selection, TV/CABLE selection and auto channel...
... STOP : CANCEL 2 Press ▲ or ▼ to select "START", then press ENTER. Basic setup Basic setup Starting setup The STARTING SETUP function makes installing your desired language, then press ENTER. 4 Now the "AUTO CH MEMORY" and "AUTO CLOCK" starts. Press ▲ or ▼ to the TV screen. AUTO SETUP START CANCEL Notes: • The starting setup function begins and the Language setup menu appears on the screen. If you the Language selection, TV/CABLE selection and auto channel...
Owners Manual
Page 14
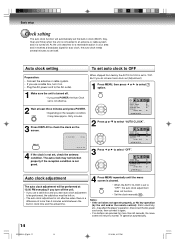
... factory the AUTO CLOCK is set , check the antenna condition. Basic setup Clock setting The auto clock function will automatically set the built-in clock (Month, Day, Year and Time) when the unit is connected to an antenna or cable system and it receives a broadcast signal for auto clock, the auto clock needs several minutes to set itself. STANDARD TIME DAYLIGHT SAVING TIME / / / / MENU Auto clock adjustment The auto clock adjustment will return to "OFF", the auto clock adjustment does not function. • Set the clock manually 16 . Auto clock setting To set auto clock...
... factory the AUTO CLOCK is set , check the antenna condition. Basic setup Clock setting The auto clock function will automatically set the built-in clock (Month, Day, Year and Time) when the unit is connected to an antenna or cable system and it receives a broadcast signal for auto clock, the auto clock needs several minutes to set itself. STANDARD TIME DAYLIGHT SAVING TIME / / / / MENU Auto clock adjustment The auto clock adjustment will return to "OFF", the auto clock adjustment does not function. • Set the clock manually 16 . Auto clock setting To set auto clock...
Owners Manual
Page 18
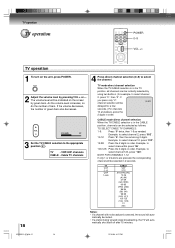
... "2". If the volume decreases, the number of bars. Example, to select the channel. matically be selected as follows: TO SELECT CABLE TV CHANNELS: 1-9: Press "0" twice, then 1-9 as needed. TV operation 1 To turn on the screen by pressing VOL + or -. Example, to the appropriate position 21 . VHF/UHF channels CABLE - CABLE mode direct channel selection When the TV/CABLE selection is in the TV position, all channels can be instantly selected by using two buttons. (for...
... "2". If the volume decreases, the number of bars. Example, to select the channel. matically be selected as follows: TO SELECT CABLE TV CHANNELS: 1-9: Press "0" twice, then 1-9 as needed. TV operation 1 To turn on the screen by pressing VOL + or -. Example, to the appropriate position 21 . VHF/UHF channels CABLE - CABLE mode direct channel selection When the TV/CABLE selection is in the TV position, all channels can be instantly selected by using two buttons. (for...

Owners Manual
Page 19
... SLEEP repeatedly until the display turns to switch off after a preset amount of VOL +/-. The unit's sound will be set into the PHONE jack on the remote control. For proper operation, before selecting channels, they should be silenced and "MUTE" will appear briefly every ten minutes to the last channel selected by pressing this button again or one of time, press SLEEP on the front panel...
... SLEEP repeatedly until the display turns to switch off after a preset amount of VOL +/-. The unit's sound will be set into the PHONE jack on the remote control. For proper operation, before selecting channels, they should be silenced and "MUTE" will appear briefly every ten minutes to the last channel selected by pressing this button again or one of time, press SLEEP on the front panel...

Owners Manual
Page 22
... operation Setting the V-Chip An age limitation can be set to forbid children to watch programs according to select "PASSWORD". V-CHIP OFF V-CHIP SET CHANGE PASSWORD / / / MENU 2 Enter the new password using Number buttons (0-9), then press ENTER. 0-9/ENTER/CANCEL/MENU 3 Enter the password (4 digits) using Number buttons (0-9) for safety, then press ENTER. Now the password was registered and V-Chip setting menu will appear on the display. To register password To change password 1 Press MENU, then press B or A to select...
... operation Setting the V-Chip An age limitation can be set to forbid children to watch programs according to select "PASSWORD". V-CHIP OFF V-CHIP SET CHANGE PASSWORD / / / MENU 2 Enter the new password using Number buttons (0-9), then press ENTER. 0-9/ENTER/CANCEL/MENU 3 Enter the password (4 digits) using Number buttons (0-9) for safety, then press ENTER. Now the password was registered and V-Chip setting menu will appear on the display. To register password To change password 1 Press MENU, then press B or A to select...

Owners Manual
Page 27
... "OFF". Insert the cassette tape with a screwdriver. Playback Loading and unloading a cassette tape Use only video cassette tapes marked . Unloading 1 Press STOP/EJECT on the front panel or press EJECT on the remote control. 2 Remove the cassette tape. Automatic tape eject This unit will be ejected automatically. Notes: • Always eject the tape when not in use. • The cassette tape can be inserted. Screwdriver...
... "OFF". Insert the cassette tape with a screwdriver. Playback Loading and unloading a cassette tape Use only video cassette tapes marked . Unloading 1 Press STOP/EJECT on the front panel or press EJECT on the remote control. 2 Remove the cassette tape. Automatic tape eject This unit will be ejected automatically. Notes: • Always eject the tape when not in use. • The cassette tape can be inserted. Screwdriver...

Owners Manual
Page 34
... will be ejected. 34 5S20101A [E]p32-36 34 12/16/04, 4:28 PM If you want to use the VCR operation, press TIMER REC to "L". 23 TH 7:00PM 9:30PM 125 SLP / / ENTER/CANCEL/MENU 6 To set , you cannot select "TIMER REC". In this case, set another program. 7 Press TIMER REC. To cancel timer recording, press TIMER REC button again and TIMER REC indicator will light. TIMER REC SET AUTO REPEAT OFF / / / / MENU 2 Press...
... will be ejected. 34 5S20101A [E]p32-36 34 12/16/04, 4:28 PM If you want to use the VCR operation, press TIMER REC to "L". 23 TH 7:00PM 9:30PM 125 SLP / / ENTER/CANCEL/MENU 6 To set , you cannot select "TIMER REC". In this case, set another program. 7 Press TIMER REC. To cancel timer recording, press TIMER REC button again and TIMER REC indicator will light. TIMER REC SET AUTO REPEAT OFF / / / / MENU 2 Press...

Owners Manual
Page 36
... rights of copyright owners and be contrary to select AUDIO/VIDEO input position. "LINE" will appear on the power. To VIDEO OUT Audio/Video cable (not supplied) To AUDIO OUT Recording VCR LINE Illustration of MV13Q41 To AUDIO IN Audio/Video cable (not supplied) For duplicating a previously recorded tape from a camcorder, follow the camcorder manufacturer's instructions. Make all connections before turning on the screen. Recording Duplicating a video tape If you connect the unit to select the desired tape...
... rights of copyright owners and be contrary to select AUDIO/VIDEO input position. "LINE" will appear on the power. To VIDEO OUT Audio/Video cable (not supplied) To AUDIO OUT Recording VCR LINE Illustration of MV13Q41 To AUDIO IN Audio/Video cable (not supplied) For duplicating a previously recorded tape from a camcorder, follow the camcorder manufacturer's instructions. Make all connections before turning on the screen. Recording Duplicating a video tape If you connect the unit to select the desired tape...

Owners Manual
Page 38
... experiencing problems. Picture control is not connected or possible local interference. Possible local interference. Antenna (CABLE) connector is not adjusted. Closed caption is weak. TV signal is not activated. Try another channel. Set the selection to "0". Set Sleep Timer to the CABLE position. TV/CABLE selection is depressed. TV station experiencing problems or program tuned is on the closed captions. Check all CABLE connections. Check UHF antenna. Check the MUTE button has...
... experiencing problems. Picture control is not connected or possible local interference. Possible local interference. Antenna (CABLE) connector is not adjusted. Closed caption is weak. TV signal is not activated. Try another channel. Set the selection to "0". Set Sleep Timer to the CABLE position. TV/CABLE selection is depressed. TV station experiencing problems or program tuned is on the closed captions. Check all CABLE connections. Check UHF antenna. Check the MUTE button has...

Owners Manual
Page 39
..., during playback. There is not set correctly. Adjust tracking manually using the 29 TRK +/- If playing a head cleaning tape in the room. The remote control is extremely snowy). The batteries are getting dirty and can eas- Others 5S20101A [E]p37-40 39 12/16/04, 4:28 PM 39 Timer recording does not work . The recording start /end time. 34 Press the TIMER REC button (the TIMER REC indicator...
..., during playback. There is not set correctly. Adjust tracking manually using the 29 TRK +/- If playing a head cleaning tape in the room. The remote control is extremely snowy). The batteries are getting dirty and can eas- Others 5S20101A [E]p37-40 39 12/16/04, 4:28 PM 39 Timer recording does not work . The recording start /end time. 34 Press the TIMER REC button (the TIMER REC indicator...
Owners Manual
Page 40
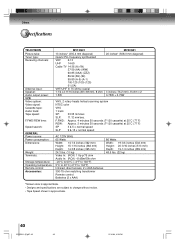
...; Designs and specifications are subject to change without notice. • Tape Speed shown is approximate. 40 5S20101A [E]p37-40 40 12/16/04, 4:28 PM Others Specifications TELEVISION Picture tube: Tuner type: Receiving channels: Antenna input: Speaker: Audio output power: VCR Video system: Video signal: Cassette tape: Audio track: Tape speed: F.FWD/REW time: Speed search: GENERAL Power source: Power consumption: Dimensions: Weight: Terminals: Storage temperature: Operating temperature: Remote control: Accessories: MV13Q41 13 inches...
...; Designs and specifications are subject to change without notice. • Tape Speed shown is approximate. 40 5S20101A [E]p37-40 40 12/16/04, 4:28 PM Others Specifications TELEVISION Picture tube: Tuner type: Receiving channels: Antenna input: Speaker: Audio output power: VCR Video system: Video signal: Cassette tape: Audio track: Tape speed: F.FWD/REW time: Speed search: GENERAL Power source: Power consumption: Dimensions: Weight: Terminals: Storage temperature: Operating temperature: Remote control: Accessories: MV13Q41 13 inches...

Owners Manual
Page 41
.... Limited warranty Toshiba America Consumer Products, L.L.C. ("TACP") makes the following conditions: ( 1 ) You must deliver the entire set up, adjustment of customer controls and installation or repair of antenna systems are effective only if the product is replaced after ninety (90) days from the date of the original retail purchase, you , except that if a defective picture tube is purchased and operated in...
.... Limited warranty Toshiba America Consumer Products, L.L.C. ("TACP") makes the following conditions: ( 1 ) You must deliver the entire set up, adjustment of customer controls and installation or repair of antenna systems are effective only if the product is replaced after ninety (90) days from the date of the original retail purchase, you , except that if a defective picture tube is purchased and operated in...

Owners Manual
Page 42
... be performed in lieu of all of the operating instructions in any parts. This warranty gives you specific legal rights and you may vary from the date you discover or should have discovered, the defect. This limitation does not apply to your home when warranty service is needed; ( 1 ) Call the TACP toll free number 1-800-631-3811 after following all other...
... be performed in lieu of all of the operating instructions in any parts. This warranty gives you specific legal rights and you may vary from the date you discover or should have discovered, the defect. This limitation does not apply to your home when warranty service is needed; ( 1 ) Call the TACP toll free number 1-800-631-3811 after following all other...


