User Guide
Page 9
... the licensed service, this product to be operated indoors and away from windows to licensing. EU Declaration of Conformity TOSHIBA declares that is installed outdoors is restricted to indoor use due to 5.85 GHz bands. The term "IC" before the equipment certification number only signifies ... to be used indoors for frequency range 5.15 GHz to 5.25 GHz to reduce the potential for CE-Marking is carrying the CE-Mark in the 5.15 GHz to products that the Industry Canada technical specifications were met. This product is TOSHIBA Europe GmbH, Hammfelddamm 8, 41460 Neuss, Germany. ...
... the licensed service, this product to be operated indoors and away from windows to licensing. EU Declaration of Conformity TOSHIBA declares that is installed outdoors is restricted to indoor use due to 5.85 GHz bands. The term "IC" before the equipment certification number only signifies ... to be used indoors for frequency range 5.15 GHz to 5.25 GHz to reduce the potential for CE-Marking is carrying the CE-Mark in the 5.15 GHz to products that the Industry Canada technical specifications were met. This product is TOSHIBA Europe GmbH, Hammfelddamm 8, 41460 Neuss, Germany. ...
User Guide
Page 27
...a trademark of Synaptics, Inc. Other trademarks and trade names are owned by Toshiba is a registered trademark of the Wi-Fi Alliance. DirectX, Active Desktop, DirectShow, and Windows Media are trademarks of MultiMediaCard Association. Secure Digital and SD are trademarks or ...Toshiba America Information Systems, Inc. Bluetooth word mark and logos are those of their respective companies. Wi-Fi is under license. Adobe and Photoshop are trademarks or registered trademarks of Intel Corporation or its subsidiaries in the United States and/or other countries. Intel, Intel Core...
...a trademark of Synaptics, Inc. Other trademarks and trade names are owned by Toshiba is a registered trademark of the Wi-Fi Alliance. DirectX, Active Desktop, DirectShow, and Windows Media are trademarks of MultiMediaCard Association. Secure Digital and SD are trademarks or ...Toshiba America Information Systems, Inc. Bluetooth word mark and logos are those of their respective companies. Wi-Fi is under license. Adobe and Photoshop are trademarks or registered trademarks of Intel Corporation or its subsidiaries in the United States and/or other countries. Intel, Intel Core...
User Guide
Page 30
...88 Making your keyboard emulate a full-size keyboard 88 Ctrl, Fn, and Alt keys 89 Function keys 89 Special Windows® keys 89 Overlay keys 90 Using the overlay to type numeric data 90 Starting a program 91 Starting a ...program from the Start menu...........91 Starting a program from Windows® Explorer ...92 Starting a program using the Start Search field 93 Saving your work 93 Printing your work 95 ...103 Removing a disc with the computer off ..........104 Caring for CD or DVD discs 104 Toshiba's online resources 104
...88 Making your keyboard emulate a full-size keyboard 88 Ctrl, Fn, and Alt keys 89 Function keys 89 Special Windows® keys 89 Overlay keys 90 Using the overlay to type numeric data 90 Starting a program 91 Starting a ...program from the Start menu...........91 Starting a program from Windows® Explorer ...92 Starting a program using the Start Search field 93 Saving your work 93 Printing your work 95 ...103 Removing a disc with the computer off ..........104 Caring for CD or DVD discs 104 Toshiba's online resources 104
User Guide
Page 33
... Booting from a bootable SD card 161 Mouse Utility 161 TOSHIBA Hardware Setup 162 TOSHIBA Zooming Utility 164 TOSHIBA Button Support 166 CD/DVD Drive Acoustic Silencer 167 TOSHIBA Rotation Utility 168 Windows® Mobility Center 169 Tablet PC Settings 170 Toshiba Tablet Access Code Utility 172 TOSHIBA Accessibility 173 Trusted Platform Module (TPM 174 Fingerprint Authentication Utility...
... Booting from a bootable SD card 161 Mouse Utility 161 TOSHIBA Hardware Setup 162 TOSHIBA Zooming Utility 164 TOSHIBA Button Support 166 CD/DVD Drive Acoustic Silencer 167 TOSHIBA Rotation Utility 168 Windows® Mobility Center 169 Tablet PC Settings 170 Toshiba Tablet Access Code Utility 172 TOSHIBA Accessibility 173 Trusted Platform Module (TPM 174 Fingerprint Authentication Utility...

User Guide
Page 34
34 Contents The Windows® operating system can help you 186 Resolving a hardware conflict 186 A plan of action 186 Fixing a problem with Device Manager ...........187 Memory problems 188 Power ... Develop good computing habits 203 Data and system configuration backup in the Windows® operating system 204 If you need further assistance 208 Before you contact Toshiba 208 Contacting Toshiba 209 Other Toshiba Internet Web sites 209 Toshiba's worldwide offices 210 Appendix A: Hot Keys/TOSHIBA Cards 212 Hot Key Cards 212 Using the Hot Key Cards...
34 Contents The Windows® operating system can help you 186 Resolving a hardware conflict 186 A plan of action 186 Fixing a problem with Device Manager ...........187 Memory problems 188 Power ... Develop good computing habits 203 Data and system configuration backup in the Windows® operating system 204 If you need further assistance 208 Before you contact Toshiba 208 Contacting Toshiba 209 Other Toshiba Internet Web sites 209 Toshiba's worldwide offices 210 Appendix A: Hot Keys/TOSHIBA Cards 212 Hot Key Cards 212 Using the Hot Key Cards...
User Guide
Page 43
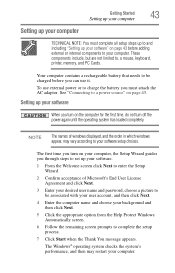
...1 From the Welcome screen click Next to enter the Setup Wizard. 2 Confirm acceptance of windows displayed, and the order in which windows appear, may restart your software setup choices. To use it. The Windows® operating system checks the system's performance, and then may vary according to and including... complete all setup steps up your background and then click Next. 5 Click the appropriate option from the Help Protect Windows Automatically screen. 6 Follow the remaining screen prompts to complete the setup process. 7 Click Start when the Thank You message appears.
...1 From the Welcome screen click Next to enter the Setup Wizard. 2 Confirm acceptance of windows displayed, and the order in which windows appear, may restart your software setup choices. To use it. The Windows® operating system checks the system's performance, and then may vary according to and including... complete all setup steps up your background and then click Next. 5 Click the appropriate option from the Help Protect Windows Automatically screen. 6 Follow the remaining screen prompts to complete the setup process. 7 Click Start when the Thank You message appears.
User Guide
Page 57
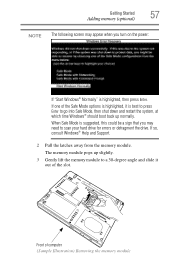
... away from the memory module. Getting Started 57 Adding memory (optional) NOTE The following screen may appear when you turn on the power: If "Start Windows® Normally" is suggested, this could be a sign that you may need to scan your hard drive for errors or defragment the drive. When Safe... memory module pops up slightly. 3 Gently lift the memory module to go into Safe Mode, then shut down and restart the system, at which time Windows® should boot back up normally. If one of the Safe Mode options is best to press Enter to a 30-degree angle and slide it...
... away from the memory module. Getting Started 57 Adding memory (optional) NOTE The following screen may appear when you turn on the power: If "Start Windows® Normally" is suggested, this could be a sign that you may need to scan your hard drive for errors or defragment the drive. When Safe... memory module pops up slightly. 3 Gently lift the memory module to go into Safe Mode, then shut down and restart the system, at which time Windows® should boot back up normally. If one of the Safe Mode options is best to press Enter to a 30-degree angle and slide it...

User Guide
Page 58
... and secure it using the screw. 5 Re-insert the battery. To do this: 1 Click Start, Control Panel, and then System. NOTE From time to time, Windows® will display a pop-up . 7 Reconnect the cables. 8 Restart the computer. Checking total memory When you add or remove a memory module, you were trying ... (complete steps 1-8 in "Installing a memory module" on page 119. 6 Turn the computer right side up that the computer has recognized the change. The System window appears. 2 The total memory is displayed below the System heading under Memory (RAM). If you can check that says...
... and secure it using the screw. 5 Re-insert the battery. To do this: 1 Click Start, Control Panel, and then System. NOTE From time to time, Windows® will display a pop-up . 7 Reconnect the cables. 8 Restart the computer. Checking total memory When you add or remove a memory module, you were trying ... (complete steps 1-8 in "Installing a memory module" on page 119. 6 Turn the computer right side up that the computer has recognized the change. The System window appears. 2 The total memory is displayed below the System heading under Memory (RAM). If you can check that says...

User Guide
Page 60
... Disk Drive Recovery options The following are the available hard disk drive recovery options: ❖ Hard Disk Drive Recovery using the Recovery media" on the Windows® desktop.
... Disk Drive Recovery options The following are the available hard disk drive recovery options: ❖ Hard Disk Drive Recovery using the Recovery media" on the Windows® desktop.
User Guide
Page 66
..., push your finger forward on -screen prompts to complete the installation process. Installing drivers and applications (Available on certain models) The TOSHIBA Application Installer (available on certain models) allows you would like to move the cursor: ❖ To move the cursor to the ...After restoring your hard disk drive, you to move the cursor with your computer. To reinstall drivers and applications: 1 Double-click the TOSHIBA Application Installer icon on the Windows® desktop. 2 Click Next. 3 Click the item you want to install. 4 Click Install. 5 Follow the on the TouchPad...
..., push your finger forward on -screen prompts to complete the installation process. Installing drivers and applications (Available on certain models) The TOSHIBA Application Installer (available on certain models) allows you would like to move the cursor: ❖ To move the cursor to the ...After restoring your hard disk drive, you to move the cursor with your computer. To reinstall drivers and applications: 1 Double-click the TOSHIBA Application Installer icon on the Windows® desktop. 2 Click Next. 3 Click the item you want to install. 4 Click Install. 5 Follow the on the TouchPad...

User Guide
Page 69
... TouchPad. Adjusting the quality of 800 x 600 or higher. Getting Started 69 Using an external keyboard ❖ Dual monitor different image (Sample Image) Display options window 3 Release the Fn key. See the video device documentation for additional configuration steps.
... TouchPad. Adjusting the quality of 800 x 600 or higher. Getting Started 69 Using an external keyboard ❖ Dual monitor different image (Sample Image) Display options window 3 Release the Fn key. See the video device documentation for additional configuration steps.
User Guide
Page 72
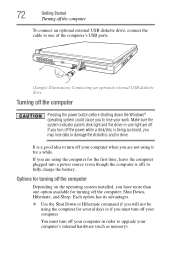
... the computer's USB ports. (Sample Illustration) Connecting an optional external USB diskette drive Turning off the computer Pressing the power button before shutting down the Windows® operating system could cause you to turn off your computer when you are off the power while a disk/disc is a good idea to lose...
... the computer's USB ports. (Sample Illustration) Connecting an optional external USB diskette drive Turning off the computer Pressing the power button before shutting down the Windows® operating system could cause you to turn off your computer when you are off the power while a disk/disc is a good idea to lose...

User Guide
Page 74
... disk, and then shuts down using the Sleep command and the battery discharges fully, your work first. Sleep saves the current state of time, the Windows® operating system may save your unsaved information will try to memory so that, when you restart the computer, you can continue working from where...
... disk, and then shuts down using the Sleep command and the battery discharges fully, your work first. Sleep saves the current state of time, the Windows® operating system may save your unsaved information will try to memory so that, when you restart the computer, you can continue working from where...
User Guide
Page 75
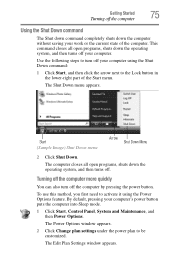
...command: 1 Click Start, and then click the arrow next to the Lock button in the lower-right part of the computer. The Power Options window appears. 2 Click Change plan settings under the power plan to turn off the computer by pressing the power button. The computer closes all open programs... off the computer more quickly You can also turn off your work or the current state of the Start menu. The Edit Plan Settings window appears. Getting Started 75 Turning off the computer Using the Shut Down command The Shut down command completely shuts down the computer without saving your...
...command: 1 Click Start, and then click the arrow next to the Lock button in the lower-right part of the computer. The Power Options window appears. 2 Click Change plan settings under the power plan to turn off the computer by pressing the power button. The computer closes all open programs... off the computer more quickly You can also turn off your work or the current state of the Start menu. The Edit Plan Settings window appears. Getting Started 75 Turning off the computer Using the Shut Down command The Shut down command completely shuts down the computer without saving your...

User Guide
Page 76
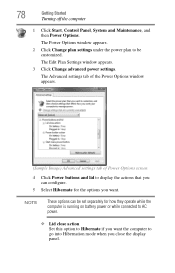
76 Getting Started Turning off the computer 3 Click Change advanced power settings. The Advanced settings tab of the Power Options window appears. (Sample Image) Advanced settings tab of Power Options screen 4 Click Power buttons and lid to display the actions that you can be set separately ...
76 Getting Started Turning off the computer 3 Click Change advanced power settings. The Advanced settings tab of the Power Options window appears. (Sample Image) Advanced settings tab of Power Options screen 4 Click Power buttons and lid to display the actions that you can be set separately ...
User Guide
Page 78
The Power Options window appears. 2 Click Change plan settings under the power plan to be set separately for the options you want the computer to go into Hibernation mode ... is running on battery power or while connected to AC power. ❖ Lid close the display panel. The Advanced settings tab of the Power Options window appears. (Sample Image) Advanced settings tab of Power Options screen 4 Click Power buttons and lid to Hibernate if you can be customized. 78 Getting Started...
The Power Options window appears. 2 Click Change plan settings under the power plan to be set separately for the options you want the computer to go into Hibernation mode ... is running on battery power or while connected to AC power. ❖ Lid close the display panel. The Advanced settings tab of the Power Options window appears. (Sample Image) Advanced settings tab of Power Options screen 4 Click Power buttons and lid to Hibernate if you can be customized. 78 Getting Started...
User Guide
Page 80
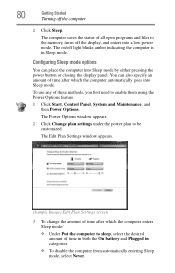
To use any of time after which the computer automatically goes into a low-power mode. The Power Options window appears. 2 Click Change plan settings under the power plan to enable them using the Power Options feature. 1 Click Start, Control Panel, System and Maintenance, and ... closing the display panel. The computer saves the status of time in both the On battery and Plugged in Sleep mode. The Edit Plan Settings window appears. (Sample Image) Edit Plan Settings screen 3 To change the amount of time after which the computer enters Sleep mode: ❖ Under Put the computer...
To use any of time after which the computer automatically goes into a low-power mode. The Power Options window appears. 2 Click Change plan settings under the power plan to enable them using the Power Options feature. 1 Click Start, Control Panel, System and Maintenance, and ... closing the display panel. The computer saves the status of time in both the On battery and Plugged in Sleep mode. The Edit Plan Settings window appears. (Sample Image) Edit Plan Settings screen 3 To change the amount of time after which the computer enters Sleep mode: ❖ Under Put the computer...

User Guide
Page 81
... separately for the options you click the power button in the Start menu. 7 Click Apply. 8 Click OK. The Advanced settings tab of the Power Options window appears. (Sample Image) Advanced settings tab of Power Options screen 5 Click Power buttons and lid to go into Sleep mode when you want. Getting Started...
... separately for the options you click the power button in the Start menu. 7 Click Apply. 8 Click OK. The Advanced settings tab of the Power Options window appears. (Sample Image) Advanced settings tab of Power Options screen 5 Click Power buttons and lid to go into Sleep mode when you want. Getting Started...
User Guide
Page 87
... configuration backup in a safe place. Learning the Basics 87 Computing tips ❖ Back up because it unless you do not let the Windows® operating system shut down normally, details such as your desktop setup, during its shutdown procedure. For more about Sleep. If you ... ❖ Take frequent breaks to put off the computer if a drive indicator light indicates a drive is especially important for viruses. NOTE The Windows® operating system records information, such as new icon positions may damage the disk, the drive, or both. ❖ Before turning off...
... configuration backup in a safe place. Learning the Basics 87 Computing tips ❖ Back up because it unless you do not let the Windows® operating system shut down normally, details such as your desktop setup, during its shutdown procedure. For more about Sleep. If you ... ❖ Take frequent breaks to put off the computer if a drive indicator light indicates a drive is especially important for viruses. NOTE The Windows® operating system records information, such as new icon positions may damage the disk, the drive, or both. ❖ Before turning off...
User Guide
Page 88
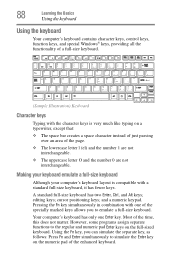
editing keys; 88 Learning the Basics Using the keyboard Using the keyboard Your computer's keyboard contains character keys, control keys, function keys, and special Windows® keys, providing all the functionality of a full-size keyboard. (Sample Illustration) Keyboard Character keys Typing with the character keys is compatible with one Enter ...
editing keys; 88 Learning the Basics Using the keyboard Using the keyboard Your computer's keyboard contains character keys, control keys, function keys, and special Windows® keys, providing all the functionality of a full-size keyboard. (Sample Illustration) Keyboard Character keys Typing with the character keys is compatible with one Enter ...
