Owners Manual
Page 9
... camera, remove the battery and AC adapter. Do not use the camera in this state might cause fire or electric shock. This might cause fire or electric shock. Do not touch power cables, TV cables, or LAN/USB cables during rain, snow, on repair, consult the Toshiba Customer Service Department or Toshiba Customer Support Department. Consult the Toshiba Customer Service Department or Toshiba Customer Support Department. WARNING Do not use the camera...
... camera, remove the battery and AC adapter. Do not use the camera in this state might cause fire or electric shock. This might cause fire or electric shock. Do not touch power cables, TV cables, or LAN/USB cables during rain, snow, on repair, consult the Toshiba Customer Service Department or Toshiba Customer Support Department. Consult the Toshiba Customer Service Department or Toshiba Customer Support Department. WARNING Do not use the camera...
Owners Manual
Page 14
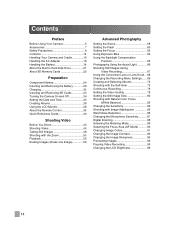
... and Removing the Battery 28 Charging 30 Inserting and Removing SD Cards 33 Turning the Camera On and Off 34 Setting the Date and Time 35 Creating Albums 36 Using the LCD Monitor 38 About the Remote Control 39 Quick Reference Guide 40 Shooting Video Before You Shoot 43 Shooting Video 45 Taking Still Images 48 Shooting with the Zoom 50 Playback 52 Erasing Images (Erase one Image 56 Advanced Photography Setting the Scene 58 Setting the Flash 60 Setting the Focus 62 Using Exposure...
... and Removing the Battery 28 Charging 30 Inserting and Removing SD Cards 33 Turning the Camera On and Off 34 Setting the Date and Time 35 Creating Albums 36 Using the LCD Monitor 38 About the Remote Control 39 Quick Reference Guide 40 Shooting Video Before You Shoot 43 Shooting Video 45 Taking Still Images 48 Shooting with the Zoom 50 Playback 52 Erasing Images (Erase one Image 56 Advanced Photography Setting the Scene 58 Setting the Flash 60 Setting the Focus 62 Using Exposure...

Owners Manual
Page 15
... a Drive 133 Basic Camera Settings Changing the Basic Camera Settings........ 135 Sound 137 Setting the LEDs 138 Auto Power Off 139 LCD-linked Power 140 Video Output 141 LANGUAGE 142 System 143 Using the Hard Disk Drive Protection Function 143 Resetting the System 144 Formatting Drives 145 Displaying the Version Information...... 146 Connecting to Other Devices Connecting to a TV 148 Connecting to a PC 150 Connecting to a DVD Recorder with DVR . 153 Working with Images on Your PC About the Software 156 Supported PCs 157 Installing the Software 159 Viewing Camera Images...
... a Drive 133 Basic Camera Settings Changing the Basic Camera Settings........ 135 Sound 137 Setting the LEDs 138 Auto Power Off 139 LCD-linked Power 140 Video Output 141 LANGUAGE 142 System 143 Using the Hard Disk Drive Protection Function 143 Resetting the System 144 Formatting Drives 145 Displaying the Version Information...... 146 Connecting to Other Devices Connecting to a TV 148 Connecting to a PC 150 Connecting to a DVD Recorder with DVR . 153 Working with Images on Your PC About the Software 156 Supported PCs 157 Installing the Software 159 Viewing Camera Images...
Owners Manual
Page 21
... continuous free space decreases. Play back the trial recording to the hard disk drive or any loss or corruption of the data. At worst, it is a precision component that the video and audio were recorded properly. Increasing numbers of split files will also be erased or copied for viewing images before recording content that you . The hard disk drive is used. Accordingly, the hard disk drive should back up the data saved on the hard disk drive to the disk...
... continuous free space decreases. Play back the trial recording to the hard disk drive or any loss or corruption of the data. At worst, it is a precision component that the video and audio were recorded properly. Increasing numbers of split files will also be erased or copied for viewing images before recording content that you . The hard disk drive is used. Accordingly, the hard disk drive should back up the data saved on the hard disk drive to the disk...
Owners Manual
Page 31
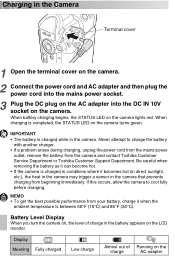
... camera to charge the battery with another charger. • If a problem arises during charging, unplug the power cord from the mains power outlet, remove the battery from the camera and contact Toshiba Customer Service Department or Toshiba Customer Support Department. When charging is charged in conditions where it becomes hot (in direct sunlight, etc.), the heat in the camera may trigger a sensor in the battery appears on the camera. Battery Level Display When you turn the camera...
... camera to charge the battery with another charger. • If a problem arises during charging, unplug the power cord from the mains power outlet, remove the battery from the camera and contact Toshiba Customer Service Department or Toshiba Customer Support Department. When charging is charged in conditions where it becomes hot (in direct sunlight, etc.), the heat in the camera may trigger a sensor in the battery appears on the camera. Battery Level Display When you turn the camera...

Owners Manual
Page 32
....). The available video recording times when a new battery is not charged. Continuous video recording Conditions: Recording a video continuously without using the zoom and power ON/OFF at a temperature of 73°F (23°C) Shooting time: Approx. 110 min. Actual time video recording Conditions: Recording a video using the zoom at a temperature of 73°F (23°C) Shooting time: Approx. 60 min. * The figures above relating to video recording time are for which the camera will operate on battery power varies considerably...
....). The available video recording times when a new battery is not charged. Continuous video recording Conditions: Recording a video continuously without using the zoom and power ON/OFF at a temperature of 73°F (23°C) Shooting time: Approx. 110 min. Actual time video recording Conditions: Recording a video using the zoom at a temperature of 73°F (23°C) Shooting time: Approx. 60 min. * The figures above relating to video recording time are for which the camera will operate on battery power varies considerably...

Owners Manual
Page 44
of available shots Battery level From left: Self-timer*, Continuous recording* Focus* Scene* Flash* Backlight compensation* Exposure bias* LCD Display When in Recording Mode (Normal Display) Available video recording time Video icon Still image icon Zoom bar From left : Still image size, ISO sensitivity, Self-timer*, Continuous recording* Drive When an SD card is selected, is displayed. Album type and number Date and time * Icons displayed when the camera settings are not Auto (Scene, Flash and White balance), Auto focus (Focus), ±0 (Exposure bias), Off (Self-timer...
of available shots Battery level From left: Self-timer*, Continuous recording* Focus* Scene* Flash* Backlight compensation* Exposure bias* LCD Display When in Recording Mode (Normal Display) Available video recording time Video icon Still image icon Zoom bar From left : Still image size, ISO sensitivity, Self-timer*, Continuous recording* Drive When an SD card is selected, is displayed. Album type and number Date and time * Icons displayed when the camera settings are not Auto (Scene, Flash and White balance), Auto focus (Focus), ±0 (Exposure bias), Off (Self-timer...

Owners Manual
Page 62
.... to select the desired focus and press the OK button. Setting the Focus This section describes how to set the focus to match the distance to the subject you turn the camera off or the Auto power off function is activated. Your focus setting is retained even when you are more likely to infinity Zoom T : Approx. 1.2 m. to be affected by Focus Settings Focus AUTO FOCUS MACRO MANUAL FOCUS Type of focus icons appears.
.... to select the desired focus and press the OK button. Setting the Focus This section describes how to set the focus to match the distance to the subject you turn the camera off or the Auto power off function is activated. Your focus setting is retained even when you are more likely to infinity Zoom T : Approx. 1.2 m. to be affected by Focus Settings Focus AUTO FOCUS MACRO MANUAL FOCUS Type of focus icons appears.

Owners Manual
Page 136
...-LINKED POWER Specifies whether the camera turns on/off when the LCD is opened/closed. 140 LAN SETTINGS Settings for LAN connection to a DVD recorder with DVR. 173 VIDEO OUTPUT Sets the video output format used for resetting the system, formatting drives, etc. 143 Returns to the recording menu or play menu Returns to the previous screen Selects a menu setting Selects a setting Selects a menu setting Selects a setting Returns to the original menu Returns to the setup menu Returns to recording mode Returns to the camera. 141 LANGUAGE Sets the display language used in screens...
...-LINKED POWER Specifies whether the camera turns on/off when the LCD is opened/closed. 140 LAN SETTINGS Settings for LAN connection to a DVD recorder with DVR. 173 VIDEO OUTPUT Sets the video output format used for resetting the system, formatting drives, etc. 143 Returns to the recording menu or play menu Returns to the previous screen Selects a menu setting Selects a setting Selects a menu setting Selects a setting Returns to the original menu Returns to the setup menu Returns to recording mode Returns to the camera. 141 LANGUAGE Sets the display language used in screens...

Owners Manual
Page 138
... LED does not light. Setting the LEDs This option specifies whether the camera LEDs light during image recording. 3 Use the jog dial to select [AF ASSIST LIGHT] or [RECORDING LED] and press the OK button. RECORDING LED : Sets whether the LED lights during shooting. 1 From the setup menu, use the jog dial to select [LED] and press the OK button. ■ SETUP SOUND LED AUTO POWER OFF LCD-LINKED POWER EXIT 2 Use the jog dial...
... LED does not light. Setting the LEDs This option specifies whether the camera LEDs light during image recording. 3 Use the jog dial to select [AF ASSIST LIGHT] or [RECORDING LED] and press the OK button. RECORDING LED : Sets whether the LED lights during shooting. 1 From the setup menu, use the jog dial to select [LED] and press the OK button. ■ SETUP SOUND LED AUTO POWER OFF LCD-LINKED POWER EXIT 2 Use the jog dial...
Owners Manual
Page 153
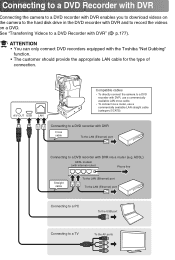
... cross cable. • To connect via a router (e.g. A/V OUT USB LAN Compatible cables • To directly connect the camera to a DVD recorder with DVR via a router, use a commercially available LAN straight cable (category 5/CAT5). Connecting to a DVD Recorder with DVR Connecting the camera to a DVD recorder with DVR enables you to download videos on a DVD. See "Transferring Videos to record the videos on the camera to the hard disk drive in the DVD recorder with DVR and to a DVD Recorder with DVR" ( p.177). ADSL) ADSL modem (with the Toshiba "Net Dubbing" function...
... cross cable. • To connect via a router (e.g. A/V OUT USB LAN Compatible cables • To directly connect the camera to a DVD recorder with DVR via a router, use a commercially available LAN straight cable (category 5/CAT5). Connecting to a DVD Recorder with DVR Connecting the camera to a DVD recorder with DVR enables you to download videos on a DVD. See "Transferring Videos to record the videos on the camera to the hard disk drive in the DVD recorder with DVR and to a DVD Recorder with DVR" ( p.177). ADSL) ADSL modem (with the Toshiba "Net Dubbing" function...

Owners Manual
Page 154
... the instruction manuals for Connecting to the model used. Check that the camera is ready to the DVD recorder with DVR" ( p.173). Connect the AC adapter to the cradle before connecting the camera to record or play back images. 3 Press the LAN button on the cradle. The DVD recorder with DVR starts up in the cradle ( p.30). 1 Plug one end of the ports on the DVD recorder with DVR may differ according to a DVD Recorder with DVR. You...
... the instruction manuals for Connecting to the model used. Check that the camera is ready to the DVD recorder with DVR" ( p.173). Connect the AC adapter to the cradle before connecting the camera to record or play back images. 3 Press the LAN button on the cradle. The DVD recorder with DVR starts up in the cradle ( p.30). 1 Plug one end of the ports on the DVD recorder with DVR may differ according to a DVD Recorder with DVR. You...
Owners Manual
Page 156
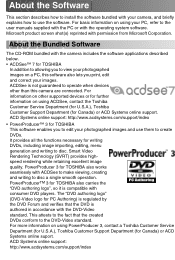
...; PowerProducer™ 3 for TOSHIBA also works seamlessly with the operating system software. For more information on using PowerProducer 3, contact a Toshiba Customer Service Department (for U.S.A.), Toshiba Customer Support Department (for writing DVDs, including image importing, editing, menu generation and writing to edit your PC, refer to the user manuals supplied with the PC or with ACDSee to make viewing, creating and writing to the DVD-Video standard. For basic...
...; PowerProducer™ 3 for TOSHIBA also works seamlessly with the operating system software. For more information on using PowerProducer 3, contact a Toshiba Customer Service Department (for U.S.A.), Toshiba Customer Support Department (for writing DVDs, including image importing, editing, menu generation and writing to edit your PC, refer to the user manuals supplied with the PC or with ACDSee to make viewing, creating and writing to the DVD-Video standard. For basic...
Owners Manual
Page 174
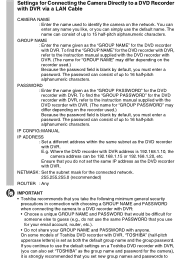
... the recorder used .) Because the password field is blank by default, you must enter a password. To find the "GROUP PASSWORD" for the DVD recorder with DVR, refer to the instruction manual supplied with the DVD recorder with DVR. (The name for "GROUP PASSWORD" may differ depending on the network. Settings for Connecting the Camera Directly to a DVD Recorder with DVR via a LAN Cable CAMERA NAME : Enter the name used to identify the camera on the recorder used...
... the recorder used .) Because the password field is blank by default, you must enter a password. To find the "GROUP PASSWORD" for the DVD recorder with DVR, refer to the instruction manual supplied with the DVD recorder with DVR. (The name for "GROUP PASSWORD" may differ depending on the network. Settings for Connecting the Camera Directly to a DVD Recorder with DVR via a LAN Cable CAMERA NAME : Enter the name used to identify the camera on the recorder used...
Owners Manual
Page 182
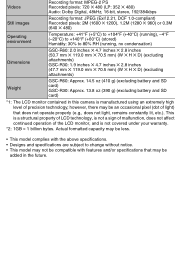
...; D) (excluding attachments) Weight GSC-R60: Approx. 14.5 oz (410 g) (excluding battery and SD card) GSC-R30: Approx. 13.8 oz (390 g) (excluding battery and SD card) *1: The LCD monitor contained in the future. Videos Recording format: MPEG-2 PS Recorded pixels: 720 ✕ 480 (LP: 352 ✕ 480) Audio: Dolby Digital, 48kHz, 16-bit, stereo, 192/384kbps Still images Recording format: JPEG (Exif 2.21, DCF 1.0-compliant) Recorded pixels: 2M (1600...
...; D) (excluding attachments) Weight GSC-R60: Approx. 14.5 oz (410 g) (excluding battery and SD card) GSC-R30: Approx. 13.8 oz (390 g) (excluding battery and SD card) *1: The LCD monitor contained in the future. Videos Recording format: MPEG-2 PS Recorded pixels: 720 ✕ 480 (LP: 352 ✕ 480) Audio: Dolby Digital, 48kHz, 16-bit, stereo, 192/384kbps Still images Recording format: JPEG (Exif 2.21, DCF 1.0-compliant) Recorded pixels: 2M (1600...
Owners Manual
Page 186
... drive. 74 Erase some images. 130 Edit one or more videos. 124 Move some images to the subject. You tried to shoot while the Wait until preparation is close to Select the [1 SHOT] continuous [CONTINUOUS RECORDING] recording setting. 76 or [AEB]. flash charging). Problem Cause Solution Page Photography I can 't select The scene setting is not some of flash [AUTO]. The camera The focus setting does not will not focus. shoot...
... drive. 74 Erase some images. 130 Edit one or more videos. 124 Move some images to the subject. You tried to shoot while the Wait until preparation is close to Select the [1 SHOT] continuous [CONTINUOUS RECORDING] recording setting. 76 or [AEB]. flash charging). Problem Cause Solution Page Photography I can 't select The scene setting is not some of flash [AUTO]. The camera The focus setting does not will not focus. shoot...

Owners Manual
Page 188
Clean the lens. 17 Select the correct focus setting for the distance to the subject. 62 The camera was beyond the take the shot. - Use the self-timer to subject that was moved during Hold the camera correctly. 43 shooting (still image). FLASH]. close to 84 [ISO200]. Set the correct exposure bias setting. 64 Backlight compensation is in very dark surroundings. images are flash when...
Clean the lens. 17 Select the correct focus setting for the distance to the subject. 62 The camera was beyond the take the shot. - Use the self-timer to subject that was moved during Hold the camera correctly. 43 shooting (still image). FLASH]. close to 84 [ISO200]. Set the correct exposure bias setting. 64 Backlight compensation is in very dark surroundings. images are flash when...

Owners Manual
Page 197
... "USB1.1" standards. Uses a data transfer rate of 480Mb/ sec. ● IP address A number that it allows the creation of DVD video with JPEG and TIFF and can be obtained quickly and easily from a DPOFcompatible printer or commercial developing and printing service. ● Exif (Exchangeable Image File format) A full-color still-image file format for segments of recorded content. Uses a data transfer rate of 12Mb/sec. ● HIGH SPEED MODE A USB mode supported by the...
... "USB1.1" standards. Uses a data transfer rate of 480Mb/ sec. ● IP address A number that it allows the creation of DVD video with JPEG and TIFF and can be obtained quickly and easily from a DPOFcompatible printer or commercial developing and printing service. ● Exif (Exchangeable Image File format) A full-color still-image file format for segments of recorded content. Uses a data transfer rate of 12Mb/sec. ● HIGH SPEED MODE A USB mode supported by the...
Owners Manual
Page 200
... for set installation, setup, adjustment of customer controls, and installation or repair of shipment to the rental firm, whichever comes first. By registering your gigashot Digital Camcorder you will enable TACP to meet your gigashot Digital Camcorder online at www.tacp.toshiba.com/service as soon as possible. Consumer Product Safety Act. Complete and mail the enclosed product registration card or register your needs and help us...
... for set installation, setup, adjustment of customer controls, and installation or repair of shipment to the rental firm, whichever comes first. By registering your gigashot Digital Camcorder you will enable TACP to meet your gigashot Digital Camcorder online at www.tacp.toshiba.com/service as soon as possible. Consumer Product Safety Act. Complete and mail the enclosed product registration card or register your needs and help us...
Owners Manual
Page 201
... needed: (1) For instructions on how to obtain warranty service for the gigashot Digital Camcorder to the Depot Warranty Repair Center specified by the TACP Consumer Solutions Center. SOME STATES OF THE U.S.A. (5) Warranties extend only to defects in materials or workmanship as lightning or fluctuations in electric power), improper installation, improper maintenance, or use of this manual and reviewing the section entitled "Troubleshooting...
... needed: (1) For instructions on how to obtain warranty service for the gigashot Digital Camcorder to the Depot Warranty Repair Center specified by the TACP Consumer Solutions Center. SOME STATES OF THE U.S.A. (5) Warranties extend only to defects in materials or workmanship as lightning or fluctuations in electric power), improper installation, improper maintenance, or use of this manual and reviewing the section entitled "Troubleshooting...


