Owners Manual
Page 4
Preface Before Using Your Camera Accessories Safety Precautions Contents Handling Your Camera and Cradle Handling the AC Adapter Handling the Battery About the Built-in Hard Disk Drive About SD Memory Cards
Preface Before Using Your Camera Accessories Safety Precautions Contents Handling Your Camera and Cradle Handling the AC Adapter Handling the Battery About the Built-in Hard Disk Drive About SD Memory Cards
Owners Manual
Page 6
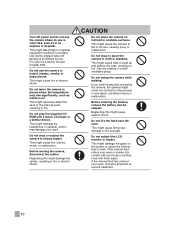
...which was erased to fall into the hands of shooting conditions and shooting intentions are not available with compatible software. DISPOSE OF USED BATTERIES ACCORDING TO LOCAL ORDINANCES OR REGULATIONS. A faithful reflection of an unintended party. Some features are possible when printing with a PRINT ... As a prevention, it is used to indicate functions and settings that apply to still image photography. CAUTION RISK OF EXPLOTION IF BATTERY IS REPLACED BY AN INCORRECT TYPE. We cannot be recovered using an apparatus with this manual, the icon indicates functions and settings ...
...which was erased to fall into the hands of shooting conditions and shooting intentions are not available with compatible software. DISPOSE OF USED BATTERIES ACCORDING TO LOCAL ORDINANCES OR REGULATIONS. A faithful reflection of an unintended party. Some features are possible when printing with a PRINT ... As a prevention, it is used to indicate functions and settings that apply to still image photography. CAUTION RISK OF EXPLOTION IF BATTERY IS REPLACED BY AN INCORRECT TYPE. We cannot be recovered using an apparatus with this manual, the icon indicates functions and settings ...

Owners Manual
Page 7
... cord Lens cap Remote control USB cable (only with GSC-R60 for cradle connection) USB cable (only with GSC-R30 for camera connection) Battery for Canada). If any item is missing, damaged or mismatched, please contact the Toshiba Customer Service Department [(800) 319-6684] (for U.S.A.) or Toshiba Customer Support Department [(800) 268-3404] (for remote control...
... cord Lens cap Remote control USB cable (only with GSC-R60 for cradle connection) USB cable (only with GSC-R30 for camera connection) Battery for Canada). If any item is missing, damaged or mismatched, please contact the Toshiba Customer Service Department [(800) 319-6684] (for U.S.A.) or Toshiba Customer Support Department [(800) 268-3404] (for remote control...
Owners Manual
Page 9
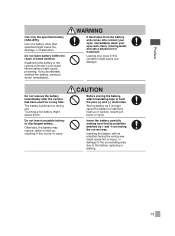
...damaged, turn the power OFF and remove the battery and AC adapter. Do not touch power cables, TV cables, or LAN/USB cables during rain, snow, on repair, consult the Toshiba Customer Service Department or Toshiba Customer Support Department. Preface When using the ...product Should you to burn yourself if the battery gets hot. Consult the Toshiba Customer Service Department or Toshiba Customer Support Department. This might cause electric ...
...damaged, turn the power OFF and remove the battery and AC adapter. Do not touch power cables, TV cables, or LAN/USB cables during rain, snow, on repair, consult the Toshiba Customer Service Department or Toshiba Customer Support Department. Preface When using the ...product Should you to burn yourself if the battery gets hot. Consult the Toshiba Customer Service Department or Toshiba Customer Support Department. This might cause electric ...
Owners Manual
Page 10
... in places where the temperature may damage your body or clothes, rinse with a music CD player or a similar device. Before cleaning the camera, remove the battery and AC adapter. Do not drop or subject the camera to receive treatment. 10 Turn off / landing is restricted, such as inside a car. If the...
... in places where the temperature may damage your body or clothes, rinse with a music CD player or a similar device. Before cleaning the camera, remove the battery and AC adapter. Do not drop or subject the camera to receive treatment. 10 Turn off / landing is restricted, such as inside a car. If the...
Owners Manual
Page 12
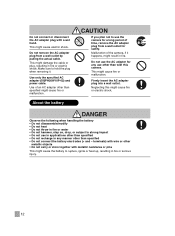
... fire or malfunction. Firmly insert the AC adapter plug into a wall outlet. terminals) with wire or other than specified • Do not connect the battery electrodes (+ and - Do not remove the AC adapter plug from a wall outlet for a long period of time, remove the AC adapter plug from ... rupture, ignite or heat up, resulting in any use the camera for safety. Malfunction of an AC adapter other than specified might cause the battery to hold the plug when removing it happens, might cause electric shock. Use of the camera, if it . This might result in applications...
... fire or malfunction. Firmly insert the AC adapter plug into a wall outlet. terminals) with wire or other than specified • Do not connect the battery electrodes (+ and - Do not remove the AC adapter plug from a wall outlet for a long period of time, remove the AC adapter plug from ... rupture, ignite or heat up, resulting in any use the camera for safety. Malfunction of an AC adapter other than specified might cause the battery to hold the plug when removing it happens, might cause electric shock. Use of the camera, if it . This might result in applications...
Owners Manual
Page 13
... up , resulting in this condition might cause eye damage. Touching a hot battery might cause fire or injury, or damage to the surrounding area due to both the plus (+) and (-) electrodes. Preface Use only the specified battery (GSC-BT5). Do not remove the battery immediately after the camera has been used for treatment. Do not...
... up , resulting in this condition might cause eye damage. Touching a hot battery might cause fire or injury, or damage to the surrounding area due to both the plus (+) and (-) electrodes. Preface Use only the specified battery (GSC-BT5). Do not remove the battery immediately after the camera has been used for treatment. Do not...
Owners Manual
Page 14
... About the Built-in Hard Disk Drive 21 About SD Memory Cards 22 Preparation Component Names 24 Inserting and Removing the Battery 28 Charging 30 Inserting and Removing SD Cards 33 Turning the Camera On and Off 34 Setting the Date and Time 35 Creating Albums 36 ...
... About the Built-in Hard Disk Drive 21 About SD Memory Cards 22 Preparation Component Names 24 Inserting and Removing the Battery 28 Charging 30 Inserting and Removing SD Cards 33 Turning the Camera On and Off 34 Setting the Date and Time 35 Creating Albums 36 ...
Owners Manual
Page 18
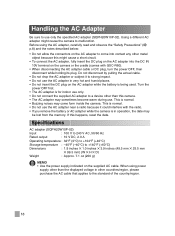
...the actual cable. • Do not drop the AC adapter or subject it could interfere with GSC-R60). • When disconnecting the AC adapter cable or DC plug, turn the power OFF, then...the AC adapter in very hot and humid places. • Do not insert the DC plug on the AC adapter while the battery is being used. Specifications AC adapter (SQPH20W10P-02) Input : 100 V to 240 V AC, 50/60 Hz Rated output ...IN 10V terminal on the camera or the cradle (comes with the radio. • If you remove the battery or AC adapter while the camera is normal. • Do not use only. • Do not ...
...the actual cable. • Do not drop the AC adapter or subject it could interfere with GSC-R60). • When disconnecting the AC adapter cable or DC plug, turn the power OFF, then...the AC adapter in very hot and humid places. • Do not insert the DC plug on the AC adapter while the battery is being used. Specifications AC adapter (SQPH20W10P-02) Input : 100 V to 240 V AC, 50/60 Hz Rated output ...IN 10V terminal on the camera or the cradle (comes with the radio. • If you remove the battery or AC adapter while the camera is normal. • Do not use only. • Do not ...
Owners Manual
Page 19
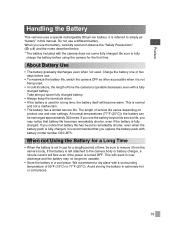
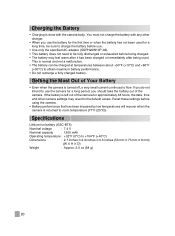
... observe the "Safety Precautions" ( p.8) and the notes described below. * The battery included with battery model number GSC-BT5. When not Using the Battery for a lengthy period of 59°F (15°C) to 77°F (25°C). Avoid storing the battery in this manual. Charge the battery one or two days before using the camera for a long...
... observe the "Safety Precautions" ( p.8) and the notes described below. * The battery included with battery model number GSC-BT5. When not Using the Battery for a lengthy period of 59°F (15°C) to 77°F (25°C). Avoid storing the battery in this manual. Charge the battery one or two days before using the camera for a long...
Owners Manual
Page 20
...camera for approximately 48 hours, the date, time and other charger. • When you use the battery for the first time or when the battery has not been used . Specifications Lithium-ion battery (GSC-BT5) Nominal voltage : 7.4 V Nominal capacity : 1200 mAh Operating temperature : +32°F (0&#...2.0 oz (58 g) 20 This is returned to room temperature (77°F (25°C)). You must not charge the battery with the camera body. Charging the Battery • Charging is done with any other camera settings may feel warm after it has been charged or immediately after being ...
...camera for approximately 48 hours, the date, time and other charger. • When you use the battery for the first time or when the battery has not been used . Specifications Lithium-ion battery (GSC-BT5) Nominal voltage : 7.4 V Nominal capacity : 1200 mAh Operating temperature : +32°F (0&#...2.0 oz (58 g) 20 This is returned to room temperature (77°F (25°C)). You must not charge the battery with the camera body. Charging the Battery • Charging is done with any other camera settings may feel warm after it has been charged or immediately after being ...
Owners Manual
Page 23
Preparation Component Names Inserting and Removing the Battery Charging Inserting and Removing SD Cards Turning the Camera On and Off Setting the Date and Time Creating Albums Using the LCD Monitor About the Remote Control Quick Reference Guide
Preparation Component Names Inserting and Removing the Battery Charging Inserting and Removing SD Cards Turning the Camera On and Off Setting the Date and Time Creating Albums Using the LCD Monitor About the Remote Control Quick Reference Guide
Owners Manual
Page 24
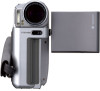
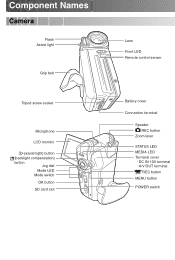
Component Names Camera Flash Assist light Grip belt Tripod screw socket Microphone LCD monitor (assist light) button (backlight compensation) button Jog dial Mode LED Mode switch OK button SD card slot Lens Front LED Remote control sensor Battery cover Connection terminal Speaker REC button Zoom lever STATUS LED MEDIA LED Terminal cover · DC IN 10V terminal · A/V OUT terminal REC button MENU button POWER switch
Component Names Camera Flash Assist light Grip belt Tripod screw socket Microphone LCD monitor (assist light) button (backlight compensation) button Jog dial Mode LED Mode switch OK button SD card slot Lens Front LED Remote control sensor Battery cover Connection terminal Speaker REC button Zoom lever STATUS LED MEDIA LED Terminal cover · DC IN 10V terminal · A/V OUT terminal REC button MENU button POWER switch
Owners Manual
Page 28
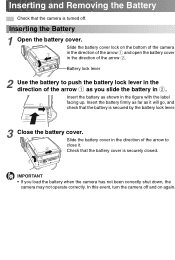
...this event, turn the camera off . Battery lock lever 2 Use the battery to close it will go, and check that the battery is securely closed. Slide the battery cover lock on again. Slide the battery cover in the direction of the arrow to push the battery lock lever in the direction of the ...far as shown in the figure with the label facing up. Inserting the Battery 1 Open the battery cover. Check that the battery cover is secured by the battery lock lever. 3 Close the battery cover. Inserting and Removing the Battery Check that the camera is turned off and on the bottom of the ...
...this event, turn the camera off . Battery lock lever 2 Use the battery to close it will go, and check that the battery is securely closed. Slide the battery cover lock on again. Slide the battery cover in the direction of the arrow to push the battery lock lever in the direction of the ...far as shown in the figure with the label facing up. Inserting the Battery 1 Open the battery cover. Check that the battery cover is secured by the battery lock lever. 3 Close the battery cover. Inserting and Removing the Battery Check that the camera is turned off and on the bottom of the ...
Owners Manual
Page 29
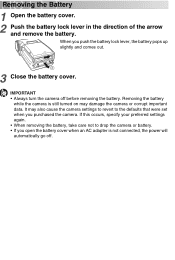
... adapter is not connected, the power will automatically go off before removing the battery. IMPORTANT • Always turn the camera off . If this occurs, specify your preferred settings again. • When removing the battery, take care not to the defaults that were set when you purchased the ...camera. It may damage the camera or corrupt important data. Removing the Battery 1 Open the battery cover. 2 Push the battery lock lever in the direction of the arrow and remove the battery. Removing the battery while the camera is still turned on may also cause the camera settings to ...
... adapter is not connected, the power will automatically go off before removing the battery. IMPORTANT • Always turn the camera off . If this occurs, specify your preferred settings again. • When removing the battery, take care not to the defaults that were set when you purchased the ...camera. It may damage the camera or corrupt important data. Removing the Battery 1 Open the battery cover. 2 Push the battery lock lever in the direction of the arrow and remove the battery. Removing the battery while the camera is still turned on may also cause the camera settings to ...
Owners Manual
Page 30
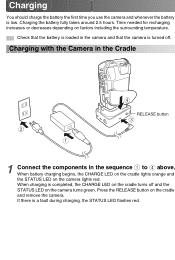
Check that the battery is loaded in the sequence to above. Press the RELEASE button on factors including the surrounding temperature. If there is low. Charging with the Camera ... or decreases depending on the cradle and remove the camera. When charging is turned off and the STATUS LED on the camera turns green. When battery charging begins, the CHARGE LED on the cradle lights orange and the STATUS LED on the cradle turns off . Charging You should charge the...
Check that the battery is loaded in the sequence to above. Press the RELEASE button on factors including the surrounding temperature. If there is low. Charging with the Camera ... or decreases depending on the cradle and remove the camera. When charging is turned off and the STATUS LED on the camera turns green. When battery charging begins, the CHARGE LED on the cradle lights orange and the STATUS LED on the cradle turns off . Charging You should charge the...
Owners Manual
Page 31
... may trigger a sensor in conditions where it when the ambient temperature is charged in the camera that prevents charging from the camera and contact Toshiba Customer Service Department or Toshiba Customer Support Department. When battery charging begins, the STATUS LED on the LCD monitor. If this occurs, allow the camera to charge the...
... may trigger a sensor in conditions where it when the ambient temperature is charged in the camera that prevents charging from the camera and contact Toshiba Customer Service Department or Toshiba Customer Support Department. When battery charging begins, the STATUS LED on the LCD monitor. If this occurs, allow the camera to charge the...

Owners Manual
Page 32
... considerably depending on the corresponding terminals in the camera, can obstruct current flow and the camera to incorrectly indicate that the battery is fully charged are dirty, clean them with a clean, dry cloth. Continuous video recording Conditions: Recording a video continuously... without using the zoom and power ON/OFF at a temperature of the battery and camera, and the shooting conditions (whether the flash and zoom are not guaranteed. Actual time video recording Conditions: Recording a video using...
... considerably depending on the corresponding terminals in the camera, can obstruct current flow and the camera to incorrectly indicate that the battery is fully charged are dirty, clean them with a clean, dry cloth. Continuous video recording Conditions: Recording a video continuously... without using the zoom and power ON/OFF at a temperature of the battery and camera, and the shooting conditions (whether the flash and zoom are not guaranteed. Actual time video recording Conditions: Recording a video using...
Owners Manual
Page 34
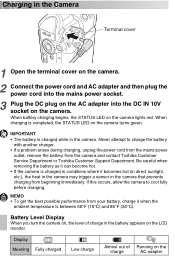
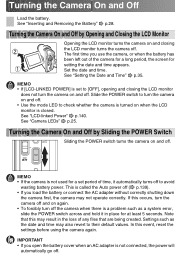
... on and off. • Use the mode LED to [OFF], opening and closing the LCD monitor turns the camera off . See "Inserting and Removing the Battery" p.28. See "LCD-linked Power" p.140. This is not connected, the power will automatically go off . In this may also revert to avoid wasting... Camera On and Off by Sliding the POWER Switch Sliding the POWER switch turns the camera on and off ( p.139). • If you load the battery or connect the AC adapter without correctly shutting down the camera first, the camera may not operate correctly. The first time you open the...
... on and off. • Use the mode LED to [OFF], opening and closing the LCD monitor turns the camera off . See "Inserting and Removing the Battery" p.28. See "LCD-linked Power" p.140. This is not connected, the power will automatically go off . In this may also revert to avoid wasting... Camera On and Off by Sliding the POWER Switch Sliding the POWER switch turns the camera on and off ( p.139). • If you load the battery or connect the AC adapter without correctly shutting down the camera first, the camera may not operate correctly. The first time you open the...
Owners Manual
Page 35
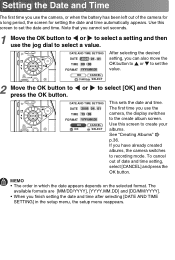
... you can also move the OK button to or to set the date and time. The first time you use the camera, or when the battery has been left out of date and time setting, select [CANCEL] and press the OK button. Setting the Date and Time The first time you...
... you can also move the OK button to or to set the date and time. The first time you use the camera, or when the battery has been left out of date and time setting, select [CANCEL] and press the OK button. Setting the Date and Time The first time you...
