
Owners Manual
Page 4
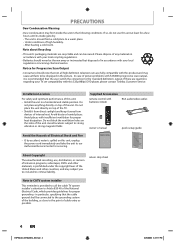
... fully compatible with this product and may cause artifacts to be thrown away or incinerated but disposed of in accordance with your TV set compatibility with batteries (AAx2) RCA audio/video cables owner's manual quick setup guide Avoid the Hazards of Electrical Shock and Fire &#.... Installation Location For safety and optimum performance of cable entry as close to the point of this 525p(480p) DVD player, please contact Toshiba Customer Service. Supplied Accessories remote control with this unit: • Install the unit in the following conditions. Avoid places with 525(480)...
... fully compatible with this product and may cause artifacts to be thrown away or incinerated but disposed of in accordance with your TV set compatibility with batteries (AAx2) RCA audio/video cables owner's manual quick setup guide Avoid the Hazards of Electrical Shock and Fire &#.... Installation Location For safety and optimum performance of cable entry as close to the point of this 525p(480p) DVD player, please contact Toshiba Customer Service. Supplied Accessories remote control with this unit: • Install the unit in the following conditions. Avoid places with 525(480)...
Owners Manual
Page 6
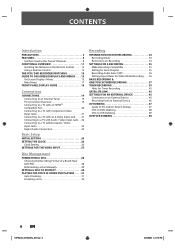
...Video Input Jacks . . 22 Connecting to a TV without Audio / Video Input Jacks 22 Digital Audio Connection 23 Basic Setup INITIAL SETTING 25 SETTING THE CLOCK 26 Clock Setting 26 SETTINGS FOR THE VIDEO INPUT 27 Disc Management FORMATTING A DISC 28 Choosing the Recording Format of a Brand-New DVD-RW 28 Reformatting ... . . . . 36 BASIC RECORDING & ONE-TOUCH TIMER RECORDING 37 TIMER RECORDING 39 Hints for Timer Recording 42 SATELLITE LINK 43 SETTINGS FOR AN EXTERNAL DEVICE 45 Connection to an External Device 45 Recording from an External Device 46 DV DUBBING 47 Guide to DV and On...
...Video Input Jacks . . 22 Connecting to a TV without Audio / Video Input Jacks 22 Digital Audio Connection 23 Basic Setup INITIAL SETTING 25 SETTING THE CLOCK 26 Clock Setting 26 SETTINGS FOR THE VIDEO INPUT 27 Disc Management FORMATTING A DISC 28 Choosing the Recording Format of a Brand-New DVD-RW 28 Reformatting ... . . . . 36 BASIC RECORDING & ONE-TOUCH TIMER RECORDING 37 TIMER RECORDING 39 Hints for Timer Recording 42 SATELLITE LINK 43 SETTINGS FOR AN EXTERNAL DEVICE 45 Connection to an External Device 45 Recording from an External Device 46 DV DUBBING 47 Guide to DV and On...

Owners Manual
Page 7
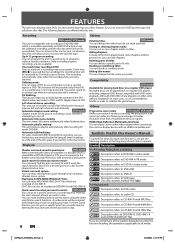
... TV Commercials During Playback 59 Rapid Playback 60 Step by Step Playback 60 Slow Forward / Slow Reverse Playback 60 Zoom 61 Marker Setting 61 Chasing Playback during Recording 62 Simultaneous Playback and Recording 63 SEARCH 64 Title/Chapter Search 64 Track Search 64 Time Search 65 ... a Part of a Title 80 Dividing a Title 82 Combining Titles 83 Setting or Releasing the Title Protection 84 Setting or Clearing All Chapter Marks at Once. . . . . . 85 Function Setup LIST OF THE DEFAULT SETTINGS 86 GENERAL SETTING 88 Playback 88 Display 92 Video 95 DivX 96 HDMI 97 Reset All ...
... TV Commercials During Playback 59 Rapid Playback 60 Step by Step Playback 60 Slow Forward / Slow Reverse Playback 60 Zoom 61 Marker Setting 61 Chasing Playback during Recording 62 Simultaneous Playback and Recording 63 SEARCH 64 Title/Chapter Search 64 Track Search 64 Time Search 65 ... a Part of a Title 80 Dividing a Title 82 Combining Titles 83 Setting or Releasing the Title Protection 84 Setting or Clearing All Chapter Marks at Once. . . . . . 85 Function Setup LIST OF THE DEFAULT SETTINGS 86 GENERAL SETTING 88 Playback 88 Display 92 Video 95 DivX 96 HDMI 97 Reset All ...
Owners Manual
Page 8
... is recommended to finalize in most cases, it is applicable to all timer recordings or at the end of the disc space if you set before attempting to record. Recording Editing DVD mode VCR mode This unit is not copy protected. Dubbing mode: You can record the sound ... recording, the recording time will be possible only if the DVD or a cassette tape is compatible with an HDMI-compatible port. Automatic chapter mark setting: DVD mode Chapter marks will be recorded on a cassette tape by entering the exact amount of time you want to the cassette tape. DivX...
... is recommended to finalize in most cases, it is applicable to all timer recordings or at the end of the disc space if you set before attempting to record. Recording Editing DVD mode VCR mode This unit is not copy protected. Dubbing mode: You can record the sound ... recording, the recording time will be possible only if the DVD or a cassette tape is compatible with an HDMI-compatible port. Automatic chapter mark setting: DVD mode Chapter marks will be recorded on a cassette tape by entering the exact amount of time you want to the cassette tape. DivX...
Owners Manual
Page 11
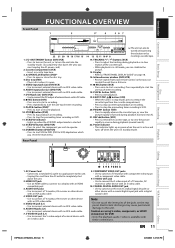
...)* • Press to start VCR to DVD (DVD to start or resume playback. 10. DUBBING button (DVD/VCR) • Press to VCR) duplication which you set in the main menu. 14. PLAY B button (VCR) • Press to a display with an RCA video cable. 6. Rear Panel 1 2 HDMI OUT DIGITAL AUDIO OUT AUDIO...
...)* • Press to start VCR to DVD (DVD to start or resume playback. 10. DUBBING button (DVD/VCR) • Press to VCR) duplication which you set in the main menu. 14. PLAY B button (VCR) • Press to a display with an RCA video cable. 6. Rear Panel 1 2 HDMI OUT DIGITAL AUDIO OUT AUDIO...

Owners Manual
Page 12
... CLEAR ENTER RETURN INSTANT 1.3x/0.8x SKIP PLAY TIME SLIP REV PLAY FWD SKIP STOP SKIP PAUSE VCR DVD DUBBING REC MODE REC REPEAT TIMER SET SEARCH ZOOM SE-R0295 16 17 18 19 20 21 22 23 24 25 26 27 28 29 30 31 32 33 34 35 36...
... CLEAR ENTER RETURN INSTANT 1.3x/0.8x SKIP PLAY TIME SLIP REV PLAY FWD SKIP STOP SKIP PAUSE VCR DVD DUBBING REC MODE REC REPEAT TIMER SET SEARCH ZOOM SE-R0295 16 17 18 19 20 21 22 23 24 25 26 27 28 29 30 31 32 33 34 35 36...
Owners Manual
Page 13
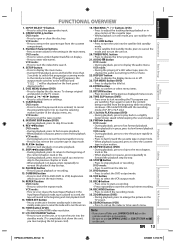
.... • Press to the beginning and start the one-touch timer recording. 34. SEARCH button (VCR) • Press to select items or settings. 7. Number/Character buttons • Press to enter values for more than 3 seconds to switch the progressive scanning mode to the interlace mode. (Though... Setup Disc Management Recording FUNCTIONAL OVERVIEW 1. VCR mode: • Press to turn the unit on the TV screen. 6. To change the audio out setting to forward the playback step by step. 12. VCR mode: • Press to confirm or select menu items. 25. REV E button DVD mode...
.... • Press to the beginning and start the one-touch timer recording. 34. SEARCH button (VCR) • Press to select items or settings. 7. Number/Character buttons • Press to enter values for more than 3 seconds to switch the progressive scanning mode to the interlace mode. (Though... Setup Disc Management Recording FUNCTIONAL OVERVIEW 1. VCR mode: • Press to turn the unit on the TV screen. 6. To change the audio out setting to forward the playback step by step. 12. VCR mode: • Press to confirm or select menu items. 25. REV E button DVD mode...
Owners Manual
Page 14
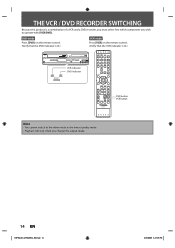
... CLEAR ENTER RETURN INSTANT 1.3x/0.8x SKIP PLAY TIME SLIP REV PLAY FWD SKIP STOP SKIP PAUSE VCR DVD DUBBING REC MODE REC REPEAT TIMER SET SEARCH ZOOM SE-R0295 DVD button VCR button Note • You cannot switch to operate with [VCR/DVD].
... CLEAR ENTER RETURN INSTANT 1.3x/0.8x SKIP PLAY TIME SLIP REV PLAY FWD SKIP STOP SKIP PAUSE VCR DVD DUBBING REC MODE REC REPEAT TIMER SET SEARCH ZOOM SE-R0295 DVD button VCR button Note • You cannot switch to operate with [VCR/DVD].
Owners Manual
Page 15
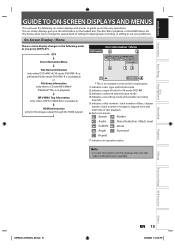
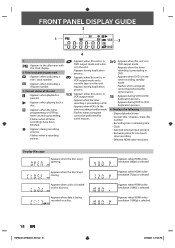
... an example. On-Screen Display / Menu The on-screen display changes in the following on -screen displays give you to change the various kinds of settings for playing back, recording, or editing to guide you press [DISPLAY]. Indicates a selected external input mode. 4. The on -screen displays and menus to suit your...
... an example. On-Screen Display / Menu The on-screen display changes in the following on -screen displays give you to change the various kinds of settings for playing back, recording, or editing to guide you press [DISPLAY]. Indicates a selected external input mode. 4. The on -screen displays and menus to suit your...
Owners Manual
Page 17
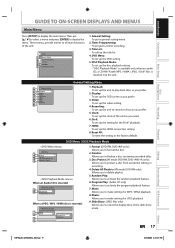
...you to all main functions of the unit. Playback: To set up the DVD setting. 5. HDMI: To set up the video setting. 4. Disc Protect (VR mode DVD-RW, DVD+RW/+R only): Allows you to make settings for JPEG playback. 9. General Setting: To go to display the main menu. Timer Programming:...17 3/25/2009 3:47:27 PM Random Play: Allows you prefer. 5. Clock: To set up the HDMI connection setting. 8. These menus provide entries to activate the random playback feature. 6. Recording: To set up the unit to record to discs as you to finalize a disc containing recorded titles....
...you to all main functions of the unit. Playback: To set up the DVD setting. 5. HDMI: To set up the video setting. 4. Disc Protect (VR mode DVD-RW, DVD+RW/+R only): Allows you to make settings for JPEG playback. 9. General Setting: To go to display the main menu. Timer Programming:...17 3/25/2009 3:47:27 PM Random Play: Allows you prefer. 5. Clock: To set up the HDMI connection setting. 8. These menus provide entries to activate the random playback feature. 6. Recording: To set up the unit to record to discs as you to finalize a disc containing recorded titles....
Owners Manual
Page 18
... process. 4. Current status of the unit : Appears when playback is paused. : Appears when playing back a disc. : Appears when the timer programming or OTR has been set and is proceeding. : Flashes when all timer recordings have been finished. : Appears during recording process. : Flashes when a recording pauses. : Appears when this unit is in...
... process. 4. Current status of the unit : Appears when playback is paused. : Appears when playing back a disc. : Appears when the timer programming or OTR has been set and is proceeding. : Flashes when all timer recordings have been finished. : Appears during recording process. : Flashes when a recording pauses. : Appears when this unit is in...

Owners Manual
Page 20
...the connector are output in digital RGB. • When the power failure occurs, or when you unplug the unit, some problems in the HDMI setting might occur. Note • Some devices with an HDMI input may be limited by the device that is connected. • Among the monitors ... as this unit, audio signals are used in VCR mode. 20 EN E9PKAUD_DVR620KU_EN.indd 20 3/25/2009 3:47:32 PM Please check and set the HDMI setting again. • HDMI video resolution cannot be viewed properly. • Among the devices that comprises data encryption and authentication of the connected ...
...the connector are output in digital RGB. • When the power failure occurs, or when you unplug the unit, some problems in the HDMI setting might occur. Note • Some devices with an HDMI input may be limited by the device that is connected. • Among the monitors ... as this unit, audio signals are used in VCR mode. 20 EN E9PKAUD_DVR620KU_EN.indd 20 3/25/2009 3:47:32 PM Please check and set the HDMI setting again. • HDMI video resolution cannot be viewed properly. • Among the devices that comprises data encryption and authentication of the connected ...

Owners Manual
Page 22
... VHF / UHF antenna ANT. CONNECTIONS Connecting to a TV with this unit. IN VIDEO IN AUDIO IN RF modulator 3 4 CHANNEL TO TV RF coaxial cable Set channel 3 or 4 Supplied cables used in this connection are as follows: • RCA audio cable (L/R) x 1 • RCA video cable x 1 Please... purchase the rest of picture may become poor if this unit HDMI OUT Set channel 3 or 4 DIGITAL AUDIO OUT AUDIO OUT DVD/VCR S-VIDEO COMPONENT S-VIDEO VIDEO OUT Y IN ---AUDIO---OUT (L1) L L COAXIAL L OUT R PB ...
... VHF / UHF antenna ANT. CONNECTIONS Connecting to a TV with this unit. IN VIDEO IN AUDIO IN RF modulator 3 4 CHANNEL TO TV RF coaxial cable Set channel 3 or 4 Supplied cables used in this connection are as follows: • RCA audio cable (L/R) x 1 • RCA video cable x 1 Please... purchase the rest of picture may become poor if this unit HDMI OUT Set channel 3 or 4 DIGITAL AUDIO OUT AUDIO OUT DVD/VCR S-VIDEO COMPONENT S-VIDEO VIDEO OUT Y IN ---AUDIO---OUT (L1) L L COAXIAL L OUT R PB ...
Owners Manual
Page 23
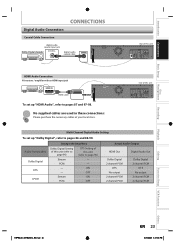
...connections: Please purchase the necessary cables at your local store. No supplied cables are used in the Setup Menu Dolby Digital Setting of this unit (refer to page 90) DTS Setting of this unit (refer to page 90) Stream - PCM - - Introduction Connections Basic Setup Disc Management CONNECTIONS Digital ... R IN ---VIDEO---OUT HDMI Audio Connection AV receiver / amplifier with an HDMI input jack HDMI IN HDMI OUT HDMI cable HDMI OUT To set up "HDMI Audio", refer to pages 87 and 97-98. OFF Stream ON PCM OFF Actual Audio Output HDMI Out Digital Audio Out Dolby Digital...
...connections: Please purchase the necessary cables at your local store. No supplied cables are used in the Setup Menu Dolby Digital Setting of this unit (refer to page 90) DTS Setting of this unit (refer to page 90) Stream - PCM - - Introduction Connections Basic Setup Disc Management CONNECTIONS Digital ... R IN ---VIDEO---OUT HDMI Audio Connection AV receiver / amplifier with an HDMI input jack HDMI IN HDMI OUT HDMI cable HDMI OUT To set up "HDMI Audio", refer to pages 87 and 97-98. OFF Stream ON PCM OFF Actual Audio Output HDMI Out Digital Audio Out Dolby Digital...

Owners Manual
Page 24
... in a Dolby Digital multi channel surround format cannot be recorded as digital sound by the DTS, Inc. • Playing back a DVD using incorrect settings may generate noise distortion and may also damage the speakers. • For audio CD and MP3 / WMA files, 2 channel PCM will be output ...sound as heard in this connection are not output from the HDMI connector (including the sampling frequency, the number of the "Dolby Digital" setting. If the connected device is not compatible with HDMI BITSTREAM, audio will not be output. 2 Channel Analog Audio Connection stereo system analog audio...
... in a Dolby Digital multi channel surround format cannot be recorded as digital sound by the DTS, Inc. • Playing back a DVD using incorrect settings may generate noise distortion and may also damage the speakers. • For audio CD and MP3 / WMA files, 2 channel PCM will be output ...sound as heard in this connection are not output from the HDMI connector (including the sampling frequency, the number of the "Dolby Digital" setting. If the connected device is not compatible with HDMI BITSTREAM, audio will not be output. 2 Channel Analog Audio Connection stereo system analog audio...

Owners Manual
Page 25
... repeatedly until you have completed all the necessary connections, press [I/yON/STANDBY] to your TV's user manual). Initial Setting Clock Setting ENTER: Set Clock. Initial Setting REV SKIP PLAY STOP FWD SKIP OSD Language English Français Español PAUSE VCR DVD DUBBING REC MODE...DEF GHI JKL MNO TRACKING PQRS TUV WXYZ SAT.LINK SPACE TIMER PROG. OPEN/ INPUT CLOSE SELECT HDMI 1 After you see the "Initial Setting" menu. Recording Playback Editing Function Setup VCR Function Others E9PKAUD_DVR620KU_EN.indd 25 EN 25 3/25/2009 3:47:36 PM It may be labeled...
... repeatedly until you have completed all the necessary connections, press [I/yON/STANDBY] to your TV's user manual). Initial Setting Clock Setting ENTER: Set Clock. Initial Setting REV SKIP PLAY STOP FWD SKIP OSD Language English Français Español PAUSE VCR DVD DUBBING REC MODE...DEF GHI JKL MNO TRACKING PQRS TUV WXYZ SAT.LINK SPACE TIMER PROG. OPEN/ INPUT CLOSE SELECT HDMI 1 After you see the "Initial Setting" menu. Recording Playback Editing Function Setup VCR Function Others E9PKAUD_DVR620KU_EN.indd 25 EN 25 3/25/2009 3:47:36 PM It may be labeled...

Owners Manual
Page 26
... [SETUP] and use [K / L] to select the contents to suit your preference, then press [ENTER]. Clock Setting JAN / 01 / 2009 ( THU ) 12 : 00 AM 4 Use [{ / B] to select an item to set the built-in calendar from the year 2008 up to select calendar or time, then press [ENTER]. "Clock"...start counting when you try the timer programming. Note • Your clock setting will be used. • You can also be activated. SETTING THE CLOCK Set the clock before you press [ENTER]. 5 Press [SETUP] to exit. Clock Setting OPEN/ INPUT CLOSE SELECT HDMI .@/: ABC DEF GHI JKL MNO TRACKING ...
... [SETUP] and use [K / L] to select the contents to suit your preference, then press [ENTER]. Clock Setting JAN / 01 / 2009 ( THU ) 12 : 00 AM 4 Use [{ / B] to select an item to set the built-in calendar from the year 2008 up to select calendar or time, then press [ENTER]. "Clock"...start counting when you try the timer programming. Note • Your clock setting will be used. • You can also be activated. SETTING THE CLOCK Set the clock before you press [ENTER]. 5 Press [SETUP] to exit. Clock Setting OPEN/ INPUT CLOSE SELECT HDMI .@/: ABC DEF GHI JKL MNO TRACKING ...
Owners Manual
Page 27
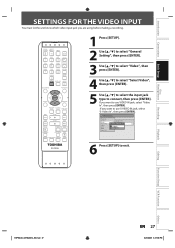
...HDMI .@/: ABC DEF GHI JKL MNO TRACKING PQRS TUV WXYZ SAT.LINK SPACE TIMER PROG. If you are using before making a recording. General Setting Playback Display Video Recording Clock DivX HDMI Reset All Progressive TV Aspect Select VidSeeole-cLt1Vi(dReeoar) Video In S-Video In 6 Press [SETUP] to... connect, then press [ENTER]. Introduction Connections Basic Setup Disc Management SETTINGS FOR THE VIDEO INPUT You must let the unit know which video input jack you want to use VIDEO IN jack, select "Video In",...
...HDMI .@/: ABC DEF GHI JKL MNO TRACKING PQRS TUV WXYZ SAT.LINK SPACE TIMER PROG. If you are using before making a recording. General Setting Playback Display Video Recording Clock DivX HDMI Reset All Progressive TV Aspect Select VidSeeole-cLt1Vi(dReeoar) Video In S-Video In 6 Press [SETUP] to... connect, then press [ENTER]. Introduction Connections Basic Setup Disc Management SETTINGS FOR THE VIDEO INPUT You must let the unit know which video input jack you want to use VIDEO IN jack, select "Video In",...
Owners Manual
Page 28
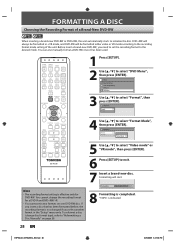
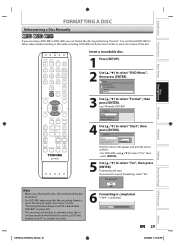
... mode according to "Reformatting a Disc Manually" on one DVD-RW disc. You cannot change disc format type), refer to the recording format mode setting of a Brand-New DVD-RW When inserting a brand-new DVD-RW or DVD+RW, the unit automatically starts to select "Format Mode", then... EN E9PKAUD_DVR620KU_EN.indd 28 3/25/2009 3:47:38 PM Formatting 90% 8 Formatting is not changed if you need to set the recording format to select "Format", then press [ENTER]. Setup General Setting Timer Programming Title List DVD Menu 3 Use [K / L] to the desired mode. To reformat a disc (change the...
... mode according to "Reformatting a Disc Manually" on one DVD-RW disc. You cannot change disc format type), refer to the recording format mode setting of a Brand-New DVD-RW When inserting a brand-new DVD-RW or DVD+RW, the unit automatically starts to select "Format Mode", then... EN E9PKAUD_DVR620KU_EN.indd 28 3/25/2009 3:47:38 PM Formatting 90% 8 Formatting is not changed if you need to set the recording format to select "Format", then press [ENTER]. Setup General Setting Timer Programming Title List DVD Menu 3 Use [K / L] to the desired mode. To reformat a disc (change the...
Owners Manual
Page 29
...on page 28.) • This unit may not be able to reformat a disc that the recording format is set to the desired mode. (See steps 1 to 6 in order to erase all content of the disc are using...RW, you can format DVD-RW for either video mode recording or VR mode recording. Setup General Setting Timer Programming Title List DVD Menu DISC MENU TOP MENU CLEAR ENTER RETURN INSTANT 1.3x/0.8x SKIP ...PLAY TIME SLIP REV PLAY FWD SKIP STOP SKIP PAUSE VCR DVD DUBBING REC MODE REC REPEAT TIMER SET SEARCH ZOOM SE-R0295 Note • When you reformat the disc, the contents of the disc....
...on page 28.) • This unit may not be able to reformat a disc that the recording format is set to the desired mode. (See steps 1 to 6 in order to erase all content of the disc are using...RW, you can format DVD-RW for either video mode recording or VR mode recording. Setup General Setting Timer Programming Title List DVD Menu DISC MENU TOP MENU CLEAR ENTER RETURN INSTANT 1.3x/0.8x SKIP ...PLAY TIME SLIP REV PLAY FWD SKIP STOP SKIP PAUSE VCR DVD DUBBING REC MODE REC REPEAT TIMER SET SEARCH ZOOM SE-R0295 Note • When you reformat the disc, the contents of the disc....

