
Owners Manual
Page 5
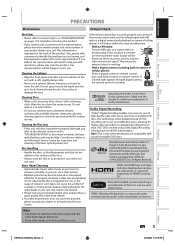
... dirty. Introduction Connections Basic Setup Disc Management Recording PRECAUTIONS Maintenance IR Signal Check Servicing • Please refer to relevant topics on "TROUBLESHOOTING" on pages 103-106 before returning the product. • If you need to call a customer service representative, please know the model number and serial number of your product before use a solvent, thinner, benzene or alcohol to clean the unit. EN 5 Playback Editing Function Setup VCR Function Others...
... dirty. Introduction Connections Basic Setup Disc Management Recording PRECAUTIONS Maintenance IR Signal Check Servicing • Please refer to relevant topics on "TROUBLESHOOTING" on pages 103-106 before returning the product. • If you need to call a customer service representative, please know the model number and serial number of your product before use a solvent, thinner, benzene or alcohol to clean the unit. EN 5 Playback Editing Function Setup VCR Function Others...
Owners Manual
Page 6
... Setup INITIAL SETTING 25 SETTING THE CLOCK 26 Clock Setting 26 SETTINGS FOR THE VIDEO INPUT 27 Disc Management FORMATTING A DISC 28 Choosing the Recording Format of a Brand-New DVD-RW 28 Reformatting a Disc Manually 29 SETTING A DISC TO PROTECT 30 PLAYING THE DISCS IN OTHER DVD PLAYERS . . . . . 31 Auto Finalizing 31 Finalizing a Disc 32 Recording INFORMATION ON DVD RECORDING 34 Recording Mode 34 Restrictions on Recording 34 SETTINGS FOR A RECORDING 35 Make Recording Compatible 35 Setting for Auto Chapter 35 Recording Audio Select (XP 36 Setting Aspect Ratio for Video Mode...
... Setup INITIAL SETTING 25 SETTING THE CLOCK 26 Clock Setting 26 SETTINGS FOR THE VIDEO INPUT 27 Disc Management FORMATTING A DISC 28 Choosing the Recording Format of a Brand-New DVD-RW 28 Reformatting a Disc Manually 29 SETTING A DISC TO PROTECT 30 PLAYING THE DISCS IN OTHER DVD PLAYERS . . . . . 31 Auto Finalizing 31 Finalizing a Disc 32 Recording INFORMATION ON DVD RECORDING 34 Recording Mode 34 Restrictions on Recording 34 SETTINGS FOR A RECORDING 35 Make Recording Compatible 35 Setting for Auto Chapter 35 Recording Audio Select (XP 36 Setting Aspect Ratio for Video Mode...
Owners Manual
Page 8
... to VCR. DV dubbing: This function helps you want to stabilize the performance. Automatic title menu making : The unit creates a playlist automatically after that of a title. Hiding chapters: To keep others from discs with DivX® files If you to record to skip. 8 EN Deleting titles: DVD mode You can delete a specific part of traditional television signals. Although DVD+RW/+R are offered with DVD-video playback. Symbol Description For Recording, Playing Back, and Editing Description refers to DVD-RW in video mode...
... to VCR. DV dubbing: This function helps you want to stabilize the performance. Automatic title menu making : The unit creates a playlist automatically after that of a title. Hiding chapters: To keep others from discs with DivX® files If you to record to skip. 8 EN Deleting titles: DVD mode You can delete a specific part of traditional television signals. Although DVD+RW/+R are offered with DVD-video playback. Symbol Description For Recording, Playing Back, and Editing Description refers to DVD-RW in video mode...
Owners Manual
Page 11
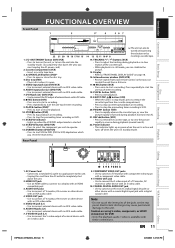
... (DVD/VCR) • Receive signals from your remote control so that you must unplug the AC power cord.) 2. I REC button (DVD) • Press once to start a recording. • Press repeatedly to a display with an RCA video cable. 6. HDMI OUT jack • Use an HDMI cable to connect to start playback. 19. COAXIAL DIGITAL AUDIO OUT jack • Use to start the one -touch timer recording. 9. DUBBING button (DVD/VCR) • Press to connect an AV receiver, Dolby Digital decoder or other device with an RCA audio cable. 7. PLAY B button (VCR...
... (DVD/VCR) • Receive signals from your remote control so that you must unplug the AC power cord.) 2. I REC button (DVD) • Press once to start a recording. • Press repeatedly to a display with an RCA video cable. 6. HDMI OUT jack • Use an HDMI cable to connect to start playback. 19. COAXIAL DIGITAL AUDIO OUT jack • Use to start the one -touch timer recording. 9. DUBBING button (DVD/VCR) • Press to connect an AV receiver, Dolby Digital decoder or other device with an RCA audio cable. 7. PLAY B button (VCR...
Owners Manual
Page 13
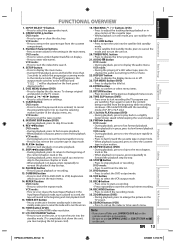
.... AUDIO button DVD mode: • During playback, press to switch the recording mode. 35. Introduction Connections Basic Setup Disc Management Recording FUNCTIONAL OVERVIEW 1. DVD mode: • Press to set the HDMI video resolution. 17. Cursor K / L/ { / B buttons • Press to display the title list. 24. TOP MENU button (DVD) • Press to select items or settings. 7. FWD D button DVD mode: • During playback, press to fast forward playback. • When playback is not available. VCR mode: • Press to select a title/chapter/track...
.... AUDIO button DVD mode: • During playback, press to switch the recording mode. 35. Introduction Connections Basic Setup Disc Management Recording FUNCTIONAL OVERVIEW 1. DVD mode: • Press to set the HDMI video resolution. 17. Cursor K / L/ { / B buttons • Press to display the title list. 24. TOP MENU button (DVD) • Press to select items or settings. 7. FWD D button DVD mode: • During playback, press to fast forward playback. • When playback is not available. VCR mode: • Press to select a title/chapter/track...
Owners Manual
Page 17
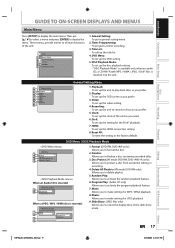
...-SCREEN DISPLAYS AND MENUS Main Menu Press [SETUP] to activate the random playback feature. 6. Then use [K / L] to select a menu and press [ENTER] to delete playlist. 5. Setup 1 General Setting 2 Timer Programming 3 Title List 4 DVD Menu 5 DISC Playback Mode 1. Display: To set up the unit to record to make settings for the DivX® playback. 7. Delete All Playlists (VR mode DVD-RW only): Allows you to display the main menu. EN 17 Playback Editing Function Setup VCR Function Others E9PKAUD_DVR620KU_EN.indd 17 3/25/2009 3:47:27 PM Program Play: (Audio...
...-SCREEN DISPLAYS AND MENUS Main Menu Press [SETUP] to activate the random playback feature. 6. Then use [K / L] to select a menu and press [ENTER] to delete playlist. 5. Setup 1 General Setting 2 Timer Programming 3 Title List 4 DVD Menu 5 DISC Playback Mode 1. Display: To set up the unit to record to make settings for the DivX® playback. 7. Delete All Playlists (VR mode DVD-RW only): Allows you to display the main menu. EN 17 Playback Editing Function Setup VCR Function Others E9PKAUD_DVR620KU_EN.indd 17 3/25/2009 3:47:27 PM Program Play: (Audio...
Owners Manual
Page 31
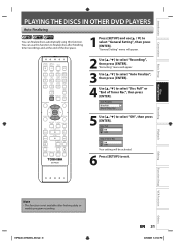
...1.3x/0.8x SKIP PLAY TIME SLIP REV PLAY FWD SKIP STOP SKIP PAUSE VCR DVD DUBBING REC MODE REC REPEAT TIMER SET SEARCH ZOOM SE-R0295 2 Use [K / L] to exit. Auto Finalize Disc Full End of the disc space. 1 Press [SETUP] and use this function. You can finalize discs automatically using this function to finalize discs after finishing daily or weekly program recording. "Recording" menu will appear. 3 Use [K / L] to select "Auto Finalize", then press [ENTER]. 4 Use [K / L] to select "ON", then press [ENTER]. Recording Playback Editing Function Setup VCR Function Note...
...1.3x/0.8x SKIP PLAY TIME SLIP REV PLAY FWD SKIP STOP SKIP PAUSE VCR DVD DUBBING REC MODE REC REPEAT TIMER SET SEARCH ZOOM SE-R0295 2 Use [K / L] to exit. Auto Finalize Disc Full End of the disc space. 1 Press [SETUP] and use this function. You can finalize discs automatically using this function to finalize discs after finishing daily or weekly program recording. "Recording" menu will appear. 3 Use [K / L] to select "Auto Finalize", then press [ENTER]. 4 Use [K / L] to select "ON", then press [ENTER]. Recording Playback Editing Function Setup VCR Function Note...

Owners Manual
Page 36
... the program you selected "PCM". 1) Follow step 1 to 2 on "Recording Audio Select(XP)". 2) Use [K / L] to select "Aspect Ratio (Video mode)", then press [ENTER]. 3) Use [K / L] to select "PCM" or "Dolby Digital", then press [ENTER]. SETTINGS FOR A RECORDING Recording Audio Select (XP) Setting Aspect Ratio for Pulse Code Modulation. You can enjoy high quality sound recording. It changes analog sound to digital sound without compressing audio data. • When the recording mode is set at other than XP, the unit records "Dolby Digital" audio automatically even if you started to...
... the program you selected "PCM". 1) Follow step 1 to 2 on "Recording Audio Select(XP)". 2) Use [K / L] to select "Aspect Ratio (Video mode)", then press [ENTER]. 3) Use [K / L] to select "PCM" or "Dolby Digital", then press [ENTER]. SETTINGS FOR A RECORDING Recording Audio Select (XP) Setting Aspect Ratio for Pulse Code Modulation. You can enjoy high quality sound recording. It changes analog sound to digital sound without compressing audio data. • When the recording mode is set at other than XP, the unit records "Dolby Digital" audio automatically even if you started to...

Owners Manual
Page 39
... tuner's channel while you can program the unit to record up to start without canceling the recording currently in progress (for either L1 or L2 and set it to output audio/video signals when it comes to the time you want to 12 programs within a month in advance. Current date and time 3. SETUP DISPLAY AUDIO DISC MENU TOP MENU CLEAR ENTER RETURN INSTANT 1.3x/0.8x SKIP PLAY TIME SLIP REV PLAY FWD SKIP STOP SKIP PAUSE VCR DVD DUBBING REC MODE REC REPEAT TIMER SET...
... tuner's channel while you can program the unit to record up to start without canceling the recording currently in progress (for either L1 or L2 and set it to output audio/video signals when it comes to the time you want to 12 programs within a month in advance. Current date and time 3. SETUP DISPLAY AUDIO DISC MENU TOP MENU CLEAR ENTER RETURN INSTANT 1.3x/0.8x SKIP PLAY TIME SLIP REV PLAY FWD SKIP STOP SKIP PAUSE VCR DVD DUBBING REC MODE REC REPEAT TIMER SET...

Owners Manual
Page 40
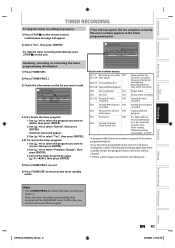
... displaying an instructive message for one program in the timer program list. • The recording may be displayed in the standby mode. Date JAN/02 L1/L2 L1 Start 1 : 00AM REC To DVD End 2 : 00AM Mode SP SP 1 : 00 Auto recording mode select (DVD only)... Press TIMER SET for VCR. • You can check the remaining recordable space of the disc is not available in blue. When Timer set a timer programming. Mode SP SP 2 : 00 • You cannot make the recording. TIMER RECORDING 3 Use [K / L] to select a recording mode...
... displaying an instructive message for one program in the timer program list. • The recording may be displayed in the standby mode. Date JAN/02 L1/L2 L1 Start 1 : 00AM REC To DVD End 2 : 00AM Mode SP SP 1 : 00 Auto recording mode select (DVD only)... Press TIMER SET for VCR. • You can check the remaining recordable space of the disc is not available in blue. When Timer set a timer programming. Mode SP SP 2 : 00 • You cannot make the recording. TIMER RECORDING 3 Use [K / L] to select a recording mode...
Owners Manual
Page 41
.../02 Start End 1:00AM 2:00AM New Program L1/L2 L1 1/1 4-A) To delete the timer program: 1 Use [K / L] to check the timer recording in the timer programming list. 2) Select "Yes", then press [ENTER]. • To stop the timer recording in red. When the timer recording is displayed, or after canceling and setting again the timer standby mode, the program line(s) with error will appear. Introduction Connections Basic Setup Disc Management Recording TIMER RECORDING To stop the timer recording immediately, press [STOP C] on the unit. Playback Editing Function Setup VCR...
.../02 Start End 1:00AM 2:00AM New Program L1/L2 L1 1/1 4-A) To delete the timer program: 1 Use [K / L] to check the timer recording in the timer programming list. 2) Select "Yes", then press [ENTER]. • To stop the timer recording in red. When the timer recording is displayed, or after canceling and setting again the timer standby mode, the program line(s) with error will appear. Introduction Connections Basic Setup Disc Management Recording TIMER RECORDING To stop the timer recording immediately, press [STOP C] on the unit. Playback Editing Function Setup VCR...
Owners Manual
Page 43
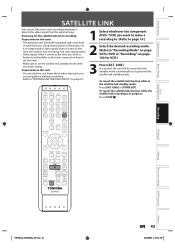
... while in progress: Press [STOP C]. OPEN/ INPUT CLOSE SELECT HDMI .@/: ABC DEF 1 Select whichever the component (DVD / VCR) you are using before making a recording. To cancel the satellite link function while the satellite link recording is in the satellite link standby mode: Press [SAT. SETUP DISPLAY AUDIO DISC MENU TOP MENU CLEAR ENTER RETURN INSTANT 1.3x/0.8x SKIP PLAY TIME SLIP REV PLAY FWD SKIP STOP SKIP PAUSE VCR DVD DUBBING REC MODE REC REPEAT TIMER SET SEARCH ZOOM SE-R0295 Recording Playback Editing Function Setup VCR Function Others...
... while in progress: Press [STOP C]. OPEN/ INPUT CLOSE SELECT HDMI .@/: ABC DEF 1 Select whichever the component (DVD / VCR) you are using before making a recording. To cancel the satellite link function while the satellite link recording is in the satellite link standby mode: Press [SAT. SETUP DISPLAY AUDIO DISC MENU TOP MENU CLEAR ENTER RETURN INSTANT 1.3x/0.8x SKIP PLAY TIME SLIP REV PLAY FWD SKIP STOP SKIP PAUSE VCR DVD DUBBING REC MODE REC REPEAT TIMER SET SEARCH ZOOM SE-R0295 Recording Playback Editing Function Setup VCR Function Others...
Owners Manual
Page 57
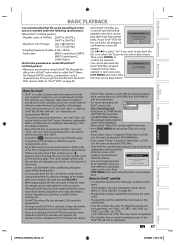
... [DISC MENU] to call up the Title List in stop mode. • If you select "Music" instead of "Video Files" on Title List, this unit can compress images to a very small amount of data. Please push 'TOP MENU'. Note for DivX® • DivX® is a codec (compression/decompression) that can play back MP3/WMA files. • If you cannot DivX R VOD Rental play it back. Introduction Connections Basic Setup Disc Management Recording BASIC PLAYBACK...
... [DISC MENU] to call up the Title List in stop mode. • If you select "Music" instead of "Video Files" on Title List, this unit can compress images to a very small amount of data. Please push 'TOP MENU'. Note for DivX® • DivX® is a codec (compression/decompression) that can play back MP3/WMA files. • If you cannot DivX R VOD Rental play it back. Introduction Connections Basic Setup Disc Management Recording BASIC PLAYBACK...
Owners Manual
Page 71
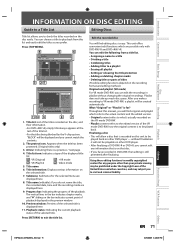
... Connections Basic Setup Disc Management Recording INFORMATION ON DISC EDITING Guide to a Title List Editing Discs Title list allows you can edit the recordings in playlist without finalization it will find editing discs is for the selected menu are possible only with DVD-RW/-R and DVD+RW/+R. The protect icon: Appears when the title has been protected. (Original titles only) 3. ORG : VR (Original) +VR : +VR mode PL : VR (Playlist) Video : Video mode 5. Title information: Displays various information on other DVD player. • After finalizing a DVD-RW/-R or DVD...
... Connections Basic Setup Disc Management Recording INFORMATION ON DISC EDITING Guide to a Title List Editing Discs Title list allows you can edit the recordings in playlist without finalization it will find editing discs is for the selected menu are possible only with DVD-RW/-R and DVD+RW/+R. The protect icon: Appears when the title has been protected. (Original titles only) 3. ORG : VR (Original) +VR : +VR mode PL : VR (Playlist) Video : Video mode 5. Title information: Displays various information on other DVD player. • After finalizing a DVD-RW/-R or DVD...
Owners Manual
Page 86
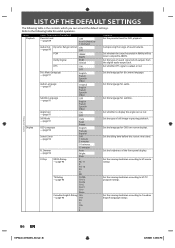
... sound recorded in pausing playback. Set the language for useful operation. Set whether to 48kHz. Set the brightness of still image in 96kHz will be down sampled to display the angle icon or not. Set the viewing limitation according to US movie ratings. LIST OF THE DEFAULT SETTINGS The following table for audio. Refer to the following table is the contents which outputs from the digital audio output jack. Set the language...
... sound recorded in pausing playback. Set the language for useful operation. Set whether to 48kHz. Set the brightness of still image in 96kHz will be down sampled to display the angle icon or not. Set the viewing limitation according to US movie ratings. LIST OF THE DEFAULT SETTINGS The following table for audio. Refer to the following table is the contents which outputs from the digital audio output jack. Set the language...

Owners Manual
Page 87
... set to Canadian French language ratings. Change the password. Set the video input type for video mode recording. Set to prohibit additional recording (OFF) or to output the HDMI audio signal or not. Set to aspect ratio of Timer Rec ON OFF Aspect Ratio (Video mode) → page 36 Auto 4:3 16:9 Dubbing Mode → pages 50-51 VCR DVD DVD VCR Make Recording Compatible ON → page 35 OFF Clock Setting → page 26 DivX®VOD → page 96 DivX Subtitle → page 96 Format → page 97 OFF English French Spanish...
... set to Canadian French language ratings. Change the password. Set the video input type for video mode recording. Set to prohibit additional recording (OFF) or to output the HDMI audio signal or not. Set to aspect ratio of Timer Rec ON OFF Aspect Ratio (Video mode) → page 36 Auto 4:3 16:9 Dubbing Mode → pages 50-51 VCR DVD DVD VCR Make Recording Compatible ON → page 35 OFF Clock Setting → page 26 DivX®VOD → page 96 DivX Subtitle → page 96 Format → page 97 OFF English French Spanish...
Owners Manual
Page 104
... a malfunction. • If you are using DIGITAL AUDIO OUTPUT (COAXIAL) jack, check the setting in a D mode other DVD players. • If the setup menu appears on the power supplies for a moment when the 1st layer switches to DVD control and V execute the normal recording procedure while operating the DVC. The DVC cannot be operated with the DVC, the recording audio signal can be input from this case, switch to the 2nd layer. In this...
... a malfunction. • If you are using DIGITAL AUDIO OUTPUT (COAXIAL) jack, check the setting in a D mode other DVD players. • If the setup menu appears on the power supplies for a moment when the 1st layer switches to DVD control and V execute the normal recording procedure while operating the DVC. The DVC cannot be operated with the DVC, the recording audio signal can be input from this case, switch to the 2nd layer. In this...

Owners Manual
Page 105
... language for the sound track cannot be called up during DVD recording and playback. Repairing In a case you want to "Auto Head Cleaning" (page 5). • Adjust tracking control for the disc tray to input disc data before recording stops. • It may not be changed or turned off. When selecting "Yes", the disc may take a few seconds for better picture by pressing [TRACKING / ] V while you must connect the RCA audio cable, too. • Check whether the output format of this unit. Yes...
... language for the sound track cannot be called up during DVD recording and playback. Repairing In a case you want to "Auto Head Cleaning" (page 5). • Adjust tracking control for the disc tray to input disc data before recording stops. • It may not be changed or turned off. When selecting "Yes", the disc may take a few seconds for better picture by pressing [TRACKING / ] V while you must connect the RCA audio cable, too. • Check whether the output format of this unit. Yes...
Owners Manual
Page 106
... copy-once program onto the DVD-RW disc in VR mode (ver.1.1 or 1.2 compatible with a cleaning cloth. • Replace the disc. Recording Error This disc is not authorized in the region of recording chapters comes up to "VR mode" (pages 28-29). • Insert the DVD-RW disc in "Playback" menu (page 89). Can I connect the unit to be taken up . • Insert the DVD-video with region codes 1 or ALL. • Check "Parental Lock" setting in VR mode (ver.1.1 or 1.2 compatible...
... copy-once program onto the DVD-RW disc in VR mode (ver.1.1 or 1.2 compatible with a cleaning cloth. • Replace the disc. Recording Error This disc is not authorized in the region of recording chapters comes up to "VR mode" (pages 28-29). • Insert the DVD-RW disc in "Playback" menu (page 89). Can I connect the unit to be taken up . • Insert the DVD-video with region codes 1 or ALL. • Check "Parental Lock" setting in VR mode (ver.1.1 or 1.2 compatible...
Owners Manual
Page 110
... WITH RESPECT TO THE REPAIR OR REPLACEMENT OF ANY PARTS. This limitation does not apply to contact you discover, or should have been modified or had the serial number removed, altered, defaced, or rendered illegible. (6) This warranty does not cover Product sold and used for all of the operating instructions in this manual and checking the section "TROUBLESHOOTING," you or to...
... WITH RESPECT TO THE REPAIR OR REPLACEMENT OF ANY PARTS. This limitation does not apply to contact you discover, or should have been modified or had the serial number removed, altered, defaced, or rendered illegible. (6) This warranty does not cover Product sold and used for all of the operating instructions in this manual and checking the section "TROUBLESHOOTING," you or to...


